


“Hello World”——多么熟悉的问候语。对于Cocos2d-JS来说,这个问候,来得太简单了,无论你是否熟悉Cocos2d-JS,只要你用过或者见过其他人使用过与Eclipse类似的IDE的话,简单几步,就可以创建一个可以运行项目,跑起你对世界的问候“Hello World”。
然而,对于大多数“新手”甚至是一部分“老手”来说,新建的一个项目,可能对各个目录或文件有个大概的了解,但,如果要深入每个文件来细致解释的话,可能就不行了,更不用说深入每一行代码了。我们今天,就来解决这个问题。
一、新建一个简单项目
在这里呢,我们先新建一个项目,然后,根据这个新建的项目,我们深入地去解释一下。当然了,新建之后,你可以自己运行一下,用模拟器形式和Web形式。新建的项目大致情况如下:
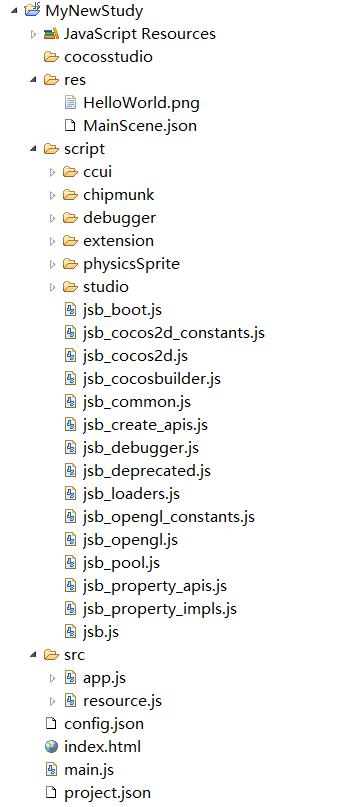
如果一切顺利的话,你新建的项目的大概情况呢,就和上面的图示大致一样。
二、总体分析
我们首先来大概分析一下项目的组成内容,自上而下顺序分析。
JavaScript Resources: 你使用的就是JavaScript,没有它,你怎么搞?
cocosstudio文件夹:主要用于存放Cocos Studio项目相关内容等。
res文件夹:主要存放资源文件,如json文件,图片,音乐等。
script文件夹:主要存放游戏引擎的相关文件,主要是jsb*.js文件。
src文件夹:存放主要的程序代码。
——app.js:实现游戏场景“Hello World”的JS文件。
——resource.js:定义资源对应的变量。
config.json:保存模拟器运行配置信息。
index.html: Web工程的首页。
main.js:与首页index.html对应的JS文件。
project.json:项目的配置信息。
下面,我们详细分析一下,其中一些比较让人困惑的部分。一些简单的文件和文件夹就不再分析了。
三、index.html——Web工程的首页
代码如下:
<!DOCTYPE html>
<html>
<head>
    <meta charset="utf-8">
    <title>Cocos2d-html5 Hello World test</title>
    <link rel="icon" type="image/GIF" href="res/favicon.ico"/>
    <meta name="apple-mobile-web-app-capable" content="yes"/>
    <meta name="full-screen" content="yes"/>
    <meta name="screen-orientation" content="portrait"/>
    <meta name="x5-fullscreen" content="true"/>
    <meta name="360-fullscreen" content="true"/>
    <style>
        body, canvas, div {
            -moz-user-select: none;
            -webkit-user-select: none;
            -ms-user-select: none;
            -khtml-user-select: none;
            -webkit-tap-highlight-color: rgba(0, 0, 0, 0);
        }
    </style>
</head>
<body style="padding:0; margin: 0; background: #000;">
<canvas id="gameCanvas" width="800" height="450"></canvas>
<script src="frameworks/cocos2d-html5/CCBoot.js"></script>
<script src="main.js"></script>
</body>
</html>
代码分析:
上面是一段很简单的HTML代码,并没有涉及什么高级用法。
网页头部(head):主要简单设置了网页样式(style)以及meta信息,其中meta信息是网页的基本信息,主要作用是尽量使得网页能够在各种浏览器上优雅地显示出来。具体meta的用法请自行Google或百度,这里就不赘述了。
canvas标签: canvas标签是HTML5提供的,通过JavaScript可以在Canvas上绘制2D图形,Cocos2d-JS在网页运行的游戏场景都是通过Canvas渲染出来的,但Cocos2d-JS在本地运行游戏场景时,是通过OpenGL渲染出来的。其实与OpenGL类似,HTML5有WebGL,但是不同浏览器对WebGL的支持程度不同。所以,Cocos2d-JS没有采用WebGL进行渲染,而是采用了Canvas。虽然后者在性能方面不如前者,但是,对于一般的网页游戏来说,Canvas已经足够满足要求了。但是,我觉得未来的发展趋势必然是对WebGL的全面支持,HTML5游戏(网页游戏)会越来越好,性能也越来越不是问题。另外,注意canvas标签的id,后面的project.json文件中会用到这个id。
JavaScript导入:文件的末尾分别导入了CCBoot.js和main.js文件,其中CCBoot.js可以查看源码,是游戏引擎文件。main.js则是我们马上要讲的与首页对应的JavaScript文件。
四、main.js——与首页对应的JS
代码如下:
cc.game.onStart = function(){
    cc.view.adjustViewPort(true);
    cc.view.setDesignResolutionSize(960, 640, cc.ResolutionPolicy.SHOW_ALL);
    cc.view.resizeWithBrowserSize(true);
    //load resources
    cc.LoaderScene.preload(g_resources, function () {
        cc.director.runScene(new HelloWorldScene());
    }, this);
};
cc.game.run();
代码分析:
main.js主要负责启动游戏场景,无论是在Web浏览器上运行还是在本地运行,都是由它来负责启动游戏场景。
其中,cc.game.onStart是设置cc.game的onStart函数方法,在游戏启动时会自动调用这个函数。该函数的第一、二行代码,用于设置游戏视图的相关属性。其中,第二行是设置游戏视图的适配策略,这个我们后面再详细介绍,这里有个印象就好。接下来是加载游戏场景所需的资源,其中g_resources参数是加载资源的数组,该数组是在resource.js文件中定义的。加载完资源之后,要通过cc.director对象来运行HelloWorldScene场景。
最后一句cc.game.run()。让游戏启动,这样才会在适当的时机自动运行我们刚刚定义好的onStart函数方法。
PS:有些方法没有细说,由于Cocos2d-JS是开源的,你可以自行查看源代码,其中一些深入的东西,我们后面会慢慢讲。
五、project.json——项目配置文件
代码如下:
{
    "project_type": "javascript",

    "debugMode" : 1,
    "showFPS" : true,
    "frameRate" : 60,
    "id" : "gameCanvas",
    "renderMode" : 0,
    "engineDir":"frameworks/cocos2d-html5",

    "modules" : ["cocos2d", "cocostudio"],

    "jsList" : [
        "src/resource.js",
        "src/app.js"
    ]
}
代码分析:
其实这个文件主要是项目的一些配置信息。由于在mian.js文件开头有一段对project.json文件的简要介绍,介绍地很全面了。虽然是英文的,但是还是很简单的。看看就懂了。这里主要提一点,Cocos2d-JS游戏引擎有很多模块(modules),我们最好按需加载,而不是全部加载,至于游戏引擎都有哪些模块,各个模块到底都包含些什么内容,请自行查看frameworks\cocos2d-html5\moduleConfig.json文件。
英文介绍如下:
/**
 * A brief explanation for "project.json":
 * Here is the content of project.json file, this is the global configuration for your game, you can modify it to customize some behavior.
 * The detail of each field is under it.
 {
    "project_type": "javascript",
    // "project_type" indicate the program language of your project, you can ignore this field

    "debugMode"     : 1,
    // "debugMode" possible values :
    //      0 - No message will be printed.
    //      1 - cc.error, cc.assert, cc.warn, cc.log will print in console.
    //      2 - cc.error, cc.assert, cc.warn will print in console.
    //      3 - cc.error, cc.assert will print in console.
    //      4 - cc.error, cc.assert, cc.warn, cc.log will print on canvas, available only on web.
    //      5 - cc.error, cc.assert, cc.warn will print on canvas, available only on web.
    //      6 - cc.error, cc.assert will print on canvas, available only on web.

    "showFPS"       : true,
    // Left bottom corner fps information will show when "showFPS" equals true, otherwise it will be hide.

    "frameRate"     : 60,
    // "frameRate" set the wanted frame rate for your game, but the real fps depends on your game implementation and the running environment.

    "id"            : "gameCanvas",
    // "gameCanvas" sets the id of your canvas element on the web page, it's useful only on web.

    "renderMode"    : 0,
    // "renderMode" sets the renderer type, only useful on web :
    //      0 - Automatically chosen by engine
    //      1 - Forced to use canvas renderer
    //      2 - Forced to use WebGL renderer, but this will be ignored on mobile browsers

    "engineDir"     : "frameworks/cocos2d-html5/",
    // In debug mode, if you use the whole engine to develop your game, you should specify its relative path with "engineDir",
    // but if you are using a single engine file, you can ignore it.

    "modules"       : ["cocos2d"],
    // "modules" defines which modules you will need in your game, it's useful only on web,
    // using this can greatly reduce your game's resource size, and the cocos console tool can package your game with only the modules you set.
    // For details about modules definitions, you can refer to "../../frameworks/cocos2d-html5/modulesConfig.json".

    "jsList"        : [
    ]
    // "jsList" sets the list of js files in your game.
 }
 *
 */
六、config.json——模拟器配置文件
代码如下:
{
  "init_cfg": {
    "isLandscape": true,
    "isWindowTop": false,
    "name": "MyNewStudy",
    "width": 960,
    "height": 640,
    "entry": "main.js",
    "consolePort": 6050,
    "uploadPort": 6060,
    "debugPort": 5086,
    "forwardConsolePort": 10088,
    "forwardDebugPort": 10086,
    "forwardUploadPort": 10090
  },
  "simulator_screen_size": [
    {
      "title": "iPhone 3Gs (480x320)",
      "width": 480,
      "height": 320
    },
    {
      "title": "iPhone 4 (960x640)",
      "width": 960,
      "height": 640
    },
    {
      "title": "iPhone 5 (1136x640)",
      "width": 1136,
      "height": 640
    },
    {
      "title": "iPad (1024x768)",
      "width": 1024,
      "height": 768
    },
    {
      "title": "iPad Retina (2048x1536)",
      "width": 2048,
      "height": 1536
    },
    {
      "title": "Android (800x480)",
      "width": 800,
      "height": 480
    },
    {
      "title": "Android (854x480)",
      "width": 854,
      "height": 480
    },
    {
      "title": "Android (1280x720)",
      "width": 1280,
      "height": 720
    },
    {
      "title": "Android (1920x1080)",
      "width": 1920,
      "height": 1080
    }
  ]
}
代码分析:
只有在Cocos Code IDE中运行才需要该文件,它是配置模拟器运行信息的。
在这里,简要介绍一下,第一行isLandscape主要用于设置是否横屏显示,第二行用于设置模拟器的标题,第三、四行用于设置屏幕的宽高,第五行用于设置入口文件,接下来几行用于设置端口信息。
七、resource.js——定义资源变量
代码如下:
var res = {
    HelloWorld_png : "res/HelloWorld.png",
    MainScene_json : "res/MainScene.json"
};

var g_resources = [];
for (var i in res) {
    g_resources.push(res[i]);
}
代码分析:
这段代码比较简单,主要通过变量res来定义资源的别名,防止资源硬编码,这样更加灵活便捷。接着,就把定义好的资源都加入到g_resources变量中,在游戏启动的时候会自动加载g_resources变量中的资源(main.js中进行相关设置)。
八、app.js——“Hello World”场景文件
代码如下:
var HelloWorldLayer = cc.Layer.extend({
    sprite:null,
    ctor:function () {
        //////////////////////////////
        // 1. super init first
        this._super();

        /////////////////////////////
        // 2. add a menu item with "X" image, which is clicked to quit the program
        //    you may modify it.
        // ask the window size
        var size = cc.winSize;

        var mainscene = ccs.load(res.MainScene_json);
        this.addChild(mainscene.node);

        return true;
    }
});

var HelloWorldScene = cc.Scene.extend({
    onEnter:function () {
        this._super();
        var layer = new HelloWorldLayer();
        this.addChild(layer);
    }
});
代码分析:
这段代码呢,完成了我们看到的“Hello World”场景的展示。上面两段代码呢,主要声明了两个类,分别是继承自cc.Scene的HelloWorldScene和继承自cc.Layer的HelloWorldLayer。并且在HelloWorldScene中重写了父类的onEnter方法,该方法在进入场景时调用。重写父类方法时,通过this._super()调用父类的实现。然后,创建了一个HelloWorldLayer的实例,并添加到场景中。而HelloWorldLayer中主要重写了父类的ctor构造函数,并在构造函数中使用了Cocos Studio中导出的资源(ccs.load)。
小结:
关于整个项目的大概构造分析到这里就结束了,其中一些细节我们后面还会再提到,再细致分析。我们下一篇博客,将要来分析一下,游戏启动的过程到底是怎样的!


 1万+
1万+


 被折叠的 条评论
为什么被折叠?
被折叠的 条评论
为什么被折叠?
 到【灌水乐园】发言


