


这一节要创建后台的管理工程,故首先需要完成后台工程的创建,利用带有maven插件的Eclipse创建。
首先分析一下项目的依赖关系,假如我们在公司工作,我们在开发时需要集成整个公司的共有的仓库,所以我们选择了maven来进行管理版本以及工程和jar包的依赖关系,选项目的工程之间的关系等可以用下面这个图来简单描述:
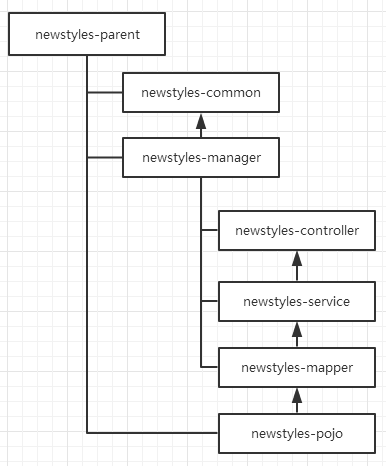
其中,不带有箭头的线段表示继承关系,带尖头的则表示依赖,对于工程的主要的关系如上图所示:
newstyles-parent -- 管理依赖jar包的版本,全局,公司级别
|--newstyles-common --- 通用组件、工具类
|--newstyles-manager -- 后台系统
|--com.newstyles-manager-web(controller)
|--com.newstyles-manager-service
|--com.newstyles-manager-mapper
|--com.newstyles-manager-pojo
工程的大致的结构以及依赖关系理顺之后,则开始逐个建立工程,首先,建立继承于公司的newstyles-parent,这里面定义了公司级别的引用,其为我们日常刚工作所经常使用的jar包的版本,是一个全局的依赖。创建newstyles-parent
1.创建newstyles-parent:在创建界面勾选“Create a simple project”,可以不再使用模板了,因为这个工程是继承自公司级别的,并不需要多少编码工作,所以可以创建一个简单的工程来实现即可。

2.编辑pom.xml文件,实现jar包版本的以来管理,以及工程的依赖管理。
<project xmlns="http://maven.apache.org/POM/4.0.0" xmlns:xsi="http://www.w3.org/2001/XMLSchema-instance"
	xsi:schemaLocation="http://maven.apache.org/POM/4.0.0 http://maven.apache.org/xsd/maven-4.0.0.xsd">
	<modelVersion>4.0.0</modelVersion>
	<groupId>com.newstyles</groupId>
	<artifactId>newstyles-parent</artifactId>
	<version>0.0.1-SNAPSHOT</version>
	<packaging>pom</packaging>
	<!-- 集中定义依赖版本号 -->
	<properties>
		<junit.version>4.12</junit.version>
		<spring.version>4.1.3.RELEASE</spring.version>
		<mybatis.version>3.2.8</mybatis.version>
		<mybatis.spring.version>1.2.2</mybatis.spring.version>
		<mybatis.paginator.version>1.2.15</mybatis.paginator.version>
		<mysql.version>5.1.32</mysql.version>
		<slf4j.version>1.6.4</slf4j.version>
		<jackson.version>2.4.2</jackson.version>
		<druid.version>1.0.9</druid.version>
		<httpclient.version>4.3.5</httpclient.version>
		<jstl.version>1.2</jstl.version>
		<servlet-api.version>2.5</servlet-api.version>
		<jsp-api.version>2.0</jsp-api.version>
		<joda-time.version>2.5</joda-time.version>
		<commons-lang3.version>3.3.2</commons-lang3.version>
		<commons-io.version>1.3.2</commons-io.version>
		<commons-net.version>3.3</commons-net.version>
		<pagehelper.version>3.4.2-fix</pagehelper.version>
		<jsqlparser.version>0.9.1</jsqlparser.version>
		<commons-fileupload.version>1.3.1</commons-fileupload.version>
		<jedis.version>2.7.2</jedis.version>
		<solrj.version>4.10.3</solrj.version>
	</properties>
	<dependencyManagement>
		<dependencies>
			<!-- 时间操作组件 -->
			<dependency>
				<groupId>joda-time</groupId>
				<artifactId>joda-time</artifactId>
				<version>${joda-time.version}</version>
			</dependency>
			<!-- Apache工具组件 -->
			<dependency>
				<groupId>org.apache.commons</groupId>
				<artifactId>commons-lang3</artifactId>
				<version>${commons-lang3.version}</version>
			</dependency>
			<dependency>
				<groupId>org.apache.commons</groupId>
				<artifactId>commons-io</artifactId>
				<version>${commons-io.version}</version>
			</dependency>
			<dependency>
				<groupId>commons-net</groupId>
				<artifactId>commons-net</artifactId>
				<version>${commons-net.version}</version>
			</dependency>
			<!-- Jackson Json处理工具包 -->
			<dependency>
				<groupId>com.fasterxml.jackson.core</groupId>
				<artifactId>jackson-databind</artifactId>
				<version>${jackson.version}</version>
			</dependency>
			<!-- httpclient -->
			<dependency>
				<groupId>org.apache.httpcomponents</groupId>
				<artifactId>httpclient</artifactId>
				<version>${httpclient.version}</version>
			</dependency>
			<!-- 单元测试 -->
			<dependency>
				<groupId>junit</groupId>
				<artifactId>junit</artifactId>
				<version>${junit.version}</version>
				<scope>test</scope>
			</dependency>
			<!-- 日志处理 -->
			<dependency>
				<groupId>org.slf4j</groupId>
				<artifactId>slf4j-log4j12</artifactId>
				<version>${slf4j.version}</version>
			</dependency>
			<!-- Mybatis -->
			<dependency>
				<groupId>org.mybatis</groupId>
				<artifactId>mybatis</artifactId>
				<version>${mybatis.version}</version>
			</dependency>
			<dependency>
				<groupId>org.mybatis</groupId>
				<artifactId>mybatis-spring</artifactId>
				<version>${mybatis.spring.version}</version>
			</dependency>
			<dependency>
				<groupId>com.github.miemiedev</groupId>
				<artifactId>mybatis-paginator</artifactId>
				<version>${mybatis.paginator.version}</version>
			</dependency>
			<dependency>
				<groupId>com.github.pagehelper</groupId>
				<artifactId>pagehelper</artifactId>
				<version>${pagehelper.version}</version>
			</dependency>
			<!-- MySql -->
			<dependency>
				<groupId>mysql</groupId>
				<artifactId>mysql-connector-java</artifactId>
				<version>${mysql.version}</version>
			</dependency>
			<!-- 连接池 -->
			<dependency>
				<groupId>com.alibaba</groupId>
				<artifactId>druid</artifactId>
				<version>${druid.version}</version>
			</dependency>
			<!-- Spring -->
			<dependency>
				<groupId>org.springframework</groupId>
				<artifactId>spring-context</artifactId>
				<version>${spring.version}</version>
			</dependency>
			<dependency>
				<groupId>org.springframework</groupId>
				<artifactId>spring-beans</artifactId>
				<version>${spring.version}</version>
			</dependency>
			<dependency>
				<groupId>org.springframework</groupId>
				<artifactId>spring-webmvc</artifactId>
				<version>${spring.version}</version>
			</dependency>
			<dependency>
				<groupId>org.springframework</groupId>
				<artifactId>spring-jdbc</artifactId>
				<version>${spring.version}</version>
			</dependency>
			<dependency>
				<groupId>org.springframework</groupId>
				<artifactId>spring-aspects</artifactId>
				<version>${spring.version}</version>
			</dependency>
			<!-- JSP相关 -->
			<dependency>
				<groupId>jstl</groupId>
				<artifactId>jstl</artifactId>
				<version>${jstl.version}</version>
			</dependency>
			<dependency>
				<groupId>javax.servlet</groupId>
				<artifactId>servlet-api</artifactId>
				<version>${servlet-api.version}</version>
				<scope>provided</scope>
			</dependency>
			<dependency>
				<groupId>javax.servlet</groupId>
				<artifactId>jsp-api</artifactId>
				<version>${jsp-api.version}</version>
				<scope>provided</scope>
			</dependency>
			<!-- 文件上传组件 -->
			<dependency>
				<groupId>commons-fileupload</groupId>
				<artifactId>commons-fileupload</artifactId>
				<version>${commons-fileupload.version}</version>
			</dependency>
			<!-- Redis客户端 -->
			<dependency>
				<groupId>redis.clients</groupId>
				<artifactId>jedis</artifactId>
				<version>${jedis.version}</version>
			</dependency>
			<!-- solr客户端 -->
			<dependency>
				<groupId>org.apache.solr</groupId>
				<artifactId>solr-solrj</artifactId>
				<version>${solrj.version}</version>
			</dependency>
		</dependencies>
	</dependencyManagement>

	<build>
		<finalName>${project.artifactId}</finalName>
		<plugins>
			<!-- 资源文件拷贝插件 -->
			<plugin>
				<groupId>org.apache.maven.plugins</groupId>
				<artifactId>maven-resources-plugin</artifactId>
				<version>2.7</version>
				<configuration>
					<encoding>UTF-8</encoding>
				</configuration>
			</plugin>
			<!-- java编译插件 -->
			<plugin>
				<groupId>org.apache.maven.plugins</groupId>
				<artifactId>maven-compiler-plugin</artifactId>
				<version>3.2</version>
				<configuration>
					<source>1.7</source>
					<target>1.7</target>
					<encoding>UTF-8</encoding>
				</configuration>
			</plugin>
		</plugins>
		<pluginManagement>
			<plugins>
				<!-- 配置Tomcat插件 -->
				<plugin>
					<groupId>org.apache.tomcat.maven</groupId>
					<artifactId>tomcat7-maven-plugin</artifactId>
					<version>2.2</version>
				</plugin>
			</plugins>
		</pluginManagement>
	</build>
</project>
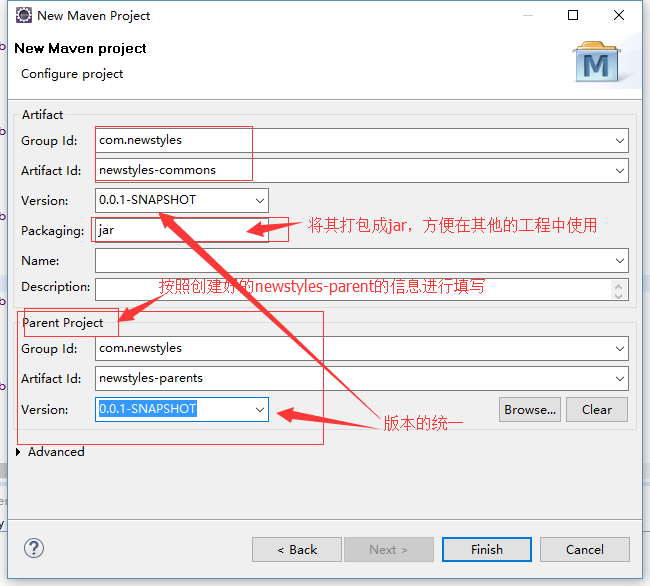
创建newstyles-common工程
这个工程除了引用parent的依赖关系之外,其还可以在里面定义我们在整个工程项目中经常使用的工具类,插件等。
修改pom此文件的pom文件,这个文件中体现了common工程是继承自parent工程的。
<project xmlns="http://maven.apache.org/POM/4.0.0" xmlns:xsi="http://www.w3.org/2001/XMLSchema-instance" xsi:schemaLocation="http://maven.apache.org/POM/4.0.0 http://maven.apache.org/xsd/maven-4.0.0.xsd">
  <modelVersion>4.0.0</modelVersion>
  <parent>
  	<groupId>com.newstyles</groupId>
  	<artifactId>newstyles-parent</artifactId>
  	<version>0.0.1-SNAPSHOT</version>
  </parent>
  <groupId>com.newstyles</groupId>
  <artifactId>newstyles-common</artifactId>
  <version>0.0.1-SNAPSHOT</version>
</project>

填写好之后,则创建了继承于parent的manager工程,暂时不需要修改pom文件。之后我们需要在这个工程下面创建几个工程,分别是按照分层来实现的,起体系结构在上面已经叙述过了,所以我们直接创立3个打包成jar方式的工程,因为其为pojo,service,mapper等这些,并建立一个war包方式的contoller,也就是说manager下面有4个工程,前三个,选中manager工程,创建Maven Model来生成,注意填写好文件名,以及其打包方式为jar,最后一个我们需要将起打包方式改为war;这样,manager所管理的子项目也已经创建完成了,接下来需要修改各个子项目的pom文件,这一节就先不修改了,这节的主要工作为建立一个整体的框架,过后会细说如何更改。
然而这时候可能会报错,出错的位置在WEB-INF位置没有web.xml文件,这时候需要建立一个web.xml文件并进行修改,修改如下:
<?xml version="1.0" encoding="UTF-8"?>
<web-app xmlns:xsi="http://www.w3.org/2001/XMLSchema-instance"
	xmlns="http://java.sun.com/xml/ns/javaee" xmlns:web="http://java.sun.com/xml/ns/javaee/web-app_2_5.xsd"
	xsi:schemaLocation="http://java.sun.com/xml/ns/javaee http://java.sun.com/xml/ns/javaee/web-app_2_5.xsd"
	id="newstyles" version="2.5">
	<display-name>newstyles-manager</display-name>
	<welcome-file-list>
		<welcome-file>index.html</welcome-file>
		<welcome-file>index.htm</welcome-file>
		<welcome-file>index.jsp</welcome-file>
		<welcome-file>default.html</welcome-file>
		<welcome-file>default.htm</welcome-file>
		<welcome-file>default.jsp</welcome-file>
	</welcome-file-list>

</web-app>
<build>
		<plugins>
			<!-- 配置Tomcat插件 -->
			<plugin>
				<groupId>org.apache.tomcat.maven</groupId>
				<artifactId>tomcat7-maven-plugin</artifactId>
				<version>2.2</version>
				<configuration>
					<port>8080</port>
					<path>/</path>
				</configuration>
			</plugin>
		</plugins>
	</build>
此时,整个的工程已经搭建完成了,我们需要检验一下,我们的工程是不是可以运行了呢,首先将parent,common以及manger进行Maven安装,安装之后可以启动Maven Build来建立工程。测试一下吧;


 2053
2053


 被折叠的 条评论
为什么被折叠?
被折叠的 条评论
为什么被折叠?
 到【灌水乐园】发言


