


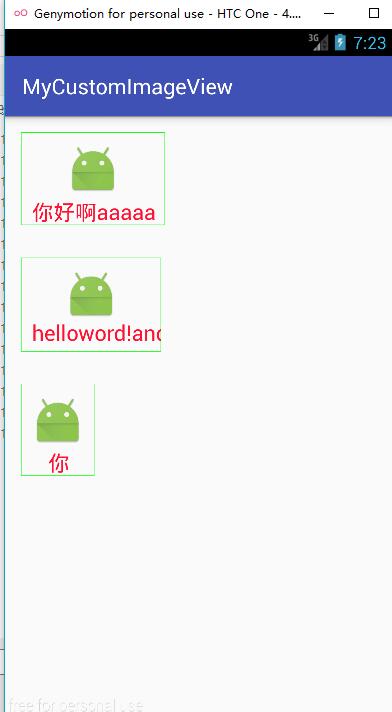
 本文介绍如何在Android中创建自定义的ImageView,包括定义属性、实现布局、重写绘图方法等关键步骤。
- 在values/attrs.xml文件中创建自定义的属性。设置了自定义的属性。
<?xml version="1.0" encoding="utf-8"?>
<resources>
    <attr name="texttitle" format="string"/>
    <attr name="texttitlesize" format="dimension"/>
    <attr name="texttitlecolor" format="color"/>
    <attr name="iamge" format="reference"/>
    <attr name="imageScaleType" format="enum">
        <enum name="fillXY" value="0"/>
        <enum name="center" value="1"/>
    </attr>


    <declare-styleable name="MyCustomImageView">
        <attr name="texttitle"/>
        <attr name="texttitlesize"/>
        <attr name="texttitlecolor"/>
        <attr name="iamge"/>
        <attr name="imageScaleType"/>
    </declare-styleable>
</resources>- 布局文件
<?xml version="1.0" encoding="utf-8"?>
<LinearLayout
    xmlns:android="http://schemas.android.com/apk/res/android"
    xmlns:tools="http://schemas.android.com/tools"
    xmlns:keke="http://schemas.android.com/apk/res-auto"
    android:layout_width="match_parent"
    android:layout_height="match_parent"
    android:orientation="vertical">

    <com.best.keke.mycustomimageview.MyCustomImageView
        android:layout_width="wrap_content"
        android:layout_height="wrap_content"
        android:layout_margin="15dp"
        android:padding="10dp"
        keke:texttitle="你好啊aaaaa"
        keke:imageScaleType="center"
        keke:iamge="@mipmap/ic_launcher"
        keke:texttitlecolor="#ff1231"
        keke:texttitlesize="20sp"/>

    <com.best.keke.mycustomimageview.MyCustomImageView
        android:layout_width="130dp"
        android:layout_height="wrap_content"
        android:layout_margin="15dp"
        android:padding="10dp"
        keke:texttitle="helloword!android ios java"
        keke:imageScaleType="center"
        keke:iamge="@mipmap/ic_launcher"
        keke:texttitlecolor="#ff1231"
        keke:texttitlesize="20sp"/>

    <com.best.keke.mycustomimageview.MyCustomImageView
        android:layout_width="wrap_content"
        android:layout_height="wrap_content"
        android:layout_margin="15dp"
        android:padding="10dp"
        keke:texttitle="你"
        keke:imageScaleType="center"
        keke:iamge="@mipmap/ic_launcher"
        keke:texttitlecolor="#ff1231"
        keke:texttitlesize="20sp"/>
</LinearLayout>
3.自定义view,在view的构造方法中获取到自定义的属性
    private String textTitle;   // 图片下的字体
    private Bitmap image;
    private int imageScale;
    private int textColor;
    private int textSize;

    private Rect rect;  // 整个控件的边界
    private Paint paint;
    private Rect textBound;     // 文本的边界

    // 控件的宽高
    private int width;
    private int height;

    private static final int IMAGE_SCALE_FITXY = 0;
    private static final int IMAGE_SCALE_CENTER = 1;

    public MyCustomImageView(Context context) {
        this(context, null);
    }

    public MyCustomImageView(Context context, AttributeSet attrs) {
        this(context, attrs, 0);
    }

    public MyCustomImageView(Context context, AttributeSet attrs, int defStyleAttr) {
        super(context, attrs, defStyleAttr);
        // 初始化属性
        TypedArray typedArray =
                context.getTheme().obtainStyledAttributes(attrs, R.styleable.MyCustomImageView, defStyleAttr, 0);
        // 获取到属性值的个数
        int indexCount = typedArray.getIndexCount();
        Log.i("tag", "属性值的个数:" + indexCount);
        for (int i = 0; i < indexCount; i++) {
            // 获取到每一个属性
            int attr = typedArray.getIndex(i);
            switch (attr) {
                case R.styleable.MyCustomImageView_iamge:
                    image = BitmapFactory.decodeResource(getResources(), typedArray.getResourceId(attr, 0));
                    break;
                case R.styleable.MyCustomImageView_texttitle:
                    textTitle = typedArray.getString(attr);
                    Log.e("tag", textTitle + "texttitle");
                    break;
                case R.styleable.MyCustomImageView_imageScaleType:
                    imageScale = typedArray.getInt(attr, 0);
                    break;
                case R.styleable.MyCustomImageView_texttitlesize:
                    textSize = typedArray.getDimensionPixelSize(attr, (int) TypedValue.applyDimension
                            (TypedValue.COMPLEX_UNIT_DIP, 16, getResources().getDisplayMetrics()));
                    break;
                case R.styleable.MyCustomImageView_texttitlecolor:
                    textColor = typedArray.getColor(attr, Color.BLACK);
                    break;
            }
        }
            typedArray.recycle();
            rect = new Rect();
            textBound = new Rect();
            paint = new Paint();
            // 设置字体的大小
            paint.setTextSize(textSize);
            // 设置字体需要的大小范围
            Log.e("tag", textTitle + "texttitle");
            Log.e("tag", textBound + "textBound");
            paint.getTextBounds(textTitle, 0, textTitle.length(), textBound);
        }
4.重写onMeasure()方法
    @Override
    protected void onMeasure(int widthMeasureSpec, int heightMeasureSpec) {
        // super.onMeasure(widthMeasureSpec, heightMeasureSpec);
        // 设置宽度
        int widthMode = MeasureSpec.getMode(widthMeasureSpec);
        int widthSize = MeasureSpec.getSize(widthMeasureSpec);


        if (widthMode == MeasureSpec.EXACTLY) {
            width = widthSize;
        } else {
            // 当图片宽度大于字体宽度的时候,由图片决定宽度
            int desiredWidthByImage = getPaddingLeft() + getPaddingRight() + image.getWidth();
            // 当字体宽度大于图片宽度的时候,由字体决定宽度
            int desiredWidthByTitle = getPaddingLeft() + getPaddingRight() + textBound.width();

            // 当属性值为wrap_content的时候
            // 取两者较大的
            int desiredWidth = Math.max(desiredWidthByImage, desiredWidthByTitle);
            width = Math.min(desiredWidth, widthSize);
        }

        // 设置高度
        int heightMode = MeasureSpec.getMode(heightMeasureSpec);
        int heightSize = MeasureSpec.getSize(heightMeasureSpec);
        if (heightMode == MeasureSpec.EXACTLY) {
            height = heightSize;
        } else {
            int desiredHeight = getPaddingBottom() + getPaddingTop()
                    + image.getHeight() + textBound.height();
            height = Math.min(desiredHeight, heightSize);
        }
        // 设置测量的尺寸
        setMeasuredDimension(width, height);
    }
5.重写onDraw()方法
@Override
    protected void onDraw(Canvas canvas) {
        //super.onDraw(canvas);
        // 设置画笔的样式
        paint.setStrokeWidth(3);    // 边框线的粗细
        paint.setStyle(Paint.Style.STROKE); // 画笔的风格,空心或者是实心
        paint.setColor(Color.GREEN);    // 设置画笔的颜色
        // 画边框
        canvas.drawRect(0, 0,getMeasuredWidth(),getMeasuredHeight(), paint);

        // 获取到矩形的上下左右边距
        rect.left = getPaddingLeft();
        rect.top = getPaddingTop();
        rect.right = width - getPaddingRight();
        rect.bottom = height - getPaddingBottom();

        paint.setColor(textColor);
        paint.setStyle(Paint.Style.FILL);


        // 若当前的宽度小于字体的宽度,给字体添加带省略号的。
        if (textBound.width() > width) {
            TextPaint textPaint = new TextPaint();
            /**
             * Android TextView中有个内容过长加省略号的属性,即ellipsize
             * TextUtils.TruncateAt.END  表示将省略号添加在结尾处
             */
            String msg = TextUtils.ellipsize(textTitle, textPaint, width - getPaddingLeft() - getPaddingRight(),
                    TextUtils.TruncateAt.END).toString();
            /**
             * Draw the text, with origin at (x,y), using the specified paint. The
             * origin is interpreted based on the Align setting in the paint.
             * @param text  The text to be drawn    要写的文字
             * @param x     The x-coordinate of the origin of the text being drawn  x坐标
             * @param y     The y-coordinate of the baseline of the text being drawn    y坐标
             * @param paint The paint used for the text (e.g. color, size, style)   画笔
             */
            canvas.drawText(msg, getPaddingLeft(), height - getPaddingBottom(), paint);
        } else {
            // 将字体进行居中显示
            canvas.drawText(textTitle, width / 2 - textBound.width() / 2,
                    height - getPaddingBottom() / 2, paint);
        }

        rect.bottom -= textBound.height();

        if (imageScale == IMAGE_SCALE_FITXY) {
            /**
             * drawBitmap(Bitmap bitmap, Rect src, RectF dst, Paint paint);
             * Rect src: 是对图片进行裁截,若是空null则显示整个图片
             * RectF dst:是图片在Canvas画布中显示的区域,
             *              大于src则把src的裁截区放大,
             *              小于src则把src的裁截区缩小。
             */
            canvas.drawBitmap(image, null, rect, paint);
        } else {
            // 计算居中的矩形的范围
            rect.left = width / 2 - image.getWidth() / 2;   //控件的一半 - 图片的一半
            rect.bottom = (height - textBound.height()) / 2 + image.getHeight() / 2;
            rect.top = (height - textBound.height()) / 2 - image.getHeight() / 2;
            rect.right = width / 2 + image.getWidth() / 2;

            canvas.drawBitmap(image, null, rect, paint);
        }
    }
样式图如下:
padding的图示解析:
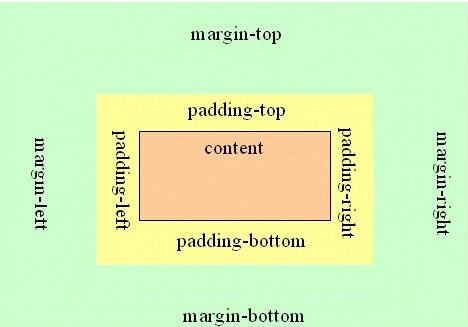
参考出处:http://blog.csdn.net/lmj623565791/article/details/24300125


 被折叠的 条评论
为什么被折叠?
被折叠的 条评论
为什么被折叠?
 到【灌水乐园】发言


