


你希望你使用的app布局是怎样的?
乱七八糟,你中有我,我中有你?
还是整整齐齐?
还是绚丽多彩?
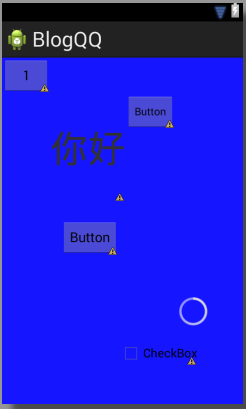
要让app界面如图三那样,就需要用到布局了。
看思维导图:
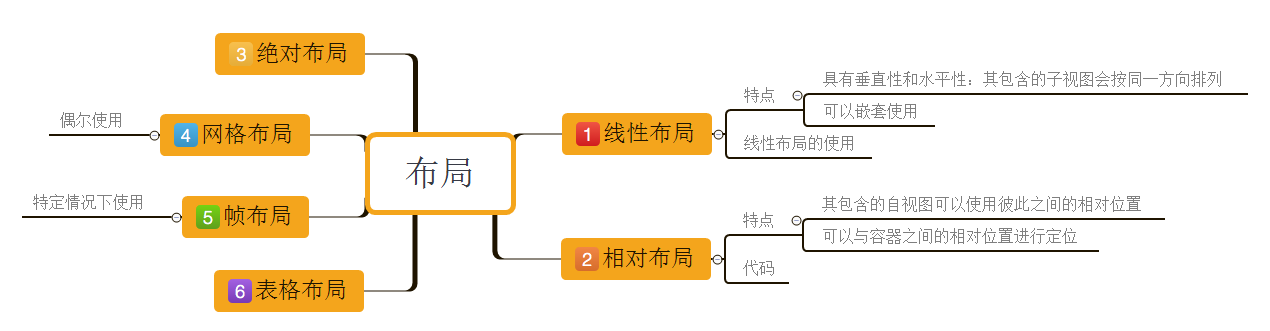
(一) 布局的种类
- 线性布局
- 相对布局
- 绝对布局
- 表格布局
- 帧布局
网格布局
其中,最常使用的是线性布局和相对布局,另外,帧布局在特殊情况下使用,网格布局偶尔使用,这里只介绍线性布局和相对布局的使用。
(二) 线性布局
(1)线性布局的特点:
- 具有垂直性和水平性:其包含的子视图会按同一方向排列
可以嵌套使用
当我们打开一个安卓工程中的xml文件的时候,在代码的开始有一个这样
的标签,其实这就是线性布局的一个标签,当然这样的标签是成对出现的,我们可以看到在xml代码的最后,有一个这样
的标签。
(2)线性布局的使用方法:
| 属性名 | 解释 |
|---|---|
| orientation | 设置布局的方向 |
| layout_gravity | 设置该控件在父控件中的位置 |
| gravity | 设置该控件中的元素位置 |
| layout_weight | 指定该控件在其父控件中所占的比重 |
(3)属性使用效果:
1.将线性布局调成水平方向,并创建5个Button
效果:
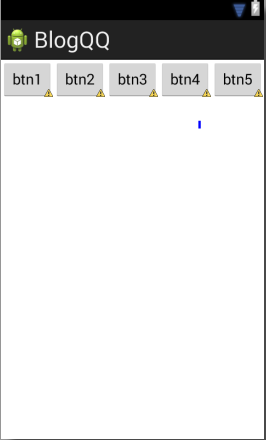
代码:
<LinearLayout xmlns:android="http://schemas.android.com/apk/res/android"
    xmlns:tools="http://schemas.android.com/tools"
    android:layout_width="match_parent"
    android:layout_height="match_parent"
    android:orientation="horizontal"
    tools:context=".MenuActivity" >

    <Button
        android:layout_width="wrap_content"
        android:layout_height="wrap_content"
        android:text="btn1" />

    <Button
        android:layout_width="wrap_content"
        android:layout_height="wrap_content"
        android:text="btn2" />

    <Button
        android:layout_width="wrap_content"
        android:layout_height="wrap_content"
        android:text="btn3" />

    <Button
        android:layout_width="wrap_content"
        android:layout_height="wrap_content"
        android:text="btn4" />

    <Button
        android:layout_width="wrap_content"
        android:layout_height="wrap_content"
        android:text="btn5" />

</LinearLayout>
2.将线性布局调成垂直方向
效果:
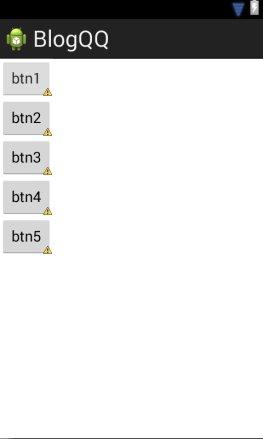
然而在代码中仅仅是把orientation属性的属性值变为vertical:

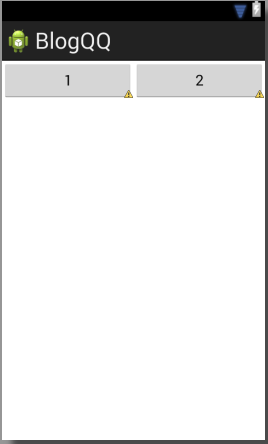
3.实现下图的布局该怎样做呢?
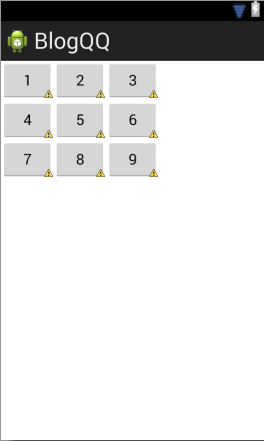
其实实现方法有好多种,这里只列举一种:
<LinearLayout xmlns:android="http://schemas.android.com/apk/res/android"
    xmlns:tools="http://schemas.android.com/tools"
    android:layout_width="match_parent"
    android:layout_height="match_parent"
    android:orientation="vertical"
    tools:context=".MenuActivity" >

    <LinearLayout
        android:layout_width="wrap_content"
        android:layout_height="wrap_content"
        android:orientation="horizontal" >

        <Button
            android:id="@+id/textview"
            android:layout_width="wrap_content"
            android:layout_height="wrap_content"
            android:text="1" />

        <Button
            android:layout_width="wrap_content"
            android:layout_height="wrap_content"
            android:text="2" />

        <Button
            android:layout_width="wrap_content"
            android:layout_height="wrap_content"
            android:text="3" />
    </LinearLayout>

    <LinearLayout
        android:layout_width="wrap_content"
        android:layout_height="wrap_content"
        android:orientation="horizontal" >

        <Button
            android:id="@+id/textview"
            android:layout_width="wrap_content"
            android:layout_height="wrap_content"
            android:text="4" />

        <Button
            android:layout_width="wrap_content"
            android:layout_height="wrap_content"
            android:text="5" />

        <Button
            android:layout_width="wrap_content"
            android:layout_height="wrap_content"
            android:text="6" />
    </LinearLayout>

    <LinearLayout
        android:layout_width="wrap_content"
        android:layout_height="wrap_content"
        android:orientation="horizontal" >

        <Button
            android:id="@+id/textview"
            android:layout_width="wrap_content"
            android:layout_height="wrap_content"
            android:text="7" />

        <Button
            android:layout_width="wrap_content"
            android:layout_height="wrap_content"
            android:text="8" />

        <Button
            android:layout_width="wrap_content"
            android:layout_height="wrap_content"
            android:text="9" />
    </LinearLayout>

</LinearLayout>
4.layout_weight属性:
layout_weight属性的解释是:指定该控件在其父控件中所占的比重
For example :
代码:
<LinearLayout xmlns:android="http://schemas.android.com/apk/res/android"
    xmlns:tools="http://schemas.android.com/tools"
    android:layout_width="match_parent"
    android:layout_height="match_parent"
    android:orientation="horizontal"
    tools:context=".MenuActivity" >

    <Button
        android:layout_width="wrap_content"
        android:layout_height="wrap_content"
        android:layout_weight="1"
        android:text="1" />

    <Button
        android:layout_width="wrap_content"
        android:layout_height="wrap_content"
        android:layout_weight="1"
        android:text="2" />

</LinearLayout>
结合代码以及解释,相信layout_weight属性很好理解运用!
(三) 相对布局
(1) 相对布局的特点:
- 其包含的自视图可以使用彼此之间的相对位置
- 可以与容器之间的相对位置进行定位
同样的,相对布局的标签是 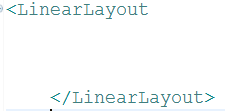
(2) 相对布局的使用方法:
| 属性名 | 解释 |
|---|---|
| android:layout_above/below/toLeftOf/toRightOf | 某控件的上下左右 |
| android:layout_alignTop/Buttom/Left/Right | 与某控件的上下左右边缘对齐 |
| android:layout_alignParentTop/Buttom/Left/Right | 父控件的上下左右 |
| android:layout_centerHorizontal | 水平居中 |
| android:layout_centerVertical | 垂直居中 |
| android:layout_centerInParent | 水平+垂直居中 |
(3) 属性使用效果:
使用相对布局实现九宫格的布局:
还是这样的效果:

但是代码是这样的:
<RelativeLayout xmlns:android="http://schemas.android.com/apk/res/android"
    xmlns:tools="http://schemas.android.com/tools"
    android:layout_width="match_parent"
    android:layout_height="match_parent"
    tools:context=".MenuActivity" >

    <Button
        android:id="@+id/btn1"
        android:layout_width="wrap_content"
        android:layout_height="wrap_content"
        android:text="1" />

    <Button
        android:id="@+id/btn2"
        android:layout_width="wrap_content"
        android:layout_height="wrap_content"
        android:layout_toRightOf="@+id/btn1"
        android:text="2" />

    <Button
        android:id="@+id/btn3"
        android:layout_width="wrap_content"
        android:layout_height="wrap_content"
        android:layout_toRightOf="@+id/btn2"
        android:text="3" />

    <Button
        android:id="@+id/btn4"
        android:layout_width="wrap_content"
        android:layout_height="wrap_content"
        android:layout_below="@+id/btn1"
        android:text="4" />

    <Button
        android:id="@+id/btn5"
        android:layout_width="wrap_content"
        android:layout_height="wrap_content"
        android:layout_alignTop="@+id/btn4"
        android:layout_toRightOf="@+id/btn4"
        android:text="5" />

    <Button
        android:id="@+id/btn6"
        android:layout_width="wrap_content"
        android:layout_height="wrap_content"
        android:layout_alignTop="@+id/btn5"
        android:layout_toRightOf="@+id/btn5"
        android:text="6" />

    <Button
        android:id="@+id/btn7"
        android:layout_width="wrap_content"
        android:layout_height="wrap_content"
        android:layout_below="@+id/btn4"
        android:text="7" />

    <Button
        android:id="@+id/btn8"
        android:layout_width="wrap_content"
        android:layout_height="wrap_content"
        android:layout_alignTop="@+id/btn7"
        android:layout_toRightOf="@+id/btn7"
        android:text="8" />

    <Button
        android:id="@+id/btn9"
        android:layout_width="wrap_content"
        android:layout_height="wrap_content"
        android:layout_alignTop="@+id/btn8"
        android:layout_toRightOf="@+id/btn8"
        android:text="9" />


</RelativeLayout>
仔细看一下代码,并敲出来,基本上就会理解了!
(四)当然,除此之外,还有一些属性,在两种布局中是都可以使用的:
| 属性名 | 解释 |
|---|---|
| background | 背景颜(属性值为六位颜色代码[百度]) |
| alpha | 透明度(属性值为浮点数) |
| paddingTop/Bottom/Left/Right | 将整个布局空间向上下左右某个方位平移一定方位量 |
| Layout_maringTop/Bottom/Left/Right | 将控件分别向上下左右某个方位离开一定位移量 |
尝试一下吧!
记得要长敲代码,实践是检验真理的唯一标准!


 434
434

 被折叠的 条评论
为什么被折叠?
被折叠的 条评论
为什么被折叠?
 到【灌水乐园】发言


