


建立一个WTP的WEB工程,解压FCKeditor的压缩包,将压缩包下面的FCKeditor目录拷贝到建立的WEB工程的WebContent目录下,目录结构如图所示:
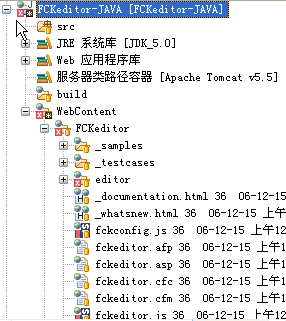
下面对FCKedior目录下面的目录及文件作一个说明:
(1) “_”开头的目录或文件为FCKeditor的DEMO等资料,都可以在工程中删除
(2) editor目录
该目录为FCKeditor主要目录,目录结构如图:

该目录为FCKeditor的核心目录,包含了FCKeditor的核心文件,其中:
(1)_source为FCKEditor的源文件目录
(2)css为FCKeditor的样式文件目录
(3)dialog为FCKeditor工具栏中相应的工具按钮的弹出对话框文件目录
(4)filemanager为FCKeditor处理文件上传的文件目录
(5)images为FCKeditor中增加表情头像等资源的图像文件目录
(6)js为FCKeditor的核心javascript文件目录
(7)lang为FCKeditor的语言文件目录,包含国际化支持。
(8)plugins为FCKeditor的插件目录,FCKeditor的插件开发文件都放入该目录
(9)skins为FCKeditor的皮肤文件,自带三种皮肤文件default,office2003和silver。
本文所写的插件开发,主要就是在plugins目录下进行的。下面说明如何编写FCKeditor插件:(在编写插件的时候借鉴了FCKeditor的插件placeholder,该插件也在plugins目录下)
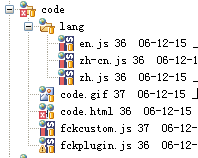
(1) 在plugins目录下面新建code目录
(2) 在code目录下面新建lang目录
目录结构如图所示:
(3) 新建fckplugins.js文件,该文件为FCKeditor插件的定义文件,内容如下:
 //注册Code命令.
FCKCommands.RegisterCommand( 'Code', new FCKDialogCommand( 'Code', FCKLang.CodeDlgTitle, FCKPlugins.Items['code'].Path + 'code.html', 340, 170 ) ) ;
// 注册名为”Code”的工具栏按钮
var oCodeItem = new FCKToolbarButton( 'Code', FCKLang.CodeBtn ) ;
oCodeItem.IconPath = FCKPlugins.Items['code'].Path + 'code.gif' ;
FCKToolbarItems.RegisterItem( 'Code', oCodeItem ) ;
// 创建FCKCodes对象,通过FCKCodes对象处理工具栏按钮的操作
var FCKCodes = new Object() ;
//注册Code命令.
FCKCommands.RegisterCommand( 'Code', new FCKDialogCommand( 'Code', FCKLang.CodeDlgTitle, FCKPlugins.Items['code'].Path + 'code.html', 340, 170 ) ) ;
// 注册名为”Code”的工具栏按钮
var oCodeItem = new FCKToolbarButton( 'Code', FCKLang.CodeBtn ) ;
oCodeItem.IconPath = FCKPlugins.Items['code'].Path + 'code.gif' ;
FCKToolbarItems.RegisterItem( 'Code', oCodeItem ) ;
// 创建FCKCodes对象,通过FCKCodes对象处理工具栏按钮的操作
var FCKCodes = new Object() ;
下面分加对上面的各个命令作一下说明:
通过FCKCommands的RegisterCommand命令注册一个名为”Code”的命令,new FCKDialogCommand()说明”Code”命令为一个对话框命令,FCKLang.CodeDlgTitle为弹出对话框的标题,它的值在code目录下的lang目录下的语言文件中定义,lang目录下面en.js,zh_cn.js等是语言的资源文件,采用国际化资源文件的命名方式,下面给出zh_cn.js的内容:
FCKLang.CodeDlgTitle就说明在语言文件中有一个键为FCKLang.CodeDlgTitle的字符串。
FCKPlugins.Items['code'].Path + 'code.html', 340, 170 ) ),这个方法主要是用来加载code目录下面的code.html网页文件(该网页的内容在下面给出),上面说到的弹出对话框,就是以窗口的方式显示code.html这个网页文件。而下面的340,170是弹出的网页的大小(这个和windows.open()这个方法类似)。
// 注册名为”Code”的工具栏按钮
var oCodeItem = new FCKToolbarButton( 'Code', FCKLang.CodeBtn ) ;
oCodeItem.IconPath = FCKPlugins.Items['code'].Path + 'code.gif' ;
通过FCKToolbarButton来定义一个名为”Code”的工具栏按钮,FCKLang.CodeBtn同样为获取语言文件中的字符串。
FCKPlugins.Items['code'].Path + 'code.gif' 用来加载code目录下面的”code.gif”图像文件,该图像用为工具栏按钮的位图文件。
FCKToolbarItems.RegisterItem( 'Code', oCodeItem ) 最后通过FCKToolbarItems.RegisterItem注册”Code”按钮。
(注意:上面的”code”都为plugins下面定义的”code”插件的目录名)
下面是fckcustom.js文件,内容如下:
// ONLY CHANGE BELOW HERE
FCKConfig.SkinPath = FCKConfig.BasePath + 'skins/silver/';
FCKConfig.Plugins.Add( 'code', 'en,zh,zh-cn' ) ;
FCKConfig.ToolbarSets["Plugin"] = [
['Source','-','-','Templates'],
['Cut','Copy','Paste','PasteWord','-','Print','SpellCheck'],
['Undo','Redo','-','Find','Replace','-','SelectAll'],
'/',
['Bold','Italic','Underline','StrikeThrough','-','Subscript','Superscript'],
['OrderedList','UnorderedList','-','Outdent','Indent'],
['JustifyLeft','JustifyCenter','JustifyRight','JustifyFull'],
['Link','Unlink'],
'/',
['Image','Table','Rule','Smiley'],
['FontName','FontSize'],
['TextColor','BGColor'],
['-','Code']
] ;
FCKConfig.SkinPath = FCKConfig.BasePath + 'skins/silver/'为设定FCKeditor的皮肤文件,这些皮肤文件就是在FCKeditor/editor/skins目录下面的皮肤文件。
FCKConfig.Plugins.Add( 'code', 'en,zh,zh-cn' ) 为加载刚才自己定义的”code”插件(注意:这里的”code”都为plugins下面定义的”code”插件的目录名),后面的’en,zh,zh-cn’为该插件支持的语言,这里指定支持英文,简体中文和繁体中文(需要在插件目录的lang目录中编写语言文件)
可以看到,这就是一个普通的HTML文件,里面可以写HTML标签,也支持javascript的脚本语言,需要说明的是下面部分:
如上面代码所示,首先要加载自己定义的FCKeditor配置文件,就是我们刚才写的fckcustom.js文件,加外,我们在上面已经在自定义的ToolbarSets ---“Plugin”中加入了自定义的”Code”工具栏按钮,所以我们只要在FCKeditor中指定使用”Plugin”这一个工具栏设置就可以了。
最后效果如下图所示:
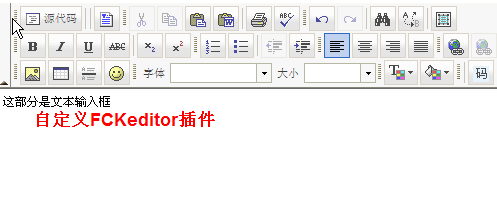
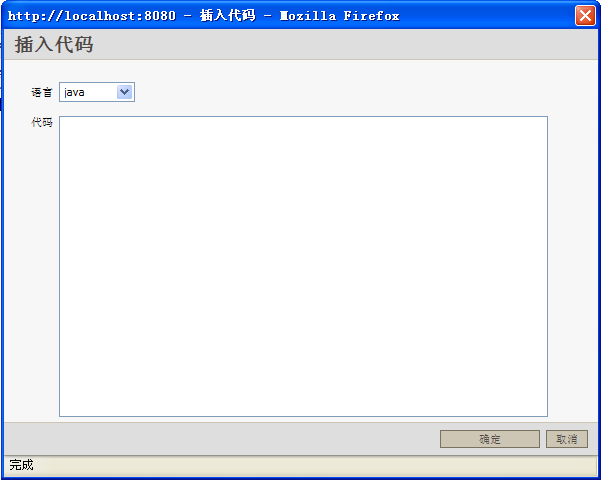
注意工具栏右下角的”码”工具栏按钮,就是自己定义的按钮,”码”为code.gif图片内容,下图为弹出的网页:
var oEditor = window.parent.InnerDialogLoaded() ;
var FCKLang = oEditor.FCKLang ;
var FCKCodes = oEditor.FCKCodes ;
window.onload = function ()

 ...{
...{
 oEditor.FCKLanguageManager.TranslatePage( document ) ;
window.parent.SetOkButton( true ) ;
oEditor.FCKLanguageManager.TranslatePage( document ) ;
window.parent.SetOkButton( true ) ;
 }
}
var oEditor = window.parent.InnerDialogLoaded()通过这个方法,来获取弹出网页的父网页
接着就可以这个oEditor对象来获取FCKeditor的资源,包括刚才自定义的插件对象,像下面的
var FCKCodes = oEditor.FCKCodes来获取在fckplugins.js中定义的FCKCodes对象。
加一个要说明的地方是<span fckLang="CodeDlgName">,可以通过fckLang这个标签来获取在lang目录下面的语言文件中的语言资源,以此来实现FCKeditor的国际化。
通过window.onload()方法中网页文件加载时调用上面创建的oEditor对象的FCKLanguageManager对象的TranslatePage(document)方法给页面加入国际化支持。
并且指定父窗口的”Ok”命令可用。
在FCKeditor中调用自定义插件
oFCKeditor.Config['CustomConfigurationsPath'] = '../editor/plugins/code/fckcustom.js';
oFCKeditor.ToolbarSet = "Plugin";
['Source','-','-','Templates'],
['Cut','Copy','Paste','PasteWord','-','Print','SpellCheck'],
['Undo','Redo','-','Find','Replace','-','SelectAll'],
'/',
['Bold','Italic','Underline','StrikeThrough','-','Subscript','Superscript'],
['OrderedList','UnorderedList','-','Outdent','Indent'],
['JustifyLeft','JustifyCenter','JustifyRight','JustifyFull'],
['Link','Unlink'],
'/',
['Image','Table','Rule','Smiley'],
['FontName','FontSize'],
['TextColor','BGColor'],
['Code']
] ;
这定义自己的工具栏,注意其中的[‘Code’],”Code”为刚才定义的”Code”工具栏命令按钮,通过FCKConfig.ToolbarSets将自定义的插件加入到了工具栏中。
下面给出code.html文件内容:
<html>
<head>
<title>Code Properties</title>
<meta http-equiv="Content-Type" content="text/html; charset=utf-8">
<meta content="noindex, nofollow" name="robots">
<link href="stylesheets/highlight.css" media="screen" rel="Stylesheet"
type="text/css" />
<script language="javascript">
var oEditor = window.parent.InnerDialogLoaded() ;
var FCKLang = oEditor.FCKLang ;
var FCKCodes = oEditor.FCKCodes ;
window.onload = function ()
{
oEditor.FCKLanguageManager.TranslatePage( document ) ;
window.parent.SetOkButton( true ) ;
}
function Ok()
{
var select = document.getElementById('code_type');
FCKCodes.Add(select.options[select.selectedIndex].innerHTML,document.getElementById('code_text').value);
return true ;
}
</script>
</head>
<body scroll="no" style="OVERFLOW: hidden">
<table height="100%" width="95%" align="center">
<tr height="40">
<td><span fckLang="CodeDlgName"></span></td>
<td>
<select id="code_type">
<option selected="selected">java</option>
<option>ruby</option>
<option>python</option>
<option>c/c++</option>
<option>c#</option>
<option>sql</option>
<option>xml</option>
<option>css</option>
<option>javascript</option>
</select>
</td>
</td>
</tr>
<tr valign="top">
<td><span fckLang="Code"></span></td>
<td><textarea id="code_text" cols="90" rows="20"></textarea></td>
</tr>
</table>
</body>
</html>
FCKLang.Code = '代码';
FCKLang.CodeDlgTitle = '插入代码' ;
FCKLang.CodeDlgName = '语言' ;
FCKLang.CodeErrNoName = '请输入代码' ;
//注册Code命令.
FCKCommands.RegisterCommand( 'Code', new FCKDialogCommand( 'Code', FCKLang.CodeDlgTitle, FCKPlugins.Items['code'].Path + 'fck_code.html', 340, 170 ) ) ;


 1630
1630

 被折叠的 条评论
为什么被折叠?
被折叠的 条评论
为什么被折叠?
 到【灌水乐园】发言


