版权声明:可以任意转载,转载时请务必以超链接形式标明如下文章原始出处和作者信息及本声明
作者:xixi
出处:http://blog.csdn.net/slowgrace/archive/2008/12/09/3483119.aspx
一、用ADD方法添加节点
生成树其实很简单,只要用Treeview 控件的Add方法一个个地把树的节点加上就行。Add方法的参考信息如下:
[功能] 在Treeview 控件的Nodes 集合中添加一个Node对象。
[语法] object.Add(relative, relationship, key, text, image, selectedimage)
[返回] 返回新添加的Node对象。
[说明]
- 参数Object是必需的,为对象表达式,该对象必须是MSComctlLib.TreeView类的对象哦。
- 参数Relative是可选的,代表已存在的Node对象的索引号或键值。如果在relative中没有被命名的Node对象,则新节点被放在节点顶层的最后位置。
- 参数relationship是可选的,代表新节点与已存在的节点间的关系,指定Node对象的相对位置。relationship的设置值是:
-
- 0——tvwFirst 首节点,该Node和在relative中被命名的节点位于同一层,并位于所有同层节点之前。
- 1——tvwLast 最后的节点,该Node和在relative中被命名的节点位于同一层,并位于所有同层节点之后。任何连续地添加的节点可能位于最后添加的节点之后。
- 2——tvwNext(缺省),下一个节点,该Node位于在relative中被命名的节点之后。
- 3——tvwPrevious,前一个节点,该Node位于在relative中被命名的节点之前。
- 4——tvwChild(缺省),子节点。该Node为在relative中被命名的节点的子节点。
- 参数key是可选的,唯一的字符串,可用于用Item 方法检索Node。
- 参数text是必需的,在Node中出现的字符串。
- 参数image是可选的,代表一个图像或在ImageList控件中图象的索引。注意,这个值必须是索引值,一个整数;而不能是带双引号的别名,我曾经因为用这个别名导致程序调不出来,折腾了个多小时!
- 参数selectedimage是可选的,代表一个图像或在ImageList控件中图象的索引,在Node被选中时显示。
二、给节点附着有意义的信息
node对象有一些属性,可以用来存储与它相关的信息:
| 属性 | 说明 |
| .text | 节点的名称 |
| .index | Unique number assigned to a node by VBA,貌似是动态变化的 |
| .key | Unique value assigned by developer, must start with a letter |
| .tag | string类型,存嘛开发者自己定 |
示例:添加一个节点,并且设置它的相关信息
三、递归地添加节点
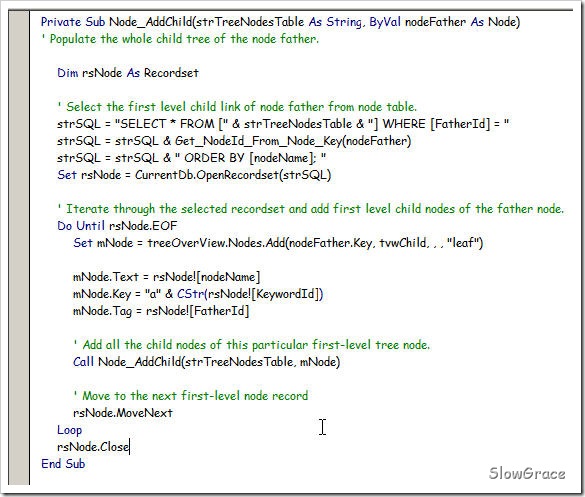
现在我们学会了添加节点,但是,如果我们要维护的层次化信息有数千个节点、十好几个层次,这么一个个地添那得累S。一个聪明的办法是把节点信息都存在表里,表里的每条记录指明自己的father node是谁,然后用程序递归地从这个表里读信息添加节点。节点表包含的字段如下:
递归的过程如下:
生成孩子节点(node)
示例的代码如下,点击可以放大哦:
注意,这里只写了生成child的过程,而最初的根节点还是要单独写代码来添加,添加后再调用这个根节点的NODE_ADDCHILD过程即可。
四、第0步,添加TREEVIEW控件
要让以上代码能run,你得首先把treeview控件加到窗体上,这是一切的根本,第一步之前的第0步。具体方法如下:
- TREEVIEW控件放到窗体上:
-
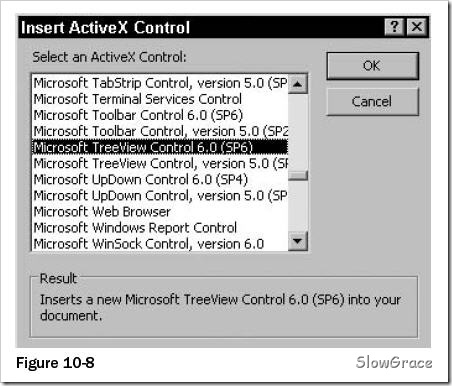
- Start a new blank form, insert the treeview control by choosing Insert/ActiveX Control. . . from the main menu, as shown in Figure 10-8. The figure displays the ActiveX Control selection dialog box. For this example, the Treeview control is from Visual Basic 6, SP 6.
- Select the desired control from the ActiveX Control dialog box, and it will be added to the form. Depending on the type of control selected, it may need to be moved, resized, or have its properties modified.
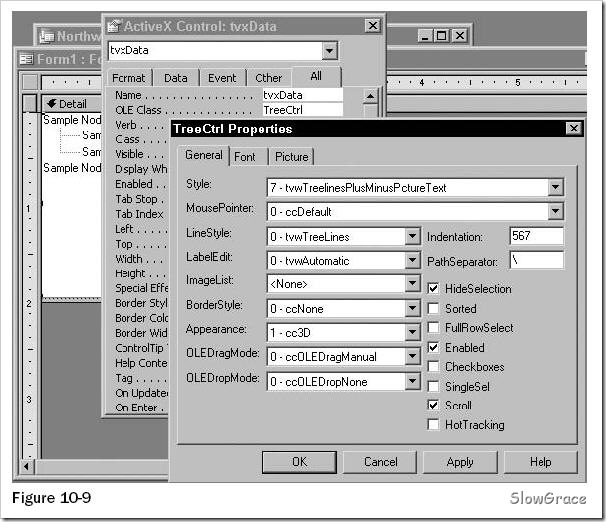
- It is important to note that an ActiveX control has properties that are displayed in the standard properties window, but a control can also possess another set of custom properties that were added by the control creator. In Figure 10-9, both the standard and custom property windows are displayed.
- 设置imagelist: In order for a Treeview control to be operational, you must create an ImageList control. The ImageList control is a storage area for pictures that the Treeview uses when it displays the data.
-
- 把imagelist控件放到窗体上:To add an ImageList control to the form, use the ActiveX Controls selection dialog box and select the Microsoft ImageList control.
- 在imagelist中添加图标文件:
-
- 打开imagelist属性对话框:Right-click on the inserted ImageList control, select ImageListCtrl object from the submenu, then select the Properties choice. These steps open the ImageListCtrl Properties dialog box, which is where the images and their properties are defined.
- 设置图标大小:On the General tab, first select the size of the icons, as this value cannot be changed after images are inserted.
- 添加图标文件:The Images tab contains the inventory of icons. To add an image to the inventory, click on the Insert Picture button. This opens the standard Windows File Open dialog box to allow the user to browse for image files. Each image in the list has an Index, Key, and Tag property.
- 把imagelist和treeview控件关联起来:After defining the icons in the ImageList, the final setup step is to set the ImageList property of the Treeview control to the name of the ImageList control. To perform this step, right-click the Treeview control, choose TreeCtrl object, then Properties, and finally select the ImageList control name for the ImageList property.
五、生成树完整过程回放
- 在窗体设计视图做如下操作:
-
- 在窗体中放上treeview控件和imagelist控件;
- 给imagelist控件加上图标,并把treeview控件和imagelist控件关联起来;
- 在表设计视图,建立node表并录入一些数据。
- 在代码窗口,完成递归生成树节点的代码。
参考文献:
- http://fanjy.blog.excelhome.net/user1/fanjy/archives/2007/910.html
- Patricia Cardoza, Teresa Hennig, Graham Seach, Armen Stein, "Access 2003 VBA Programmer’s Reference", Published by Wiley Publishing, Inc., Indianapolis, Indiana, 2004
更多树类文章


 1521
1521


 被折叠的 条评论
为什么被折叠?


