


 本文介绍OpenWRT系统升级过程中配置文件的保存与恢复机制,详细解析sysupgrade命令的工作原理及其脚本实现,包括如何选择保存的配置文件、压缩处理方式以及升级过程中的关键步骤。
0:扯淡
对这个openwrt的细节方面了解的还比较欠缺,故从实际中的经常用的功能说起,研究研究,可以了解更多的细节。
在openwrt的页面中已经涉及到下面的内容如:
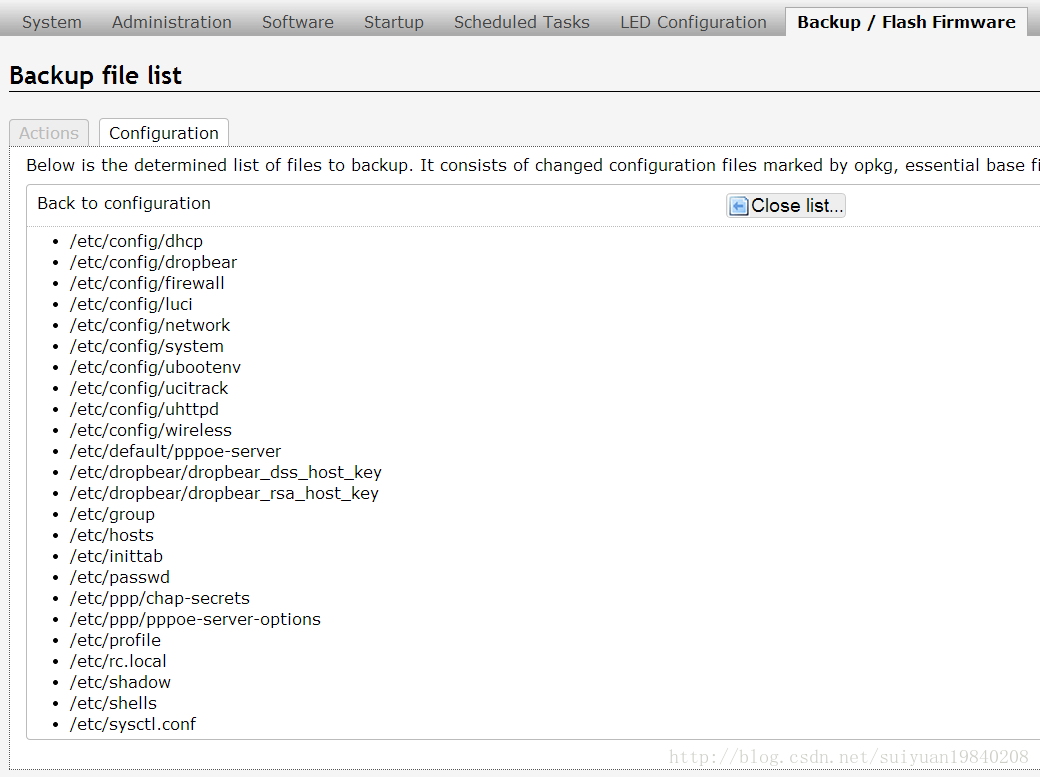
其中在更新系统时候有进行配置保存及恢复的功能。
1:sysupgrade是的交互式使用命令如下:
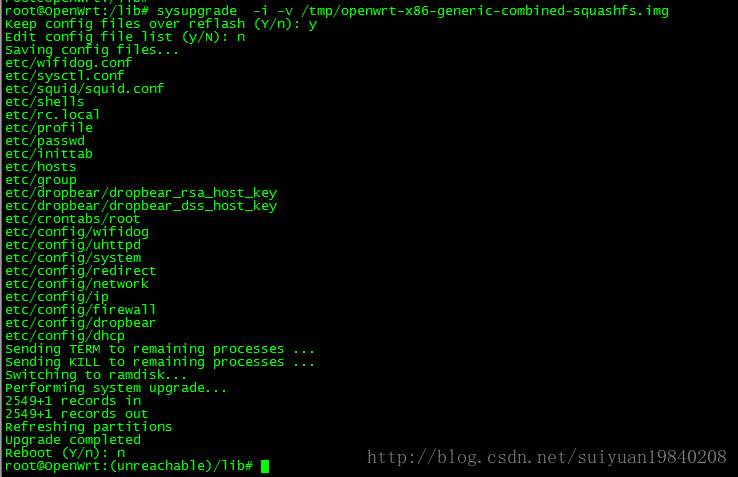
经过上面的系统更新之后,会保存上面显示的配置文件中的内容,故更新系统不会影响配置的丢失。
3:脚本分析
脚本有点多,其中分析主要的脚本就可以了,其他的加一些打印信息可以帮助分析执行流程。
- 上面就是通过openwrt系统提供的sysupgrade命令来对系统进行更新的。
- root@OpenWrt:~# which sysupgrade
- /sbin/sysupgrade
- 看看脚本中的主要内容,
- include /lib/upgrade
- do_save_conffiles() {
- local conf_tar="${1:-$CONF_TAR}"
- [ -z "$(rootfs_type)" ] && {
- echo "Cannot save config while running from ramdisk."
- ask_bool 0 "Abort" && exit
- return 0
- }
- run_hooks "$CONFFILES" $sysupgrade_init_conffiles
- ask_bool 0 "Edit config file list" && vi "$CONFFILES"
- v "Saving config files..."
- [ "$VERBOSE" -gt 1 ] && TAR_V="v" || TAR_V=""
- tar c${TAR_V}zf "$conf_tar" -T "$CONFFILES" 2>/dev/null
- }
- 其中run_hooks函数的定义如下,其主要是执行钩子函数,即,第一个参数为:函数参数,第二个参数之后为:调用函数。
- run_hooks() {
- local arg="$1"; shift
- for func in "$@"; do
- eval "$func $arg"
- done
- }
- run_hooks "$CONFFILES" $sysupgrade_init_conffiles 的作用就是将需要保存的文件名字保存到"$CONFFILES"文件中,保存那些文件了
- 定义在add_uci_conffiles()和add_overlayfiles()函数中。
- add_uci_conffiles() {
- local file="$1"
- ( find $(sed -ne '/^[[:space:]]*$/d; /^#/d; p' \
- /etc/sysupgrade.conf /lib/upgrade/keep.d/* 2>/dev/null) \
- -type f 2>/dev/null;
- opkg list-changed-conffiles ) | sort -u > "$file"
- return 0
- }
- add_overlayfiles() {
- local file="$1"
- find /overlay/etc/ -type f | sed \
- -e 's,^/overlay/,/,' \
- -e '\,/META_[a-zA-Z0-9]*$,d' \
- -e '\,/functions.sh$,d' \
- -e '\,/[^/]*-opkg$,d' \
- > "$file"
- return 0
- }
- 默认保存的文件内容如下:如果需要对自定
- etc/wifidog.conf
- etc/sysctl.conf
- etc/squid/squid.conf
- etc/shells
- etc/rc.local
- etc/profile
- etc/passwd
- etc/inittab
- etc/hosts
- etc/group
- etc/dropbear/dropbear_rsa_host_key
- etc/dropbear/dropbear_dss_host_key
- etc/crontabs/root
- etc/config/wifidog
- etc/config/uhttpd
- etc/config/system
- etc/config/redirect
- etc/config/network
- etc/config/ip
- etc/config/firewall
- etc/config/dropbear
- etc/config/dhcp
- 函数ask_bool()实现是否与命令行进行交互式的处理。
- v "Saving config files..."
- [ "$VERBOSE" -gt 1 ] && TAR_V="v" || TAR_V=""
- tar c${TAR_V}zf "$conf_tar" -T "$CONFFILES" 2>/dev/null
- 实现对上面的数据文件进行压缩处理,其文件名称为:/tmp/sysupgrade.tgz
- if [ -n "$CONF_IMAGE" ]; then
- case "$(get_magic_word $CONF_IMAGE cat)" in
- # .gz files
- 1f8b) ;;
- *)
- echo "Invalid config file. Please use only .tar.gz files"
- exit 1
- ;;
- esac
- get_image "$CONF_IMAGE" "cat" > "$CONF_TAR"
- export SAVE_CONFIG=1
- elif ask_bool $SAVE_CONFIG "Keep config files over reflash"; then
- do_save_conffiles
- export SAVE_CONFIG=1
- else
- export SAVE_CONFIG=0
- fi
- 上面的条件判断执行的是elif,即默认是保存更改过的配置文件。 export SAVE_CONFIG=1
- 其中语句
- kill_remaining TERM
- sleep 3
- kill_remaining KILL
- 实现对进程的term和kill操作
- kill_remaining() { # [ <signal> ]
- local sig="${1:-TERM}"
- echo -n "Sending $sig to remaining processes ... "
- local stat
- for stat in /proc/[0-9]*/stat; do
- [ -f "$stat" ] || continue
- local pid name state ppid rest
- read pid name state ppid rest < $stat
- name="${name#(}"; name="${name%)}"
- local cmdline
- read cmdline < /proc/$pid/cmdline
- # Skip kernel threads
- [ -n "$cmdline" ] || continue
- case "$name" in
- # Skip essential services
- *ash*|*init*|*watchdog*|*ssh*|*dropbear*|*telnet*|*login*|*hostapd*|*wpa_supplicant*) : ;;
- # Killable process
- *)
- if [ $pid -ne $$ ] && [ $ppid -ne $$ ]; then
- echo -n "$name "
- kill -$sig $pid 2>/dev/null
- fi
- ;;
- esac
- done
- echo ""
- }
- 在升级操作之前有一个run_ramfs(),将一个最小能运行的系统mount到内存中去。为后的操作提供运行环境。
- run_ramfs() { # <command> [...]
- install_bin /bin/busybox /bin/ash /bin/sh /bin/mount /bin/umount \
- /sbin/pivot_root /usr/bin/wget /sbin/reboot /bin/sync /bin/dd \
- /bin/grep /bin/cp /bin/mv /bin/tar /usr/bin/md5sum "/usr/bin/[" \
- /bin/vi /bin/ls /bin/cat /usr/bin/awk /usr/bin/hexdump \
- /bin/sleep /bin/zcat /usr/bin/bzcat /usr/bin/printf /usr/bin/wc
- install_bin /sbin/mtd
- for file in $RAMFS_COPY_BIN; do
- install_bin $file
- done
- install_file /etc/resolv.conf /lib/functions.sh /lib/functions.sh /lib/upgrade/*.sh $RAMFS_COPY_DATA
- pivot $RAM_ROOT /mnt || {
- echo "Failed to switch over to ramfs. Please reboot."
- exit 1
- }
- mount -o remount,ro /mnt
- umount -l /mnt
- grep /overlay /proc/mounts > /dev/null && {
- mount -o remount,ro /overlay
- umount -l /overlay
- }
- # spawn a new shell from ramdisk to reduce the probability of cache issues
- exec /bin/busybox ash -c "$*"
- }
- 在整整操作之前先看看 mtd,sysupgrade 更新过程实际使用的就是mtd命令
- root@OpenWrt:/overlay/etc#mtd
- Usage: mtd [<options> ...] <command> [<arguments> ...] <device>[:<device>...]
- The device is in the format of mtdX (eg: mtd4) or its label.
- mtd recognizes these commands:
- unlock unlock the device
- refresh refresh mtd partition
- erase erase all data on device
- write <imagefile>|- write <imagefile> (use - for stdin) to device
- jffs2write <file> append <file> to the jffs2 partition on the device
- Following options are available:
- -q quiet mode (once: no [w] on writing,
- twice: no status messages)
- -n write without first erasing the blocks
- -r reboot after successful command
- -f force write without trx checks
- -e <device> erase <device> before executing the command
- -d <name> directory for jffs2write, defaults to "tmp"
- -j <name> integrate <file> into jffs2 data when writing an image
- -p write beginning at partition offset
- Example: To write linux.trx to mtd4 labeled as linux and reboot afterwards
- mtd -r write linux.trx linux
- do_upgrade() {
- v "Performing system upgrade..."
- if type 'platform_do_upgrade' >/dev/null 2>/dev/null; then
- platform_do_upgrade "$ARGV"
- else
- default_do_upgrade "$ARGV"
- fi
- [ "$SAVE_CONFIG" -eq 1 -a -n "$USE_REFRESH" ] && {
- v "Refreshing partitions"
- if type 'platform_refresh_partitions' >/dev/null 2>/dev/null; then
- platform_refresh_partitions
- else
- refresh_mtd_partitions
- fi
- if type 'platform_copy_config' >/dev/null 2>/dev/null; then
- platform_copy_config
- else
- jffs2_copy_config
- fi
- }
- v "Upgrade completed"
- [ -n "$DELAY" ] && sleep "$DELAY"
- ask_bool 1 "Reboot" && {
- v "Rebooting system..."
- reboot -f
- sleep 5
- echo b 2>/dev/null >/proc/sysrq-trigger
- }
- }
- default_do_upgrade() {
- sync
- if [ "$SAVE_CONFIG" -eq 1 -a -z "$USE_REFRESH" ]; then
- get_image "$1" | mtd -j "$CONF_TAR" write - "${PART_NAME:-image}"
- else
- get_image "$1" | mtd write - "${PART_NAME:-image}"
- fi
- }
- platform_do_upgrade() {
- local rootfs="$(x86_get_rootfs)"
- local rootfsdev="${rootfs##*:}"
- sync
- [ -b ${rootfsdev%[0-9]} ] && get_image "$@" | dd of=${rootfsdev%[0-9]} bs=4096 conv=fsync
- sleep 1
- }
- x86_get_rootfs() {
- local rootfsdev
- local rootfstype
- rootfstype="$(awk 'BEGIN { RS=" "; FS="="; } ($1 == "rootfstype") { print $2 }' < /proc/cmdline)"
- case "$rootfstype" in
- squashfs|jffs2)
- rootfsdev="$(awk 'BEGIN { RS=" "; FS="="; } ($1 == "block2mtd.block2mtd") { print substr($2,1,index($2, ",")-1) }' < /proc/cmdline)";;
- ext4)
- rootfsdev="$(awk 'BEGIN { RS=" "; FS="="; } ($1 == "root") { print $2 }' < /proc/cmdline)";;
- esac
- echo "$rootfstype:$rootfsdev"
- }
- jffs2_copy_config() {
- if grep rootfs_data /proc/mtd >/dev/null; then
- # squashfs+jffs2
- mtd -e rootfs_data jffs2write "$CONF_TAR" rootfs_data
- else
- # jffs2
- mtd jffs2write "$CONF_TAR" rootfs
- fi
- }
- refresh_mtd_partitions() {
- mtd refresh rootfs
- }
其中需要注意的是不同的平台如,Atheros和x86的各个平台的执行过程有所不同,最终一点是需要将$CONF_TAR保存到系统的 rootfs_data或者 rootfs_data分区数据中去。


 7904
7904

 被折叠的 条评论
为什么被折叠?
被折叠的 条评论
为什么被折叠?
 到【灌水乐园】发言


