


玩Linux系统,会经常用到远程桌面软件。 我一直用的2个是Xmanager 和 VNC。 今天看到一个新软件: NoMachine。 NoMachine NX 是一个快速的终端服务器和虚拟桌面软件,基于 X11 协议。据说速度比 VNC 还快,甚至可以在只有 10k 的带宽环境下运行。 而且画面也比VNC 的清楚。
NoMachine 官网地址:http://www.nomachine.com/
使用NoMachine 需要配置服务端和客户端。
一. 服务端
服务端需要安装3个包:
nxserver-3.4.0-12.i386.rpm
nxnode-3.4.0-11.i386.rpm
nxclient-3.4.0-7.i386.rpm
Linux 32bit 的下载地址是:
http://www.nomachine.com/download-package.php?Prod_Id=2068
下面是NoMachine网页的上一个使用说明:
| 1. Download the RPMs 2. Change your working directory to the location where you saved the package and install it by running from a console: |
| If you don't have the sudo utility installed, log on as superuser ("root") and run the commands without sudo. |
| Note: click here for detailed instructions on how to install the NX Client, NX Node and NX Server packages. The NX service can be controlled by the command /usr/NX/bin/nxserver --status|--start|--stop|--restart. Additional commands are available to configure the server. Try /usr/NX/bin/nxserver --help for more information. Please, don't forget to download and read the NX Server Administrator's Guide available here. |
[root@rac2 /]# mkdir /windows
[root@rac2 /]# mount -o username=dave,password=888 //192.168.6.80/tmp /windows
[root@rac2 /]# cd windows/
[root@rac2 windows]# ls
nxclient-3.4.0-7.i386.rpm nxnode-3.4.0-14.i386.rpm nxserver-3.4.0-14.i386.rpm
[root@rac2 windows]# ls -lrt
total 17033
-rwxrwSrwx 1 root root 6928970 Nov 11 18:53 nxserver-3.4.0-14.i386.rpm
-rwxrwSrwx 1 root root 6033923 Nov 11 18:53 nxnode-3.4.0-14.i386.rpm
-rwxrwSrwx 1 root root 4477229 Nov 11 18:54 nxclient-3.4.0-7.i386.rpm
[root@rac2 windows]# rpm -ivh *.rpm
error: failed to stat /mnt: Host is down
Preparing... ########################################### [100%]
1:nxclient ########################################### [ 33%]
Showing file: /usr/NX/share/documents/client/cups-info
CUPS Printing Backend
The NX Client set-up procedure detected that your "IPP CUPS" printing
backend doesn't allow printing from the NX session. In order to have
printing support in your NX system, you need to set proper permissions
on the IPP backend. Please execute:
chmod 755 /usr/lib/cups/backend/ipp
2:nxnode ########################################### [ 67%]
NX> 700 Starting: install node operation at: Thu Nov 11 18:58:13 2010.
NX> 700 Autodetected system 'redhat'.
NX> 700 Install log is '/usr/NX/var/log/install'.
NX> 700 Creating configuration in /usr/NX/etc/node.cfg.
NX> 700 Inspecting local CUPS environment.
NX> 700 Generating CUPS entries in: /usr/NX/etc/node.cfg.
NX> 700 Installation of version: 3.4.0-14 completed.
NX> 700 Bye.
3:nxserver ########################################### [100%]
NX> 700 Installing: server at: Thu Nov 11 18:58:27 2010.
NX> 700 Autodetected system: redhat.
NX> 700 Install log is: /usr/NX/var/log/install.
NX> 700 Creating configuration file: /usr/NX/etc/server.cfg.
NX> 723 Cannot start NX statistics:
NX> 709 NX statistics are disabled for this server.
NX> 700 Version '3.4.0-14' installation completed.
NX> 700 Showing file: /usr/NX/share/documents/server/install-notices
...
NX> 700 Bye.
[root@rac2 windows]#
上面有提示我们执行脚本:
[root@rac1 windows]# chmod 755 /usr/lib/cups/backend/ipp
查看NXserver :
[root@rac2 Server]# /usr/NX/bin/nxserver --status
NX> 900 Connecting to server ...
NX> 110 NX Server is running.
NX> 999 Bye.
[root@rac2 Server]#
二. 客户端
Windows 客户端下载:
http://www.nomachine.com/download-client-windows.php
安装完之后去连服务端即可。
运行之后,看配置:
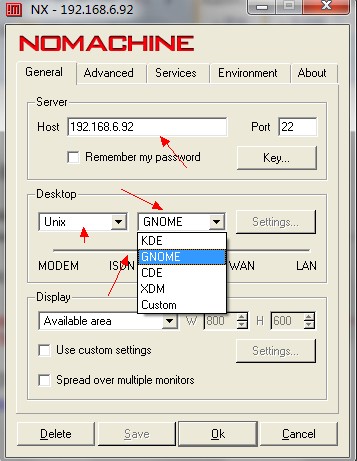
在这里我们需要输入Host 和 远程桌面类型。 现在基本用的是KDE 和 GNOME。 如果Linux 只安装了一个,就要选对。
下面还有一个选择网络类型的。

连接之后的画面:

这里有两点注意的地方:
1. 不能用root用户进行连接
2. 如果遇到一下问题,请检查环境变量:
To launch a desktop session, KDE or GNOME, the corresponding
commands, either startkde or gnome-session must be set in the PATH.
If the command is not available in the PATH, an error message like:
"Cannot run 'startkde'. Please check that the requested application is in
the system PATH and that you have the rights to execute it."
NoMachine 官网对这个错误做了说明:
http://www.nomachine.com/ar/view.php?ar_id=AR06D00398
三. 修改NoMachine 的端口
NoMachine和 SSH 使用相同的通道,所以如果SSH的端口修改了,NoMachine 的端口也要修改。
NoMachine 端口的2个配置文件:
文件1:/usr/NX/etc/server.cfg
修改如下2个参数:
SSHDPort = "222"
ServerName = " ds-nb-dbserver "
--这个是/etc/hosts 文件里的
文件2:/usr/NX/etc/node.cfg
修改如下3个参数:
NodeName = "ds-nb-dbserver"
SSHDPort = "222"
SSHDAuthPort = "222"
SSH 的端口配置文件:/etc/ssh/sshd_config
修改其中的端口与NoMachine保持一致:
Port 222
记得在防火墙里把端口添加进去:
http://www.cndba.cn/Dave/article/731
重启SSH 和端口:
[root@ds-nb-dbserver Linux32bitServer]#/usr/NX/bin/nxserver --stop
NX> 123 Service stopped.
NX> 153 Stopping NX server monitor.
NX> 153 NX server monitor alreadystopped.
NX> 999 Bye.
[root@ds-nb-dbserver Linux32bitServer]#/usr/NX/bin/nxserver --start
NX> 122 Service started.
NX> 999 Bye.
[root@ds-nb-dbserver Linux32bitServer]#/usr/NX/bin/nxserver --status
NX> 900 Connecting to server ...
NX> 110 NX Server is running.
NX> 999 Bye.
/etc/init.d/ssh restart
-------------------------------------------------------------------------------------------------------
版权所有,文章允许转载,但必须以链接方式注明源地址,否则追究法律责任!
QQ: 492913789
Email:ahdba@qq.com
Blog:http://www.cndba.cn/dave
Weibo: http://weibo.com/tianlesoftware
Email: tianlesoftware@gmail.com
Skype: tianlesoftware
-------加群需要在备注说明Oracle表空间和数据文件的关系,否则拒绝申请----
DBA1 群:62697716(满); DBA2 群:62697977(满) DBA3 群:62697850(满)
DBA 超级群:63306533(满); DBA4 群:83829929(满) DBA5群: 142216823(满)
DBA6 群:158654907(满) DBA7 群:69087192(满) DBA8 群:172855474
DBA 超级群2:151508914 DBA9群:102954821 聊天 群:40132017(满)


 422
422

 被折叠的 条评论
为什么被折叠?
被折叠的 条评论
为什么被折叠?
 到【灌水乐园】发言


