


从零开始纪录学习GeekBlog博客项目的过程:
多版本管理的环境配置:
virtualenv:
virtualenv blog
cd blog
source bin/activate
安装django1.6.5至blog环境中,并创建blog项目
pip install Django
django-admin.py startproject blog
cd blog
或用eclipse Pydev
基本uWSGI安装与配置
在虚拟环境中安装
pip install uwsgi安装nginx
sudo apt-get install nginx
sudo /etc/init.d/nginx start    # start nginx
拷贝 uwsgi_params 文件;
可从这两处 nginx directory of the uWSGI distribution, 或从 https://github.com/nginx/nginx/blob/master/conf/uwsgi_params
创建新的文件在blog工程目录下 blog_nginx.conf
# the upstream component nginx needs to connect to
upstream django {
    server unix:///var/run/blog.sock; # for a file socket
    #server 127.0.0.1:8001; # for a web port socket (we'll use this first)
}

# configuration of the server
server {
    # the port your site will be served on
    listen      8000;
    # the domain name it will serve for
    server_name 192.168.27.130; # substitute your machine's IP address or FQDN
    charset     utf-8;

    # max upload size
    client_max_body_size 75M;   # adjust to taste

    # Django media
    location /media  {
        alias /root/git/blog/blog/media;  # your Django project's media files - amend as required
    }

    location /static {
        alias /root/git/blog/blog/static; # your Django project's static files - amend as required
    }

    # Finally, send all non-media requests to the Django server.
    location / {
        uwsgi_pass  django;
        include     /root/git/blog/blog/uwsgi_params; # the uwsgi_params file you installed
    }
}
Symlink to this file from /etc/nginx/sites-enabled so nginx can see it:
sudo ln -s /root/git/blog/blog/blog_nginx.conf /etc/nginx/sites-enabled/Deploying static files
Before running nginx, you have to collect all Django static files in the static folder. First of all you have to edit mysite/settings.py adding:
STATIC_ROOT = os.path.join(BASE_DIR, "static/")and then run
python manage.py collectstaticRestart nginx:
sudo /etc/init.d/nginx restartRunning the Django application with uwsgi and nginx
uwsgi --socket blog.sock --module blog.wsgi --chmod-socket=664Configuring uWSGI to run with a .ini file
We can put the same options that we used with uWSGI into a file, and then ask uWSGI to run with that file. It makes it easier to manage configurations.
Create a file called blog_uwsgi.ini:
# blog_uwsgi.ini file
[uwsgi]

# Django-related settings
# the base directory (full path)
chdir           = /root/git/blog/blog
# Django's wsgi file
module          = blog.wsgi
# the virtualenv (full path)
home            = /root/git/blog

# process-related settings
# master
master          = true
# maximum number of worker processes
processes       = 10
# the socket (use the full path to be safe
socket          = /var/run/blog.sock
# ... with appropriate permissions - may be needed
# chmod-socket    = 664
# clear environment on exit
vacuum          = true
And run uswgi using this file:
uwsgi --ini blog_uwsgi.ini
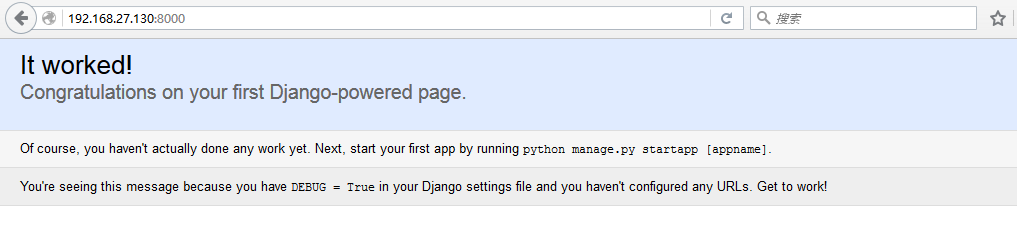
# the --ini option is used to specify a fileOnce again, test that the Django site works as expected.
到此基本环境配置结束。。。接着着手。models
遇见的错误:
- nginx 启动失败,解决:查看配置错误原因,
nginx -t - Got ‘No such file or directory’ error while configuring nginx and uwsgi
项目配置文件生成 blog.sock 将其移动至 /var/run/blog.rock
参考:http://stackoverflow.com/questions/32974204/got-no-such-file-or-directory-error-while-configuring-nginx-and-uwsgi - nginx权限问题
暂时用root,安全问题以后再学习。。
在nginx.conf中,第一行 改写为user root
参考:
http://uwsgi-docs.readthedocs.io/en/latest/tutorials/Django_and_nginx.html


 743
743

 被折叠的 条评论
为什么被折叠?
被折叠的 条评论
为什么被折叠?
 到【灌水乐园】发言


