


前言
Spring cloud是较为完善的分布式微服务框架,网上教程数量较少,所以我就去油管上找了找,找到一个1小时多的视频,会翻的可以自行去看看 “Getting Started with Spring Cloud” 。里边的大牛讲的挺有意思的,而且是当场构建项目,编写代码并演示。
但是如果英文不好,或者没有耐心看视频的同学,可以看看这篇博客(接下来还会陆续更新Spring Cloud自学系列),均根据这个视频的示例进行练习,并整理的。第一篇,我们首先讲讲如何配置一个统一的配置服务器。
统一配置服务(Config-server)介绍
简介
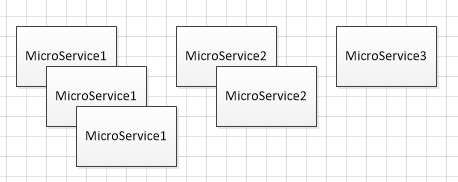
假设一个拥有众多微服务(假设使用的是SpringBoot)的系统,而每个服务均有若干副本共同运行,则要维护每个服务的配置信息将变得十分困难。
若配置文件在SpringBoot应用包中,则需要依次停止各个服务,更新配置文件,再重启,这会浪费很多时间。
Config-server就可以为这些应用提供统一的配置服务。
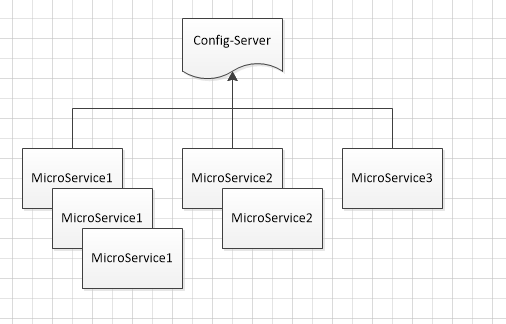
若要修改某个应用的配置,仅需修改Config-Server所监视的文件即可。
特点
- 与SpringBoot应用结合紧密,使用方便
- 通过Git或者SVN统一管理配置文件
- 免重启刷新配置信息
Config-Server 项目构建
新建maven项目
通过start.spring.io页面配置,并下载maven包,或者直接通过新建maven项目生成。若通过start.spring.io页面进行生成,则仅需勾选Config-server组件即可。若通过maven生成,则附上pom文件如下:
<?xml version="1.0" encoding="UTF-8"?>
<project xmlns="http://maven.apache.org/POM/4.0.0" xmlns:xsi="http://www.w3.org/2001/XMLSchema-instance"
    xsi:schemaLocation="http://maven.apache.org/POM/4.0.0 http://maven.apache.org/xsd/maven-4.0.0.xsd">
    <modelVersion>4.0.0</modelVersion>

    <groupId>org.wsy</groupId>
    <artifactId>config-server</artifactId>
    <version>0.0.1-SNAPSHOT</version>
    <packaging>jar</packaging>

    <name>config-server</name>
    <description>Demo project for Spring Boot</description>

    <parent>
        <groupId>org.springframework.boot</groupId>
        <artifactId>spring-boot-starter-parent</artifactId>
        <version>1.3.8.RELEASE</version>
        <relativePath/> <!-- lookup parent from repository -->
    </parent>

    <properties>
        <project.build.sourceEncoding>UTF-8</project.build.sourceEncoding>
        <project.reporting.outputEncoding>UTF-8</project.reporting.outputEncoding>
        <java.version>1.8</java.version>
    </properties>

    <dependencies>
        <dependency>
            <groupId>org.springframework.cloud</groupId>
            <artifactId>spring-cloud-config-server</artifactId>
        </dependency>

        <dependency>
            <groupId>org.springframework.boot</groupId>
            <artifactId>spring-boot-starter-test</artifactId>
            <scope>test</scope>
        </dependency>
    </dependencies>

    <dependencyManagement>
        <dependencies>
            <dependency>
                <groupId>org.springframework.cloud</groupId>
                <artifactId>spring-cloud-dependencies</artifactId>
                <version>Brixton.SR6</version>
                <type>pom</type>
                <scope>import</scope>
            </dependency>
        </dependencies>
    </dependencyManagement>

    <build>
        <plugins>
            <plugin>
                <groupId>org.springframework.boot</groupId>
                <artifactId>spring-boot-maven-plugin</artifactId>
            </plugin>
        </plugins>
    </build>


</project>然后在application入口处新增注解@EnableConfigServer:
@EnableConfigServer
@SpringBootApplication
public class ConfigServerApplication {

    public static void main(String[] args) {
        SpringApplication.run(ConfigServerApplication.class, args);
    }
}
配置Config-Server
以Git作为版本管理为例
新建git
这里以本地仓库为例:
1. 新建一个文件夹,如properties,通过git bash 输入git init 初始化仓库。
2. 编写配置文件,若专门为某微服务应用编写配置,则以微服务名称.properties 命名,若是通用配置则可以命名为application.properties 。
3. 提交git, git add -A 然后 git commit
配置config-server
修改config-server的application.properties 文件。添加以下信息:
spring.cloud.config.server.git.uri=C:\\path\\to\\your\\git\\folder
server.port=8888
添加测试配置
例如下文将用到的reservation-service微服务,则新建一个reservation-service.properties
message=only4reservation再添加一个统一的application.properties
info=barConfig-Server 使用
应用例子
步骤如下:
- 新建一个最简单的SpringBoot的web微服务应用,此外再添加一个组件。
         <dependency>
            <groupId>org.springframework.cloud</groupId>
            <artifactId>spring-cloud-starter-config</artifactId>
</dependency>- 新建
bootstrap.properties文件:
# 这是微服务的名称,与上一章的properties文件命名相关
spring.application.name=reservation-service
# 这里填写config-server的地址
spring.cloud.config.uri=http://localhost:8888- 编写一个Controller可以显示配置文件的值,例如:
@RefreshScope
@RestController
class MessageRestController {
    @Value("${message}")
    private String message;
    @Value("${foo}")
    private String info;

    @RequestMapping("/message")
    String message(){
        return this.message;
    }

    @RequestMapping("/info")
    String info(){
        return this.info;
    }

}
这一段代码中,SpringBoot服务本身并没有配置文件指明message属性的值,但是在bootstrap文件中制定了config-server的信息,因此该服务就可以从config-server中读取message的配置值。
而info属性的值则从config-server的application.properties中读取。
效果如下:
首先分别启动config-server和reservation-service两个应用。
访问reservation-service应用(假设地址为:http://localhost:8080),则分别访问:
* http://localhost:8080/message
* http://localhost:8080/info
结果如下:

可以看到配置信息被正确读取了。


 8588
8588

 被折叠的 条评论
为什么被折叠?
被折叠的 条评论
为什么被折叠?
 到【灌水乐园】发言


