


在jdk1.4之后为了提升IO的性能(提高服务器的性能),提供了一个新的开发包NIO,此包位于java.nio.*;中
在java中已有的IO操作大多数是属于阻塞的操作,例如:键盘输入数据必须一直等待用户输入数据,否则程序无法向下继续执行、Socket编程中,服务器在用户连接之前必须一致处于阻塞状态——系统资源大量浪费。
在新IO操作中大部分的操作都是使用缓冲区完成的。
缓冲区——Buffer
缓冲区(Buffer)是一个线性的、有序的数据集,只能容纳某种特定的数据类型。

以上的缓冲区基本上都是基于基本数据类型,但是没有boolean类型——比较简单,不需要缓冲区操作。在使用缓冲区的时候有3个变量是比较有用处的:
- position:下一个缓冲区读取或者写入的操作指针,向缓冲区中写入数据时该指针会改变,指针永远位于最后一个元素之后。
- limit:不应该读取或写入的元素的索引。position<=limit。
- capacity:缓冲区的最大容量,分配缓冲区时已经设置,一般不更改。limit<=capacity。
import java.nio.IntBuffer;
public class IntBufferDemo01 {
public static void main(String[] args) {
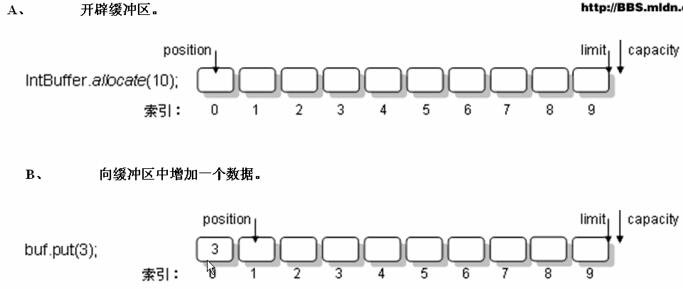
IntBuffer intBuffer = IntBuffer.allocate(10);// 准备10个大小的缓冲区
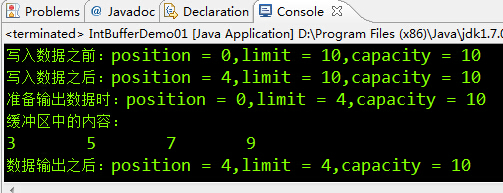
System.out.println("写入数据之前:" + getInfo(intBuffer));
int[] temp = { 5, 7, 9 };
intBuffer.put(3);// 向缓冲区中压入一个整型值
intBuffer.put(temp);// 向缓冲区中压入一个整型数组,此时缓冲区中已经有了7个数据
System.out.println("写入数据之后:" + getInfo(intBuffer));
intBuffer.flip();// 重设缓冲区-limit=position,position=0
System.out.println("准备输出数据时:" + getInfo(intBuffer));
System.out.println("缓冲区中的内容:");
while (intBuffer.hasRemaining()) {
System.out.print(intBuffer.get() + "\t");
}
System.out.println("\n数据输出之后:" + getInfo(intBuffer));
}
private static String getInfo(IntBuffer intBuffer) {
return "position = " + intBuffer.position() + ",limit = "
+ intBuffer.limit() + ",capacity = " + intBuffer.capacity();
}
}
运行结果:
操作过程:

注意:如果需要输出缓冲区中的内容需要将position设置为0,limit设置为存放数据的实际长度——即原来的position,可以使用buf.lip();。
注意:缓冲区的大小要分配合理,要能够装下所需要的数据。在取出缓冲区中的内容之前需要先flip一下。
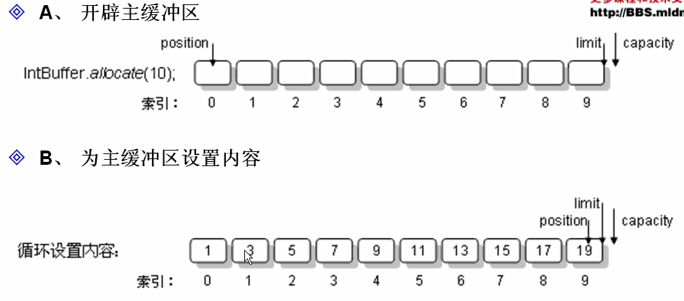
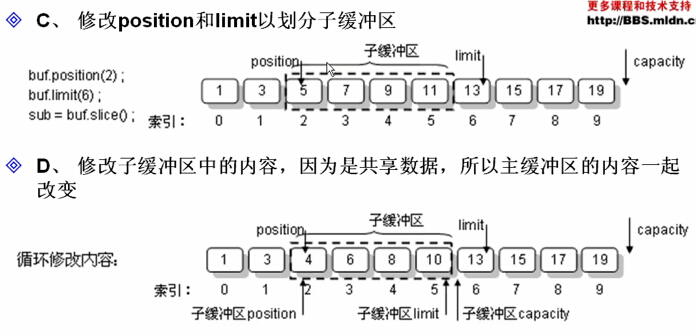
在缓冲区中创建子缓冲区
子缓冲区是可以修改数据的
import java.nio.IntBuffer;

public class IntBufferDemo02 {

    public static void main(String[] args) {
        IntBuffer intBuffer = IntBuffer.allocate(10);// 准备10个大小的缓冲区
        for (int i = 0; i < 10; i++) {
            intBuffer.put(2 * i + 1);// 向缓冲区中加入10个奇数
        }

        // 通过 slice()创建子缓冲区
        intBuffer.position(2);
        intBuffer.limit(6);
        IntBuffer subBuffer = intBuffer.slice();
        for (int i = 0; i < subBuffer.capacity(); i++) {
            int temp = subBuffer.get(i);
            subBuffer.put(temp - 1);
        }
        intBuffer.flip();// 重设缓冲区
        intBuffer.limit(intBuffer.capacity());
        System.out.println("主缓冲区中的内容:");
        while (intBuffer.hasRemaining()) {
            System.out.print(intBuffer.get() + "\t");
        }
    }

}
运行结果:

其操作流程如下面的两张图所示:
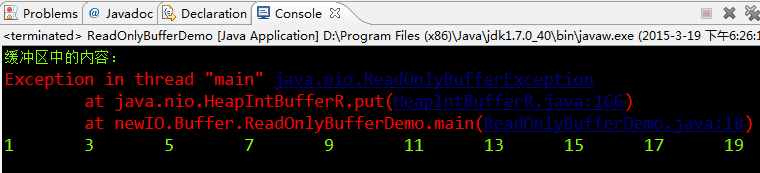
只读缓冲区
import java.nio.IntBuffer;

public class ReadOnlyBufferDemo {

    public static void main(String[] args) {
        IntBuffer buffer = IntBuffer.allocate(10);
        for (int i = 0; i < 10; i++) {
            buffer.put(2 * i + 1);
        }
        IntBuffer readOnlyBuffer = buffer.asReadOnlyBuffer();// 设置该共享缓冲区为只读
        readOnlyBuffer.flip();// 重设缓冲区
        System.out.println("缓冲区中的内容:");
        while (readOnlyBuffer.hasRemaining()) {
            System.out.print(readOnlyBuffer.get() + "\t");
        }
        readOnlyBuffer.put(-1);// 不能像只读缓冲区中添加内容!【运行时异常】
    }

}
直接缓冲区
如果创建了直接缓冲区,则JVM就会尽最大努力进行本机的IO操作。ByteBuffer.allocateDirect(capacity);
import java.nio.ByteBuffer;

public class DirectBufferDemo {

    public static void main(String[] args) {
        ByteBuffer directBuffer = ByteBuffer.allocateDirect(10);// 创建10个大小的直接缓冲区
        byte[] temp = { 1, 3, 5, 7, 9 };
        directBuffer.put(temp);
        directBuffer.flip();// 重设缓冲区

        System.out.println("缓冲区中的内容:");
        while (directBuffer.hasRemaining()) {
            System.out.print(directBuffer.get() + "\t");
        }
    }

}
以上的程序和创建普通的缓冲区在输出上没有任何区别,仅仅是JVM为了提高性能调用了底层的IO。
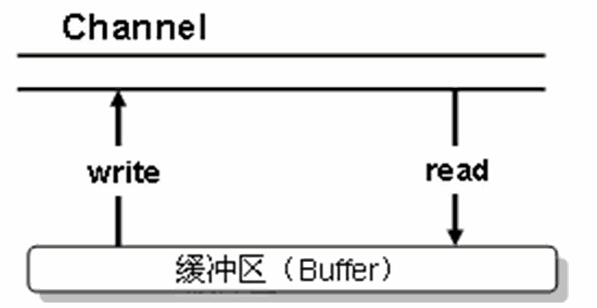
通道(Channel)
java.nio.channels接口。在新IO中,通道是一种用来读取和写入数据的一种形式。类似于之前的输入/输出流,但是程序是不会直接操作通道的,所有的内容都是先读到或者写入到缓冲区之中,再通过缓冲区进行读取或者写入。通道与传统的IO流的不同之处在于——通道本身是可以双向操作的【可以同时完成输入输出】。
使用FileChannel完成文件的双向操作
以FileInputStream和FileOutputStream为例,这两个类都是支持通道操作的。例如将字符串写入到文件:
import java.io.FileOutputStream;
import java.io.IOException;
import java.nio.ByteBuffer;
import java.nio.channels.FileChannel;

public class FileChannelDemo01 {

    public static void main(String[] args) throws IOException {
        String[] info = { "php", "www.imooc.com", "https://www.baidu.com",
                "你好好么!~" };
        FileOutputStream fos = new FileOutputStream("out.txt");

        FileChannel fout = fos.getChannel();// 得到FileChannel对象
        ByteBuffer buffer = ByteBuffer.allocateDirect(1024);// 创建缓冲区

        // 向缓冲区中写入数据
        for (int i = 0; i < info.length; i++) {
            buffer.put(info[i].getBytes());// 字符串变为字节数组放入缓冲区中
        }
        buffer.flip();
        fout.write(buffer);// 一次将缓冲区中的内容输出

        fout.close();
        fos.close();
    }

}
复制文件(读取note_in.txt写入note_out.txt)
import java.io.FileInputStream;
import java.io.FileOutputStream;
import java.io.IOException;
import java.nio.ByteBuffer;
import java.nio.channels.FileChannel;

public class FileChannelDemo02 {

    public static void main(String[] args) throws IOException {
        FileInputStream fis = new FileInputStream("note_in.txt");
        FileOutputStream fos = new FileOutputStream("note_out.txt");

        FileChannel fin = fis.getChannel();// 得到输入的通道
        FileChannel fout = fos.getChannel();// 得到输出的通道

        ByteBuffer buffer = ByteBuffer.allocateDirect(1024);// 使用缓冲区操作

        /* 从输入通道中不断读取内容到缓冲区,再将缓冲区中的内容不断写入到输出通道 */
        int temp = 0;
        while ((temp = fin.read(buffer)) != -1) {
            buffer.flip();
            fout.write(buffer);
            buffer.clear();// 清空缓冲区,所有状态变量的位置恢复原点,否则缓冲区最终会溢出
        }

        //复制文件直接使用管道之间的连接操作效率是最高的,连接两个通道从fin通道中读取,写入fout通道
        fin.transferTo(0, fin.size(), fout);
        //连接两个通道从fin通道中读取,写入fout通道
        fout.close();
        fin.close();
        fos.close();
        fis.close();
    }

}
内存映射(MappedByteBuffer)——只适合读操作
内存映射可以将文件映射到内存之中。这样文件中的数据就可以用内存中的指令来访问(而不是使用InputStream和OutputStream来完成)——性能最高的。
实际上我们已经学习了以下几种文件的读入方式:
- RandomAccessFile:较慢
- FileInputStream:较慢
- 缓冲读取:较快
- 内存映射:最快
需要将输入的操作流绑定在内存映射上。FileChannel类有3种内存映射模式:
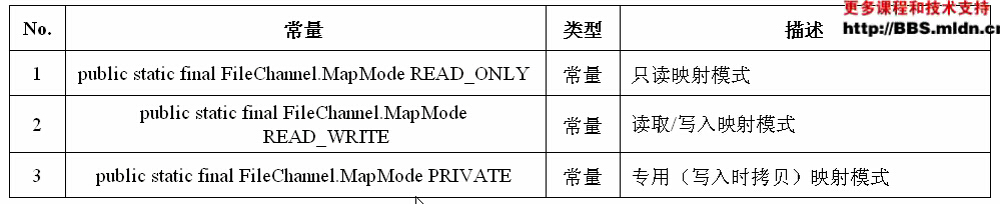
读取文件中的内容打印到标准输出
import java.io.File;
import java.io.FileInputStream;
import java.io.IOException;
import java.nio.MappedByteBuffer;
import java.nio.channels.FileChannel;

public class MappedByteBufferDemo {

    public static void main(String[] args) throws IOException {
        File file = new File("info.txt");
        FileChannel fin = new FileInputStream(file).getChannel();// 得到输入的通道
        MappedByteBuffer mbb = fin.map(FileChannel.MapMode.READ_ONLY, 0,
                file.length());// 将文件映射到内存

        byte[] data = new byte[(int) file.length()];// 开辟空间,接受内容
        int foot = 0;// 角标
        while (mbb.hasRemaining()) {
            data[foot++] = mbb.get();// 读取数据到字节数组
        }
        System.out.println(new String(data));// 输出字节数组中的内容

        fin.close();
    }

}
特别注意:执行写入操作的时候可能是非常危险的,因为仅仅改变数组中的单个元素就可以修改磁盘文件。——内存的修改相当于文件本省的修改。
文件锁
FileLock类需要依赖于FileChannel类进行实例化操作。
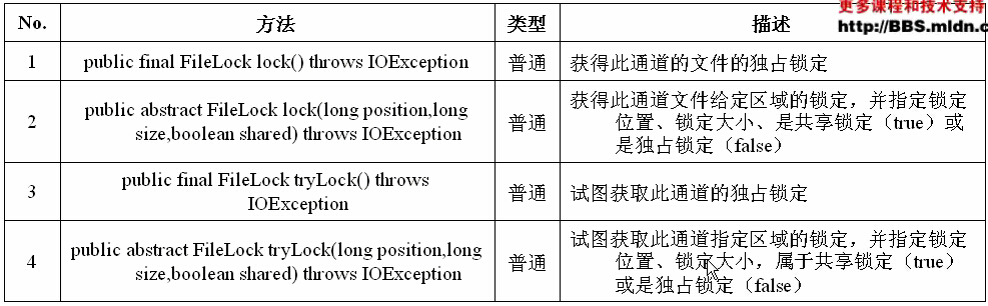
锁的方式:
- 共享锁:允许多个线程进行文件的读取操作。
- 独占锁:只允许一个线程进行文件的读写。
import java.io.File;
import java.io.FileOutputStream;
import java.io.IOException;
import java.nio.channels.FileChannel;
import java.nio.channels.FileLock;

public class FileLockDemo {

    public static void main(String[] args) throws IOException,
            InterruptedException {
        File file = new File("info.txt");
        FileChannel fout = new FileOutputStream(file,true).getChannel();// 得到通道
        FileLock lock = fout.tryLock();// 对此通道的文件进行独占锁定
        if (lock != null) {
            System.out.println("文件" + file.getName() + "锁定5s");
            Thread.sleep(5000);
            lock.release();// 释放锁
            System.out.println("文件" + file.getName() + "解除锁定");
        }
    }

}
字符集
在整个nio中,对于不同平台的编码操作,java都可以进行自动适应,因为可以使用字符集进行编码的转换操作。
Charset:在java中所有的信息都是以unicode进行编码的,java nio中提供了Charset类来处理编码问题,该类包含了创建编码器(CharsetEncoder)和创建解码器(CharsetDecoder)的操作。
获得本机的全部字符集
import java.nio.charset.Charset;
import java.util.Iterator;
import java.util.Map;
import java.util.Map.Entry;
import java.util.SortedMap;

public class GetAllCharsetDemo {

    public static void main(String[] args) {
        // 得到全部可用字符集
        SortedMap<String, Charset> allCharset = Charset.availableCharsets();
        Iterator<Entry<String, Charset>> iterator = allCharset.entrySet()
                .iterator();
        while (iterator.hasNext()) {
            Map.Entry<java.lang.String, java.nio.charset.Charset> entry = (Map.Entry<java.lang.String, java.nio.charset.Charset>) iterator
                    .next();
            System.out.println(entry.getKey() + "--->" + entry.getValue());
        }
    }

}
编码和解码操作
import java.nio.ByteBuffer;
import java.nio.CharBuffer;
import java.nio.charset.CharacterCodingException;
import java.nio.charset.Charset;
import java.nio.charset.CharsetDecoder;
import java.nio.charset.CharsetEncoder;

public class CharsetEndecoderAndDecoder {

    public static void main(String[] args) throws CharacterCodingException {
        Charset latinl = Charset.forName("iso-8859-1");// 不支持中文编码,抛出异常
        CharsetEncoder encoder = latinl.newEncoder();// 得到编码器
        CharsetDecoder decoder = latinl.newDecoder();// 得到解码器

        CharBuffer cb = CharBuffer.wrap("道生一,一生二,二生三,三生万物.Oh!".toCharArray());
        ByteBuffer buf = encoder.encode(cb);// 编码
        System.out.println(decoder.decode(buf));

    }

}
一般在读取文件的时候会按照指定的格式解码,之后将解码后的文件内容重新编码后输出。
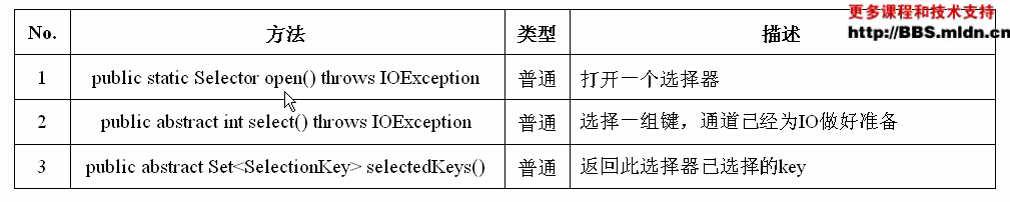
Selector——选择器
使用Selector可以构建异步的非阻塞的服务器。之前在Socket编程中,服务器必须阻塞监听等待客户端的连接,造成大量的资源浪费。在新IO的操作中主要是解决服务器端的通信性能的。【在新IO中实现网络程序需要依靠ServerSocketChannel和SocketChannel】。Selector类的常用3个方法。
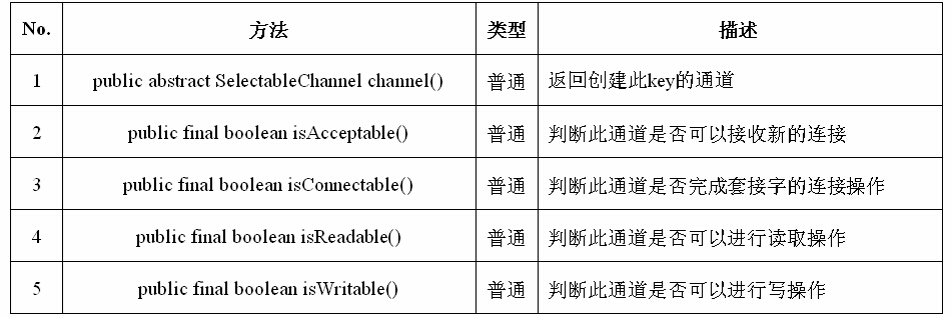
如果要使用服务器向客户端发送信息,需要使用SelectionKey类提供的方法判断服务器的操作状态,要想取得客户端的连接也需要使用SelectionKey类。
下面实现一个服务器,该服务器可以在多个端口进行监听,主要和功能是返回当前的时间。
import java.io.IOException;
import java.net.InetSocketAddress;
import java.net.ServerSocket;
import java.nio.ByteBuffer;
import java.nio.channels.SelectionKey;
import java.nio.channels.Selector;
import java.nio.channels.ServerSocketChannel;
import java.nio.channels.SocketChannel;
import java.util.Date;
import java.util.Iterator;
import java.util.Set;
public class TimeServer {
public static void main(String[] args) throws IOException {
int[] ports = { 8001, 8002, 8003, 8004, 8005, 8006, 8007, 8008 };// 8个监听端口
Selector selector = Selector.open();// 通过open()方法找到Selector
for (int i : ports) {
ServerSocketChannel initServer = ServerSocketChannel.open();// 打开服务器通道
initServer.configureBlocking(false);// 服务器配置为非阻塞
ServerSocket initSocket = initServer.socket();
InetSocketAddress address = new InetSocketAddress("localhost", i);// 实例化绑定地址
initSocket.bind(address);// 进行服务的绑定
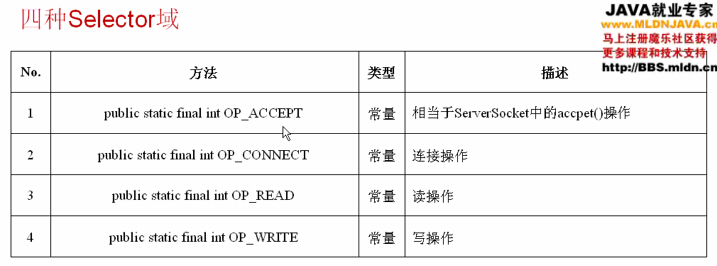
initServer.register(selector, SelectionKey.OP_ACCEPT);// 等待连接
System.out.println("服务器正常运行,在" + address.getAddress() + ":" + i
+ "端口监听。");
}
// 接收全部生成的Key,通过连接来判断是否取得客户端的输出
int keysAdd = 0;
while ((keysAdd = selector.select()) > 0) {// 选择一组键,并且响应的通道已经准备就绪
Set<SelectionKey> selectionKeys = selector.selectedKeys();// 取出全部生成的键
Iterator<SelectionKey> iterator = selectionKeys.iterator();
while (iterator.hasNext()) {
SelectionKey selectionKey = (SelectionKey) iterator.next();// 取出每一个key
if (selectionKey.isAcceptable()) {// 判断是否是连接状态
ServerSocketChannel server = (ServerSocketChannel) selectionKey
.channel();
SocketChannel client = server.accept();
client.configureBlocking(false);// 配置为非阻塞
ByteBuffer outBuf = ByteBuffer.allocateDirect(1024);
outBuf.put(("当前的时间是:" + new Date()).getBytes());
outBuf.flip();
client.write(outBuf);// 输出内容
client.close();
}
}
selectionKeys.clear();// 清除全部的key
}
}
}
客户端通过telnet登录服务器可以获得服务器的时间。


 827
827

 被折叠的 条评论
为什么被折叠?
被折叠的 条评论
为什么被折叠?
 到【灌水乐园】发言


