批量创建文件并自动按照编号命名
例如创建love1.txt、love2.txt、love3.txt……love20.txt。
# touch love{1..20}.txt
Linux常见通配符
| 字符 | 含义 |
|---|---|
| * | 匹配0个或者多个字符 |
| ? | 匹配任意一个字符 |
| [list] | 匹配list中的任意一个单一字符 |
| [!list] | 匹配 除list 中的任意单一字符以外的字符 |
| [c1-c2] | 匹配 c1-c2 中的任意单一字符 如:[0-9] [a-z] |
| {string1,string2,……} | 匹配 sring1 或 string2 (或更多)其一字符串 |
| {c1..c2} | 匹配 c1-c2 中全部字符 如{1..10} |
ManPage中的区段和说明
| 区段 | 说明 |
|---|---|
| 1 | 一般命令 |
| 2 | 系统调用 |
| 3 | 库函数,涵盖了C标准函数库 |
| 4 | 特殊文件(通常是/dev中的设备)和驱动程序 |
| 5 | 文件格式和约定 |
| 6 | 游戏和屏保 |
| 7 | 杂项 |
| 8 | 系统管理命令和守护进程 |
要查看相应区段的内容,就在man后面加上相应区段的数字即可,如:
man 3 printf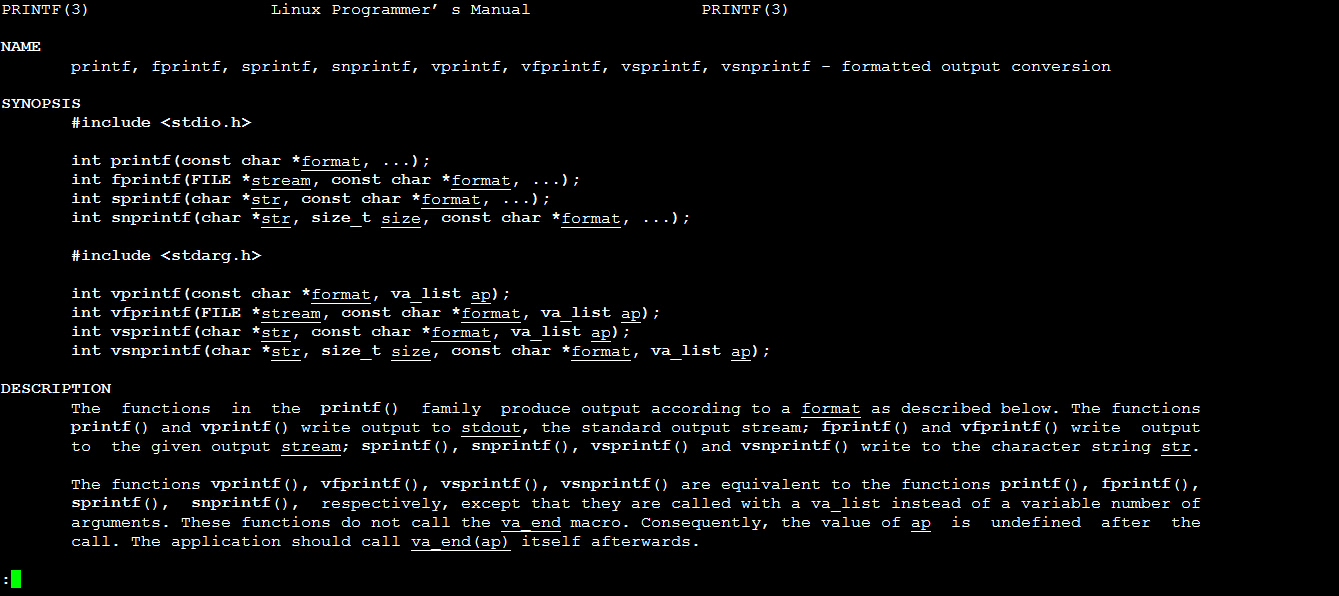
所有的手册页遵循一个常见的布局,其为通过简单的ASCII文本展示而优化,而这种情况下可能没有任何形式的高亮或字体控制。一般包括以下部分内容:
NAME(名称)
该命令或函数的名称,接着是一行简介。
SYNOPSIS(概要)
对于命令,正式的描述它如何运行,以及需要什么样的命令行参数。对于函数,介绍函数所需的参数,以及哪个头文件包含该函数的定义。
DESCRIPTION(说明)
命令或函数功能的文本描述。
EXAMPLES(示例)
常用的一些示例。
SEE ALSO(参见)
相关命令或函数的列表。
也可能存在其他部分内容,但这些部分没有得到跨手册页的标准化。常见的例子包括:OPTIONS(选项),EXIT STATUS(退出状态),ENVIRONMENT(环境),BUGS(程序漏洞),FILES(文件),AUTHOR(作者),REPORTING BUGS(已知漏洞),HISTORY(历史)和COPYRIGHT(版权)。
通常man手册中的内容很多,你可能不太容易找到你想要的结果,不过幸运的是你可以在man中使用搜索,/你要搜索的关键字,查找到后你可以使用n键切换到下一个关键字所在处,shift+n为上一个关键字所在处。使用Space(空格键)翻页,Enter(回车键)向下滚动一行,或者使用j,k(vim编辑器的移动键)进行向前向后滚动一行。按下h键为显示使用帮助(因为man使用less作为阅读器,实为less工具的帮助),按下q退出。
想要获得更详细的帮助,你还可以使用info命令,不过通常使用man就足够了。如果你知道某个命令的作用,只是想快速查看一些它的某个具体参数的作用,那么你可以使用--help参数,大部分命令都会带有这个参数,如:
# ls --help用户以及文件权限的管理
who am i命令
# who am i
从左至右依次是打开该终端的用户名(要查看当前登录用户的用户名,去掉空格直接使用whoami即可),第二列的pts/1中pts表示伪终端,所谓伪是相对于/dev/tty设备而言的,七个使用[Ctrl]+[Alt]+[F1]~[F7]进行切换的/dev/tty设备么,这是“真终端”,伪终端就是当你在图形用户界面使用/dev/tty7时每打开一个终端就会产生一个伪终端,pts/1后面那个数字就表示打开的伪终端序号。第三列则表示当前伪终端的启动时间。
真终端

who命令
-a 打印能打印的全部
-d 打印死掉的进程
-m 同am i,mom likes
-q 打印当前登录用户数及用户名
-u 打印当前登录用户登录信息
-r 打印运行等级
退出登录可以使用exit命令或者Ctrl+D
查看用户所属的组名
1.groups命令
# groups abc
其中冒号之前表示用户,后面表示该用户所属的用户组。
2.查看/etc/group文件
# cat /etc/group|grep -E "root|abc"
/etc/group文件的说明:
group_name:password:GID:user_list
其中password字段为一个’x’并不是说密码就是它,只是表示密码不可见而已。
将用户添加到特定的组中:
例如:将abc用户加入到root组中
# usermod -G root abc
删除用户:
userdel abc -r-r参数表示删除家目录和邮件池。
ls命令
-A 列出除了 . 及 .. 以外的任何项目
文件和目录管理
tree命令显示文件系统的目录结构
# tree /新建文件
1. 新建空白文件
使用touch命令创建空白文件,关于touch命令,其主要是来更改已有文件的时间戳的(比如,最近访问时间,最近修改时间),但其在不加任何参数的情况下,只指定一个文件名,则可以创建一个为指定文件名的空白文件(不会覆盖已有同名文件),当然你也可以同时指定该文件的时间戳。
2. 创建目录
使用-p参数,同时创建父目录(如果不存在该父目录),如下我们同时创建一个多级目录(这在有时候安装软件,配置安装路径时非常有用)
# mkdir -p father/son/grandson
3. 目录的复制
# cp -r a b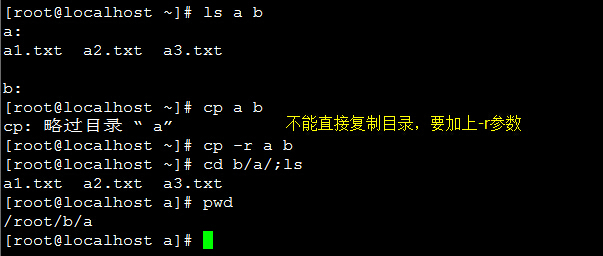
批量重命名
要实现批量重命名,mv命令就有点力不从心了,我们可以使用一个看起来更专业的命令rename来实现。不过它是要用perl正则表达式来作为参数。
# 现实用通配符批量创建5个文件
$ touch file{1..5}.txt
# 批量将这5个后缀为.txt的文本文件重命名为以.c为后缀的文件
$ rename 's/\.txt/\.c/' *.txt
# 批量将这5个文件,文件名改为大写
$ rename 'y/a-z/A-Z/' *.c
查看文件内容:
cat用于正序显示;tac用于逆序显示。常用-n参数来显示行号。但是使用nl命令就更加专家了!
file命令查看文件类型
# file /bin/ls 环境变量与文件查找
1. Shell变量
使用declare命令声明一个tmp变量:
root@ubuntu:~# declare tmp
root@ubuntu:~#
使用=号赋值运算符为变量tmp赋值为abc
root@ubuntu:~# tmp=abc
root@ubuntu:~# 读取变量的值,使用echo命令和$符号($符号用于表示引用一个变量的值,初学者经常会忘记输入)。
root@ubuntu:~# echo $tmp
abc
root@ubuntu:~#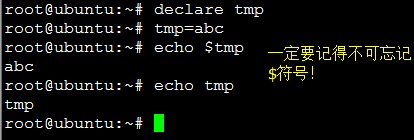
关于变量的命名规则和C语言一样:变量只能包含字母、数字、下划线,并且不能以数字开头!
2. 环境变量
环境变量就是作用域比自定义变量要大,如shell的环境变量作用于自身和它的子进程。在所有的Unix和类Unix系统中,每个进程都有其各自的环境变量设置,且默认情况下,当一个进程被创建时,处理创建过程中明确指定的话,它将继承其父进程的绝大部分环境设置。shell程序也作为一个进程运行在操作系统之上,而我们在shell中运行的大部分命令都将以shell的子进程的方式运行。
通常我们会涉及到的环境变量有三种:
- 当前shell进程私有用户自定义变量,如上面我们创建的tmp变量,只在当前shell中有效。
- shell本身内建的变量。
- 从自定义变量导出的环境变量。
也有三个与上述三种环境变量相关的命令,set,env,export。这三个命令很相似,都可以用于打印相关环境变量,区别在于涉及的是不同范围的环境变量,详见下表:
| 命令 | 说明 |
|---|---|
| set | 显示当前shell所有环境变量,包括其内建环境变量(与shell外观等相关),用户自定义变量及导出的环境变量 |
| env | 显示与当前用户相关的环境变量,还可以让命令在指定环境中运行 |
| export | 显示从shell中导出成环境变量的变量,也能通过它将自定义变量导出为环境变量 |

可以更直观的使用vimdiff工具比较一下它们之间的差别:
root@ubuntu:~# tmp=shiyanlou
root@ubuntu:~# export tmp_env=shiyanlou
root@ubuntu:~# env|sort>env.txt
root@ubuntu:~# export|sort>export.txt
root@ubuntu:~# set|sort>set.txt
上述操作将命令输出通过管道|使用sort命令排序,再重定向到对象文本文件中:
root@ubuntu:~# vimdiff env.txt export.txt set.txt 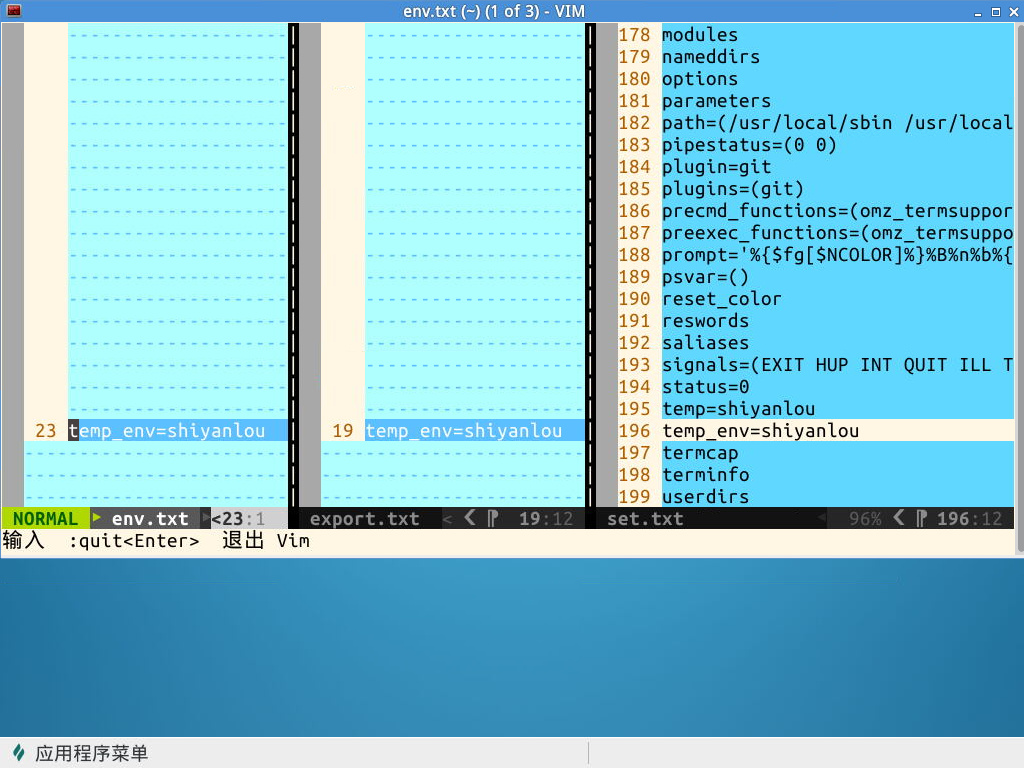
关于环境变量,可以简单的理解成在当前进程的子进程是否有效,有效则为环境变量,否则不是(有些人也将所有变量统称为环境变量,只是以全局环境变量和局部环境变量进行区分,我们只要理解它们的实质区别即可)。我们这里用export命令来体会一下,先在shell中设置一个变量temp=shiyanlou,然后再新创建一个子shell查看temp变量的值:

注意:为了与普通变量区分,通常我们习惯将环境变量名设为大写
3. 命令的查找路径与顺序
我们在shell中输入一个命令,shell是怎么知道在哪去找到这个命令然后执行的呢。这是通过环境变量PATH来进行搜索的,熟悉windows的用户可能知道windows中的也是有这么一个path环境变量。这个PATH里面就保存了shell中执行的命令的搜索路径。
root@ubuntu:~# echo $PATH默认情况下会看到以下输出:
/usr/local/sbin:/usr/local/bin:/usr/sbin:/usr/bin:/sbin:/bin:/usr/games4. 添加 自定义环境变量
例如在/root/mybin目录下有一个hello的可执行程序,如果我们需要在其他的地方也能够执行这个命令就需要将/root/mybin目录加入到环境变量。
root@ubuntu:~# PATH=$PATH:/root/mybin/
root@ubuntu:~# hello
Hello World!
注意这里一定要使用绝对路径。这样还并没有很好的解决问题,因为我给PATH环境变量追加了一个路径,它也只是在当前shell有效,我一旦退出终端,再打开就会发现又失效了。有没有方法让添加的环境变量全局有效又或者每次启动shell时自动执行上面添加自定义路径到PATH的命令了。
编辑/etc/environment文件加入自定义目录并执行source /etc/environment(使立即生效,该命令也可以使用. /代替【圆点和斜杠之间有一个空格】)
root@ubuntu:~# vim /etc/environment
root@ubuntu:~# source /etc/environment
变量修改:
| 变量设置方式 | 说明 |
|---|---|
| ${变量名#匹配字串} | 从头向后开始匹配,删除符合匹配字串的最短数据 |
| ${变量名##匹配字串} | 从头向后开始匹配,删除符合匹配字串的最长数据 |
| ${变量名%匹配字串} | 从尾向前开始匹配,删除符合匹配字串的最短数据 |
| ${变量名%%匹配字串} | 从尾向前开始匹配,删除符合匹配字串的最长数据 |
| ${变量名/旧的字串/新的字串} | 将符合旧字串的第一个字串替换为新的字串 |
| ${变量名//旧的字串/新的字串} | 将符合旧字串的全部字串替换为新的字串 |
root@ubuntu:~# echo $path
/usr/local/sbin:/usr/local/bin:/usr/sbin:/usr/bin:/sbin:/bin:/usr/games:/root/mybin
root@ubuntu:~# path=${path%/root/mybin}
root@ubuntu:~# echo $path
/usr/local/sbin:/usr/local/bin:/usr/sbin:/usr/bin:/sbin:/bin:/usr/games:
root@ubuntu:~#
删除环境变量:
root@ubuntu:~# unset tmp5. 文件查找
root@ubuntu:~# whereis who
who: /usr/bin/who /usr/share/man/man1/who.1.gz
root@ubuntu:~#
查找/etc目录下所有以sh开头的文件
root@ubuntu:~# #更新数据库
root@ubuntu:~# updatedb
root@ubuntu:~# locate /etc/sh
/etc/shadow
/etc/shadow-
/etc/shells
root@ubuntu:~#
查找/usr/share/下所有jpg文件:
root@ubuntu:~# locate /usr/share/*.jpg
/usr/share/cups/doc-root/images/smiley.jpg
/usr/share/doc/libsane/umax/sane-logo.jpg
/usr/share/doc/libsane/umax/sane-umax-advanced.jpg
/usr/share/doc/libsane/umax/sane-umax-histogram.jpg
/usr/share/doc/libsane/umax/sane-umax-standard.jpg
/usr/share/doc/libsane/umax/sane-umax-text.jpg
/usr/share/doc/libsane/umax/sane-umax-text2.jpg
/usr/share/doc/libsane/umax/sane-umax-text4.jpg
/usr/share/doc/libsane/umax/sane-umax.jpg
/usr/share/tomcat6-examples/examples/jsp/jsp2/jspx/textRotate.jpg
root@ubuntu:~# root@ubuntu:~# which ls
/bin/ls
root@ubuntu:~# 在指定目录下搜索指定文件:
root@ubuntu:~# find /etc/ -name passwd
/etc/cron.daily/passwd
/etc/init.d/passwd
/etc/pam.d/passwd
/etc/passwd
root@ubuntu:~#
注意find命令的路径是作为第一个参数的, 基本命令格式为 find [path] [option] [action]
与时间相关的参数:
-atime 最后访问时间
-ctime 创建时间
-mtime 最后修改时间
列出home目录中,当天(24小时之内)有改动的文件:
root@ubuntu:~# find ~ -mtime 0
/root
/root/.bashrc
/root/hello.c
/root/mybin
/root/mybin/hello
/root/env.txt
/root/.viminfo
/root/set.txt
/root/.bash_history
/root/export.txt
root@ubuntu:~#
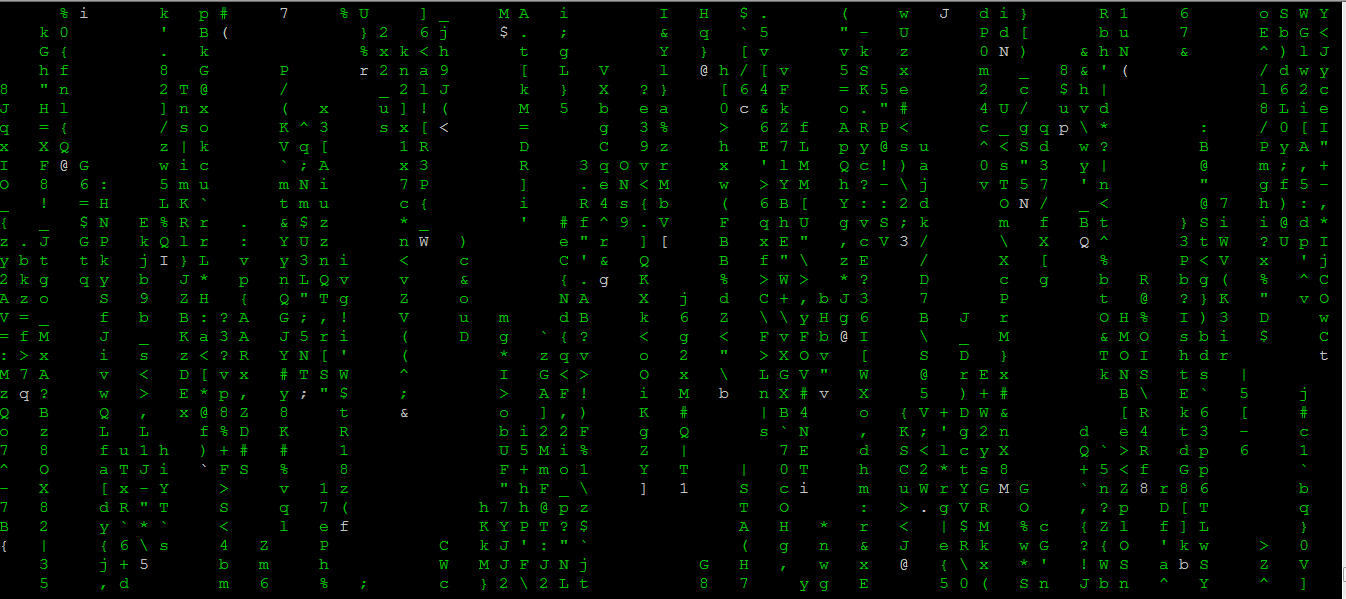
Linux实现黑客帝国数字雨:
sudo apt-get update;sudo apt-get install cmatrixroot@ubuntu:~# sudo apt-get install libaa-bin
root@ubuntu:~# aafire
彩色的版本:
root@ubuntu:~# apt-get install caca-utils
root@ubuntu:~# cacademo
root@ubuntu:~# cacafire
root@ubuntu:~# cacaview <pic_file>
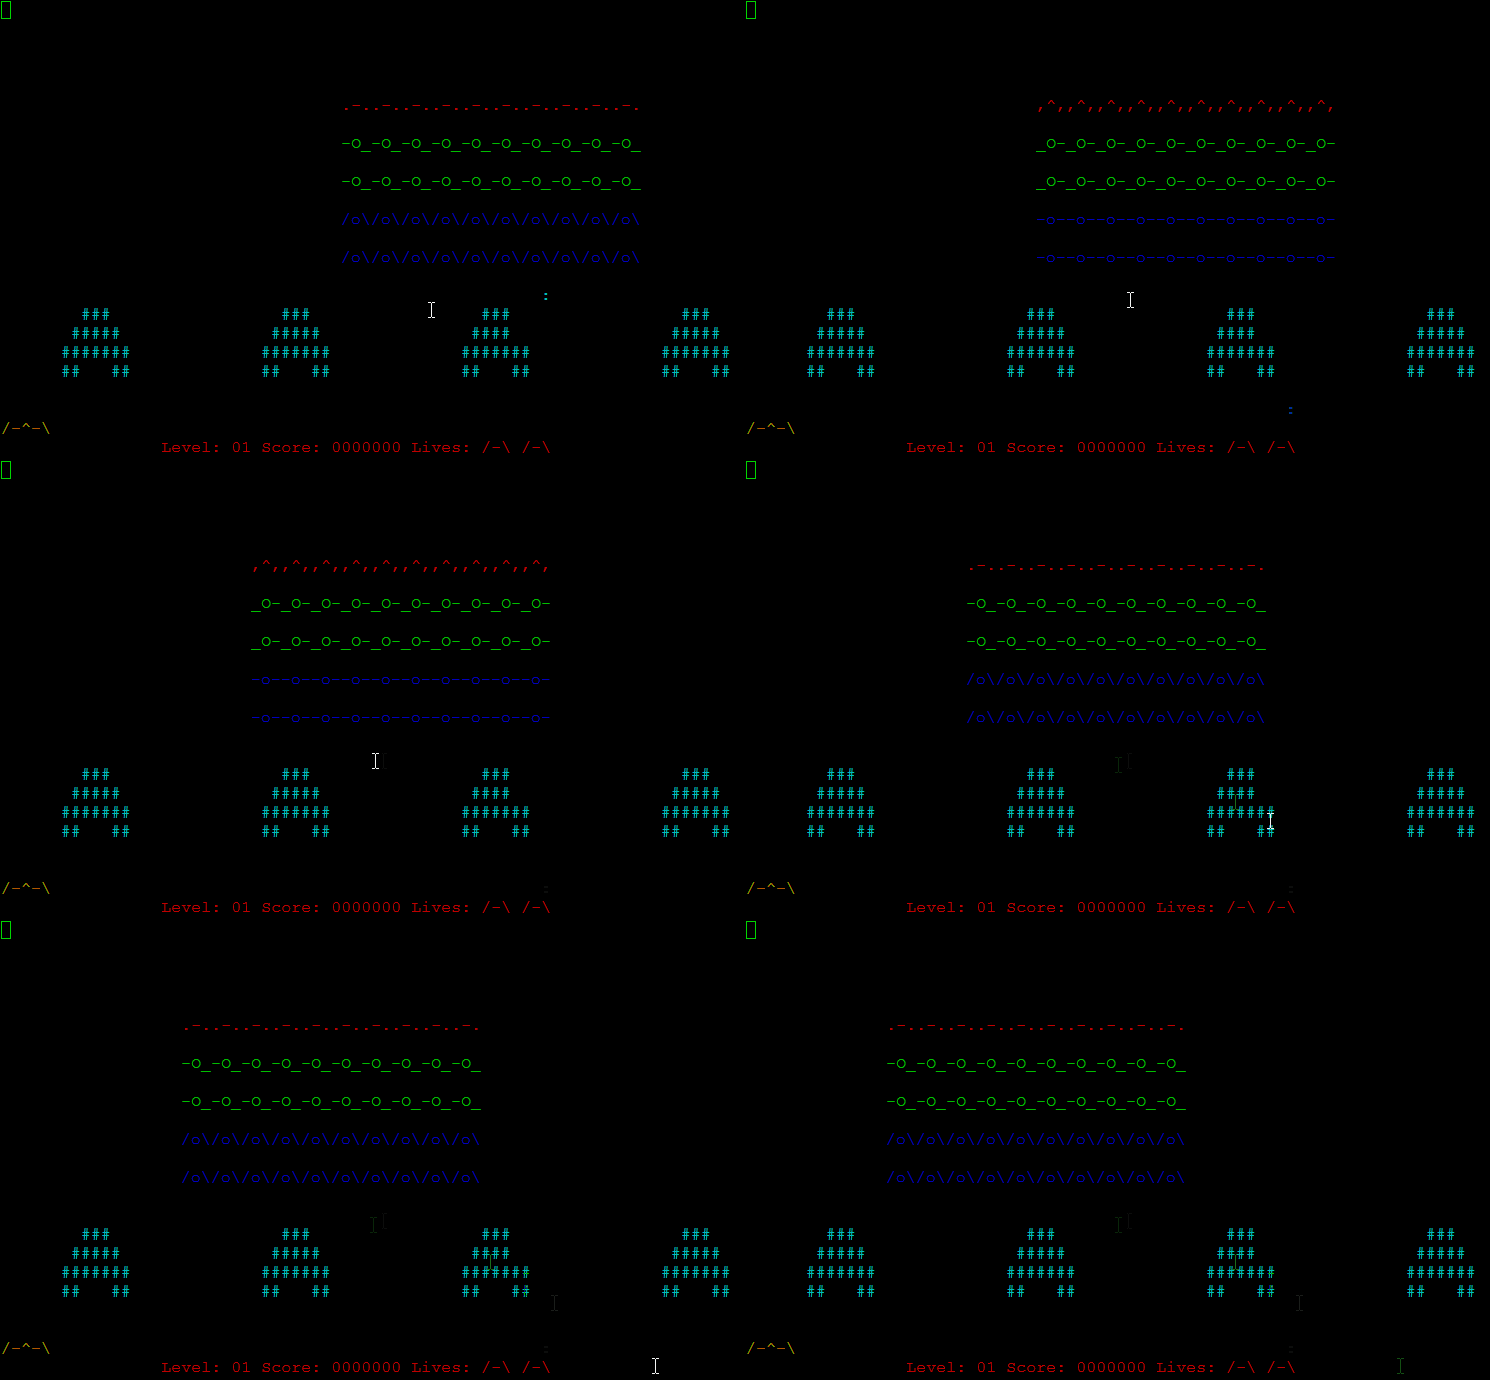
小蜜蜂游戏:
root@ubuntu:~# apt-get install ninvaders
root@ubuntu:~# ninvaders
文件打包和压缩
常见的压缩格式
| 文件后缀名 | 说明 |
|---|---|
| *.zip | zip程序打包压缩的文件 |
| *.rar | rar程序压缩的文件 |
| *.7z | bzip2程序压缩的文件 |
| *.tar | tar程序打包,未压缩的文件 |
| *.gz | gzip程序(GNU zip)压缩的文件 |
| *.xz | xz程序压缩的文件 |
| *.bz2 | bzip2程序压缩的文件 |
| *.tar.gz | tar打包,gzip程序压缩的文件 |
| *.tar.xz | tar打包,xz程序压缩的文件 |
| *tar.bz2 | tar打包,bzip2程序压缩的文件 |
| *.tar.7z | tar打包,7z程序压缩的文件 |
1. zip打包压缩命令
root@ubuntu:~# sudo apt-get install zip
root@ubuntu:~# zip -rqo root.zip ~
root@ubuntu:~# du -h root.zip
52K root.zip
root@ubuntu:~#
上述命令将/root目录打包成一个文件,并查看了打包后文件的大小和类型。-r参数表示递归打包包含子目录的全部内容,-q参数表示为安静模式,即不向屏幕输出信息,-o,表示输出文件,需在其后紧跟打包输出文件名。后面使用du命令查看打包后文件的大小。
设置压缩级别为9和1(9最大,1最小),重新打包
root@ubuntu:~# zip -r -9 -qo root_9.zip ~ -x ~/*.zip
root@ubuntu:~# zip -r -1 -qo root_1.zip ~ -x ~/*.zip
最后那个-x是为了排除我们上一次创建的zip文件,否则又会被打包进这一次的压缩文件中,不过注意:这里只能使用绝对路径,否则不起作用。
然后我们再用du命令分别查看默认压缩级别、最低、最高压缩级别及未压缩的文件的大小
root@ubuntu:~# du -h -d 0 *.zip ~ | sort
280K    /root
52K root.zip
52K root_9.zip
60K root_1.zip
root@ubuntu:~#
创建加密zip文件使用-e参数:
root@ubuntu:~# zip -erqo root_encryption.zip ~
Enter password:
Verify password:
root@ubuntu:~#
注意: 关于zip命令,还有一点希望你注意,因为windows系统与Linux/Unix在文本文件格式上的一些兼容问题,比如换行符(为不可见字符),在windows为CR+LF(Carriage-Return+Line-Feed:回车加换行),而在Linux/Unix上为LF(换行),所以如果在不加处理的情况下,在linux上编辑的文本,在windows系统上打开可能看起来是没有换行的。如果你想让你在linux创建的zip压缩文件在windows上解压后没有任何问题,使用-l参数。
2. 使用unzip加压zip文件
将root.zip解压到当前目录:
root@ubuntu:~# unzip root.zip
Archive:  root.zip
   creating: root/
  inflating: root/.bashrc
   creating: root/.cache/
 extracting: root/.cache/motd.legal-displayed
   creating: root/.ssh/
  inflating: root/.ssh/id_rsa.pub
  inflating: root/.ssh/id_rsa
 extracting: root/hello.c
 extracting: root/a12
  inflating: root/.profile
 extracting: root/a1
   creating: root/mybin/
  inflating: root/mybin/hello
  inflating: root/env.txt
  inflating: root/.viminfo
  inflating: root/set.txt
  inflating: root/.bash_history
   creating: root/.aptitude/
 extracting: root/.aptitude/config
 extracting: root/a
   creating: root/.vim/
  inflating: root/.vim/.netrwhist
  inflating: root/export.txt
 extracting: root/a.txt
 extracting: root/b.txt
root@ubuntu:~#
使用安静模式,将文件解压到指定目录
root@ubuntu:~# unzip -q root.zip -d ziptest
root@ubuntu:~# cd ziptest/;ls
root
root@ubuntu:~/ziptest# ls root/
a  a.txt  a1  a12  b.txt  env.txt  export.txt  hello.c  mybin  set.txt
root@ubuntu:~/ziptest#
如果你不想解压只想查看压缩包的内容你可以使用-l参数:
root@ubuntu:~# unzip -l root.zip
Archive:  root.zip
  Length      Date    Time    Name
---------  ---------- -----   ----
        0  2015-03-09 17:33   root/
     3107  2015-03-09 16:17   root/.bashrc
        0  2014-10-30 12:17   root/.cache/
        0  2014-10-30 12:17   root/.cache/motd.legal-displayed
        0  2014-11-10 18:22   root/.ssh/
      393  2014-11-10 18:22   root/.ssh/id_rsa.pub
     1675  2014-11-10 18:22   root/.ssh/id_rsa
       75  2015-03-09 15:59   root/hello.c
        0  2014-11-10 01:05   root/a12
      140  2012-04-19 17:15   root/.profile
        0  2014-11-10 01:05   root/a1
        0  2015-03-09 15:59   root/mybin/
     7159  2015-03-09 15:59   root/mybin/hello
     1961  2015-03-09 15:30   root/env.txt
     5942  2015-03-09 16:40   root/.viminfo
   198222  2015-03-09 15:31   root/set.txt
     3339  2015-03-09 17:26   root/.bash_history
        0  2014-10-26 08:05   root/.aptitude/
        0  2014-10-26 08:05   root/.aptitude/config
        0  2014-11-10 01:05   root/a
        0  2014-12-20 22:02   root/.vim/
       99  2014-12-20 22:02   root/.vim/.netrwhist
     2328  2015-03-09 15:30   root/export.txt
        6  2014-11-10 01:55   root/a.txt
        6  2014-11-10 01:56   root/b.txt
---------                     -------
   224452                     25 files
root@ubuntu:~# 注意: 使用unzip解压文件时我们同样应该注意兼容问题,不过这里我们关心的不再是上面的问题,而是中文编码的问题,通常windows系统上面创建的压缩文件,如果有有包含中文的文档或以中文作为文件名的文件时默认会采用GBK或其它编码,而linux上面默认使用的是UTF-8编码,如果不加任何处理,直接解压的话可能会出现中文乱码的问题(有时候它会自动帮你处理),为了解决这个问题,我们可以在解压时指定编码类型。
root@ubuntu:~# unzip -O GBK 中文压缩文件.zip使用-O(英文字母,大写o)参数指定编码类型
3. rar打包压缩命令
安装rar工具
root@ubuntu:~# sudo apt-get install rar unrar从指定文件或目录创建压缩包或添加文件到压缩包
root@ubuntu:~# ls
a  a.txt  a1  a12  b.txt  env.txt  export.txt  hello.c  mybin  set.txt  ziptest
root@ubuntu:~# rar a root.rar .

RAR 4.20   Copyright (c) 1993-2012 Alexander Roshal   9 Jun 2012
Trial version             Type RAR -? for help

Evaluation copy. Please register.

Creating archive root.rar

Adding    ./.bashrc                                                   OK
Adding    ./hello.c                                                   OK
Adding    ./a12                                                       OK
Adding    ./.profile                                                  OK
Adding    ./a1                                                        OK
Adding    ./env.txt                                                   OK
Adding    ./.viminfo                                                  OK
Adding    ./set.txt                                                   OK
Adding    ./.bash_history                                             OK
Adding    ./a                                                         OK
Adding    ./export.txt                                                OK
Adding    ./a.txt                                                     OK
Adding    ./b.txt                                                     OK
Done
root@ubuntu:~# 上面的命令使用a参数添加一个目录~到一个归档文件中,如果该文件不存在就会自动创建。注意:rar的命令参数没有-,如果加上会报错。
查看而不解压包(l参数):
root@ubuntu:~# rar l root.rar

RAR 4.20   Copyright (c) 1993-2012 Alexander Roshal   9 Jun 2012
Trial version             Type RAR -? for help

Archive root.rar

 Name             Size   Packed Ratio  Date   Time     Attr      CRC   Meth Ver
-------------------------------------------------------------------------------
 .bashrc          3107     1458  46% 09-03-15 16:17 -rw-r--r-- 8739D947 m3c 2.9
 hello.c            75       85 113% 09-03-15 15:59 -rw-r--r-- 81B79215 m3c 2.9
 a12                 0        8   0% 10-11-14 01:05 -rw-r--r-- 00000000 m3c 2.9
 .profile          140      124  88% 19-04-12 17:15 -rw-r--r-- 28580804 m3c 2.9
 a1                  0        8   0% 10-11-14 01:05 -rw-r--r-- 00000000 m3c 2.9
 env.txt          1961      770  39% 09-03-15 15:30 -rw-r--r-- 41D69BBA m3c 2.9
 .viminfo         5942     1116  18% 09-03-15 16:40 -rw------- 84591984 m3c 2.9
 set.txt        198222    33591  16% 09-03-15 15:31 -rw-r--r-- B86F03B0 m3c 2.9
 .bash_history     3856     1394  36% 09-03-15 18:10 -rw------- F76B2F17 m3c 2.9
 a                   0        8   0% 10-11-14 01:05 -rw-r--r-- 00000000 m3c 2.9
 export.txt       2328      805  34% 09-03-15 15:30 -rw-r--r-- 313F2196 m3c 2.9
 a.txt               6       17 283% 10-11-14 01:55 -rw-r--r-- 31963516 m3c 2.9
 b.txt               6       17 283% 10-11-14 01:56 -rw-r--r-- DD3861A8 m3c 2.9
-------------------------------------------------------------------------------
   13           215643    39401  18%

root@ubuntu:~#
解压rar文件:
解压到当前目录
root@ubuntu:~# unrar x root.rar

UNRAR 4.00 beta 3 freeware      Copyright (c) 1993-2010 Alexander Roshal


Extracting from root.rar


.bashrc already exists. Overwrite it ?
[Y]es, [N]o, [A]ll, n[E]ver, [R]ename, [Q]uit A

Extracting  .bashrc                                                   OK
Extracting  hello.c                                                   OK
Extracting  a12                                                       OK
Extracting  .profile                                                  OK
Extracting  a1                                                        OK
Extracting  env.txt                                                   OK
Extracting  .viminfo                                                  OK
Extracting  set.txt                                                   OK
Extracting  .bash_history                                             OK
Extracting  a                                                         OK
Extracting  export.txt                                                OK
Extracting  a.txt                                                     OK
Extracting  b.txt                                                     OK
All OK
root@ubuntu:~#
解压到指定目录:
root@ubuntu:~# mkdir tmp;unrar e root.rar tmp

UNRAR 4.00 beta 3 freeware      Copyright (c) 1993-2010 Alexander Roshal


Extracting from root.rar

Extracting  tmp/.bashrc                                               OK
Extracting  tmp/hello.c                                               OK
Extracting  tmp/a12                                                   OK
Extracting  tmp/.profile                                              OK
Extracting  tmp/a1                                                    OK
Extracting  tmp/env.txt                                               OK
Extracting  tmp/.viminfo                                              OK
Extracting  tmp/set.txt                                               OK
Extracting  tmp/.bash_history                                         OK
Extracting  tmp/a                                                     OK
Extracting  tmp/export.txt                                            OK
Extracting  tmp/a.txt                                                 OK
Extracting  tmp/b.txt                                                 OK
All OK
root@ubuntu:~# ls tmp
a  a.txt  a1  a12  b.txt  env.txt  export.txt  hello.c  set.txt
rar命令参数非常多,不过它在linux下面真心不好用啊,所以上面只涉及了一些基本操作。
- tar打包工具
tar原本只是一个打包工具,只是同时还是实现了对7z,gzip,xz,bzip2等工具的支持,这些个压缩工具本身只能实现对文件或目录(单独压缩目录中的文件)的压缩,没有实现对文件的打包压缩,所以我们也无需再单独去学习其他几个工具掌握一个tar就好,而且tar的解压和压缩都是同一个命令,只需参数不同而已,就比较方便使用。
不进行压缩只是进行打包(创建归档文件)和解包的操作。
- 创建一个tar包(归档文件)
root@ubuntu:/# tar -cf root.tar ~
tar: Removing leading `/' from member names
root@ubuntu:/# ls
bin   dev  home        lib         media  opt   root      run   selinux  sys  usr  vmlinuz
boot  etc  initrd.img  lost+found  mnt    proc  root.tar  sbin  srv      tmp  var
-c表示创建一个tar包文件,-f用于指定创建的文件名,注意文件名必须紧跟在-f参数之后,比如不能写成tar -fc shiyanlou.tar,可以写成tar -f shiyanlou.tar -c ~。你还可以加上-v参数以可视的的方式输出打包的文件。上面会自动去掉表示绝对路径的/,你也可以使用-P保留绝对路径符。
将包解到指定目录(-x和-C参数):
root@ubuntu:~# mkdir tmp;tar -xvf root.tar -C tmp
root/
root/.bashrc
root/.cache/
root/.cache/motd.legal-displayed
root/ziptest/
root/ziptest/root/
root/ziptest/root/.bashrc
root/ziptest/root/.cache/
root/ziptest/root/.cache/motd.legal-displayed
root/ziptest/root/.ssh/
root/ziptest/root/.ssh/id_rsa.pub
root/ziptest/root/.ssh/id_rsa
root/ziptest/root/hello.c
root/ziptest/root/a12
root/ziptest/root/.profile
root/ziptest/root/a1
root/ziptest/root/mybin/
root/ziptest/root/mybin/hello
root/ziptest/root/env.txt
root/ziptest/root/.viminfo
root/ziptest/root/set.txt
root/ziptest/root/.bash_history
root/ziptest/root/.aptitude/
root/ziptest/root/.aptitude/config
root/ziptest/root/a
root/ziptest/root/.vim/
root/ziptest/root/.vim/.netrwhist
root/ziptest/root/export.txt
root/ziptest/root/a.txt
root/ziptest/root/b.txt
root/.ssh/
root/.ssh/id_rsa.pub
root/.ssh/id_rsa
root/hello.c
root/a12
root/.profile
root/a1
root/mybin/
root/mybin/hello
root/env.txt
root/.viminfo
root/set.txt
root/.bash_history
root/.aptitude/
root/.aptitude/config
root/a
root/.vim/
root/.vim/.netrwhist
root/tmp/
root/tmp/.bashrc
root/tmp/hello.c
root/tmp/a12
root/tmp/.profile
root/tmp/a1
root/tmp/env.txt
root/tmp/.viminfo
root/tmp/set.txt
root/tmp/.bash_history
root/tmp/a
root/tmp/export.txt
root/tmp/a.txt
root/tmp/b.txt
root/export.txt
root/a.txt
root/b.txt
root@ubuntu:~#
查看而不解包(-t参数):
root@ubuntu:~# tar -tf root.tar
root/
root/.bashrc
root/.cache/
root/.cache/motd.legal-displayed
root/ziptest/
root/ziptest/root/
root/ziptest/root/.bashrc
root/ziptest/root/.cache/
root/ziptest/root/.cache/motd.legal-displayed
root/ziptest/root/.ssh/
root/ziptest/root/.ssh/id_rsa.pub
root/ziptest/root/.ssh/id_rsa
root/ziptest/root/hello.c
root/ziptest/root/a12
root/ziptest/root/.profile
root/ziptest/root/a1
root/ziptest/root/mybin/
root/ziptest/root/mybin/hello
root/ziptest/root/env.txt
root/ziptest/root/.viminfo
root/ziptest/root/set.txt
root/ziptest/root/.bash_history
root/ziptest/root/.aptitude/
root/ziptest/root/.aptitude/config
root/ziptest/root/a
root/ziptest/root/.vim/
root/ziptest/root/.vim/.netrwhist
root/ziptest/root/export.txt
root/ziptest/root/a.txt
root/ziptest/root/b.txt
root/.ssh/
root/.ssh/id_rsa.pub
root/.ssh/id_rsa
root/hello.c
root/a12
root/.profile
root/a1
root/mybin/
root/mybin/hello
root/env.txt
root/.viminfo
root/set.txt
root/.bash_history
root/.aptitude/
root/.aptitude/config
root/a
root/.vim/
root/.vim/.netrwhist
root/tmp/
root/tmp/.bashrc
root/tmp/hello.c
root/tmp/a12
root/tmp/.profile
root/tmp/a1
root/tmp/env.txt
root/tmp/.viminfo
root/tmp/set.txt
root/tmp/.bash_history
root/tmp/a
root/tmp/export.txt
root/tmp/a.txt
root/tmp/b.txt
root/export.txt
root/a.txt
root/b.txt
root@ubuntu:~#
有时候我们使用tar备份文件当你在其他主机还原时希望保留文件的属性(-p参数)和备份链接指向的源文件而不是链接本身(-h参数)
root@ubuntu:~# tar -cphf etc.tar /etc/对于创建不同的压缩格式的文件,对于tar来说是相当简单的,你需要的也只是换一个参数而已,这里我就以使用gzip工具创建*.tar.gz文件为例来说明。
- 我们只需要在创建tar文件的基础上添加-z参数,使用gzip来压缩文件
root@ubuntu:~# tar -czf root.tar.gz ~- 解压*.tar.gz文件
root@ubuntu:~# tar -xzf root.tar.gz 现在我们要使用其他的压缩工具创建或解压相应文件只需要更改一个参数即可:
| 压缩文件格式 | 参数 |
|---|---|
| *.tar.gz | -z |
| *.tar.xz | -J |
| *tar.bz2 | -j |
文件系统操作
1.查看磁盘使用情况(df)
root@ubuntu:~# df
Filesystem     1K-blocks    Used Available Use% Mounted on
/dev/sda5       18587076 1700196  15919664  10% /
udev              288580       4    288576   1% /dev
tmpfs             118956     428    118528   1% /run
none                5120       0      5120   0% /run/lock
none              297388       0    297388   0% /run/shm
cgroup            297388       0    297388   0% /sys/fs/cgroup
root@ubuntu:~#
通常我们只关心第一行中的内容/dev/sda5【sd-串口硬盘,a第一块硬盘,5表示第5分区】。“1k-blocks”表示以磁盘块大小的方式显示容量,后面为相应的以块大小表示的已用和可用容量。
2.使用du命令查看文件的块的数量
默认同样以blocks的大小展示,加上-h参数,以更易读的方式展示。-d参数指定查看目录的深度。
root@ubuntu:~# #只查看一级目录的信息
root@ubuntu:~# du -hd 0 ~
2.9M    /root
root@ubuntu:~# #查看二级目录的信息
root@ubuntu:~# du -hd 1 ~
4.0K    /root/.cache
284K    /root/ziptest
12K     /root/.ssh
1.4M    /root/root
12K     /root/mybin
4.0K    /root/.aptitude
8.0K    /root/.vim
808K    /root/tmp
2.9M    /root
root@ubuntu:~#
简单的磁盘管理
创建虚拟磁盘(dd命令):
dd命令用于转换和复制文件,不过它的复制不同于cp。硬件的设备驱动(如硬盘)和特殊设备文件(如/dev/zero和/dev/random)都像普通文件一样,只要在各自的驱动程序中实现了对应的功能,dd也可以读取自和/或写入到这些文件。这样,dd也可以用在备份硬件的引导扇区、获取一定数量的随机数据或者空数据等任务中。dd程序也可以在复制时处理数据,例如转换字节序、或在ASCII与EBCDIC编码间互换。
dd的命令行语句与其他的Linux程序不同,因为它的命令行选项格式为选项=值,而不是更标准的–选项 值或-选项 值。dd默认从标准输入中读取,并写入到标准输出中,但可以用选项if(input file,输入文件)和of(output file,输出文件)来重定向。
bs(block size)用于指定块大小(缺省单位为Byte,也可为其指定如’K’,’M’,’G’等单位),count用于指定块数量。只读取总共10个字节的数据。
root@ubuntu:~# dd if=/dev/stdin of=/dev/stdout bs=10 count=1
hello
hello
0+1 records in
0+1 records out
6 bytes (6 B) copied, 2.72536 s, 0.0 kB/s
root@ubuntu:~# dd if=/dev/stdin of=test bs=10 count=1
hello
0+1 records in
0+1 records out
6 bytes (6 B) copied, 3.59807 s, 0.0 kB/s
root@ubuntu:~# cat test
hello
root@ubuntu:~# du -b test
6   test
root@ubuntu:~#
dd在拷贝的同时还可以实现数据转换,那下面就举一个简单的例子:将输出的英文字符转换为大写再写入文件。
root@ubuntu:~# dd if=/dev/stdin of=test bs=10 count=1 conv=ucase
welcome
0+1 records in
0+1 records out
8 bytes (8 B) copied, 3.61307 s, 0.0 kB/s
root@ubuntu:~# cat test
WELCOME
root@ubuntu:~#
使用dd命令创建虚拟镜像文件
1.从/dev/zero设备创建一个容量为256M的空文件
root@ubuntu:~# dd if=/dev/zero of=virtual.img bs=1M count=256
256+0 records in
256+0 records out
268435456 bytes (268 MB) copied, 5.43987 s, 49.3 MB/s
root@ubuntu:~# du -h virtual.img
257M    virtual.img
root@ubuntu:~#
2.然后我们要将这个文件格式化(写入文件系统)
使用mkfs命令格式化磁盘(我们这里是自己创建的虚拟磁盘镜像)
在命令行输入mkfs然后按下Tab键,你可以看到很多个以mkfs为前缀的命令,这些不同的后缀其实就是表示着不同的文件系统,可以用mkfs格式化成的文件系统。

使用下面的命令来将我们的虚拟磁盘镜像格式化为ext4文件系统:
root@ubuntu:~# mkfs.ext4 virtual.img 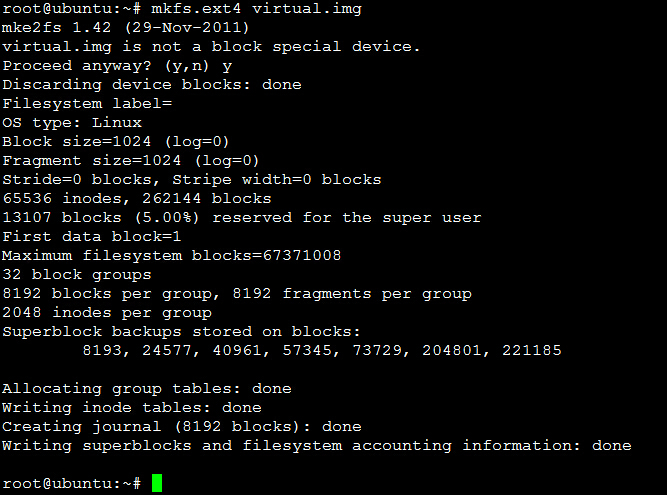
如果你想想知道linux支持哪些文件系统你可以输入
ls lib/modules/$(uname -r)/kernel/fs查看:
用户在Linux/Unix的机器上打开一个文件以前,包含该文件的文件系统必须先进行挂载的动作,此时用户要对该文件系统执行mount的指令以进行挂载。通常是使用在USB或其他可移除存储设备上,而根目录则需要始终保持挂载的状态。又因为Linux/Unix文件系统可以对应一个文件而不一定要是硬件设备,所以可以挂载一个包含文件系统的文件到目录树。
使用mount命令查看已经挂载的文件系统:
root@ubuntu:~# mount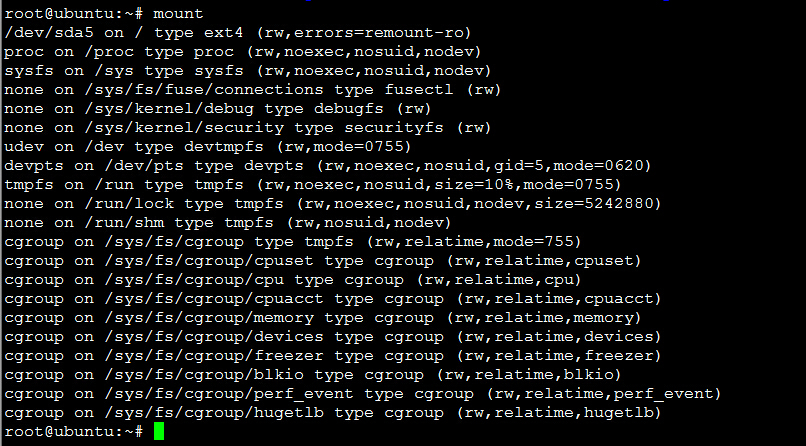
输出的结果中每一行表示一个设备或虚拟设备,每一行最前面是设备名,然后是on 后面是挂载点,type后面表示文件系统类型,再后面是挂载选项(比如可以在挂载时设定以只读方式挂载等等)。mount命令的一般格式如下:
mount [options] [source] [directory]常用操作:
mount [-o [操作选项]] [-t 文件系统类型] [-w|--rw|--ro] [文件系统源] [挂载点]例如挂载我们创建的虚拟磁盘镜像到/mnt目录(可以省略文件系统类型):
root@ubuntu:~# mount -o loop -t ext4 virtual.img /mnt/
root@ubuntu:~# umount /mnt/ #卸载已挂载的设备
root@ubuntu:~# mount -o loop --ro virtual.img /mnt/ #以read-only方式挂载/dev/loop设备的说明:在类Unix系统中,/dev/loop(或称vnd (vnode disk)、lofi(循环文件接口))是一种伪设备,这种设备使得文件可以如同块设备一般被访问。 在使用之前,循环设备必须与现存文件系统上的文件相关联。这种关联将提供给用户一个应用程序接口,接口将允许文件视为块特殊文件(参见设备文件系统)使用。因此,如果文件中包含一个完整的文件系统,那么这个文件就能如同磁盘设备一般被挂载。 这种设备文件经常被用于光盘或是磁盘镜像。通过循环挂载来挂载包含文件系统的文件,便使处在这个文件系统中的文件得以被访问。这些文件将出现在挂载点目录。如果挂载目录中本身有文件,这些文件在挂载后将被禁止使用。
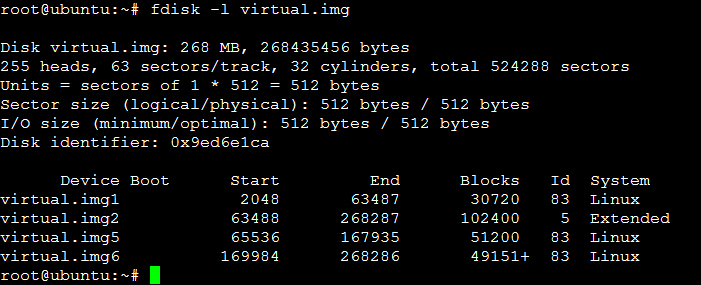
使用fdisk为磁盘分区
查看分区表信息:root@ubuntu:~# fdisk -l

进入磁盘分区模式:root@ubuntu:~# fdisk virtual.img
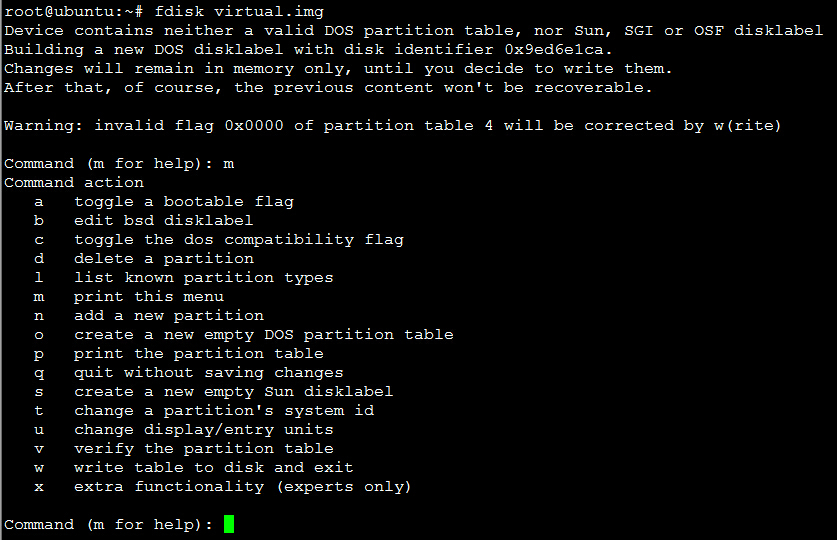
1. 输入 m 显示所有命令列示。
2. 输入 p 显示硬盘分割情形。
3. 输入 a 设定硬盘启动区。
4. 输入 n 设定新的硬盘分割区。
4.1. 输入 e 硬盘为[延伸]分割区(extend)。
4.2. 输入 p 硬盘为[主要]分割区(primary)。
5. 输入 t 改变硬盘分割区属性。
6. 输入 d 删除硬盘分割区属性。
7. 输入 q 结束不存入硬盘分割区属性。
8. 输入 w 结束并写入硬盘分割区属性。
使用losetup命令建立镜像与回环设备的关联
root@ubuntu:~# #如果提示设备忙你也可以使用其它的回环设备,"ls /dev/loop*"参看所有回环设备
root@ubuntu:~# losetup /dev/loop0 virtual.img
root@ubuntu:~# #解除回环设备
root@ubuntu:~# losetup -d /dev/loop0
命令的执行顺序和管道
我们使用which来查找是否安装某个命令,如果找到就执行该命令,否则什么也不做。
root@ubuntu:~# which cowsay>/dev/null && echo "cowsay 已安装!"你如果没有安装cowsay,你可以先执行一次上述命令,你会发现什么也没发生,你再安装好之后你再执行一次上述命令,你也会发现一些惊喜。
我们可以使用$?环境变量获取上一次命令的返回结果(0表示success)。||在这里就是与&&相反的控制效果,当上一条命令执行结果为≠0($?≠0)时则执行它后面的命令。
root@ubuntu:~#which cowsay>/dev/null || echo "cowsay 没有安装!"结合&&和||完成一些操作(注意顺序不可颠倒):
root@ubuntu:~# which cowsay>/dev/null && echo "已安装!"||echo "未安装!"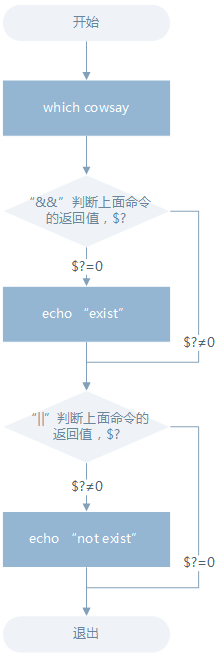
管道
管道是一种通信机制,它表现在前一个进程的输出是后一个进程的输入。管道又分为匿名管道和具名管道(这里将不会讨论在源程序中使用系统调用创建并使用管道的情况,它与命令行的管道在内核中实际都是采用相同的机制)。我们在使用一些过滤程序时经常会用到的就是匿名管道,在命令行中由|分隔符表示,|在前面的内容中我们已经多次使用到了。具名管道简单的说就是有名字的管道,通常只会在源程序中用到具名管道。
先感受一下管道的魅力,比如下面你想查看一下/etc目录下有哪些文件和目录,于是你使用ls命令来查看:
root@ubuntu:~# ll /etc你会发现一屏根本显示不玩,这时候你就只有选择使用滚动条或快捷键滚动窗口来查看了,不过这时候如果你会使用管道那情况就会不一样了,比如你可以这样:
root@ubuntu:~# ll /etc/|less打印/etc/passwd文件中以:为分隔符的第1个字段和第6个字段分别表示用户名和其家目录:
root@ubuntu:~# cut /etc/passwd -d ':' -f 1,6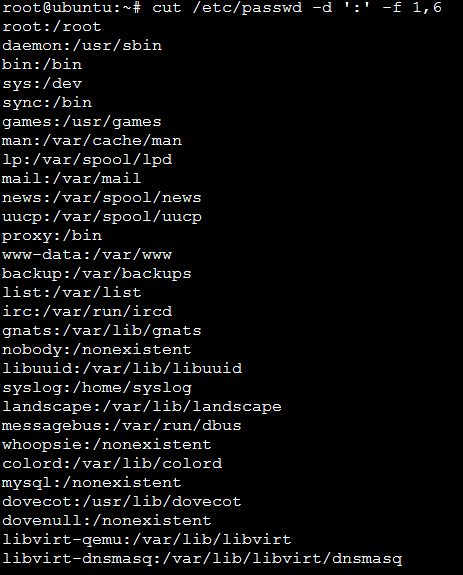
打印`/etc/passwd文件中每一行的前N个字符:
# 前五个(包含第五个)
$ cut /etc/passwd -c -5
# 前五个之后的(包含第五个)
$ cut /etc/passwd -c 5-
# 第五个
$ cut /etc/passwd -c 5
# 2到5之间的(包含第五个)
$ cut /etc/passwd -c 2-5
统计/etc目录下目录的个数:
root@ubuntu:~# ls -d /etc/*/|wc -l
114
root@ubuntu:~#
简单的文本处理
- tr
来删除一段文本信息中的某些文字。或者将其进行转换.
tr [option]...SET1 [SET2]| 选项 | 说明 |
|---|---|
| -d | 删除和set1匹配的字符,注意不是全词匹配也不是按字符顺序匹配 |
| -s | 去除set1指定的在输入文本中连续并重复的字符 |
# 删除 "hello shiyanlou" 中所有的'o','l','h'
$ echo 'hello shiyanlou' | tr -d 'olh'
# 将"hello" 中的ll,去重为一个l
$ echo 'hello' | tr -s 'l'
# 将输入文本,全部转换为大写或小写输出
$ cat /etc/passwd | tr '[:lower:]' '[:upper:]'
# 上面的'[:lower:]' '[:upper:]'你也可以简单的写作'[a-z]' '[A-Z]',当然反过来将大写变小写也是可以的
如换行符windows为CR+LF(\r\n),unix/linux为LF(\n),你使用cat -A 文本 你可以看到文本中包含的不可见特殊字符。linux的\n表现出来就是一个$,而windows/dos的表现为^M。可以使用dos2unix和unix2dos这两个工具,也可以使用下面的命令。
root@ubuntu:~# cat -A linux.txt
Hello$
root@ubuntu:~# tr '\n' '\r\n' < linux.txt > windows.txt
root@ubuntu:~# cat -A linux.txt windows.txt
Hello$
Hello^Mroot@ubuntu:~#- col
col命令可以将Tab换成对等数量的空格建,或反转这个操作。这用来格式化代码很爽啊。
root@ubuntu:~# col [option]| 选项 | 说明 |
|---|---|
| -x | 将Tab转换为空格 |
| -h | 将空格转换为Tab(默认选项) |
# 查看/etc/protocols中的不可见字符,可以看到很多^I,这其实就是Tab键转义成可见字符的符号
$ cat -A /etc/protocols
# 使用col -x将/etc/protocols中的Tab转换为空格,然后再使用cat查看,你发现^I不见了
$ cat /etc/protocols | col -x | cat -A
数据流重定向
文件描述符:文件描述符在形式上是一个非负整数。实际上,它是一个索引值,指向内核为每一个进程所维护的该进程打开文件的记录表。当程序打开一个现有文件或者创建一个新文件时,内核向进程返回一个文件描述符。在程序设计中,一些涉及底层的程序编写往往会围绕着文件描述符展开。但是文件描述符这一概念往往只适用于UNIX、Linux这样的操作系统。
使用tee命令同时重定向多个文件:
root@ubuntu:~# echo "hello"|tee file1 file2 file3
hello
root@ubuntu:~# cat file1 file2 file3
hello
hello
hello
root@ubuntu:~#
正则表达式
| 字符 | 描述 |
|---|---|
| \ | 将下一个字符标记为一个特殊字符、或一个原义字符。例如,“n”匹配字符“n”。“\n”匹配一个换行符。序列“\\”匹配“\”而“\(”则匹配“(”。 |
| ^ | 匹配输入字符串的开始位置。 |
| $ | 匹配输入字符串的结束位置。 |
| {n} | n是一个非负整数。匹配确定的n次。例如,“o{2}”不能匹配“Bob”中的“o”,但是能匹配“food”中的两个o。 |
| {n,} | n是一个非负整数。至少匹配n次。例如,“o{2,}”不能匹配“Bob”中的“o”,但能匹配“foooood”中的所有o。“o{1,}”等价于“o+”。“o{0,}”则等价于“o*”。 |
| {n,m} | m和n均为非负整数,其中n<=m。最少匹配n次且最多匹配m次。例如,“o{1,3}”将匹配“fooooood”中的前三个o。“o{0,1}”等价于“o?”。请注意在逗号和两个数之间不能有空格。 |
| * | 匹配前面的子表达式零次或多次。例如,zo*能匹配“z”、“zo”以及“zoo”。*等价于{0,}。 |
| + | 匹配前面的子表达式一次或多次。例如,“zo+”能匹配“zo”以及“zoo”,但不能匹配“z”。+等价于{1,}。 |
| ? | 匹配前面的子表达式零次或一次。例如,“do(es)?”可以匹配“do”或“does”中的“do”。?等价于{0,1}。 |
| ? | 当该字符紧跟在任何一个其他限制符(*,+,?,{n},{n,},{n,m})后面时,匹配模式是非贪婪的。非贪婪模式尽可能少的匹配所搜索的字符串,而默认的贪婪模式则尽可能多的匹配所搜索的字符串。例如,对于字符串“oooo”,“o+?”将匹配单个“o”,而“o+”将匹配所有“o”。 |
| . | 匹配除“\n”之外的任何单个字符。要匹配包括“\n”在内的任何字符,请使用像“(.|\n)”的模式。 |
| (pattern) | 匹配pattern并获取这一匹配的子字符串。该子字符串用于向后引用。要匹配圆括号字符,请使用“\(”或“\)”。 |
| x|y | 匹配x或y。例如,“z|food”能匹配“z”或“food”。“(z|f)ood”则匹配“zood”或“food”。 |
| [xyz] | 字符集合(character class)。匹配所包含的任意一个字符。例如,“[abc]”可以匹配“plain”中的“a”。其中特殊字符仅有反斜线\保持特殊含义,用于转义字符。其它特殊字符如星号、加号、各种括号等均作为普通字符。脱字符^如果出现在首位则表示负值字符集合;如果出现在字符串中间就仅作为普通字符。连字符 - 如果出现在字符串中间表示字符范围描述;如果如果出现在首位则仅作为普通字符。 |
| [^xyz] | 排除型(negate)字符集合。匹配未列出的任意字符。例如,“[^abc]”可以匹配“plain”中的“plin”。 |
| [a-z] | 字符范围。匹配指定范围内的任意字符。例如,“[a-z]”可以匹配“a”到“z”范围内的任意小写字母字符。 |
| [^a-z] | 排除型的字符范围。匹配任何不在指定范围内的任意字符。例如,“[^a-z]”可以匹配任何不在“a”到“z”范围内的任意字符。 |
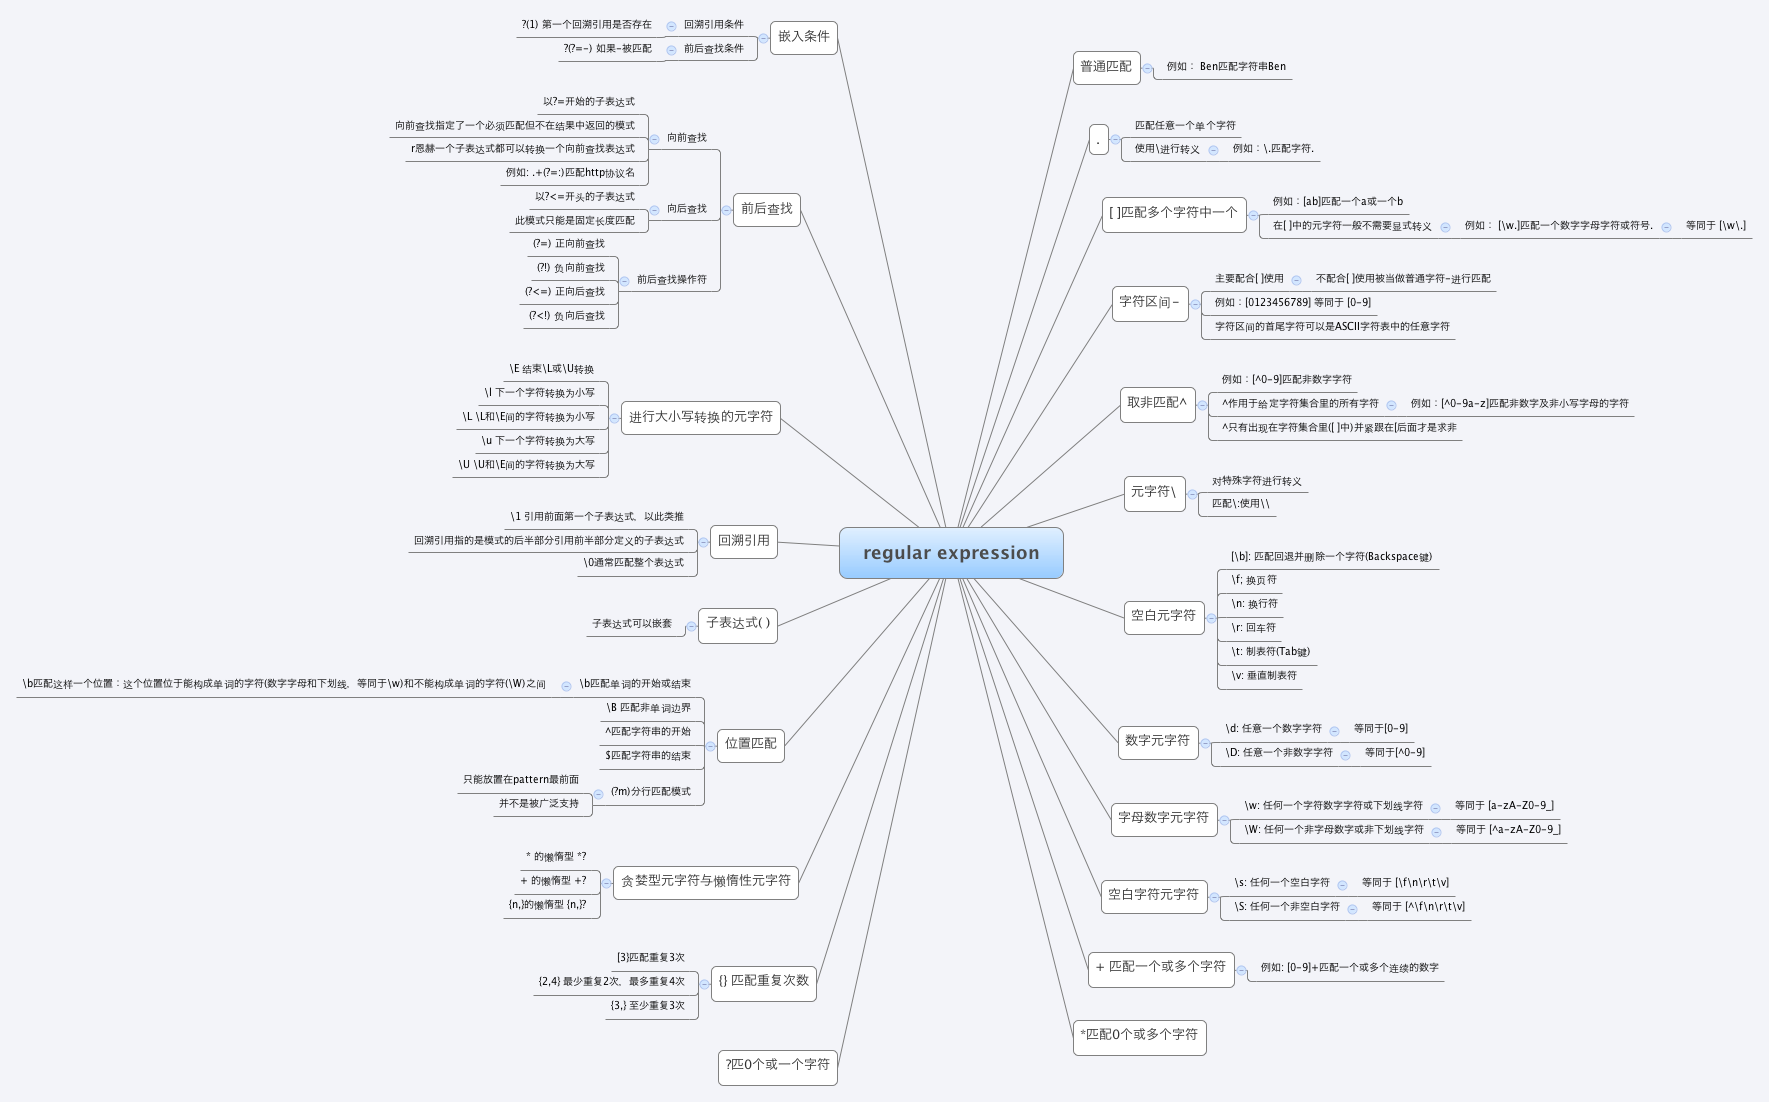
1.grep命令
grep支持三种正则表达式引擎,分别用三个参数指定(大多数情况下只会使用到ERE和BRE):
| 参数 | 说明 |
|---|---|
| -E | POSIX扩展正则表达式,ERE |
| -G | POSIX基本正则表达式,BRE |
| -P | Perl正则表达式,PCRE |
常用参数:
| 参数 | 说明 |
|---|---|
| -b | 将二进制文件作为文本来进行匹配 |
| -c | 统计以模式匹配的数目 |
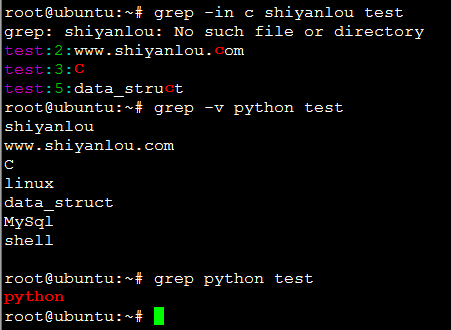
| -i | 忽略大小写 |
| -n | 显示匹配文本所在行的行号 |
| -v | 反选,输出不匹配行的内容 |
| -r | 递归匹配查找 |
| -A n | n为正整数,表示after的意思,除了列出匹配行之外,还列出后面的n行 |
| -B n | n为正整数,表示before的意思,除了列出匹配行之外,还列出前面的n行 |
| –color=auto | 将输出中的匹配项设置为自动颜色显示 |
root@ubuntu:~# # 将匹配以'z'开头以'o'结尾的所有字符串
root@ubuntu:~# echo 'zero\nzo\nzoo'|grep 'z.*o'
zero\nzo\nzoo
root@ubuntu:~# # 将匹配以'z'开头以'o'结尾,中间包含一个任意字符的字符串
root@ubuntu:~# echo 'zero\nzo\nzoo'|grep 'z.o'
zero\nzo\nzoo
root@ubuntu:~# # 将匹配以'z'开头,以任意多个'o'结尾的字符串
root@ubuntu:~# echo 'zero\nzo\nzoo'|grep 'zo*'
zero\nzo\nzoo
root@ubuntu:~# root@ubuntu:~# # grep默认是区分大小写的,这里将匹配所有的小写字母
root@ubuntu:~# echo '1234\nabcd' | grep '[a-z]'
root@ubuntu:~# # 将匹配所有的数字
root@ubuntu:~# echo '1234\nabcd' | grep '[0-9]'
root@ubuntu:~# # 将匹配所有的数字
root@ubuntu:~# echo '1234\nabcd' | grep '[[:digit:]]'
root@ubuntu:~# # 将匹配所有的小写字母
root@ubuntu:~# echo '1234\nabcd' | grep '[[:lower:]]'
root@ubuntu:~# # 将匹配所有的大写字母
root@ubuntu:~# echo '1234\nabcd' | grep '[[:upper:]]'
root@ubuntu:~# # 将匹配所有的字母和数字,包括0-9,a-z,A-Z
root@ubuntu:~# echo '1234\nabcd' | grep '[[:alnum:]]'
root@ubuntu:~# # 将匹配所有的字母
root@ubuntu:~# echo '1234\nabcd' | grep '[[:alpha:]]'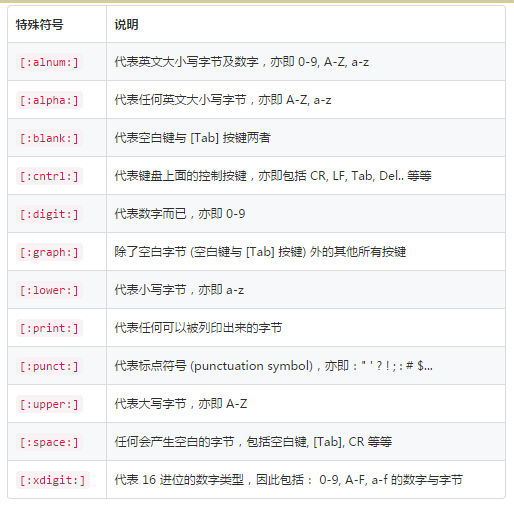
之所以要使用特殊符号,是因为上面的[a-z]不是在所有情况下都管用,这还与主机当前的语系有关,即设置在LANG环境变量的值,zh_CN.UTF-8的话[a-z],即为所有小写字母,其它语系可能是大小写交替的如,”a A b B…z Z”,[a-z]中就可能包含大写字母。所以在使用[a-z]时请确保当前语系的影响,使用[:lower:]则不会有这个问题。
行首符: ^ 与行尾符: $
‘^[A-Z]’ 表示以大写字母开头。
‘[^A-Z]’ 表示除了大写字母 A-Z 的所有字符。
grep -n '^the' regular_express.txt   # 匹配行首为the的字符行
grep -n '^[A-Z]' regular_express.txt # 匹配以大写字母开头的字符行
grep -n 'd$' regular_express.txt    # 匹配以d结尾的行
grep -n '^$' regular_express.txt    # 匹配空行
Linux中的任意一个字符用’.’(小数点)表示。
范围限定{}
由于 { 与 } 在 shell 中有特殊意义,需要用到转义字符\。
grep -n 'o\{2\}' regular_express.txt        # 查找连续的两个 o 字符
grep -n 'go\{2,5\}g' regular_express.txt    #查找 g 后面接 2 到 5 个 o,然后再接 g 的字符串
2.sed流编辑器
它不会修改文件,除非使用 shell 重定向来保存结果。默认情况下,所有的输出行都被打印到屏幕上。
sed 编辑器逐行处理文件(或输入),并将结果发送到屏幕。具体过程如下:首先 sed 把当前正在处理的行保存在一个临时缓存区中(也称为模式空间),然后处理临时缓冲区中的行,完成后把该行发送到屏幕上。sed 每处理完一行就将其从临时缓冲区删除,然后将下一行读入,进行处理和显示。处理完输入文件的最后一行后,sed 便结束运行。sed 把每一行都存在临时缓冲区中,对这个副本进行编辑,所以不会修改原文件。
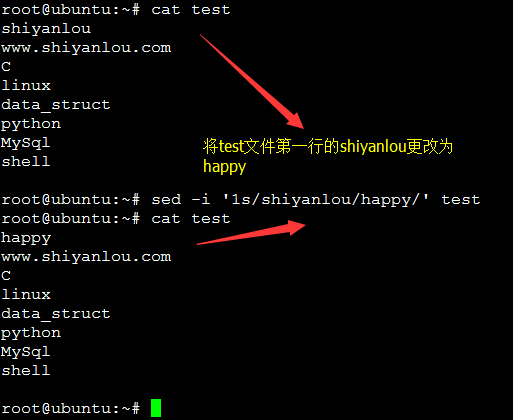
如果要修改原文件,可使用-i 选项。
sed [参数]... [执行命令] [输入文件]...
# 形如:
$ sed -i '1s/shiyanlou/happy/' test # 表示将test文件中第一行的"sad"替换为"happy"| 参数 | 说明 |
|---|---|
| -n | 安静模式,只打印受影响的行,默认打印输入数据的全部内容 |
| -e | 用于在脚本中添加多个执行命令一次执行,在命令行中执行多个命令通常不需要加该参数 |
| -f filename | 指定执行filename文件中的命令 |
| -r | 使用扩展正则表达式,默认为标准正则表达式 |
| -i | 将直接修改输入文件内容,而不是打印到标准输出设备 |
sed执行命令的格式:
[n1][,n2]command
[n1][~step]command
# 其中一些命令可以在后面加上作用范围,形如:
$ sed -i 's/sad/happy/g' test # g表示全局范围
$ sed -i 's/sad/happy/4' test # 4表示指定行中的第四个匹配字符串
其中n1,n2表示输入内容的行号,它们之间为,逗号则表示从n1到n2行,如果为~波浪号则表示从n1开始以step为步进的所有行;command为执行动作,下面为一些常用动作指令:
| 命令 | 说明 |
|---|---|
| s | 行内替换 |
| c | 整行替换 |
| a | 插入到指定行的后面 |
| i | 插入到指定行的前面 |
| p | 打印指定行,通常与-n参数配合使用 |
| d | 删除指定行 |
sed操作举例
先找一个用于练习的文本文件
$ cp /etc/passwd ~打印指定行:
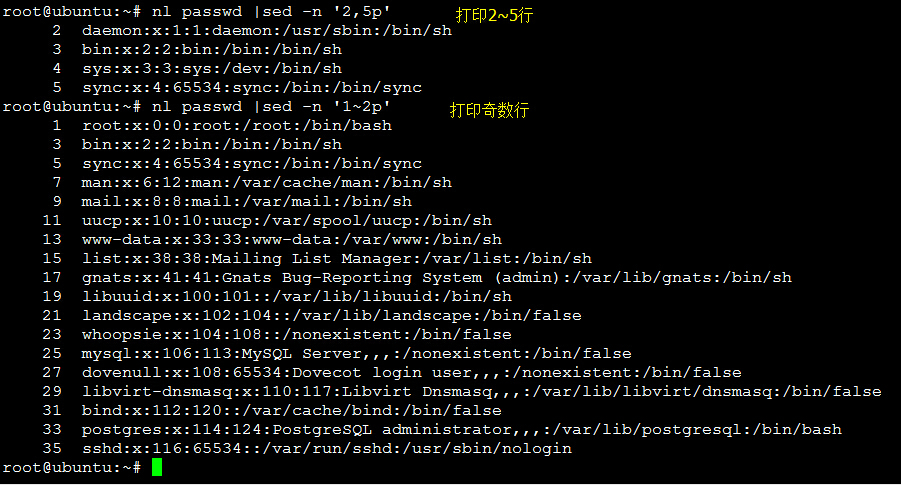
# 打印2-5行
$ nl passwd | sed -n '2,5p'
# 打印奇数行
$ nl passwd | sed -n '1~2p'
# d表示删除行
nl regular_express.txt | sed '2,5d' # 将 regular_express.txt 的内容列出并打印行号,同时,将 2-5 行删除显示
nl regular_express.txt | sed '2d' # 删除第二行显示
nl regular_express.txt | sed '3,$d' # 删除第三行到最后一行, $定位到最后一行
sed -i '1d' regular_express.txt # 在原文件中删除第 1 行
# a表示在行后加上字符串,i表示在行前添加字符串
nl regular_express.txt | sed '2a test' # 在第二行后添加 test 字符串
nl regular_express.txt | sed '2i test' # 在第二行前添加 test 字符串
nl regular_express.txt | sed '2a test\ntest' # 在第二行后加入两行 test,“\n”表示换行符
# c表示替换行
nl regular_express.txt | sed '2,5c No 2-5 number' # 将 2-5 行内容取代为 No 2-5 numberawk文本处理语言
它允许您创建简短的程序,这些程序读取输入文件、为数据排序、处理数据、对输入执行计算以及生成报表,还有无数其他的功能。
awk所有的操作都是基于pattern(模式)—action(动作)对来完成的,如下面的形式:
$ pattern {action}你可以看到就如同很多编程语言一样,它将所有的动作操作用一对{}花括号包围起来。其中pattern通常是是表示用于匹配输入的文本的“关系式”或“正则表达式”,action则是表示匹配后将执行的动作。在一个完整awk操作中,这两者可以只有其中一个,如果没有pattern则默认匹配输入的全部文本,如果没有action则默认为打印匹配内容到屏幕。
awk处理文本的方式,是将文本分割成一些“字段”,然后再对这些字段进行处理,默认情况下,awk以空格作为一个字段的分割符,不过这不是固定了,你可以任意指定分隔符。
awk命令基本格式
awk [-F fs] [-v var=value] [-f prog-file | 'program text'] [file...]其中-F参数用于预先指定前面提到的字段分隔符(还有其他指定字段的方式) ,-v用于预先为awk程序指定变量,-f参数用于指定awk命令要执行的程序文件,或者在不加-f参数的情况下直接将程序语句放在这里,最后为awk需要处理的文本输入,且可以同时输入多个文本文件。
打印文本到终端:
$ awk '{print}' test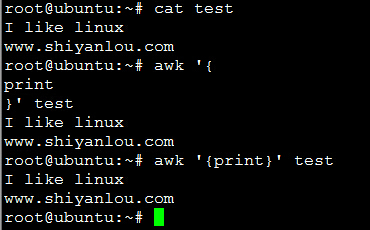
在这个操作中我是省略了patter,所以awk会默认匹配输入文本的全部内容,然后在”{}”花括号中执行动作,即print打印所有匹配项。
- 将test的第一行的每个字段单独显示为一行
$ awk '{
> if(NR==1){
> print $1 "\n" $2 "\n" $3
> } else {
> print}
> }' test

# 或者
$ awk '{
> if(NR==1){
> OFS="\n"
> print $1, $2, $3
> } else {
> print}
> }' test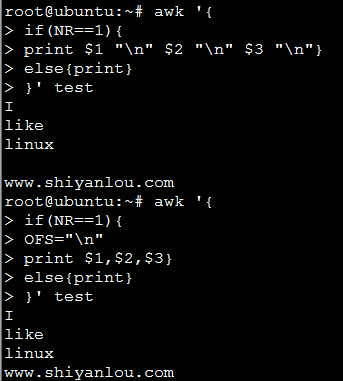
NR表示当前读入的记录数,你可以简单的理解为当前处理的行数,OFS表示输出时的字段分隔符,默认为” “空格,如上图所见,我们将字段分隔符设置为\n换行符,所以第一行原本以空格为字段分隔的内容就分别输出到单独一行了。然后是$N其中N为相应的字段号,这也是awk的内建变量,它表示引用相应的字段,因为我们这里第一行只有三个字段,所以只引用到了$3。除此之外另一个这里没有出现的$0,它表示引用当前记录(当前行)的全部内容。
- 将test的第二行的以点为分段的字段换成以空格为分隔
$ awk -F'.' '{
> if(NR==2){
> print $1 "\t" $2 "\t" $3
> }}' test
awk内置变量
Linux中的软件安装
apt-get:
在执行安装操作时,首先apt-get 工具会在本地的一个数据库中搜索 软件的相关信息,并根据这些信息在相关的服务器上下载软件安装,既然是在线安装软件,为啥会在本地的数据库中搜索?要解释这个问题就得提到几个名词了:
- 软件源镜像服务器
- 软件源
我们需要定期从服务器上下载一个软件包列表,使用 apt-get update 命令来保持本地的软件包列表是最新的(有时你也需要手动执行这个操作,比如更换了软件源),而这个表里会有软件依赖信息的记录,对于软件依赖,我举个例子:我们安装 w3m 软件的时候,而这个软件需要 libgc1c2 这个软件包才能正常工作,这个时候 apt-get 在安装软件的时候会一并替我们安装了,以保证 w3m 能正常的工作。
我们可以用它来在线安装、卸载和升级软件包等,下面列出一些apt-get包含的常用的一些工具:
| 工具 | 说明 |
|---|---|
| install | 其后加上软件包名,用于安装一个软件包 |
| update | 从软件源镜像服务器上下载/更新用于更新本地软件源的软件包列表 |
| upgrade | 升级本地可更新的全部软件包,但存在依赖问题时将不会升级,通常会在更新之前执行一次update |
| dist-upgrade | 解决依赖关系并升级(存在一定危险性) |
| remove | 移除已安装的软件包,包括与被移除软件包有依赖关系的软件包,但不包含软件包的配置文件 |
| autoremove | 移除之前被其他软件包依赖,但现在不再被使用的软件包 |
| purge | 与remove相同,但会完全移除软件包,包含其配置文件 |
| clean | 移除下载到本地的已经安装的软件包,默认保存在/var/cache/apt/archives/ |
| autoclean | 移除已安装的软件的旧版本软件包 |
apt-get的常用参数:
| 参数 | 说明 |
|---|---|
| -y | 自动回应是否安装软件包的选项,在一些自动化安装脚本中使用这个参数将十分有用 |
| -s | 模拟安装 |
| -q | 静默安装方式,指定多个q或者-q=#,#表示数字,用于设定静默级别,这在你不想要在安装软件包时屏幕输出过多时很有用 |
| -f | 修复损坏的依赖关系 |
| -d | 只下载不安装 |
| –reinstall | 重新安装已经安装但可能存在问题的软件包 |
| –install-suggests | 同时安装APT给出的建议安装的软件包 |
重新安装软件
$ apt-get --reinstall install w3m软件搜索
$ apt-cache search softname1 softname2 softname3……使用dpkg安装本地deb包:
| 参数 | 说明 |
|---|---|
| -i | 安装指定deb包 |
| -R | 后面加上目录名,用于安装该目录下的所有deb安装包 |
| -r | remove,移除某个已安装的软件包 |
| -I | 显示deb包文件的信息 |
| -s | 显示已安装软件的信息 |
| -S | 搜索已安装的软件包 |
| -L | 显示已安装软件包的目录信息 |






 195
195

 被折叠的 条评论
为什么被折叠?


