


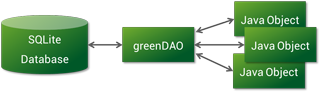
在Android中,我们都知道使用的数据库是SQLite,而使用这种原生的数据库非常繁琐,它对表的管理和进行CRUD操作都需要我们写sql语句,在进行多表关联的操作上,更是需要写一堆sql,而且维护起来也极其不便。所以ORM程序设计技术应用而生,它主要是用于实现面向对象编程语言里不同类型系统的数据之间的转换。
目前流行的ORM框架
目前主要流行这么三款ORM框架:
下面主要说一下它们的优缺点:
ORMLite
优点:
文档比较全面,使用简单,易于上手
缺点:
使用注解和反射的方式,导致ORMLite性能较差、效率上不理想
ActiveAndroid
优点:
轻量级,使用起来非常简单
缺点:
基于注解的方式,使用前需要在manifest中配置
GreenDAO
关于GreenDAO,则是本篇的重点
优点:
性能最大化、内存开销最小化、对Android高度优化、操作方便、文件体积比较小
效率很高,插入和更新的速度是SQLite的2倍,加载实体的速度是ORMLite的4.5倍
缺点:
学习成本较高,对于整个框架的需要有一定的理解才能灵活的使用。它使用时需要创建一个java工程去generate相应的实体类和DAO,另外还有众多API需要理解,如Properties、QueryBuilder、Dao等API,可以说学起来还是有一定的难度的
所以,个人还是比较喜欢GreenDAO这个框架,所以接下来就是介绍在Android Studio中配置和使用GreenDAO框架
GreenDAO的配置和使用
首先新建一个Project工程,配置java-gen目录
新建一个Project工程,然后在Module中创建一个与java目录同级的java-gen目录,如图:

该目录主要用来存放GreenDAO生成的实体类和DAO类
添加GreenDAO依赖
目前GreenDAO已经Release到2.0.0版本了,可以去它官网和github上看github地址
我们需要在Module中的gradle添加如下依赖
compile 'de.greenrobot:greendao:2.0.0'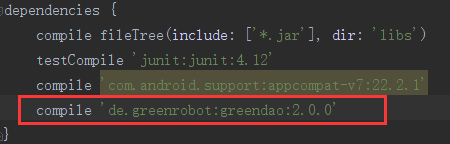
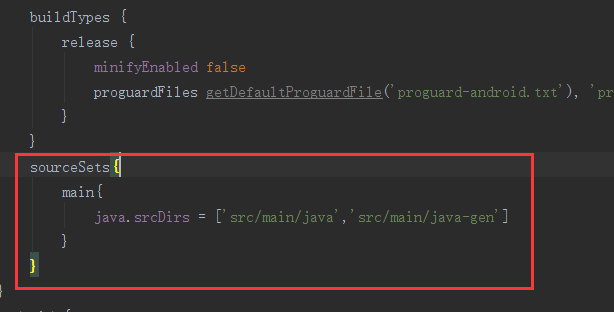
然后在Module中的gradle文件中这样配置:
sourceSets{
        main{
            java.srcDirs = ['src/main/java','src/main/java-gen']
        }
    }
在Project工程中新创建一个Java Library项目
我们创建好后,需要为该Java项目添加依赖,注意,在Java项目中添加的是greendao-generator依赖,这与上面的不同,因为这个Java项目就是负责生成相应的实体和DAO的,如下:
compile 'de.greenrobot:greendao-generator:2.0.0'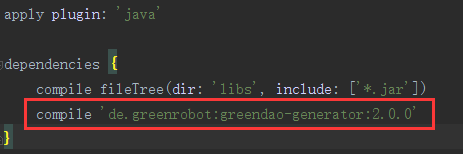
利用Java项目自动生成相应的实体类和DAO
这是使用GreenDAO配置的最后一步了,就是在java-gen目录下生成实体类和DAO类,我们在刚刚创建的Java项目中,在main方法中这样创建数据库的结构:
public class GreenDaoGenerator {
    public static void main(String[] args) throws Exception{
        //创建一个用于添加实体的Schema对象,第一个参数表示数据库的版本,第二个参数表示在java-gen目录下自动生成的实体类和DAO类存放的包名
        Schema schema = new Schema(1,"com.sunzxyong.greendao");
//        schema.setDefaultJavaPackageDao("com.sunzxyong.dao");//假如你不想实体类和DAO类都放在一个包中,你可以重新为DAO类设置一个新的包
        //创建一个实体,一个实体对应一张表,此处表示生成的实体名为Student,同样它默认也是表名
        Entity entity = schema.addEntity("Student");
//        entity.setTableName("Students");//你如果不想实体名和表名相同,也可以重新设置一个表名
        //为Student表添加字段,这里的参数表示实体类Student的字段名,生成的表中的字段会变成大写,如name在表中字段为NAME
        entity.addIdProperty().autoincrement().primaryKey();
        entity.addStringProperty("name").notNull();
        entity.addIntProperty("age");
        entity.addBooleanProperty("is_man");
        //最后通过DaoGenerator对象的generateAll()方法来生成相应的实体类和DAO类,参数分别为Schema对象和java-gen目录路径
        new DaoGenerator().generateAll(schema,"../GreenDAODemo/app/src/main/java-gen");
    }
}
其中一个Schema一对象代表一个数据库,而往数据库中add多个Entity说明在这个数据库中创建了多张表。
然后右击运行这个类,这时候等待数秒,在控制台中有这样的输出就证明成功生成了相应的实体类和DAO类,控制台的输出为:

可以看见在java-gen目录下的com.sunzxyong.greendao包中成功创建了四个类,分别是实体类:Student,DAO类:StudentDao、DaoMaster、DaoSession。
在app项目中的目录结构如下:
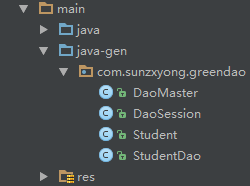
至此,现在GreenDAO的基本配置就全部完成了,同时也生成了相应的实体类和DAO类(注意,此时并没有生成相应的数据表,只是生成了实体类,只要当我们调用DaoMaster.DevOpenHelper()这个方法时,才生成了实体类对应的数据表)
在Android项目中使用GreenDAO进行CRUD操作
GreenDAO终于配置好了,接下来就是通过一个demo来看看使用GreenDAO具体怎么操作数据表以及进行CRUD操作。
首先我们创建一个布局:
<LinearLayout xmlns:android="http://schemas.android.com/apk/res/android"
    xmlns:tools="http://schemas.android.com/tools"
    android:layout_width="match_parent"
    android:layout_height="match_parent"
    android:orientation="vertical"
    android:paddingBottom="@dimen/activity_vertical_margin"
    android:paddingLeft="@dimen/activity_horizontal_margin"
    android:paddingRight="@dimen/activity_horizontal_margin"
    android:paddingTop="@dimen/activity_vertical_margin"
    tools:context=".MainActivity">

    <EditText
        android:id="@+id/edt_content"
        android:layout_width="match_parent"
        android:layout_height="wrap_content"
        android:textSize="16sp" />

    <LinearLayout
        android:layout_width="match_parent"
        android:layout_height="wrap_content"
        android:orientation="horizontal">

        <Button
            android:id="@+id/btn_add"
            android:layout_width="match_parent"
            android:layout_height="wrap_content"
            android:layout_weight="1"
            android:onClick="click"
            android:text="添加" />

        <Button
            android:id="@+id/btn_delete"
            android:layout_width="match_parent"
            android:layout_height="wrap_content"
            android:layout_weight="1"
            android:onClick="click"
            android:text="删除" />

        <Button
            android:id="@+id/btn_update"
            android:layout_width="match_parent"
            android:layout_height="wrap_content"
            android:layout_weight="1"
            android:onClick="click"
            android:text="修改" />

        <Button
            android:id="@+id/btn_search"
            android:layout_width="match_parent"
            android:layout_height="wrap_content"
            android:layout_weight="1"
            android:onClick="click"
            android:text="查询" />
    </LinearLayout>

    <ListView
        android:id="@+id/listview"
        android:layout_width="match_parent"
        android:layout_height="match_parent" />
</LinearLayout>
下面就通过代码来看看使用GreenDAO具体是怎么做CRUD操作的,代码中有注释,就不多叙述了,可以看见GreenDAO做CRUD操作非常的方便
代码为:
public class MainActivity extends AppCompatActivity {
    private DaoMaster.DevOpenHelper helper;
    private DaoMaster master;
    private DaoSession session;
    private StudentDao dao;

    private EditText mEditText;
    private ListView mListView;
    private SimpleCursorAdapter adapter;
    private Cursor cursor;
    private SQLiteDatabase db;

    @Override
    protected void onCreate(Bundle savedInstanceState) {
        super.onCreate(savedInstanceState);
        setContentView(R.layout.activity_main);
        mEditText = (EditText) findViewById(R.id.edt_content);
        mListView = (ListView) findViewById(R.id.listview);

        //第一个参数为Context,第二个参数为数据表的文件名,这个我们可以以"表名+s+'-db'"来命名,第三个通常为null
        helper = new DaoMaster.DevOpenHelper(this, "students-db", null);
        db = helper.getWritableDatabase();
        master = new DaoMaster(db);
        session = master.newSession();
        //得到StudentDAO对象,所以在这看来,对于这三个DAO文件,我们更能接触到的是StudentDao文件,进行CRUD操作也是通过StudentDao对象来操作
        dao = session.getStudentDao();

        //遍历表中的所有数据
        cursor = db.query(dao.getTablename(), dao.getAllColumns(), null, null, null, null, null);
        //通过StudentDao的静态内部类得到Name字段对应表中的列名
        String[] from = {StudentDao.Properties.Name.columnName, StudentDao.Properties.Age.columnName};
        int[] to = {android.R.id.text1, android.R.id.text2};
        adapter = new SimpleCursorAdapter(this, android.R.layout.simple_list_item_2, cursor, from, to, SimpleCursorAdapter.NO_SELECTION);
        mListView.setAdapter(adapter);
    }

    public void click(View view) {
        switch (view.getId()) {
            case R.id.btn_add:
                add();
                Cursor cursor = db.query(dao.getTablename(), dao.getAllColumns(), null, null, null, null, null);
                adapter.swapCursor(cursor);//交换cursor数据集从而实时更新UI
                //cursor.requery();//这个也可以实时更新UI,不过官方已经不推荐使用了,因为它可能会阻塞UI线程造成ANR
                break;
            case R.id.btn_delete:
                delete();
                Cursor cursor2 = db.query(dao.getTablename(), dao.getAllColumns(), null, null, null, null, null);
                adapter.swapCursor(cursor2);
                break;
            case R.id.btn_update:
                update();
                Cursor cursor3 = db.query(dao.getTablename(), dao.getAllColumns(), null, null, null, null, null);
                adapter.swapCursor(cursor3);
                break;
            case R.id.btn_search:
                search();
                break;
        }
    }

    private void add() {
        String content = mEditText.getText().toString().trim();
//        DateFormat format = DateFormat.getDateTimeInstance(DateFormat.MEDIUM, DateFormat.MEDIUM, Locale.CHINA);
        Student student = new Student(null, content,18, true);//由于主键id之前设置了自增长,所以传入null即可
        dao.insert(student);//插入数据
    }

    private void delete() {
        String content = mEditText.getText().toString().trim();
        dao.deleteByKey(Long.valueOf(content));//通过主键来删除某行数据
//        dao.deleteAll();//全部删除
    }

    private void update() {
        String content = mEditText.getText().toString().trim();
        //update只能通过主键来更新某个实体对应的数据,这里的主键为id
        dao.update(new Student(Long.valueOf(content), "这是修改的", 120, true));
    }

    private void search() {
        String content = mEditText.getText().toString().trim();
        //通过queryBuilder()来查询可以更方便的设置查询的条件,其中eq()方法表示equal(),判断Name是否和content相等,然后通过build建立查询
        Query<Student> query = dao.queryBuilder().where(StudentDao.Properties.Name.eq(content)).build();
        List<Student> list = query.list();
        //下面两个Flag的设置可以在控制台中打印出此次查询的sql语句和value值
        QueryBuilder.LOG_SQL = true;
        QueryBuilder.LOG_VALUES = true;
        new AlertDialog.Builder(this).setMessage(list.get(0).getName()+","+list.get(0).getAge()).setPositiveButton("确定",null).create().show();
    }
}
我们来看看效果:

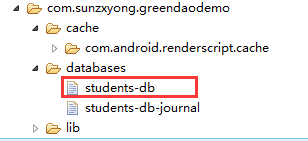
同时,我们也来看看刚刚命名为students-db的数据库文件是不是真的创建了:
再来看看其中比较重要的两个类StudentDao和Property的源码:
StudentDao.java
public class StudentDao extends AbstractDao<Student, Long> {

    public static final String TABLENAME = "STUDENT";

    /**
     * Properties of entity Student.<br/>
     * Can be used for QueryBuilder and for referencing column names.
    */
    public static class Properties {
        public final static Property Id = new Property(0, Long.class, "id", true, "_id");
        public final static Property Name = new Property(1, String.class, "name", false, "NAME");
        public final static Property Age = new Property(2, Integer.class, "age", false, "AGE");
        public final static Property Is_man = new Property(3, Boolean.class, "is_man", false, "IS_MAN");
    };
//...
}
Property.java
public class Property {
    public final int ordinal;
    public final Class<?> type;
    public final String name;
    public final boolean primaryKey;
    public final String columnName;

    public Property(int ordinal, Class<?> type, String name, boolean primaryKey, String columnName) {
        this.ordinal = ordinal;
        this.type = type;
        this.name = name;
        this.primaryKey = primaryKey;
        this.columnName = columnName;
    }

    /** Creates an "equal ('=')" condition  for this property. */
    public WhereCondition eq(Object value) {
        return new PropertyCondition(this, "=?", value);
    }

    /** Creates an "not equal ('<>')" condition  for this property. */
    public WhereCondition notEq(Object value) {
        return new PropertyCondition(this, "<>?", value);
    }

    /** Creates an "LIKE" condition  for this property. */
    public WhereCondition like(String value) {
        return new PropertyCondition(this, " LIKE ?", value);
    }

    /** Creates an "BETWEEN ... AND ..." condition  for this property. */
    public WhereCondition between(Object value1, Object value2) {
        Object[] values = { value1, value2 };
        return new PropertyCondition(this, " BETWEEN ? AND ?", values);
    }

    /** Creates an "IN (..., ..., ...)" condition  for this property. */
    public WhereCondition in(Object... inValues) {
        StringBuilder condition = new StringBuilder(" IN (");
        SqlUtils.appendPlaceholders(condition, inValues.length).append(')');
        return new PropertyCondition(this, condition.toString(), inValues);
    }

    /** Creates an "IN (..., ..., ...)" condition  for this property. */
    public WhereCondition in(Collection<?> inValues) {
        return in(inValues.toArray());
    }

    /** Creates an "NOT IN (..., ..., ...)" condition  for this property. */
    public WhereCondition notIn(Object... notInValues) {
        StringBuilder condition = new StringBuilder(" NOT IN (");
        SqlUtils.appendPlaceholders(condition, notInValues.length).append(')');
        return new PropertyCondition(this, condition.toString(), notInValues);
    }

    /** Creates an "NOT IN (..., ..., ...)" condition  for this property. */
    public WhereCondition notIn(Collection<?> notInValues) {
        return notIn(notInValues.toArray());
    }

    /** Creates an "greater than ('>')" condition  for this property. */
    public WhereCondition gt(Object value) {
        return new PropertyCondition(this, ">?", value);
    }

    /** Creates an "less than ('<')" condition  for this property. */
    public WhereCondition lt(Object value) {
        return new PropertyCondition(this, "<?", value);
    }

    /** Creates an "greater or equal ('>=')" condition  for this property. */
    public WhereCondition ge(Object value) {
        return new PropertyCondition(this, ">=?", value);
    }

    /** Creates an "less or equal ('<=')" condition  for this property. */
    public WhereCondition le(Object value) {
        return new PropertyCondition(this, "<=?", value);
    }

    /** Creates an "IS NULL" condition  for this property. */
    public WhereCondition isNull() {
        return new PropertyCondition(this, " IS NULL");
    }

    /** Creates an "IS NOT NULL" condition  for this property. */
    public WhereCondition isNotNull() {
        return new PropertyCondition(this, " IS NOT NULL");
    }

}
可以看到我们可以通过StudentDao得到静态内部类Properties中的各个字段对应的Property对象,然后通过Property对象可以得到这个字段对应的列名、是否为主键以及其它的一些操作方法。
后续几篇再慢慢介绍GreenDAO的高级用法!


 394
394


 被折叠的 条评论
为什么被折叠?
被折叠的 条评论
为什么被折叠?
 到【灌水乐园】发言


