


具体的细节看代码,这里只提取一些值得注意的点。记得上传代码库。
1.AppDelegate文件里面可以设置一些能够影响全局的属性。
前提得进行一些修改,如下图:
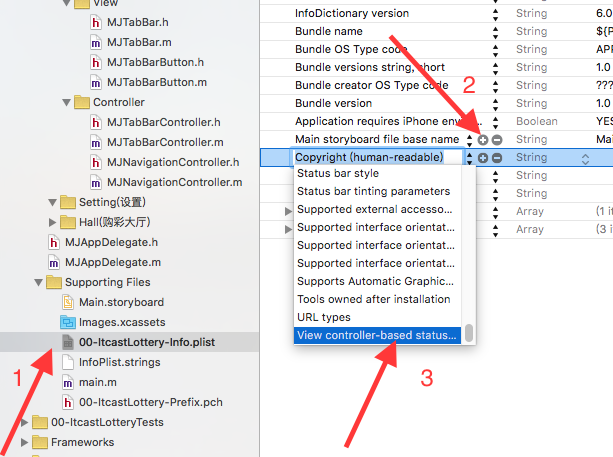
 比如,在这块设置状态栏的属性。(就是那个电池、信号那些东西)。
 代码如下:
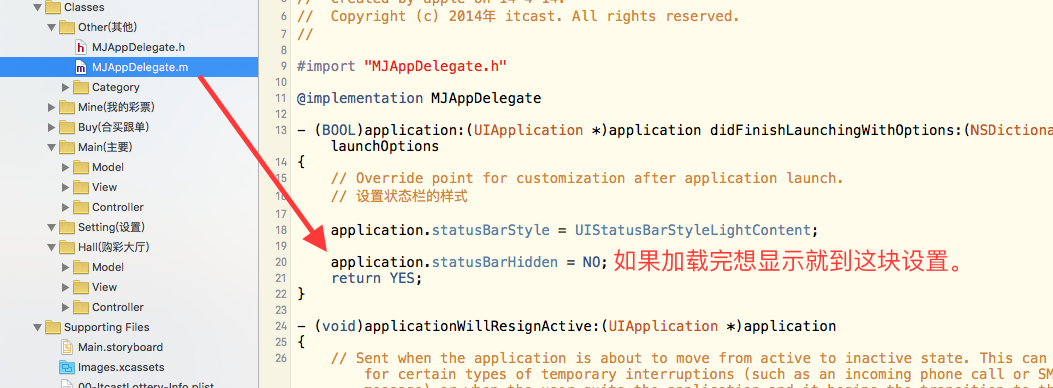
- (BOOL)application:(UIApplication *)application didFinishLaunchingWithOptions:(NSDictionary *)launchOptions
{
    // 设置状态栏的样式
    application.statusBarStyle = UIStatusBarStyleLightContent;
    return YES;
}
2.项目中涉及到监控导航控制器的segue的方法,利用重新建一个继承自UINavigationController的类,并在类中重写下面的方法,在重写时加想要的操作。
- (void)pushViewController:(UIViewController *)viewController animated:(BOOL)animated
{
   //让跳转到的控制器将底部的那个导航栏隐藏。
    viewController.hidesBottomBarWhenPushed = YES;
    //将跳转动画取消
    [super pushViewController:viewController animated:NO];
}
3.此方法只在第一次使用一个类时调用,并且是系统自动调用。想一想他的用途是不是可以节省内存?
+ (void)initialize;//放在创建的类里面进行实现。4.XXX.pch文件里面可以放一些全局的宏之类的东西。
5.自定义UIButtond继承后可以通过重写父类的下面俩个方法来实现UIButton中title与image位置,本例中实现了将两者互换位置。
- (CGRect)titleRectForContentRect:(CGRect)contentRect;
- (CGRect)imageRectForContentRect:(CGRect)contentRect;
6.ios7.0以后获取文字frame的方法:
//有待继续研究各参数的意义。
titleW = [self.currentTitle boundingRectWithSize:CGSizeMake(MAXFLOAT, MAXFLOAT) options:NSStringDrawingUsesLineFragmentOrigin attributes:attrs context:nil].size.width;
7.UI控件的旋转方法:
//可以设置动画时间以及旋转角度。
[UIView animateWithDuration:0.25 animations:^{
sender.imageView.transform = CGAffineTransformMakeRotation(M_PI);
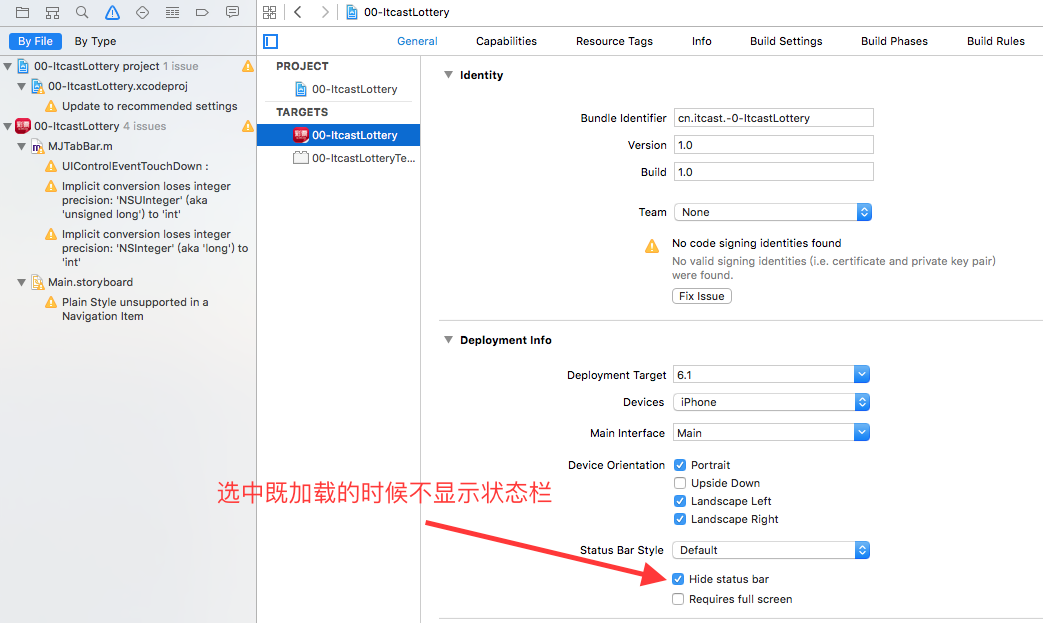
}];8.设置状态栏在加载应用时隐藏,加载完后显示。
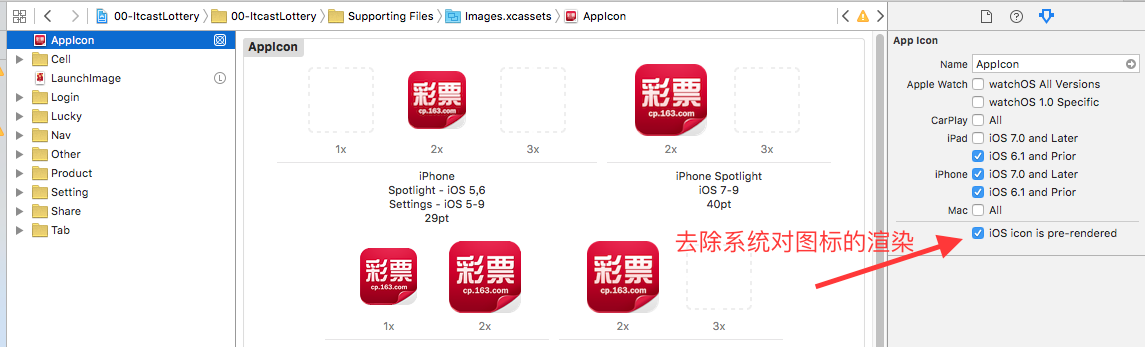
9.去除系统对应用图标的渲染。
对于ios6来说可以防止系统将图标进行玻璃质感的渲染。
10.自定义控件,要在使用之前处理一些事情,可以用下面方法。
两个都要实现,因为每种方法对应一种创建方式。
/**
 *  从文件中解析一个对象的时候就会调用这个方法
 */
- (id)initWithCoder:(NSCoder *)decoder
{
    if (self = [super initWithCoder:decoder]) {
       .....
    }
    return self;
}

/**
 *  通过代码创建控件的时候就会调用
 */
- (id)initWithFrame:(CGRect)frame
{
    if (self = [super initWithFrame:frame]) {
       ....
    }
    return self;
}
11.检测当前系统版本&检测当前Xcode版本。
1.检测系统版本
//返回值是浮点型数据,为当前系统版本。
CGFloat f = [UIDevice currentDevice].systemVersion doubleValue;
2.检测Xcode版本。
因为Xcode会对支持的ios的版本编号进行了预编译,如下所示:
#define __IPHONE_2_0     20000
#define __IPHONE_2_1     20100
#define __IPHONE_2_2     20200
#define __IPHONE_3_0     30000
#define __IPHONE_3_1     30100
#define __IPHONE_3_2     30200
#define __IPHONE_4_0     40000
#define __IPHONE_4_1     40100
#define __IPHONE_4_2     40200
#define __IPHONE_4_3     40300
#define __IPHONE_5_0     50000
#define __IPHONE_5_1     50100
#define __IPHONE_6_0     60000
#define __IPHONE_6_1     60100
#define __IPHONE_7_0     70000
#define __IPHONE_7_1     70100
#define __IPHONE_8_0     80000
#define __IPHONE_8_1     80100
#define __IPHONE_8_2     80200
#define __IPHONE_8_3     80300
#define __IPHONE_8_4     80400
#define __IPHONE_9_0     90000
#define __IPHONE_9_1     90100
#define __IPHONE_9_2     90200
所以,可以通过预编译来判断Xcode版本。(上面展示为Xcode 7.2)
如下判断:
//先插入头文件  #import <Availability.h>
#ifdef __IPHONE_9_2
        .......
#else
        .......
#endif
12.关于字体的设置
//大小
lable.font =[UIFont systemFontOfSize:18];
//字体样式设置
lable.font =[UIFont preferredFontForTextStyle:UIFontTextStyleBody];
//目前一共用以下十种字体
UIKIT_EXTERN NSString *const UIFontTextStyleTitle1 NS_AVAILABLE_IOS(9_0);
UIKIT_EXTERN NSString *const UIFontTextStyleTitle2 NS_AVAILABLE_IOS(9_0);
UIKIT_EXTERN NSString *const UIFontTextStyleTitle3 NS_AVAILABLE_IOS(9_0);
UIKIT_EXTERN NSString *const UIFontTextStyleHeadline NS_AVAILABLE_IOS(7_0);
UIKIT_EXTERN NSString *const UIFontTextStyleSubheadline NS_AVAILABLE_IOS(7_0);
UIKIT_EXTERN NSString *const UIFontTextStyleBody NS_AVAILABLE_IOS(7_0);
UIKIT_EXTERN NSString *const UIFontTextStyleCallout NS_AVAILABLE_IOS(9_0);
UIKIT_EXTERN NSString *const UIFontTextStyleFootnote NS_AVAILABLE_IOS(7_0);
UIKIT_EXTERN NSString *const UIFontTextStyleCaption1 NS_AVAILABLE_IOS(7_0);
UIKIT_EXTERN NSString *const UIFontTextStyleCaption2 NS_AVAILABLE_IOS(7_0);
13.设置View出现的动画方法
[UIView animateWithDuration:2 animations:^{
self.temp.frame = CGRectMake(0,0, 320, 50);//将最终要出现的位置以及尺寸写到这块。
            }];
14.json 文件加载以及模型转换
//这块用懒加载
@property (nonatomic, strong) NSArray *products;
- (NSArray *)products
{
    if (_products == nil) {

        // JSON文件的路径
        NSString *path = [[NSBundle mainBundle] pathForResource:@"products.json" ofType:nil];

        // 加载JSON文件
        NSData *data = [NSData dataWithContentsOfFile:path];

        // 将JSON数据转为NSArray或者NSDictionary
        NSArray *dictArray = [NSJSONSerialization JSONObjectWithData:data options:NSJSONReadingMutableContainers error:nil];

        // 将字典转成模型
        NSMutableArray *productArray = [NSMutableArray array];
        for (NSDictionary *dict in dictArray) {
            MJProduct *p = [MJProduct productWithDict:dict];
            [productArray addObject:p];
        }

        _products = productArray;
    }
    return _products;
}
15.CollectionView的使用实例之一
这块只具体列出一种使用的实例,具体的细节进入头文件查看。
//init方法是写在一个继承UICollectionView的类里面的,这块重写init方法,是将类型设置成流水型,对应的一些属性进入头文件查看。
- (id)init
{
    // 1.流水布局,设置CollectionView的类型为流水型。下面是对一些属性进行设置。
    UICollectionViewFlowLayout *layout = [[UICollectionViewFlowLayout alloc] init];
    // 2.每个cell的尺寸
    layout.itemSize = CGSizeMake(80, 80);
    // 3.设置cell之间的水平间距
    layout.minimumInteritemSpacing = 0;
    // 4.设置cell之间的垂直间距
    layout.minimumLineSpacing = 10;
    // 5.设置四周的内边距
    layout.sectionInset = UIEdgeInsetsMake(layout.minimumLineSpacing, 0, 0, 0);
    return [super initWithCollectionViewLayout:layout];
}
16.UICollectionViewCell创建的步骤:与UITableViewCell的创建类似但有区别。
一个示例如下:
//首先要在ViewDidload方法里面进行注册.然后实现一些UICollectinView的数据源方法,如下所示。
//里面涉及到的一些模型参考源程序。
#define MJProductCellID  @"product"
- (void)viewDidLoad//当View加载完后进行
{
    [super viewDidLoad];

    // 1.注册cell(告诉collectionView将来创建怎样的cell)
    UINib *nib = [UINib nibWithNibName:@"MJProductCell" bundle:nil];
    [self.collectionView registerNib:nib forCellWithReuseIdentifier:MJProductCellID];

//    [self.collectionView registerClass:[UICollectionViewCell class] forCellWithReuseIdentifier:MJProductCellID];

    // 2.设置collectionView的背景色
    self.collectionView.backgroundColor = [UIColor orangeColor];
}

#pragma mark - 数据源方法
//- (NSInteger)numberOfSectionsInCollectionView:(UICollectionView *)collectionView
//{
//    return 1;
//}
- (NSInteger)collectionView:(UICollectionView *)collectionView numberOfItemsInSection:(NSInteger)section
{
    return self.products.count;
}

- (UICollectionViewCell *)collectionView:(UICollectionView *)collectionView cellForItemAtIndexPath:(NSIndexPath *)indexPath
{
    // 1.获得cell
    MJProductCell *cell = [collectionView dequeueReusableCellWithReuseIdentifier:MJProductCellID forIndexPath:indexPath];

    // 2.传递模型
    cell.product = self.products[indexPath.item];

    return cell;
}
17.web相关
- (void)loadView//加载View的时候调用
{
    self.view = [[UIWebView alloc] init];//将View设置成web
}

- (void)viewDidLoad//web页面加载完后调用
{
    [super viewDidLoad];

    // 设置标题
    self.title = self.html.title;

    UIWebView *webView = (UIWebView *)self.view;
    webView.delegate = self;

    // 创建URL
    NSURL *url = [[NSBundle mainBundle] URLForResource:self.html.html withExtension:nil];

    // 创建请求
    NSURLRequest *request = [NSURLRequest requestWithURL:url];

    // 发送请求加载网页
    [webView loadRequest:request];

    // 设置左上角的关闭按钮
    self.navigationItem.leftBarButtonItem = [[UIBarButtonItem alloc] initWithTitle:@"关闭" style:UIBarButtonItemStylePlain target:self action:@selector(close)];
}

- (void)close
{
    [self dismissViewControllerAnimated:YES completion:nil];
}

/**
 *  网页加载完毕的时候调用
 */
- (void)webViewDidFinishLoad:(UIWebView *)webView
{
    // 跳到id对应的网页标签********
    // 1.拼接Javacript代码
    NSString *js = [NSString stringWithFormat:@"window.location.href = '#%@';", self.html.ID];
    // 2.执行JavaScript代码
    [webView stringByEvaluatingJavaScriptFromString:js];
}


 1万+
1万+

 被折叠的 条评论
为什么被折叠?
被折叠的 条评论
为什么被折叠?
 到【灌水乐园】发言


