


8.1GUI(图形用户界面)
GUI
Graphical User Interface(图形用户接口)。
用图形的方式,来显示计算机操作的界面,这样更方便更直观。
CLI
Command line User Interface (命令行用户接口)
就是常见的Dos命令行操作。
需要记忆一些常用的命令,操作不直观。
举例:
比如:创建文件夹,或者删除文件夹等
Java为GUI提供的对象都存在java.Awt和javax.Swing两个包中。
8.2Awt和Swing
Awt与 Swing
java.Awt:Abstract WindowToolKit (抽象窗口工具包),需要调用本地系统方法实现功能。属重量级控件。
javax.Swing:在AWT的基础上,建立的一套图形界面系统,其中提供了更多的组件,而且完全由Java实现。增强了移植性,属轻量级控件。
容器中的组件的排放方式,就是布局。
常见的布局管理器:
FlowLayout(流式布局管理器)
8.3布局管理器
从左到右的顺序排列。
Panel默认的布局管理器。
BorderLayout(边界布局管理器)
东,南,西,北,中
Frame默认的布局管理器。
GridLayout(网格布局管理器)
规则的矩阵
CardLayout(卡片布局管理器)
选项卡
GridBagLayout(网格包布局管理器)
非规则的矩阵
8.4建立一个简单的窗体
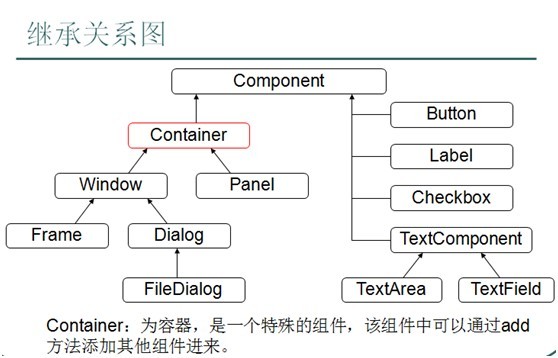
Container常用子类:Window Panel(面板,不能单独存在。)
Window常用子类:Frame Dialog
简单的窗体创建过程:
Frame f = new Frame(“my window”);
f.setLayout(new FlowLayout());
f.setSize(500,400);//设置窗体大小
f.setLocation(300,200);//设置窗体出现在屏幕的位置
f.setVisible(true);
8.5事件监听机制的特点:
1,事件源。
2,事件。
3,监听器。
4,事件处理。
事件源:就是awt包或者swing包中的那些图形界面组件。
事件:每一个事件源都有自己特有的对应事件和共性事件。
监听器:将可以触发某一个事件的动作(不只一个动作)都已经封装到了监听器中。
以上三者,在java中都已经定义好了。
直接获取其对象来用就可以了。
我们要做的事情是,就是对产生的动作进行处理
确定事件源(容器或组件)
通过事件源对象的addXXXListener()方法将侦听器注册到该事件源上。
该方法中接收XXXListener的子类对象,或者XXXListener的子类XXXAdapter的子类对象。
一般用匿名内部类来表示。
在覆盖方法的时候,方法的参数一般是XXXEvent类型的变量接收。
事件触发后会把事件打包成对象传递给该变量。(其中包括事件源对象。通过getSource()或者,getComponent()获取。
练习一:创建一个图形化界面,并让窗体具备监听功能
import java.awt.*;
import java.awt.event.*;

/*
创建图形化界面步骤:
1,创建frame窗体。
2,对窗体进行基本设置。
         比如大小,位置,布局。
3,定义组件。
4,将组件通过窗体的add方法添加到窗体中。
5,让窗体显示,通过setVisible(true)

*/
class AwtDemo
{
         public static void main(String[] args)
         {
                   Frame f = new Frame("my awt");
                   f.setSize(500,400);//窗体长宽
                   f.setLocation(300,200);//窗体离屏幕左边,离屏幕上边多远
                   f.setLayout(newFlowLayout());//窗体布局类型


                   Button b = new Button("我是一个按钮");//创建一个按钮实例

                   f.add(b);//将按钮添加到窗体中


                   f.addWindowListener(newWindowAdapter()
                   {
                            public void windowClosing(WindowEvent e)//窗口关闭
                            {
                                     System.out.println("我关");
                                     System.exit(0);
                            }
                            public void windowActivated(WindowEvent e)//窗口在屏幕最前端
                            {
                                     System.out.println("我活了。");

                            }

                            public void windowOpened(WindowEvent e)//被打开时触发
                            {
                                     System.out.println("我被打开了,hahahhahah");
                            }

                   });


                   f.setVisible(true);//显示窗体

                   //System.out.println("HelloWorld!");
         }
}
/*

class MyWin implements WindowListener
{
         //覆盖7个方法。可以我只用到了关闭的动作。
         //其他动作都没有用到,可是却必须复写。

}


//因为WindowListener的子类WindowAdapter已经实现了WindowListener接口。
//并覆盖了其中的所有方法。那么我只要继承自Windowadapter覆盖我需要的方法即可。
class MyWin extends WindowAdapter
{
         public void windowClosing(WindowEvent e)
         {
                   //System.out.println("windowclosing---"+e.toString());
                   System.exit(0);
         }
}

*/
练习二:创建一个图形化界面,并让窗体及按钮都具备监听功能
//练习,定义一个窗体,在窗体中添加一个按钮具备关闭该窗体的功能。


import java.awt.*;
import java.awt.event.*;

class FrameDemo
{

         //定义该图形中所需的组件的引用。
         private Frame f;
         private Button but;

         FrameDemo()
         {
                   init();
         }

         public void init()
         {
                   f = new Frame("my frame");

                   //对frame进行基本设置。
                   f.setBounds(300,100,600,500);
                   f.setLayout(newFlowLayout());

                   but = new Button("my button");

                   //将组件添加到frame中
                   f.add(but);


                  //加载一下窗体上事件。
                   myEvent();

                   //显示窗体;
                   f.setVisible(true);

         }
         private void myEvent()
         {
                   f.addWindowListener(new WindowAdapter()
                   {
                            public void windowClosing(WindowEvent e)
                            {
                                     System.exit(0);
                            }
                   });

                   //让按钮具备退出程序的功能
                   /*
                   按钮就是事件源。
                   那么选择哪个监听器呢?
                   通过关闭窗体示例了解到,想要知道哪个组件具备什么样的特有监听器。
                   需要查看该组件对象的功能。
                    通过查阅button的描述。发现按钮支持一个特有监听addActionListener。

                   */
                   but.addActionListener(newActionListener()
                   {
                            private int count = 1;
                            public void actionPerformed(ActionEvent e)
                            {
                                     //System.out.println("退出,按钮干的");
                                     //System.exit(0);

                                     //f.add(newButton("Button-"+(count++)));
                                     //f.setVisible(true);
                                     //f.validate();

                                     //System.out.println(e.getSource());
                                     Buttonb = (Button)e.getSource();

                                     Framef1 = (Frame)b.getParent();

                                     f1.add(newButton("button-"+count++));
                                     f1.validate();


                            }
                   });
         }


         public static void main(String[] args)
         {
                   new FrameDemo();
         }
}
练习三:鼠标,键盘监听应用
import java.awt.*;
import java.awt.event.*;


class MouseAndKeyEvent
{
         private Frame f;
         private Button but;
         private TextField tf;

         MouseAndKeyEvent()
         {
                   init();
         }

         public void init()
         {
                   f = new Frame("my frame");

                   f.setBounds(300,100,600,500);
                   f.setLayout(newFlowLayout());

                   tf = new TextField(20);

                   but = new Button("my button");


                   f.add(tf);
                   f.add(but);


                   myEvent();

                   f.setVisible(true);

         }
         private void myEvent()
         {
                   f.addWindowListener(newWindowAdapter()
                   {
                            public void windowClosing(WindowEvent e)
                            {
                                     System.exit(0);
                            }
                   });


                   tf.addKeyListener(new KeyAdapter()
                   {
                            public void keyPressed(KeyEvent e)
                            {
                                     int code = e.getKeyCode();
                                     if(!(code>=KeyEvent.VK_0&& code<=KeyEvent.VK_9))
                                     {
                                               System.out.println(code+".....是非法的");
                                               e.consume();
                                     }


                            }
                   });

                   //给But添加一个键盘监听。
                   but.addKeyListener(newKeyAdapter()
                   {
                            public void keyPressed(KeyEvent e)
                            {
                                     if(e.isControlDown()&&e.getKeyCode()==KeyEvent.VK_ENTER)
                                               //System.exit(0);
                                     System.out.println("ctrl+enteris run");

                                     //System.out.println(KeyEvent.getKeyText(e.getKeyCode())+"...."+e.getKeyCode());
                            }
                   });


                   /*
                   but.addActionListener(newActionListener()
                   {
                            public void actionPerformed(ActionEvent e)
                            {
                                     System.out.println("actionok");
                            }
                   });
                   */

                   /*

                   but.addMouseListener(newMouseAdapter()
                   {
                            private int count = 1;
                            private int clickCount = 1;
                            public void mouseEntered(MouseEvent e)
                            {
                                     System.out.println("鼠标进入到该组件"+count++);
                            }
                            public void mouseClicked(MouseEvent e)
                            {
                                     if(e.getClickCount()==2)
                                               System.out.println("双击动作"+clickCount++);
                            }
                   });
                   */
         }

         public static void main(String[] args)
         {
                   newMouseAndKeyEvent();
         }
}
练习四:利用GUI列出指定目录内容
import java.awt.*;
import java.awt.event.*;
import java.io.*;
class MyWindowDemo
{
         private Frame f;
         private TextField tf;
         private Button but;
         private TextArea ta;

         private Dialog d;
         private Label lab;
         private Button okBut;


         MyWindowDemo()
         {
                   init();
         }
         public void init()
         {
                   f = new Frame("my window");
                   f.setBounds(300,100,600,500);
                   f.setLayout(newFlowLayout());

                   tf= new TextField(60);

                   but= new Button("转到");

                   ta= new TextArea(25,70);


                   d = new Dialog(f,"提示信息-self",true);
                   d.setBounds(400,200,240,150);
                   d.setLayout(newFlowLayout());
                   lab= new Label();
                   okBut= new Button("确定");

                   d.add(lab);
                   d.add(okBut);


                   f.add(tf);
                   f.add(but);
                   f.add(ta);


                   myEvent();
                   f.setVisible(true);
         }
         private void  myEvent()
         {

                   okBut.addActionListener(newActionListener()
                   {
                            publicvoid actionPerformed(ActionEvent e)
                            {
                                     d.setVisible(false);
                            }
                   });
                   d.addWindowListener(newWindowAdapter()
                   {
                            publicvoid windowClosing(WindowEvent e)
                            {
                                     d.setVisible(false);
                            }
                   });

                   tf.addKeyListener(newKeyAdapter()
                   {
                            publicvoid keyPressed(KeyEvent e)
                            {
                                     if(e.getKeyCode()==KeyEvent.VK_ENTER)
                                               showDir();
                            }
                   });


                   but.addActionListener(newActionListener()
                   {
                            publicvoid actionPerformed(ActionEvent e)
                            {
                                     showDir();

                            }
                   });

                   f.addWindowListener(newWindowAdapter()
                   {
                            publicvoid windowClosing(WindowEvent e)
                            {
                                     System.exit(0);
                            }
                   });
         }

         private void showDir()
         {
                   String dirPath = tf.getText();

                   File dir = new File(dirPath);

                   if(dir.exists()&& dir.isDirectory())
                   {
                            ta.setText("");
                            String[] names = dir.list();
                            for(Stringname : names)
                            {
                                     ta.append(name+"\r\n");
                            }
                   }
                   else
                   {
                            String info = "您输入的信息:"+dirPath+"是错误的。请重输";
                            lab.setText(info);
                            d.setVisible(true);
                   }
         }

         public static void main(String[] args)
         {
                   newMyWindowDemo();
         }
}
练习五:GUI的菜单栏练习
import java.awt.*;
import java.awt.event.*;


class MyMenuDemo
{

         private Frame f;
         private MenuBar mb;
         private Menu m,subMenu;
         private MenuItem closeItem,subItem;

         MyMenuDemo()
         {
                   init();
         }
         public void init()
         {
                   f = new Frame("my window");
                   f.setBounds(300,100,500,600);
                   f.setLayout(newFlowLayout());

                   mb = new MenuBar();

                   m = new Menu("文件");

                   subMenu = new Menu("子菜单");


                   subIte m= new MenuItem("子条目");
                   closeItem = new MenuItem("退出");

                   subMenu.add(subItem);

                   m.add(subMenu);
                   m.add(closeItem);
                   mb.add(m);

                   f.setMenuBar(mb);

                   myEvent();

                   f.setVisible(true);


         }
         private void myEvent()
         {

                   closeItem.addActionListener(newActionListener()
                   {
                            public void actionPerformed(ActionEvent e)
                            {
                                     System.exit(0);
                            }
                   });
                   f.addWindowListener(newWindowAdapter()
                   {
                            public void windowClosing(WindowEvent e)
                            {
                                     System.exit(0);
                            }
                   });
         }

         public static void main(String[] args)
         {
                   newMyMenuDemo();
         }
}
练习六:菜单栏中的保存,打开文件功能及双击执行的jar包
package mymenu;
import java.awt.*;
import java.awt.event.*;
import java.io.*;

public class MyMenuTest
{

         private Frame f;
         private MenuBar bar;
         private TextArea ta;
         private Menu fileMenu;
         private MenuItem openItem,saveItem,closeItem;


         private FileDialog openDia,saveDia;

         private File file;
         MyMenuTest()
         {
                   init();
         }
         public void init()
         {
                   f = new Frame("my window");
                   f.setBounds(300,100,650,600);

                   bar= new MenuBar();

                   ta= new TextArea();

                   fileMenu= new Menu("文件");

                   openItem= new MenuItem("打开");
                   saveItem= new MenuItem("保存");
                   closeItem= new MenuItem("退出");

                   fileMenu.add(openItem);
                   fileMenu.add(saveItem);
                   fileMenu.add(closeItem);
                   bar.add(fileMenu);

                   f.setMenuBar(bar);


                   openDia= new FileDialog(f,"我要打开",FileDialog.LOAD);
                   saveDia= new FileDialog(f,"我要保存",FileDialog.SAVE);


                   f.add(ta);
                   myEvent();

                   f.setVisible(true);


         }
         private void myEvent()
         {

                   saveItem.addActionListener(newActionListener()
                   {

                            public void actionPerformed(ActionEvent e)
                            {
                                     if(file==null)
                                     {
                                               saveDia.setVisible(true);

                                               String dirPath = saveDia.getDirectory();
                                               String fileName = saveDia.getFile();
                                               if(dirPath==null|| fileName==null)
                                                        return;
                                               file = new File(dirPath,fileName);
                                     }

                                     try
                                     {
                                               BufferedWriter bufw  = new BufferedWriter(newFileWriter(file));

                                               String text = ta.getText();

                                               bufw.write(text);
                                               //bufw.flush();
                                               bufw.close();
                                     }
                                     catch(IOException ex)
                                     {
                                               thrownew RuntimeException();
                                     }

                            }
                   });


                   openItem.addActionListener(newActionListener()
                   {
                            public void actionPerformed(ActionEvent e)
                            {
                                     openDia.setVisible(true);
                                     String dirPath = openDia.getDirectory();
                                     String fileName = openDia.getFile();
//                                  System.out.println(dirPath+"..."+fileName);
                                     if(dirPath==null|| fileName==null)
                                               return;

                                     ta.setText("");
                                     file = new File(dirPath,fileName);

                                     try
                                     {
                                               BufferedReader bufr = new BufferedReader(new FileReader(file));

                                               String line = null;

                                               while((line=bufr.readLine())!=null)
                                               {
                                                        ta.append(line+"\r\n");
                                               }

                                               bufr.close();
                                     }
                                     catch(IOException ex)
                                     {
                                               throw new RuntimeException("读取失败");
                                     }


                            }
                   });


                   closeItem.addActionListener(newActionListener()
                   {
                            public void actionPerformed(ActionEvent e)
                            {
                                     System.exit(0);
                            }
                   });
                   f.addWindowListener(newWindowAdapter()
                   {
                            public void windowClosing(WindowEvent e)
                            {
                                     System.exit(0);
                            }
                   });
         }

         public static void main(String[] args)
         {
                   newMyMenuTest();
         }
}

/*
如何制作可以双击执行的jar包呢?
1,将多个类封装到了一个包(package)中。
2,定义一个jar包的配置信息。
         定义一个文件a.txt 。文件内容内容为:
         Main-Class:(空格)包名.类名(回车)
3,打jar包。
         jar-cvfm my.jar a.txt 包名
4,通过winrar程序进行验证,查看该jar的配置文件中是否有自定义的配置信息。

5,通过工具--文件夹选项--文件类型--jar类型文件,通过高级,定义该jar类型文件的打开动作的关联程序。
         jdk\bin\javaw.exe-jar

6,双击试试!。哦了。


*/


 2717
2717

 被折叠的 条评论
为什么被折叠?
被折叠的 条评论
为什么被折叠?
 到【灌水乐园】发言


