Ubuntu14.04-server U盘安装及django生产环境搭建简要记录
Ubuntu14.04的U盘安装
1.使用ultraiso(软碟通)将系统磁盘镜像文件写入u盘
2.将系统镜像(iso文件)拷入U盘,我拷入了u盘的iso目录(自己新建的)下
3.U盘启动,进入安装界面
4.按照提示进行系统安装,在读取系统光盘时会提示找不到系统镜像
解决方式:
-返回菜单选择进入shell
-找到拷入的系统iso镜像进行挂载
mount -t iso9660 -o loop iso/ubuntu-***.iso /cdrom-注意这里必须要挂载到/cdrom下,因为默认去这个目录下找的
-退出shell
exit5.选择安装系统,正常
6.到达选择配置软件时,会发生闪退
解决方式:
-先安装grub,然后不要重启,选择返回,重新选择配置软件,加载正常!
7.安装软件完毕后会自动重启,系统安装完毕
Django生产环境的搭建
1.先确定自己的软件源,我用的是官方源
-首先配置apt-get的sources.list文件
nano /etc/apt/sources.list
#贴上我自己的软件源
deb http://archive.ubuntu.com/ubuntu/ trusty main restricted universe multiverse
deb http://archive.ubuntu.com/ubuntu/ trusty-security main restricted universe multiverse
deb http://archive.ubuntu.com/ubuntu/ trusty-updates main restricted universe multiverse
deb http://archive.ubuntu.com/ubuntu/ trusty-proposed main restricted universe multiverse
deb http://archive.ubuntu.com/ubuntu/ trusty-backports main restricted universe multiverse
deb-src http://archive.ubuntu.com/ubuntu/ trusty main restricted universe multiverse
deb-src http://archive.ubuntu.com/ubuntu/ trusty-security main restricted universe multiverse
deb-src http://archive.ubuntu.com/ubuntu/ trusty-updates main restricted universe multiverse
deb-src http://archive.ubuntu.com/ubuntu/ trusty-proposed main restricted universe multiverse
deb-src http://archive.ubuntu.com/ubuntu/ trusty-backports main restricted universe multiverse-当然,也可以选用其他的源,但是有些不稳定,可以自己选择,给出网址:http://wiki.ubuntu.org.cn/源列表/
2.安装pip(本系统自带python2.7.6,就不换了)
wget --no-check-certificate http://pypi.python.org/packages/source/p/pip/pip-1.0.2.tar.gz
tar zxf pip-1.0.2.tar.gz
cd pip-1.0.2
python setup.py install
这里给出的pip版本不是最新的,但是笔者在更新之后,发现很多软件时安装不上的……所以就使用这个了,而且后面也没有遇到问题
3.开始安装
由于ubuntu的软件管理的强大,所以没有什么特别需要注意的问题,有些特殊的我会跟大家单独说,列代码(笔者是在root下安装的,如果你是普通用户,请加上sudo,如第一条命令):
sudo apt-get install nginx

apt-get install mysql-server mysql-client

apt-get install python-pip

pip install django==1.7.4

pip install djangorestframework

pip install gunicorn

apt-get install memcached

pip install virtualenv

apt-get install virtualenvwrapper

pip install supervisor

apt-get install emacs

apt-get install tree

apt-get install Iotop

apt-get install Htop

apt-get install phpMyAdmin

apt-get install git-core openssh-server openssh-client

apt-get install ipython

apt-get install vsftpd-这是安装的软件列表
Nginx (web服务器,正/反向代理)
MySQL (数据库服务器)
Python (开发语言)
Pip (开发依赖类/库/包管理器)
Django (Web App应用服务框架)
Django-Rest-Framework (Restful框架)
Gunicorn(Python WSGI HTTP Server)
Memcachd (缓存)
Supervisor (进程/服务启动管理)
VirtualEnv (隔离应用环境创建)
VirtualEnvWrapper(虚拟环境管理工具)
IPython (python交互解释器)
Git (分布式源码管理)
phpMyAdmin (MySQL数据库服务web管理)
Wget (命令行下载工具)
Vim (命令行编辑器)
Emacs (命令行编辑器)
Htop (系统负载查看/管理)
Iotop (系统磁盘I/O查看/管理)lI
Tree (命令行目录结构查看)
Vsftpd (FTP服务器)
下面说下一些容易出问题的软件的配置
nginx的简单配置
-配置文件都在/etc/nginx下
-虚拟主机已经安排在了/etc/nginx/sites-available下
-启动程序文件在/usr/sbin/nginx
-日志放在了/var/log/nginx中,分别是access.log和error.log
-已经在/etc/init.d/下创建了启动脚本nginx
-默认的虚拟主机的目录设置在了/usr/share/nginx/html
具体配置请参考
http://www.cnblogs.com/xiaogangqq123/archive/2011/03/02/1969006.html
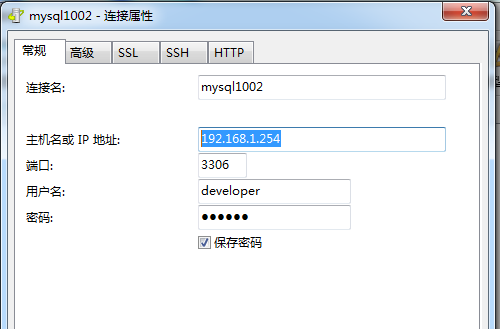
mysql的远程访问配置
nano /etc/mysql/my.conf-将 bind 127.0.0.1注释掉
-进入mysql
mysql -u root -p-创建远程连接用户
当然,可以不创建,但是不建议使用root远程登录。
grant all on *.* to username@'%' identified by 'password';username和password自定,权限也可以自己改
-刷新一下:(还是在mysql内的)
flush privileges-重启mysql
service mysql restart 或者 /etc/init.d/mysql restart-现在就可以远程访问了,比如使用navicat
使用phpmyadmin远程管理mysql
本系统自带的有apache2,所以你可以选择apache2来部署phpmyadmin。当然,我们既然安装了nginx,所以使用nginx来部署phpmyadmin应该是我们的首选,这里,都介绍一下。
-部署之前
在部署之前,我们得先创建phpmyadmin的数据库,但是我发现用apt-get安装的竟然没有create_tables.sql文件,真是很郁闷,于是去网上下载了一个phpmyadmin的zip包,找到了里面的create_tables.sql文件,这里分享一下:
好像没有上传附件的地方,传到下载频道吧。。。
http://download.csdn.net/detail/u011377873/8496979
sql脚本的执行就不说了,给俩命令吧:
这是未进入mysql的执行命令
mysql -h localhost -u root -p 123456 < /home/ftp/create_tables.sql这是已经进入的执行命令
source xxxx.sql-**
部署在apache2
**
由于apache已经很强大了,所以基本上不需要怎么配置就ok了
-将phpmyadmin连接或复制到服务器根目录
ln -s /usr/share/phpmyadmin/ /var/www/html-开启apache或者重新加载
service apache2 start|reload|restart|stop-ok,这样就可以访问了,简单吧
-**
部署在nginx上
**
-还是先连接或者复制到nginx目录下
ln -s /usr/share/phpmyadmin/ /usr/share/nginx/html -配置nginx的配置文件,使它能够解析php
(1)首先安装php5-fpm,这是用于解析php的
apt-get install php5-fpm(2)开始配置nginx.cnf
vi /etc/nginx/sites-available/defaultserver {
listen 80 default_server;
listen [::]:80 default_server ipv6only=on;
root /usr/share/nginx/html;
index index.html index.htm index.php;
# Make site accessible from http://localhost/
server_name localhost;
location / {
# First attempt to serve request as file, then
# as directory, then fall back to displaying a 404.
try_files $uri $uri/ =404;
# Uncomment to enable naxsi on this location
# include /etc/nginx/naxsi.rules
}
location /doc/ {
alias /usr/share/doc/;
autoindex on;
allow 127.0.0.1;
allow ::1;
deny all;
}
# Only for nginx-naxsi used with nginx-naxsi-ui : process denied requests
#location /RequestDenied {
# proxy_pass http://127.0.0.1:8080;
#}
#error_page 404 /404.html;
# redirect server error pages to the static page /50x.html
#
error_page 500 502 503 504 /50x.html;
location = /50x.html {
root /usr/share/nginx/html;
}
# pass the PHP scripts to FastCGI server listening on 127.0.0.1:9000
#
location ~ \.php$ {

        try_files $uri =404;
                #fastcgi_split_path_info ^(.+.php)(/.+)$;
                # NOTE: You should have "cgi.fix_pathinfo = 0;" in php.ini

                # With php5-cgi alone:
                fastcgi_pass 127.0.0.1:9000;
                # With php5-fpm:
                #fastcgi_pass unix:/var/run/php5-fpm.sock;
                fastcgi_index index.php;
        include fastcgi_params;
    }
# deny access to .htaccess files, if Apache's document root
# concurs with nginx's one
#
#location ~ /\.ht {
# deny all;
#}
}
# another virtual host using mix of IP-, name-, and port-based configuration
#
#server {
# listen 8000;
# listen somename:8080;
# server_name somename alias another.alias;
# root html;
# index index.html index.htm;
#
# location / {
# try_files $uri $uri/ =404;
# }
#}
# HTTPS server
#
#server {
# listen 443;
# server_name localhost;
#
# root html;
# index index.html index.htm;
#
# ssl on;
# ssl_certificate cert.pem;
# ssl_certificate_key cert.key;
#
# ssl_session_timeout 5m;
#
# ssl_protocols SSLv3 TLSv1 TLSv1.1 TLSv1.2;
# ssl_ciphers "HIGH:!aNULL:!MD5 or HIGH:!aNULL:!MD5:!3DES";
# ssl_prefer_server_ciphers on;
#
# location / {
# try_files $uri $uri/ =404;
# }
#}(3)主要是要配置支持php解析这一段
location ~ \.php$ {
try_files $uri =404;
#fastcgi_split_path_info ^(.+.php)(/.+)$;
# NOTE: You should have "cgi.fix_pathinfo = 0;" in php.ini
# With php5-cgi alone:
fastcgi_pass 127.0.0.1:9000;
# With php5-fpm:
#fastcgi_pass unix:/var/run/php5-fpm.sock;
fastcgi_index index.php;
include fastcgi_params;
}(4)好了,启动nginx试试吧,记得关闭apache的服务,或者自己换一个监听端口,不然回报无法绑定地址的错误的
service nginx restart最后再说说ftp的配置吧
这个真的好长,我就只好偷个懒了:
看看这个吧
http://www.cnblogs.com/witxjp/archive/2010/03/27/1698208.html
但是我还要补充一点,就是关于ubuntu的防火墙iptables的问题。大家都知道ubuntu没有iptables的配置文件了,准确说是不可见了,而ftp的访问需要开放21端口,简单配置:
iptables -A INPUT -p tcp -m tcp --dport 20 -j ACCEPT试试吧,真的可以访问ftp了(当然,其他的配置你都配置好了),但是第二天。。。。。又不行了,郁闷了。。。
永久保存防火墙配置:创建自己的iptables配置文件:
iptables -I INPUT 3 -p tcp -m tcp --dport 20 -j ACCEPT

iptables-save >/etc/iptables.up.rules
#把刚才设置的规则保存到指定的地方,文件名可以自定义。

调用Iptables设置
iptables-restore >/etc/iptables.up.rules
好了 现在命令我们都知道了,那么,设置成开机启动吧
nano /etc/network/interfaces

最后面,加上
pre-up iptables-restore >/etc/iptables.up.rules //开机时自动调用已经存在的Iptables设置
post-down iptables-save >/etc/iptables.up.rule  //关机时自动保存当前的Iptables设置
所以。。。以后直接修改iptabes.up.rule(这名字是自己起的)不就可以了吗,然后记得重新加载配置文件:
iptables-restore >/etc/iptables.up.rulesgood!!
其他的配置的推荐
好累好累,下面的就偷懒了:
memcached配置
http://www.cnblogs.com/czh-liyu/archive/2010/04/27/1722084.html
supervisor配置
http://blog.chinaunix.net/uid-16426471-id-2743154.html
gunicorn配置
http://blog.csdn.net/raptor/article/details/8681357
Git配置
http://blog.chinaunix.net/uid-9525959-id-3061349.html
个人心语:
呼~总算写完了,以前一直是在centOS玩的,第一次配置ubuntu,但是说实在的,pat-get真是好用啊,也不用可虑软件的依赖关系了,轻松无比啊。这些东西我全部配置完大概用了一个周的时间,中间走了不少弯路,也被网上的教程坑过无数次,这里写下自己的血路历程,帮助自己,也帮助他人了。
第一次用markdown,排版有点乱,大家见谅哈。。


 2万+
2万+


 被折叠的 条评论
为什么被折叠?


