


简介
本篇介绍和讲解如何在图像中隐藏一些信息。
具体实现
基本流程
一共分为两部分:第一部分是生成隐藏的加密图像,另一部分是对加密图像解密,显示出被隐藏的信息。
生成加密图像
具体代码
#include <opencv2/core/core.hpp>
#include <opencv2/highgui/highgui.hpp>
#include <math.h>
#include <string.h>
#include <opencv/cv.h>
#include <stdio.h>

using namespace cv;

char normalpicName[20];
Mat mat1, mat2;
int normalWidth, normalHeight;
IplImage src1, src2;
CvScalar s1, s2;

void initPic(){
	int i, j;

	mat1 = imread(normalpicName);
	src1 = mat1;
	mat2 = imread(normalpicName);
	src2 = mat2;
	normalWidth = mat1.rows;
	normalHeight = mat1.cols;

	for(i=0; i< normalWidth; i++){
		for(j=0; j<normalHeight; j++){
			s1 = cvGet2D(&src1, i, j);
			s2 = cvGet2D(&src2, i, j);
			if(((int)s1.val[0])%2 != 0){
				s1.val[0] = s1.val[0] -1;
				cvSet2D(&src1, i, j, s1);
			}
			if(s2.val[0] == 255){
				s2.val[0] = s2.val[0] -1;
				cvSet2D(&src2, i, j, s2);
			}
		}
	}
	imshow("mat1", mat1);
}

void writeWord(){
	putText(mat2, "yulinghan", Point(100, 100), FONT_HERSHEY_PLAIN, 3.0, CV_RGB(100,100,255), 2);
	putText(mat2, "The World!", Point(100, 300), FONT_HERSHEY_PLAIN, 3.0, CV_RGB(100,100,255), 2);
	imshow("mat2", mat2);
}

void setPic(){
	int i, j;

	for(i=0; i< normalWidth; i++){
		for(j=0; j<normalHeight; j++){
			s1 = cvGet2D(&src1, i, j);
			s2 = cvGet2D(&src2, i, j);
			if(s2.val[0] == 255){
				s1.val[0] = s1.val[0] + 1;
				cvSet2D(&src1, i, j, s1);
			}
		}
	}
	imshow("new", mat1);
}

int main(int argc, char *argv[]){
	vector<int> compression_params;

	if(argc < 2){
		printf("Please input first and second picture!\n");
		return -1;
	}
	memcpy(normalpicName, argv[1], sizeof(argv[1]));
	initPic();
	writeWord();
	setPic();
	imwrite("new.png", mat1);
	cv::waitKey(0);
	return 0;
}
代码讲解
  1、初始化图片,首先首先将源图片分别打开到mat1和mat2中,接着遍历图片元素,将mat1中蓝色分量像素全部设置为偶数,
将mat2中,蓝色分量为255的元素,全部改变为254。
void initPic(){
	int i, j;

	mat1 = imread(normalpicName);
	src1 = mat1;
	mat2 = imread(normalpicName);
	src2 = mat2;
	normalWidth = mat1.rows;
	normalHeight = mat1.cols;

	for(i=0; i< normalWidth; i++){
		for(j=0; j<normalHeight; j++){
			s1 = cvGet2D(&src1, i, j);
			s2 = cvGet2D(&src2, i, j);
			if(((int)s1.val[0])%2 != 0){
				s1.val[0] = s1.val[0] -1;
				cvSet2D(&src1, i, j, s1);
			}
			if(s2.val[0] == 255){
				s2.val[0] = s2.val[0] -1;
				cvSet2D(&src2, i, j, s2);
			}
		}
	}
	imshow("mat1", mat1);
}
  2、写入需要隐藏的信息,往mat2中写入了字符:"yulinghan","The World!"。对应的字符颜色为CV_RGB(100,100,255)。注意:这个时候在mat2中,
就只有这些字符的颜色,蓝色分量才能达到255。
void writeWord(){
	putText(mat2, "yulinghan", Point(100, 100), FONT_HERSHEY_PLAIN, 3.0, CV_RGB(100,100,255), 2);
	putText(mat2, "The World!", Point(100, 300), FONT_HERSHEY_PLAIN, 3.0, CV_RGB(100,100,255), 2);
	imshow("mat2", mat2);
}
  3、进行隐藏、加密操作。遍历mat2,找到所有它蓝色分量为255的元素,然后将mat1上,同样对应位置的蓝色分量由偶数改为奇数。注意:最后被隐藏
的信息位置,就是mat1上对应蓝色分量为奇数的信息位置。
void setPic(){
	int i, j;

	for(i=0; i< normalWidth; i++){
		for(j=0; j<normalHeight; j++){
			s1 = cvGet2D(&src1, i, j);
			s2 = cvGet2D(&src2, i, j);
			if(s2.val[0] == 255){
				s1.val[0] = s1.val[0] + 1;
				cvSet2D(&src1, i, j, s1);
			}
		}
	}
	imshow("new", mat1);
}
  4、main函数操作。首先初始化图片元素,接着将需要隐藏的文字信息,写入到mat2中,然后将信息加工隐藏到mat1上,最后将被加工后的mat1保存为
new.png。(注意图片不能用imwrite保存为jpg格式,它会导致mat1中的图像元素发生细微变化,导致加密信息被破坏)。
int main(int argc, char *argv[]){
	vector<int> compression_params;

	if(argc < 2){
		printf("Please input first and second picture!\n");
		return -1;
	}
	memcpy(normalpicName, argv[1], sizeof(argv[1]));
	initPic();
	writeWord();
	setPic();
	imwrite("new.png", mat1);
	cv::waitKey(0);
	return 0;
}
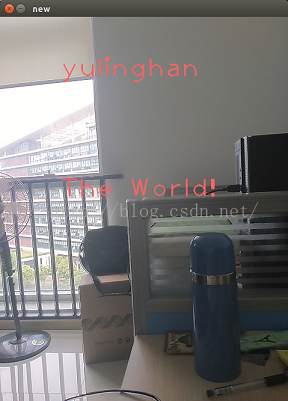
结果显示
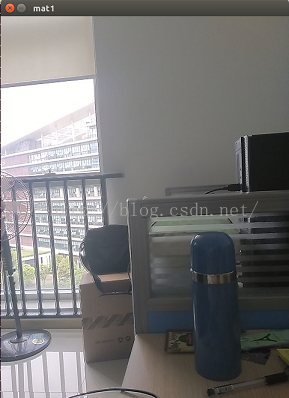
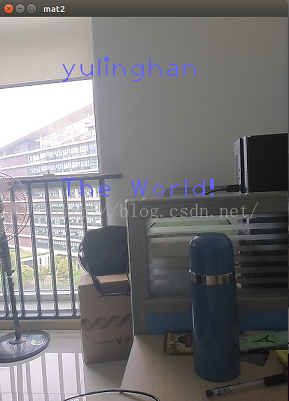
原始的mat1图像: 写入文字信息后的mat2图像:
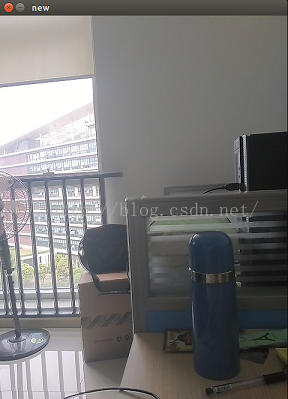
被加密之后的mat1图像:
解密显示信息
具体代码
#include <opencv2/core/core.hpp>
#include <opencv2/highgui/highgui.hpp>
#include <math.h>
#include <string.h>
#include <opencv/cv.h>
#include <stdio.h>

using namespace cv;

char normalpicName[20];
Mat mat1;
int normalWidth, normalHeight;
IplImage src1;
CvScalar s1;

void getPicInfo(){
	int i, j;
	mat1 = imread(normalpicName);
	src1 = mat1;
	normalWidth = mat1.rows;
	normalHeight = mat1.cols;
	imshow("old", mat1);

	for(i=0; i< normalWidth; i++){
		for(j=0; j<normalHeight; j++){
			s1 = cvGet2D(&src1, i, j);
			if(((int)s1.val[0]) % 2 != 0){
				s1.val[0] = 100;
				s1.val[1] = 100;
				s1.val[2] = 255;
				cvSet2D(&src1, i, j, s1);
			}
		}
	}
	imshow("new", mat1);
}
int main(int argc, char *argv[]){
	if(argc < 2){
		printf("Please input first and second picture!\n");
		return -1;
	}
	memcpy(normalpicName, argv[1], sizeof(argv[1]));

	getPicInfo();
	cv::waitKey(0);
	return 0;
}
代码讲解
  1、解密显示图像:对应传入的图像就是之前保存的new.png图像,将它打开到mat1中,接着遍历该图片,将图像蓝色分量上所有是奇数的元素,颜色全都
改为R(255)、G(100)、B(100)。最后将修改解密后图片显示出来。
结果显示
解密前图像: 解密后图像: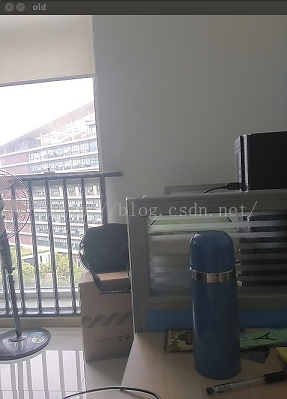


 6764
6764


 被折叠的 条评论
为什么被折叠?
被折叠的 条评论
为什么被折叠?
 到【灌水乐园】发言


