


Scrapy介绍
Scrapy是一个为了爬取网站数据,提取结构性数据而编写的应用框架。 可以应用在包括数据挖掘,信息处理或存储历史数据等一系列的程序中。
安装Scrapy
- 因为scrapy依赖其他安装包,先安装其他包
默认环境下安装
- 确保电脑已安装pip工具 (使用python get-pip.py来安装也可以)
pip –version 查看 - 安装lxml (pip install lxml)
出现错误,应该是缺少依赖文件,去lxml.de/install.html下载windows安装版 安装OpenSSL (pip install pyOpenSSL)
安装Scrpay (pip install Scrapy)
cmd内输出Scrapy查看是否有错误或者警告 (提示缺少service_identity 直接pip install service_identity )
Pycharm下安装Scrapy
在Pycharm下安装Scrapy前,已配置好Scrapy
Pycharm安装第三方包:
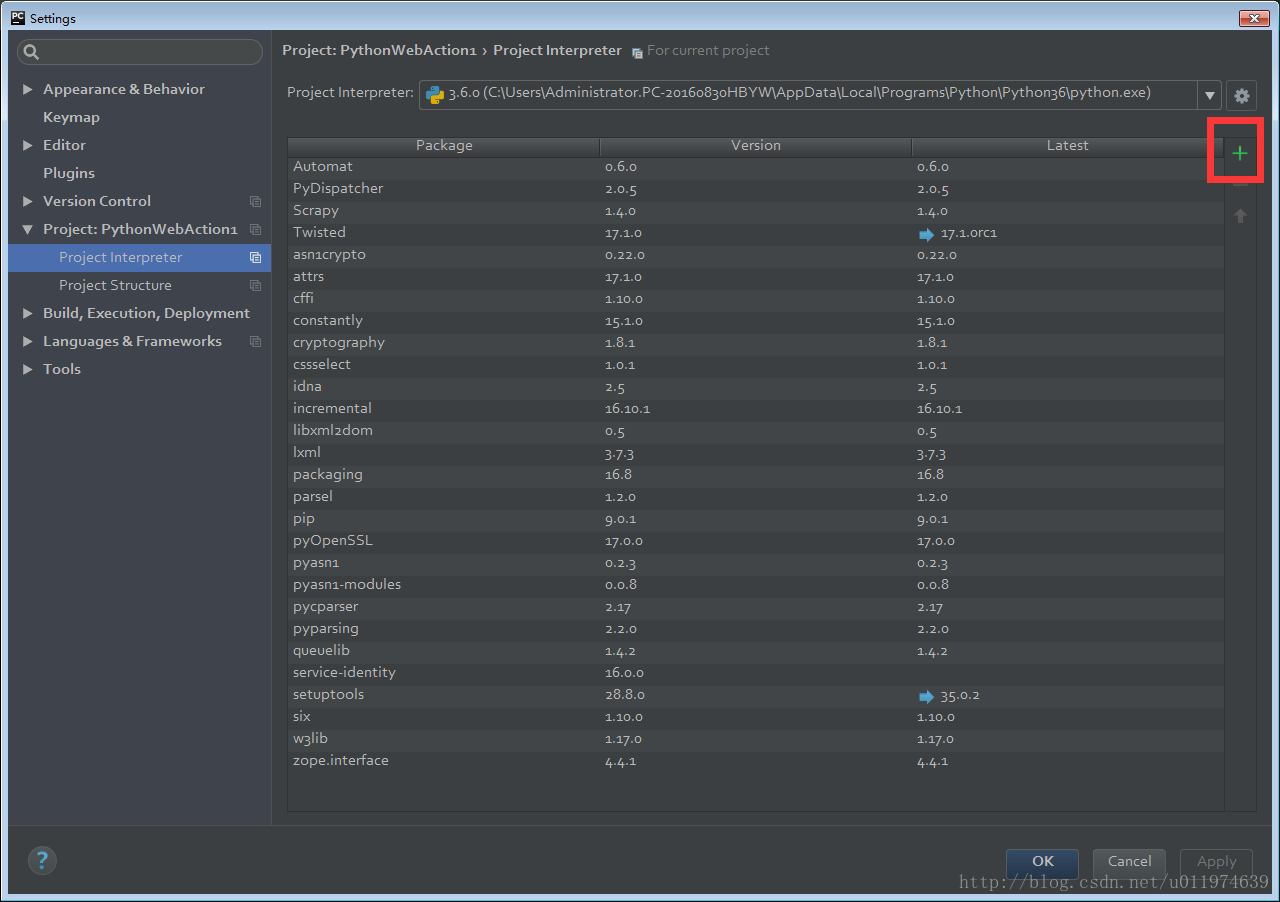
1. Pycharm下建立工程XXXXXXXX|选择File|Settings|Project:XXXXXXXX|Project Interpreter
2.点击绿色的+
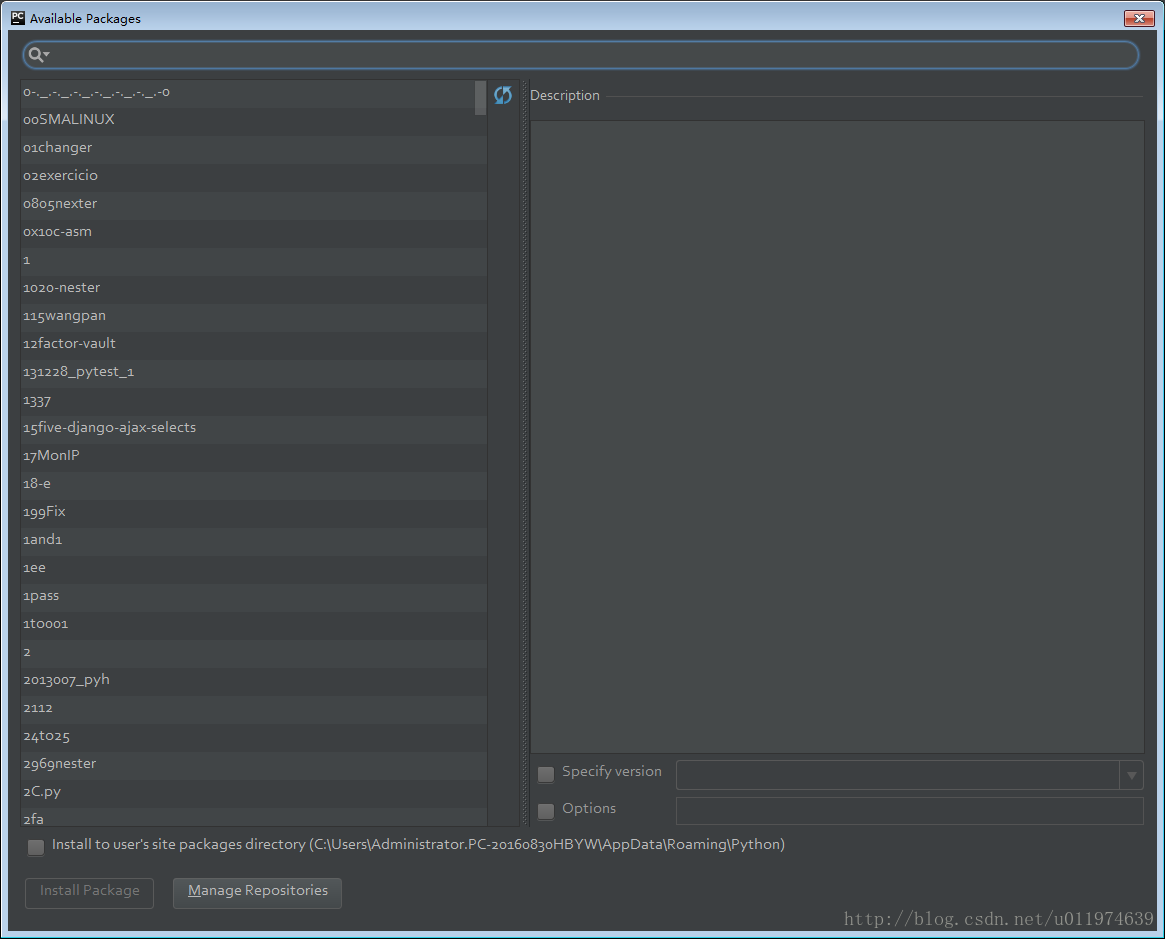
3.Available Packages就是对pip命令的窗口化集成
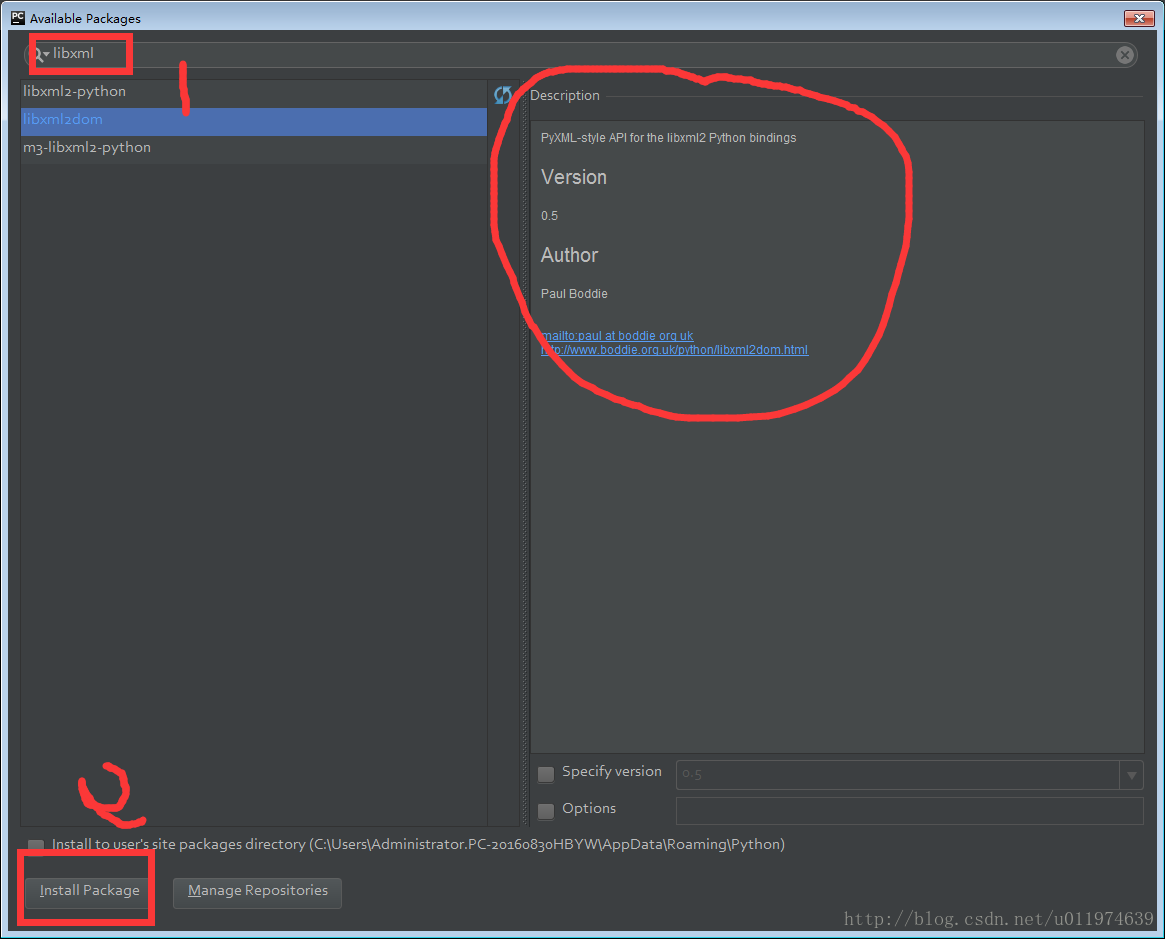
4.查询软件包 点击左下方的Install Package
按照顺序安装
- zope.interface包
- pyOpenSSL包
- twisted包
提示twisted安装失败,查看detail按照指示从http://landinghub.visualstudio.com/visual-cpp-build-tools上Download Visual C++ Build Tools 2015 . 注意这个会直接安装在C盘,大约占用了2个G。 - libxml2dom包
- lxml包(用于分析xml文档的ElementTree API)
- 安装Scrapy包
测试是否成功
尝试导入scrapy包
配置成功~
下面通过一个个实例来讲解Scrapy的用法
入门Scrapy
使用Scrapy抓取一个网站步骤:
- 创建一个Scrapy项目
- 定义一个Item容器
- 编写爬虫并提取到Item
- 编写Item Pipeline来存储提取到的Item
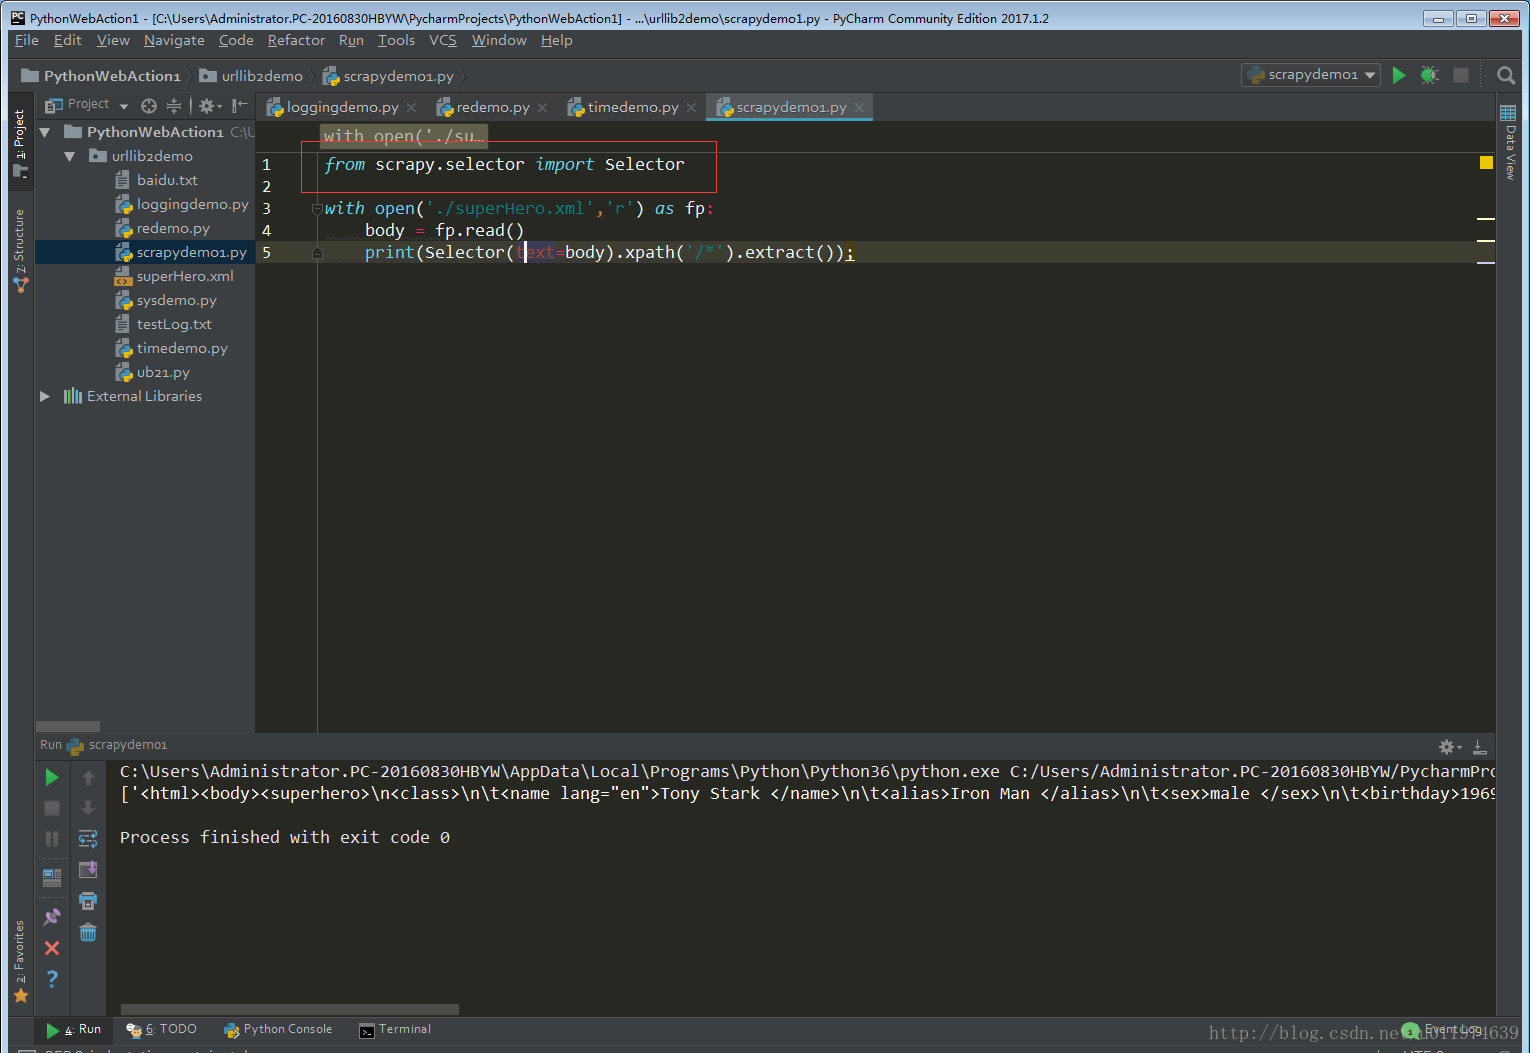
Selectors选择器
当抓取网页时,你做的最常见的任务是从HTML源码中提取数据。现有的一些库可以达到这个目的:
- BeautifulSoup 是在程序员间非常流行的网页分析库,它基于HTML代码的结构来构造一个Python对象, 对不良标记的处理也非常合理,但它有一个缺点:慢。
- lxml 是一个基于 ElementTree (不是Python标准库的一部分)的python化的XML解析库(也可以解析HTML)
Scrapy提取数据有自己的一套机制。它们被称作选择器(seletors),因为他们通过特定的 XPath 或者 CSS 表达式来“选择” HTML文件中的某个部分。
Scrapy选择器构建于 lxml 库之上,这意味着它们在速度和解析准确性上非常相似。
Scrapy的Selectors的常用方法
Selector有四个基本的方法(点击相应的方法可以看到详细的API文档):
- xpath(): 传入xpath表达式,返回该表达式所对应的所有节点的selector list列表 。
- css(): 传入CSS表达式,返回该表达式所对应的所有节点的selector list列表.
- extract(): 序列化该节点为unicode字符串并返回list。
- re(): 根据传入的正则表达式对数据进行提取,返回unicode字符串list列表。
Scrapy实战
第一个例子-爬取电影信息
以电影天堂为例.网址为http://www.dy2018.com/,本次目标是;爬取页面的电影名称和下载地址.
创建项目
在开始爬取之前,您必须创建一个新的Scrapy项目。进入您打算存储代码的目录中,运行下列命令:
scrapy startproject dytiantang创建爬虫脚本
scrapy genspider  dySpider  dy2018.com
#使用scrapy genspider命令创建一个名字为dySpider 的爬虫脚本,搜索域为 dy2018.com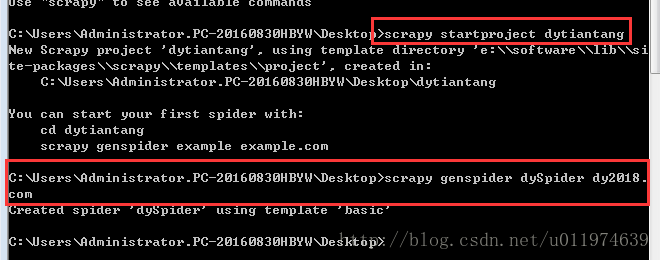
文件描述
上述两个命令将会创建包含下列内容的 dytiantang目录:
 dytiantang/
            scrapy.cfg #项目的配置文件
            dytiantang/  #该项目的python模块。之后您将在此加入代码。
                __init__.py  #模块化需求文件
                items.py  #该文件作用是定义爬虫最终需要哪些项
                pipelines.py  #文件扫尾作用,决定爬虫爬取内容后怎么处理
                middlewares.py
                settings.py  #项目设置,决定爬虫的运行方式
                spiders/  #放置spider代码的目录.
                    __init__.py
                   dySpider.py  # 爬虫代码的具体编写(如果没有,进入dytiantang目录再执行scrapy genspider命令)
自编写的爬虫程序类似于写作文,从网络访问–>数据爬取–>数据筛选都是自编写,任务量较大,重复工作也多。
Scrapy建立了一整个爬虫程序框架,在创建好工程后,剩下的就是做填空题。有4个文件是我们需要关注修改的,分别为items.py、settings.py、pipelines.py、dySpider.py.
- items.py :爬啥? –> 爬取哪些内容
- settings.py:谁去爬? –> 由谁去爬取内容
- pipelines.py:爬完了干啥? –> 爬取内容的处理方式
- dySpider.py:怎么爬? –> 爬虫的具体编写
调试过程:
1.在Shell中尝试Selector选择器
为了介绍Selector的使用方法,接下来我们将要使用内置的 Scrapy shell
在工程目录下的执行命令: scrapy shell http://www.dy2018.com/
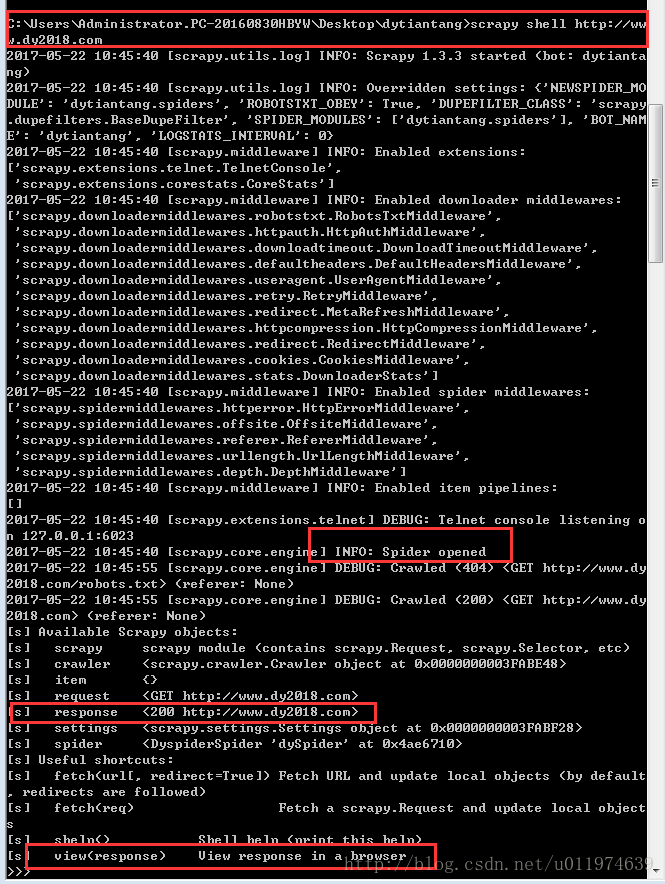
可以看出当前response值为200,说明响应成功。
当shell载入后,您将得到一个包含response数据的本地 response 变量。输入 response.body 将输出response的包体, 输出 response.headers 可以看到response的包头。
使用命令view(response)查看当前response.也可以使用response.body获取response的内容
更为重要的是,当输入 response.selector 时, 您将获取到一个可以用于查询返回数据的selector(选择器), 以及映射到 response.selector.xpath() 、 response.selector.css() 的 快捷方法(shortcut): response.xpath() 和 response.css() 。
2.使用浏览器工具对感兴趣分析后续数据筛选式
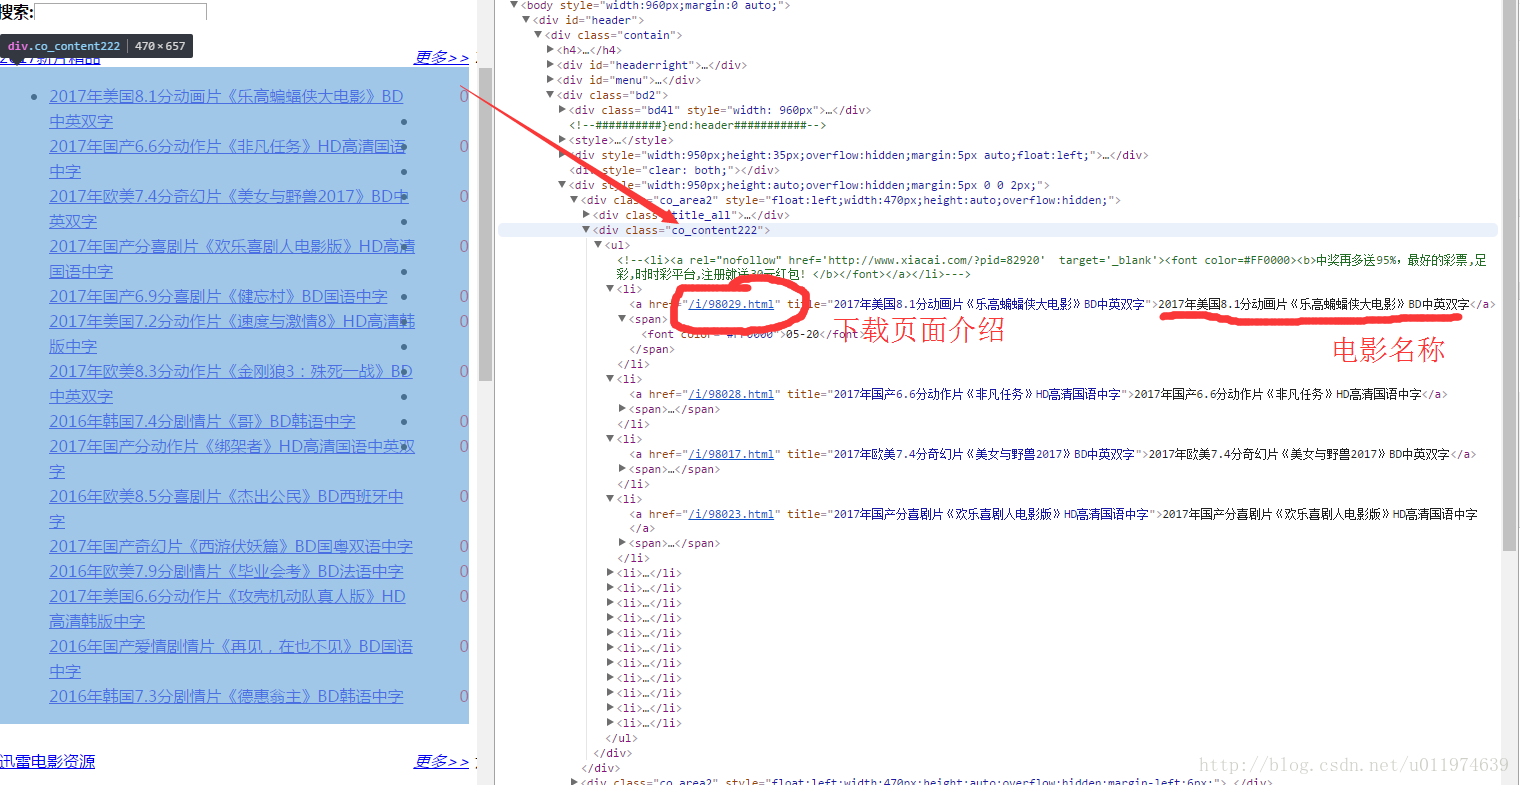
“2017年新片精品”是包裹在
#获取<div class = "co_content222">标签选择器.
subSelector = response.xpath('//div[@class="co_content222"]')    #任意class="co_content222"的标签
#subSelector为一个元组,考虑到网页中有多个class = "co_content222"的标签.我们筛选并查看出第一个内容.
print(subSelector[0].extract())
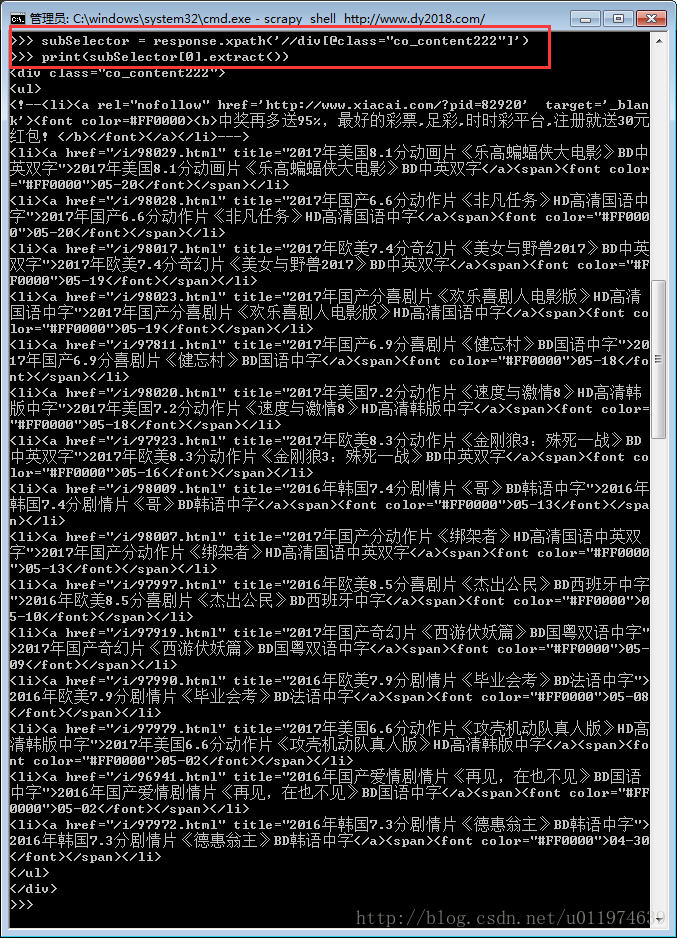
要获取的内容已经摘取到subSelector[0]内了.
筛选具体的数据:
#写一个循环,将第一个<div class='co_content222'>的所有电影名称和网址摘取下来
ssubSelector = subSelector[0].xpath('./ul/li')
    for sub in ssubSelector:
        print('\n name:'+sub.xpath('./a/text()').extract()[0]+'\n url:'+sub.xpath('./a/@href').extract()[0])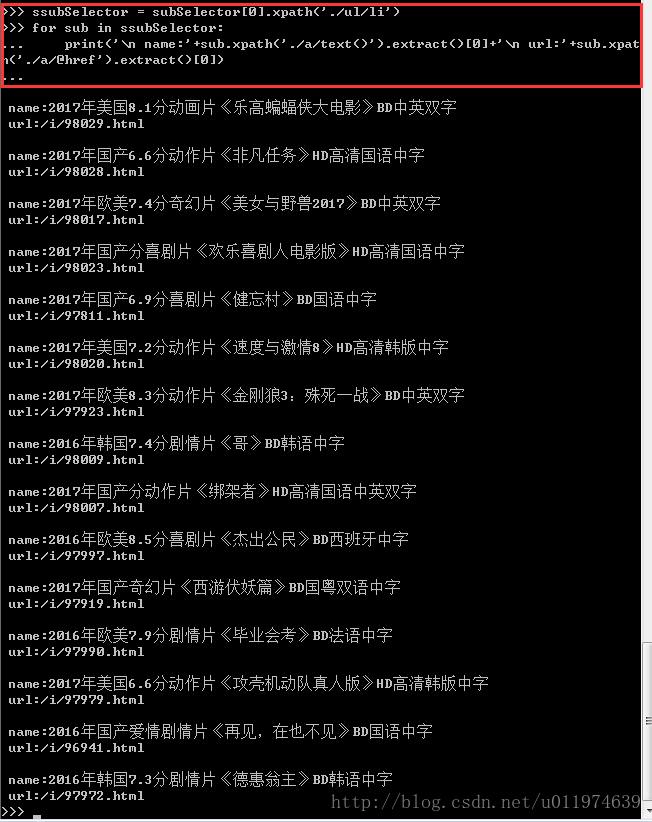
到这里需要获取的数据规律很明显了,调试完毕,编写爬虫代码.~
代码编写
这里重申一遍我们需要注意的四个文件
- items.py :爬啥? –> 爬取哪些内容
- dySpider.py:怎么爬? –> 爬虫的具体编写
- pipelines.py:爬完了干啥? –> 爬取内容的处理方式
- settings.py:谁去爬? –> 由谁去爬取内容
定义Item
Item 是保存爬取到的数据的容器;其使用方法和python字典类似,并且提供了额外保护机制来避免拼写错误导致的未定义字段错误。
类似在ORM中做的一样,您可以通过创建一个 scrapy.Item 类, 并且定义类型为scrapy.Field 的类属性来定义一个Item。 (如果不了解ORM, 不用担心,您会发现这个步骤非常简单)
根据需要从www.dy2018.com获取到的数据对item进行建模。我们需要为获取名字,url添加描述。 对此,在item中定义相应的字段。编辑 dytiantang目录中的 items.py 文件:
 import scrapy

    class DytiantangItem(scrapy.Item):
    # define the fields for your item here like:
    # name = scrapy.Field()
    moiveName  = scrapy.Field()  #保存电影名称
    moiveUrl = scrapy.Field()   #保存电影下载介绍地址
编写爬虫程序Spider
编写第一个爬虫(Spider)
Spider是用户编写用于从单个网站(或者一些网站)爬取数据的类。
其包含了一个用于下载的初始URL,如何跟进网页中的链接以及如何分析页面中的内容,提取生成 item 的方法。
为了创建一个Spider,您必须继承 scrapy.Spider 类, 且定义以下三个属性:
- name: 用于区别Spider。该名字必须是唯一的,您不可以为不同的Spider设定相同的名字
- start_urls: 包含了Spider在启动时进行爬取的url列表。因此,第一个被获取到的页面将是其中之一。 后续的URL则从初始的URL获取到的数据中提取。
- parse() 是spider的一个方法。 被调用时,每个初始URL完成下载后生成的Response对象将会作为唯一的参数传递给该函数。 该方法负责解析返回的数据(response.data),提取数据(生成item)以及生成需要进一步处理的URL的 Request 对象。
代码如下:
 # -*- coding: utf-8 -*-
import scrapy
from dytiantang.items import DytiantangItem

class DyspiderSpider(scrapy.Spider):
    name = "dySpider"           #爬虫唯一名称
    allowed_domains = ["dy2018.com"]
    start_urls = ('http://www.dy2018.com',) #爬取的起始地址

    def parse(self, response):
        subSelector = response.xpath('//div[@class="co_content222"]') #解析出的数据塞入Items
        ssubSelector = subSelector[0].xpath('./ul/li')
        items = []
        for sub in ssubSelector:
            item = DytiantangItem()
            item['moiveName'] = sub.xpath('./a/text()').extract()[0]
            item['moiveUrl'] ='http://www.dy2018.com'+str(sub.xpath('./a/@href').extract()[0])
            items.append(item)
        return items
Scrapy为Spider的 start_urls 属性中的每个URL创建了 scrapy.Request 对象,并将 parse 方法作为回调函数(callback)赋值给了Request。
Request对象经过调度,执行生成 scrapy.http.Response 对象并送回给spider parse() 方法。
爬取数据处理
每个item pipiline组件是一个独立的Python类,同时必须实现process_item方法:
process_item(item, spider)
#每个item pipeline组件都需要调用该方法,这个方法必须返回一个 Item (或任何继承类)对象, 或是抛出 DropItem 异常,被丢弃的item将不会被之后的pipeline组件所处理。

#参数介绍:
#item (Item 对象) – 被爬取的item
#spider (Spider 对象) – 爬取该item的spider
也可以实现以下方法:
open_spider(spider)  #当spider被开启时,这个方法被调用。
#参数:spider (Spider 对象) – 被开启的spider

close_spider(spider)  #当spider被关闭时,这个方法被调用
#参数:spider (Spider 对象) – 被关闭的spider
编写代码如下:
# -*- coding: utf-8 -*-

#此处将获取到的item数据保存到一个txt文档内.
# Define your item pipelines here
#
# Don't forget to add your pipeline to the ITEM_PIPELINES setting
# See: http://doc.scrapy.org/en/latest/topics/item-pipeline.html

import time

class DytiantangPipeline(object):
    def process_item(self, item, spider):
        now = time.strftime('%Y-%m-%d',time.localtime())
        fileName = 'dy'+now +'.txt'
        with open(fileName,'a') as fp:
            fp.write(item['moiveName'].encode('utf-8')+'\n'+item['moiveUrl'].encode('utf-8')+'\n\n')
        return item
启用一个Item Pipeline组件
为了启用一个Item Pipeline组件,你必须将它的类添加到 ITEM_PIPELINES 配置,就像下面这个例子
ITEM_PIPELINES = {
    'dytiantang.pipelines.DytiantangPipeline': 300,
}分配给每个类的整型值,确定了他们运行的顺序,item按数字从低到高的顺序,通过pipeline,通常将这些数字定义在0-1000范围内。
爬虫运行
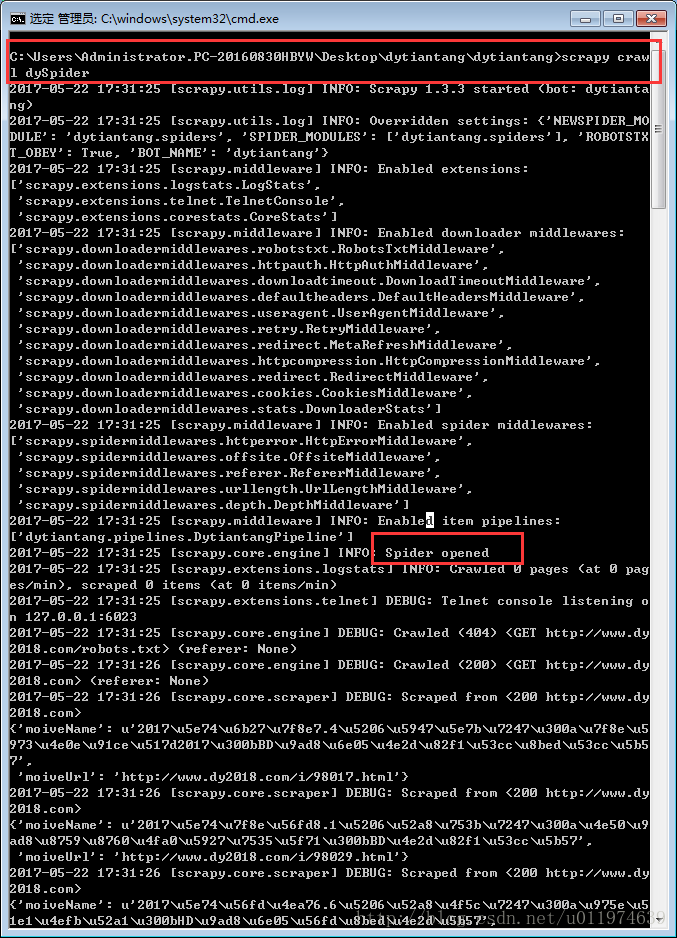
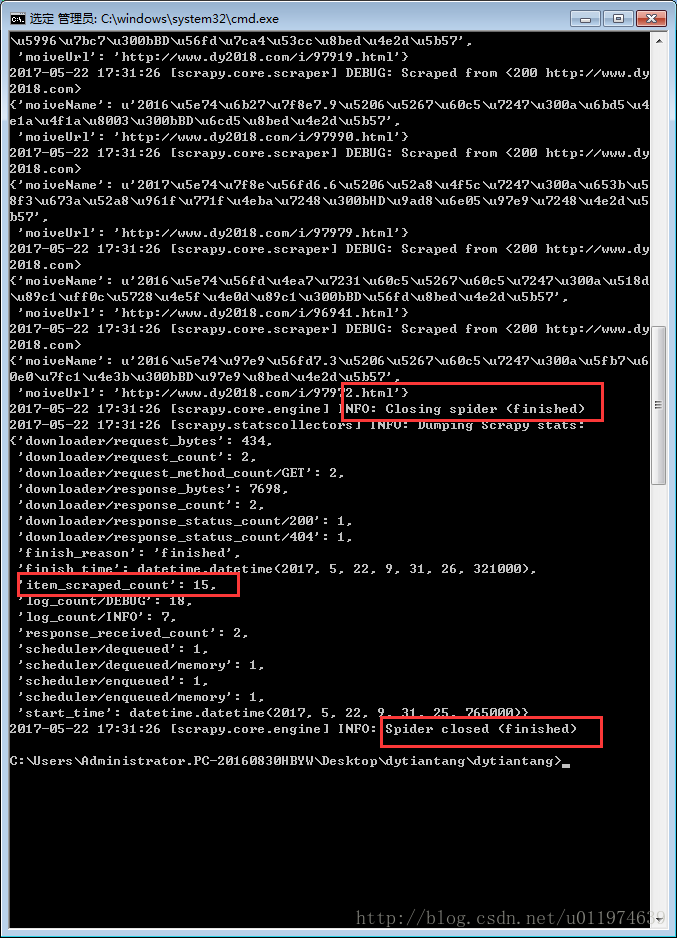
当代码编写完成后,进入项目的根目录,使用Scrapy命令启动spider:
scrapy crawl dySpider运行结果:
查看保存爬取数据的txt文档
dy2017-05-22.txt
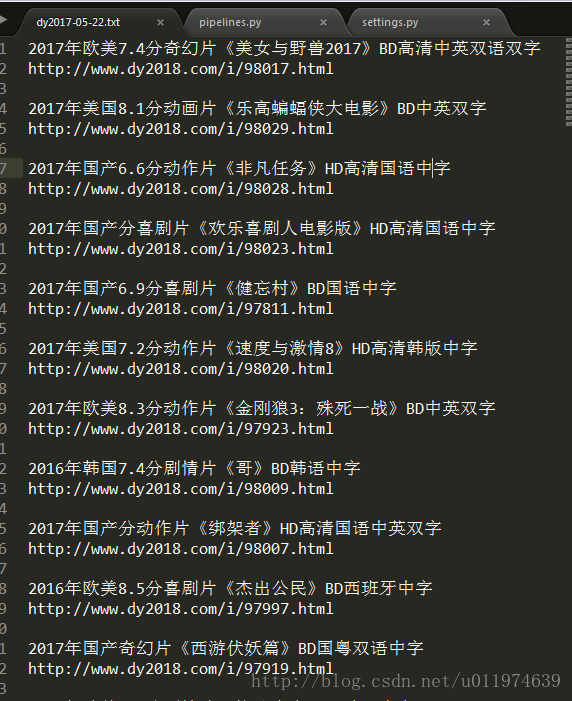
运行成功~
第二个例子-爬取天气预报
本次目标是爬取http://hefei.tianqi.com/15/ 的合肥天气情况情况
创建项目
创建Scrapy工程
scrapy startproject hftianqi创建爬虫文件
scrapy genspider hfSpider http://hefei.tianqi.com/15/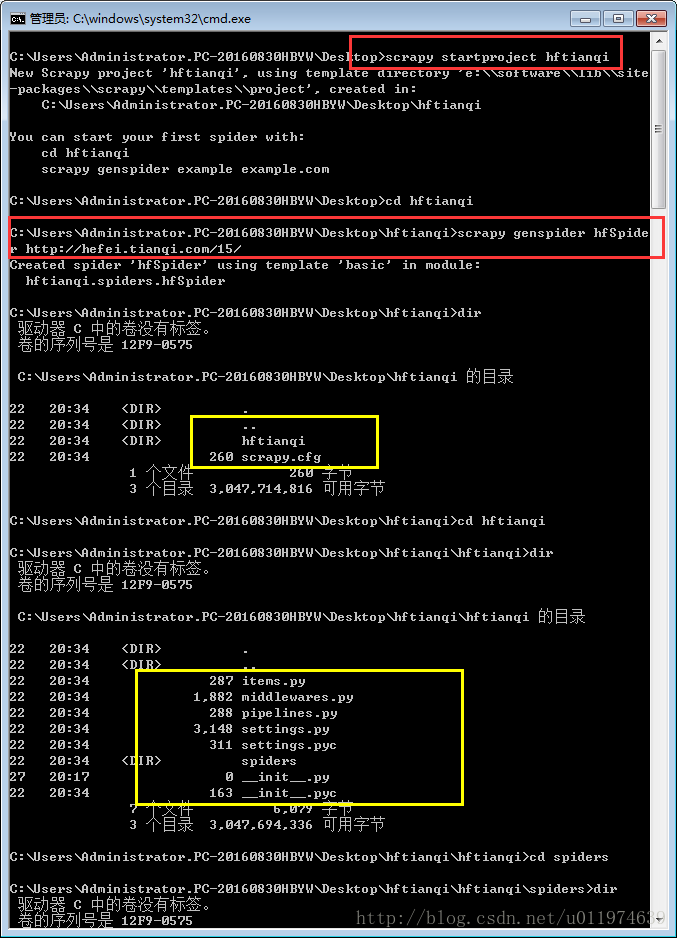
编写Item文件
# -*- coding: utf-8 -*-

import scrapy

class HftianqiItem(scrapy.Item):
    # define the fields for your item here like:
    # name = scrapy.Field()
    cityDate = scrapy.Field()
    img = scrapy.Field()
    temperature = scrapy.Field()
    weather = scrapy.Field()
    wind = scrapy.Field()
调试程序
使用shell工具调试:
scrapy shell http://hefei.tianqi.com/15/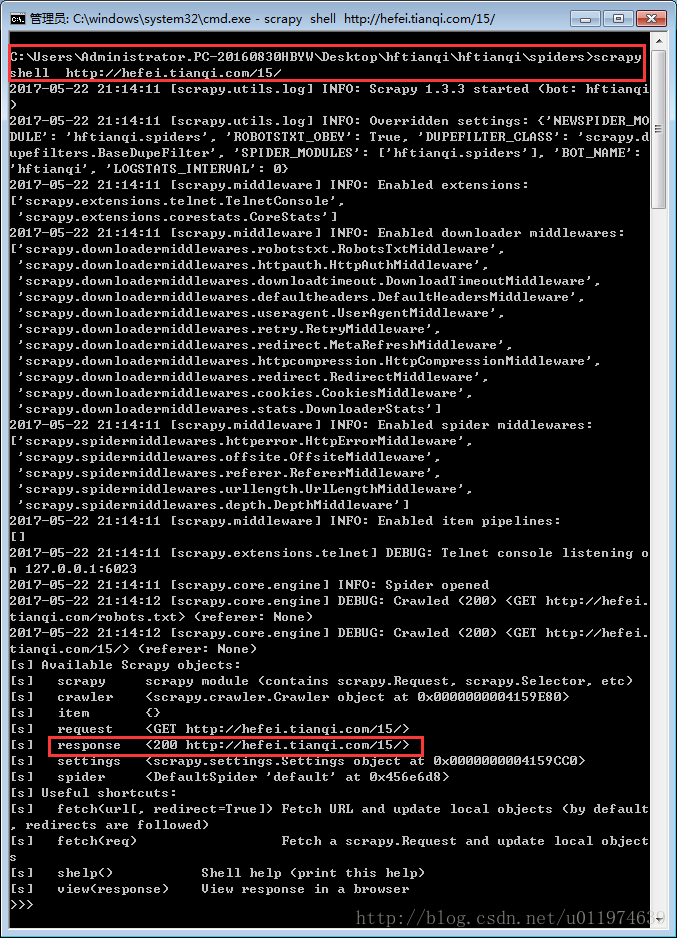
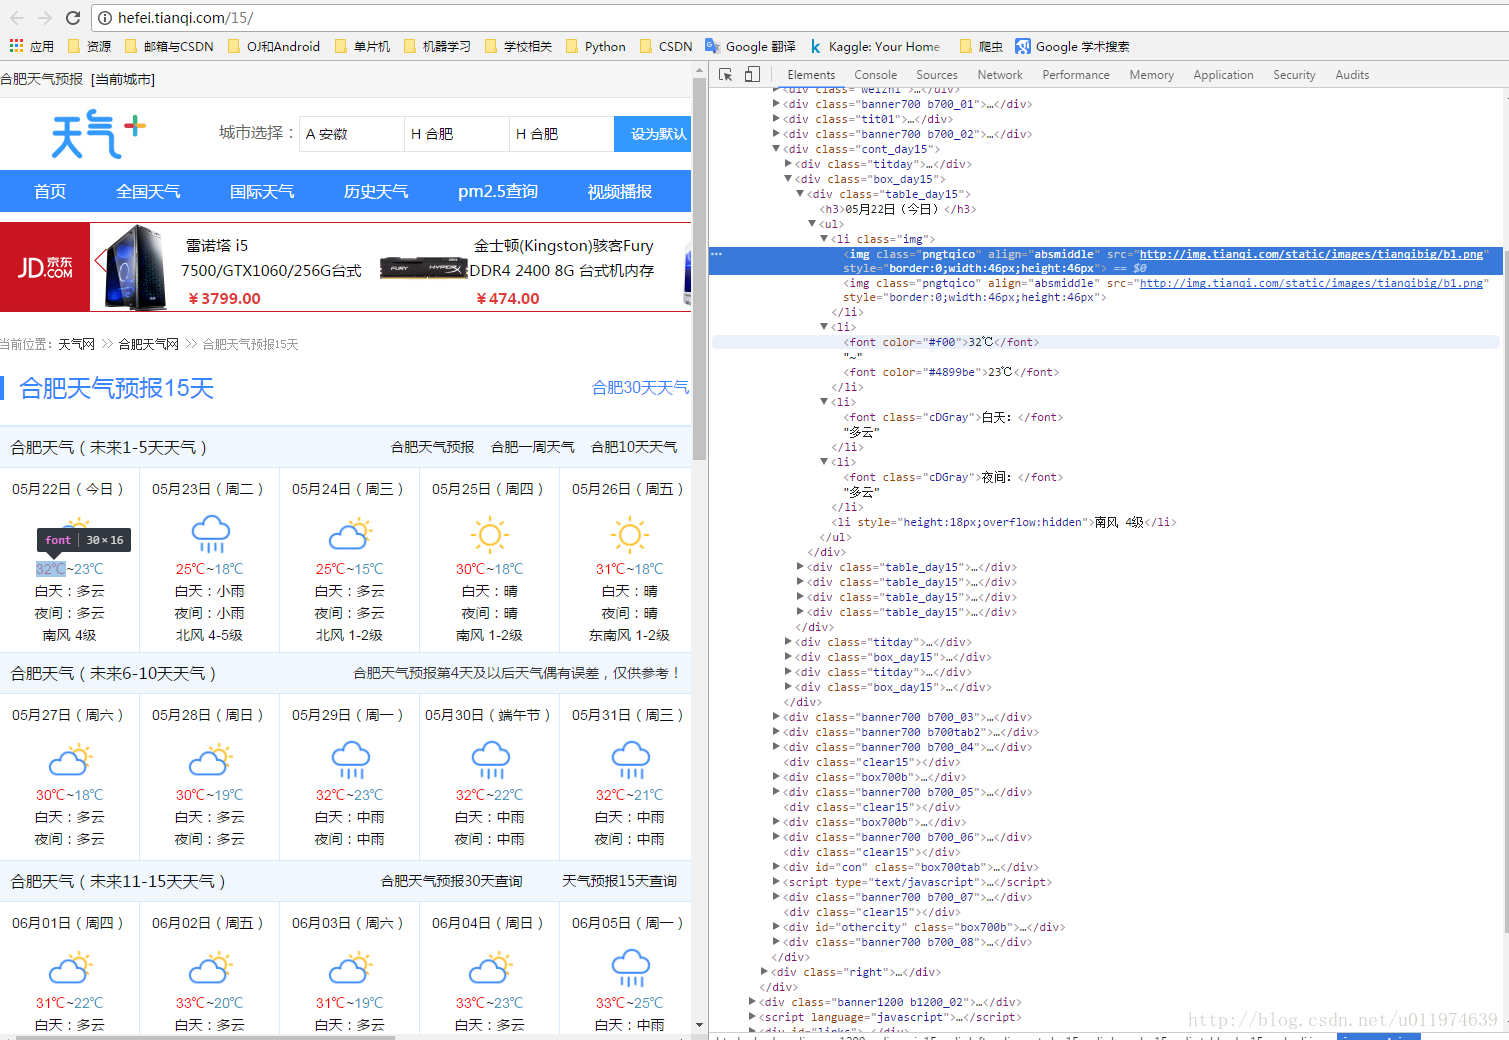
使用浏览器工具分析原网页代码
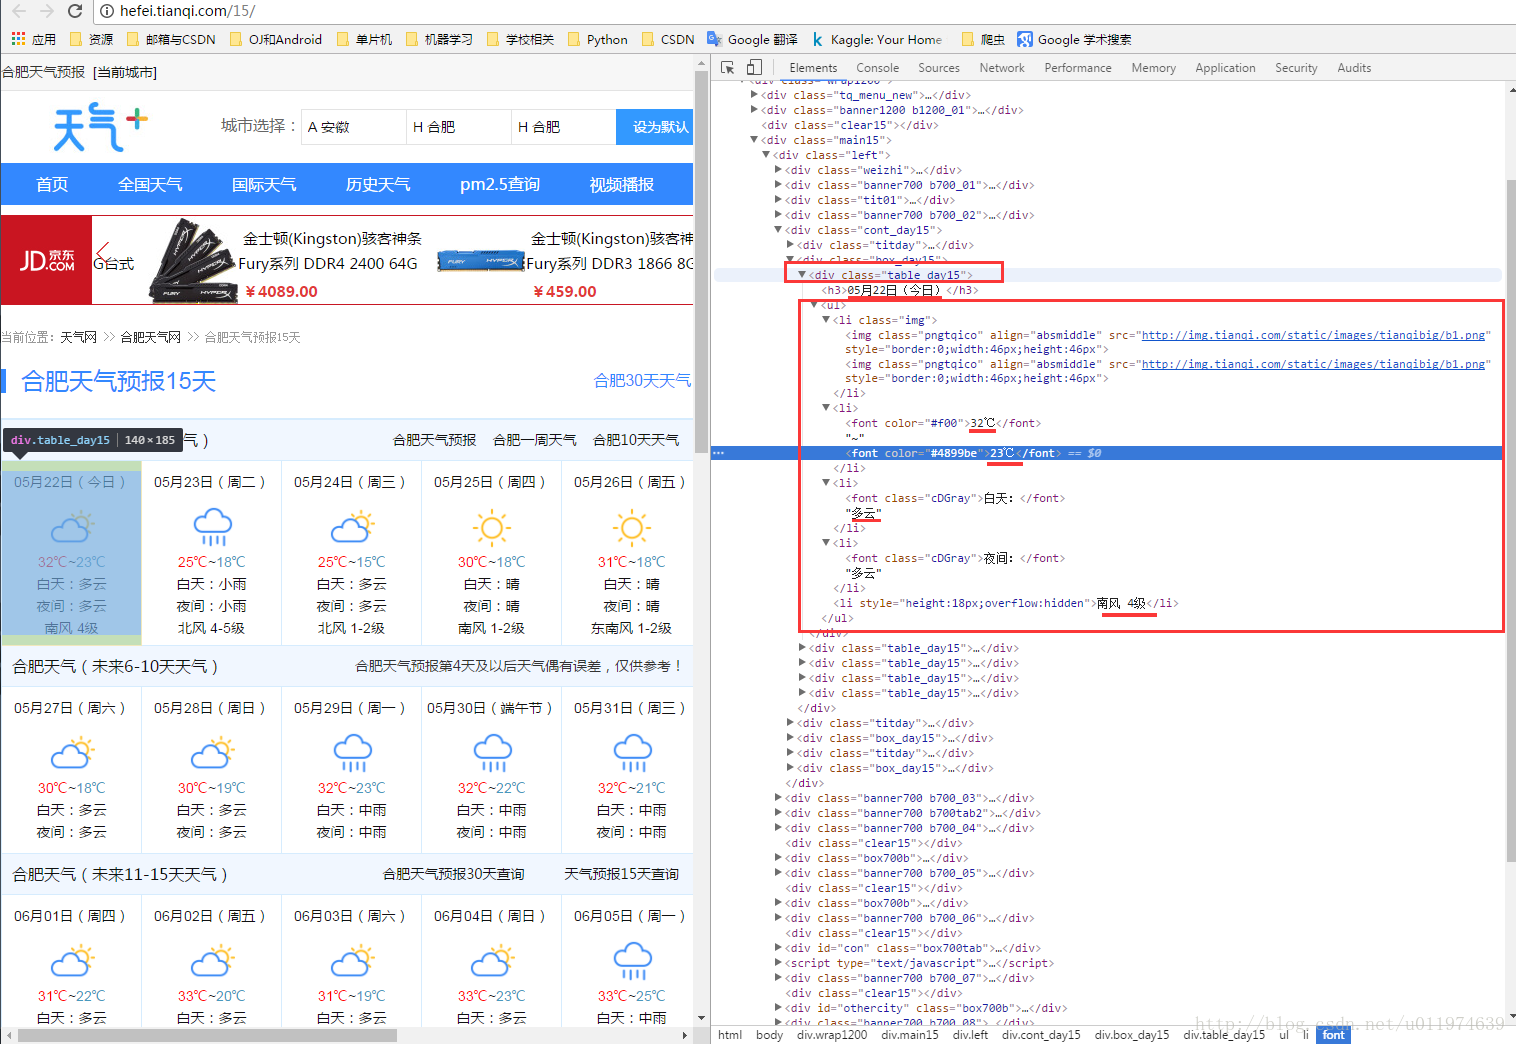
#找出所有和天气有关的table_day15标签内容.
subSelector = response.xpath('//div[@class="table_day15"]')

sub.xpath('./h3/text()') .extract()[0] #找出时间
sub.xpath('./ul/li[1]/img/@src').extract()[0] #图片

#当天温度
sub.xpath('./ul/li[2]/font[1]/text()').extract()[0][0:2]+'~'+
sub.xpath('./ul/li[2]/font[2]/text()').extract()[0][0:2]

sub.xpath('./ul/li[3]/text()').extract()[0] #当天天气概要
sub.xpath('./ul/li[5]/text()').extract()[0] #当天风力
编写程序
Spider程序
# -*- coding: utf-8 -*-
import scrapy
from hftianqi.items import HftianqiItem

class HfspiderSpider(scrapy.Spider):
    name = "hfSpider"
    allowed_domains = ["tianqi.com"]
    start_urls = ('http://hefei.tianqi.com/15/',)

    def parse(self, response):
        subSelector = response.xpath('//div[@class="table_day15"]') #找出所有标签
        items = []
        i=1
        for sub in subSelector:
            item = HftianqiItem()
            item['cityDate'] = sub.xpath('./h3/text()') .extract()[0]
            item['img'] = sub.xpath('./ul/li[1]/img/@src').extract()[0]
            temper = sub.xpath('./ul/li[2]/font[1]/text()').extract()[0][0:2]+'~'+sub.xpath('./ul/li[2]/font[2]/text()').extract()[0][0:2]
            if temper.__len__()<1:
                item['temperature'] = 'no resource'
            else:
                item['temperature'] = temper

            weather = sub.xpath('./ul/li[3]/text()').extract()[0]
            if weather.__len__()<1:
                item['weather'] = 'no resource'
            else:
                item['weather'] = weather

            if i<=5:
                item['wind'] =sub.xpath('./ul/li[5]/text()').extract()[0]
            else:
                item['wind'] = 'no resource'
            i=i+1
            items.append(item)
        return items
数据处理pipelines程序
# -*- coding: utf-8 -*-

import time
import os.path
import urllib2

class HftianqiPipeline(object):
    def process_item(self, item, spider):
        today = time.strftime('%Y%m%d',time.localtime())
        fileName = today+'.txt'
        with open(fileName,'a') as fp:
            fp.write(item['cityDate'].encode('utf-8')+'\t')
            imgName = os.path.basename(item['img'])
            fp.write(imgName+'\t')
            if os.path.exists(imgName):
                pass
            else:
                with open(imgName,'wb') as fp:
                    response = urllib2.urlopen(item['img'])
                    fp.write(response.read())
            fp.write(item['temperature'].encode('utf-8')+'\t')
            fp.write(item['weather'].encode('utf-8')+'\t')
            fp.write(item['wind'].encode('utf-8')+'\n\n')
            time.sleep(1)
        return item
爬虫配置settings程序
# -*- coding: utf-8 -*-
BOT_NAME = 'hftianqi'

SPIDER_MODULES = ['hftianqi.spiders']
NEWSPIDER_MODULE = 'hftianqi.spiders'
ROBOTSTXT_OBEY = True

ITEM_PIPELINES = {
   'hftianqi.pipelines.HftianqiPipeline': 300,
}
运行爬虫
scrapy crawl hfSpider查看记录文件
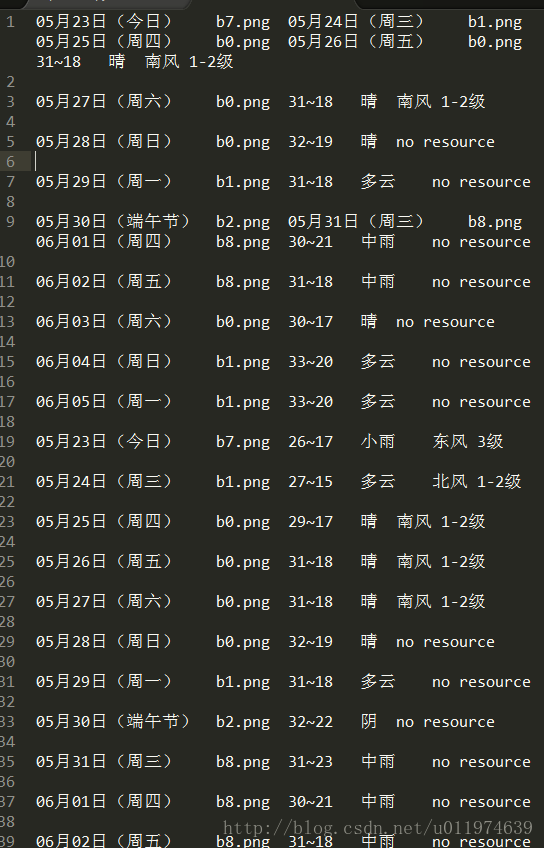
有点小问题,无伤大雅.
将数据保存为JSON
既然是对爬下来的数据处理,肯定是和pipelines.py,和settings.py文件有关.
而settings.py文件决定爬虫的工作方式,考虑到settings.py中控制pipelines.py文件的ITEM_PIPELINES项,该项为一个字典.可以添加元素.
- 编写自定义的pipelines.py文件,将数据保存为JSON格式
- 在settings.py的ITEM_PIPELINES中添加自定义的pipelines.py项
编写pipelines2json.py文件
# -*- coding: utf-8 -*-

import time
import json
import codecs

class HftianqiPipeline(object):
    def process_item(self, item, spider):
        today = time.strftime('%Y%m%d',time.localtime())
        fileName = today+'.json'
        with codecs.open(fileName,'a',encoding='utf-8') as fp:
            line = json.dumps(dict(item),ensure_ascii=False)+'\n'
            fp.write(line)
        return item
配置settings.py文件
ITEM_PIPELINES = {
   'hftianqi.pipelines.HftianqiPipeline': 300,
   'hftianqi.pipelines2json.HftianqiPipeline': 301,
}
再次运行程序
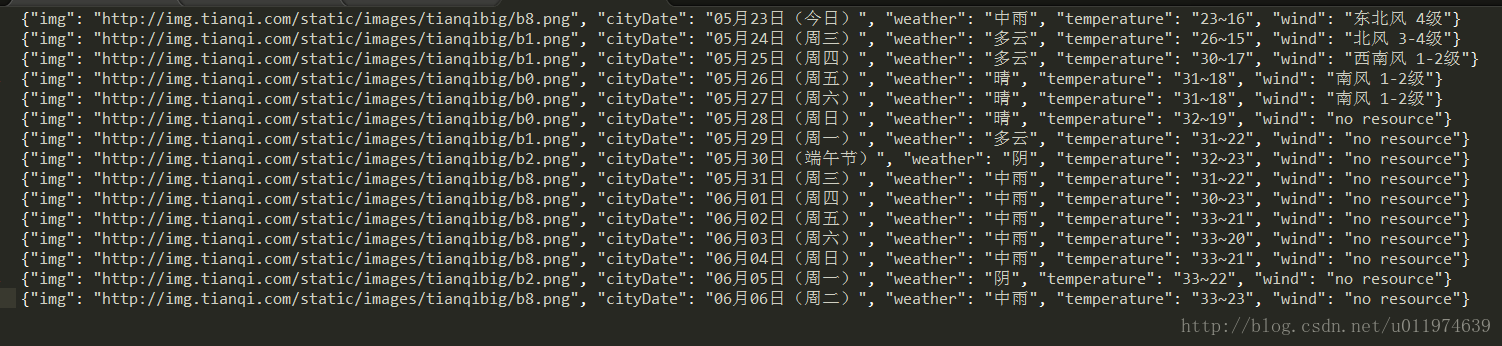
scrapy crawl hfSpider查看存储的json文件
将数据保存到MySQL
在MySQL创建对应的数据库和表
此处要求电脑已配置好mysql.(我的环境是win7 64) 安装好了安装MYSQL-python包
进入MySQL:
mysql -uroot -p #输入对应的数据库密码...#创建数据库:
create database scrapydb set 'utf8' collate 'utf8_general_Ci'
%创建一个scrapydb的数据库,字符集为utf8 校验集为大小写不敏感
#创建表:
CREATE TABLE weather(
id INT AUTO_INCREMENT,
cityDate char(24),
temperature char(12),
weather char(20),
wind char(20),
PRIMARY KEY(id)
)ENGINE=InnoDB DEFAULT CHARSET=utf8;
使用show columns from weather; %查看已建立的表结构
#创建用户:
CREATE USER 'crawlUSER'@'localhost' IDENTIFIED BY 'crawl123';
flush PRIVILEGES;
GRANT all privileges ON scrapyDB.* to crawlUSER@localhost IDENTIFIED BY 'crawl123';
%创建用户并赋予权限
出现1396 - Operation CREATE USER failed 则flush PRIVILEGES;后再添加.
使用Python连接MySQL
对应的pipelines2mysql.py文件
# -*- coding: utf-8 -*-

import MySQLdb
import os.path

class HftianqiPipeline(object):
    def process_item(self, item, spider):
        cityDate = item['cityDate']
        temperature = item['temperature']
        weather = item['weather']
        wind = item['wind']

        conn = MySQLdb.connect(host='localhost',
            user='crawlUSER',  #用户
            port = 3306,
            passwd ='crawl123',
            db='scrapydb',
            charset='utf8')

        cur = conn.cursor()
        cur.execute("INSERT INTO weather(cityDate,temperature,weather,wind) values(%s,%s,%s,%s)",(cityDate,temperature,weather,wind))
        cur.close()
        conn.commit()
        conn.close()

        return item
出现1045 - Access denied for user再保证代码没有问题的情况下,先使用user=’root’,passwd=’…’试一下,如果成功,那就是配置用户出现问题(mysql在添加用户后要重启一下),否则就是代码问题.
如果是配置问题
#尝试先
GRANT all privileges on scrapyDB.* to 'crawlUSER'@'localhost' IDENTIFIED BY 'crawl123' WITH GRANT OPTION;

#再
SHOW GRANTS FOR 'crawlUSER'@'localhost';
如果还有问题,那就先删除用户,重新配置.
对应的settings.py文件
ITEM_PIPELINES = {
   'hftianqi.pipelines.HftianqiPipeline': 300,
   'hftianqi.pipelines2json.HftianqiPipeline': 301,
   'hftianqi.pipelines2mysql.HftianqiPipeline': 302,
}
重新运行爬虫
scrapy crawl hfSpider 查看数据库:

第三个例子-获取代理
目标网站:
http://www.proxy360.cn
http://www.kuaidaili.com/ 获取多个代理IP等信息
创建项目
创建工程
scrapy startproject getProxy创建爬虫文件
scrapy genspider proxy360Spider proxy360.cn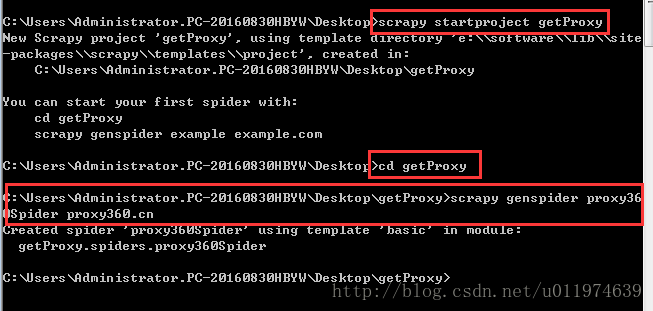
编写Item文件
# -*- coding: utf-8 -*-

import scrapy

class GetproxyItem(scrapy.Item):
    ip = scrapy.Field()
    port = scrapy.Field()
    type = scrapy.Field()
    location = scrapy.Field()
    protocol = scrapy.Field()
    source = scrapy.Field()
调试过程
使用shell工具
scrapy shell http://www.proxy360.cn/Region/China
分析数据
使用浏览器的分析工具查看网页源代码
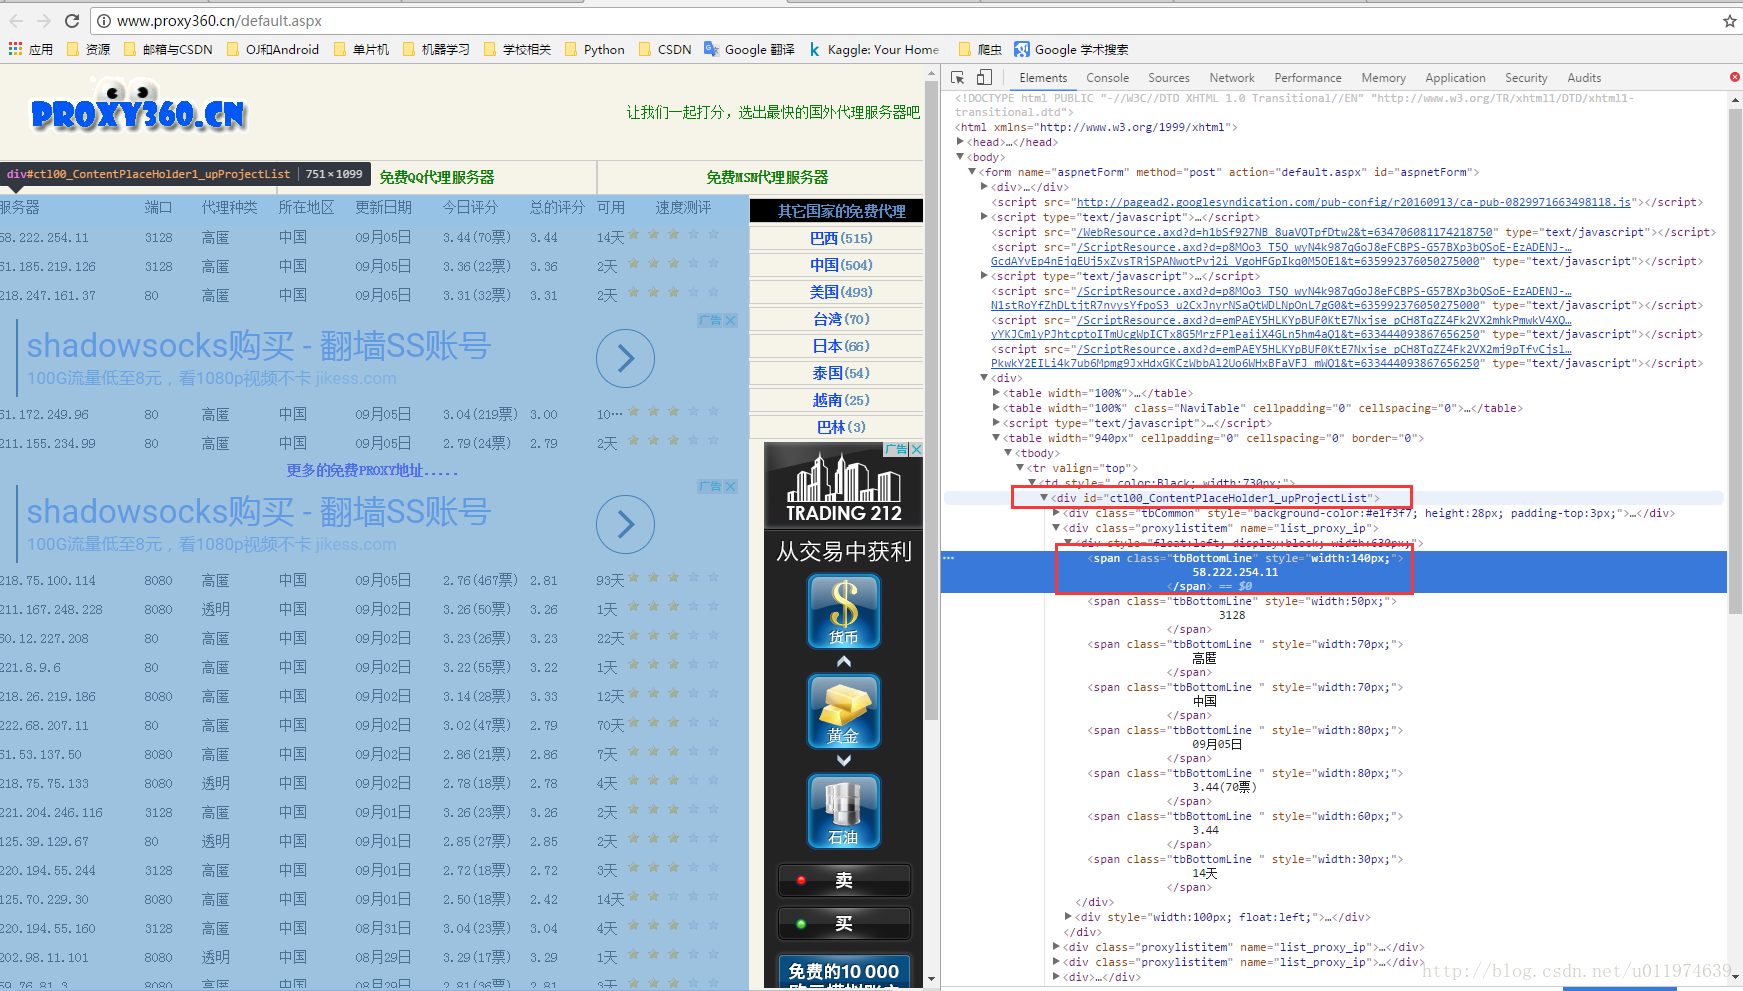
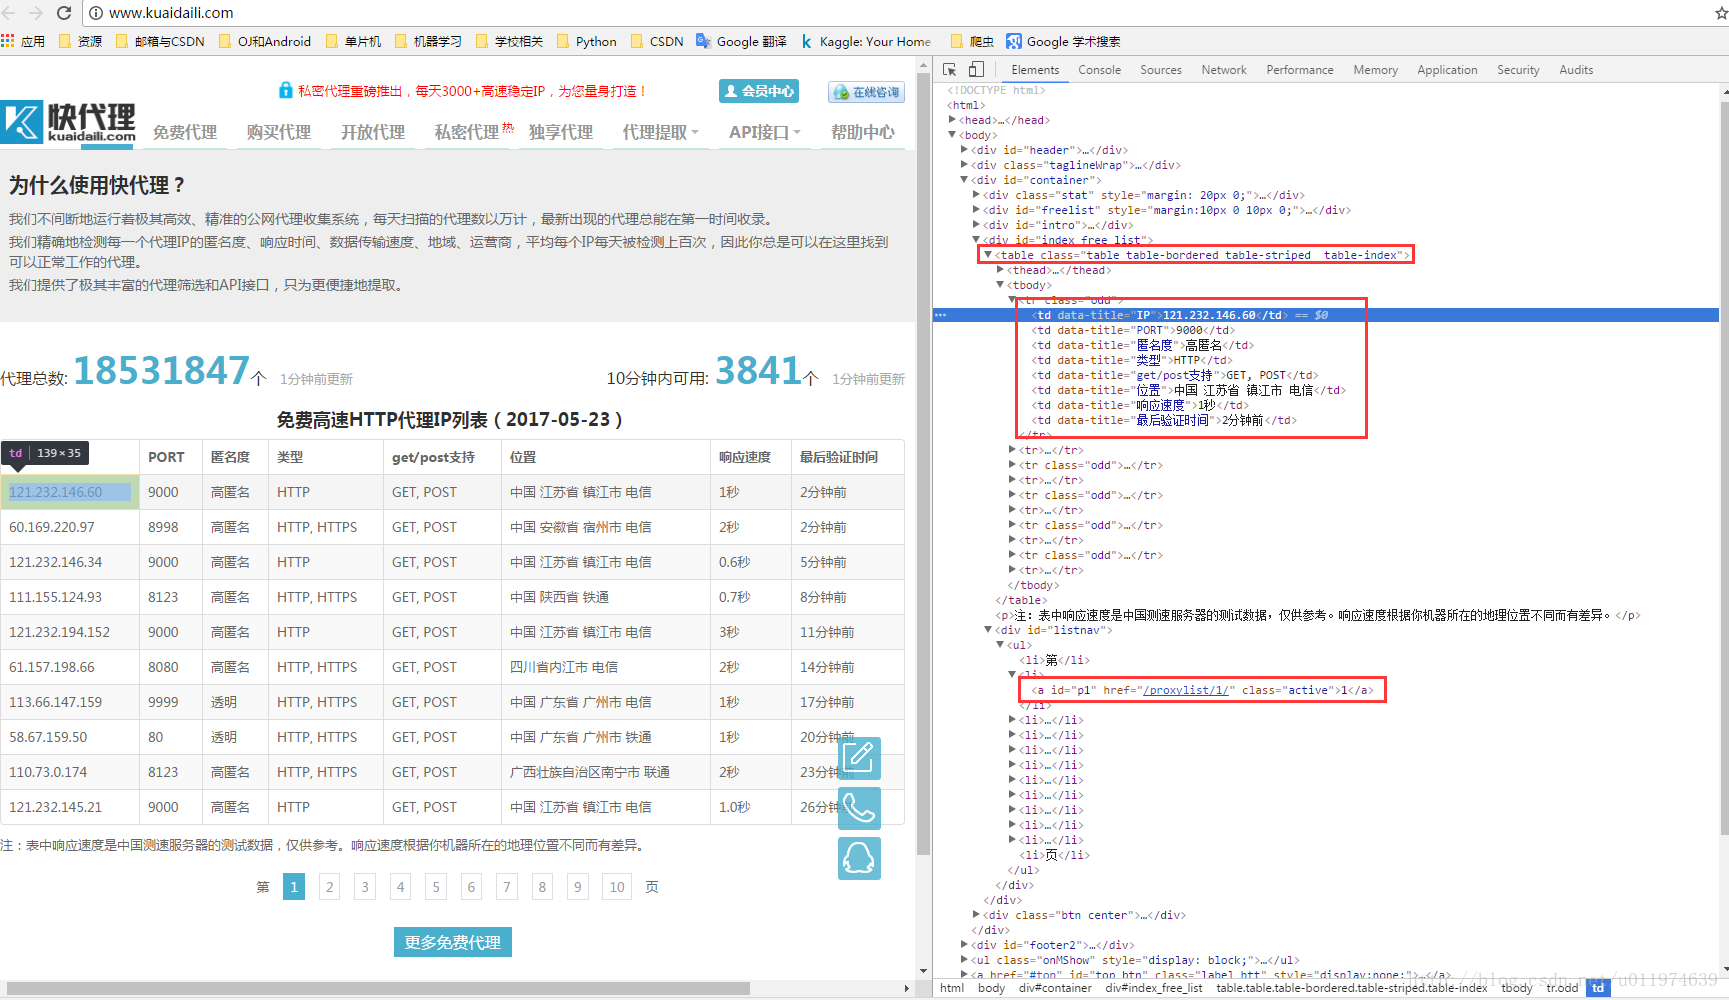
要获取的数据规律很明显了~
工程实现
proxy360Spider.py编写
# -*- coding: utf-8 -*-

# Define your item pipelines here
#
# Don't forget to add your pipeline to the ITEM_PIPELINES setting
# See: http://doc.scrapy.org/en/latest/topics/item-pipeline.html

import time

class GetproxyPipeline(object):
    def process_item(self, item, spider):
        today = time.strftime('%Y%m%d',time.localtime())
        fileName = today+'proxy360.txt'
        with open(fileName,'a') as fp:
            fp.write(item['ip'].encode('utf-8')+'\t')
            fp.write(item['port'].encode('utf-8')+'\t')
            fp.write(item['Type'].encode('utf-8')+'\t')
            fp.write(item['location'].encode('utf-8')+'\t')
            fp.write(item['protocol'].encode('utf-8')+'\t')
            fp.write(item['source'].encode('utf-8')+'\n')

        return item
pipelines.py编写
# -*- coding: utf-8 -*-

import time

class GetproxyPipeline(object):
    def process_item(self, item, spider):
        today = time.strftime('%Y%m%d',time.localtime())
        fileName = today+'proxy360.txt'
        with open(fileName,'a') as fp:
            fp.write(item['ip'].encode('utf-8')+'\t')
            fp.write(item['port'].encode('utf-8')+'\t')
            fp.write(item['Type'].encode('utf-8')+'\t')
            fp.write(item['location'].encode('utf-8')+'\t')
            fp.write(item['protocol'].encode('utf-8')+'\t')
            fp.write(item['source'].encode('utf-8')+'\n')

        return item
settings.py编写
ITEM_PIPELINES = {
   'getProxy.pipelines.GetproxyPipeline': 300,
}
运行爬虫程序
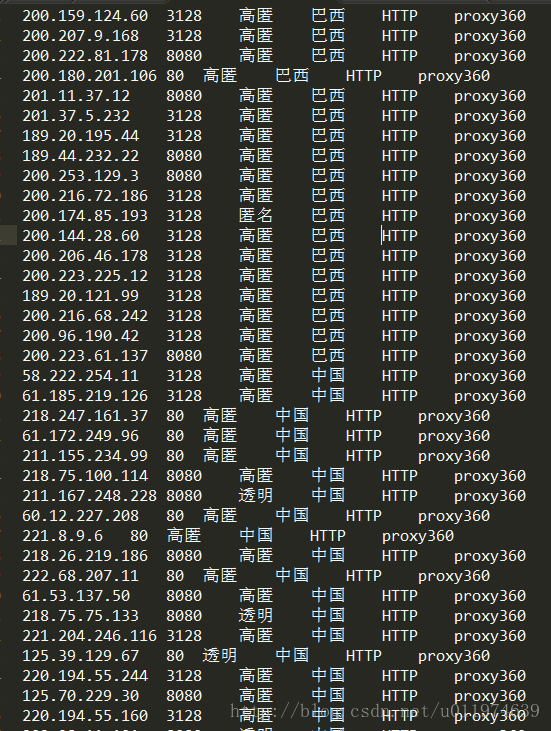
scrapy crawl proxy360Spider打开保存数据的文件如下:
使用多个Spider(针对不同的网页选择不同的Spider)
创建新的爬虫
scrapy genspider xiciSpider xicidaili.com #在getProxy目录里创建新的爬虫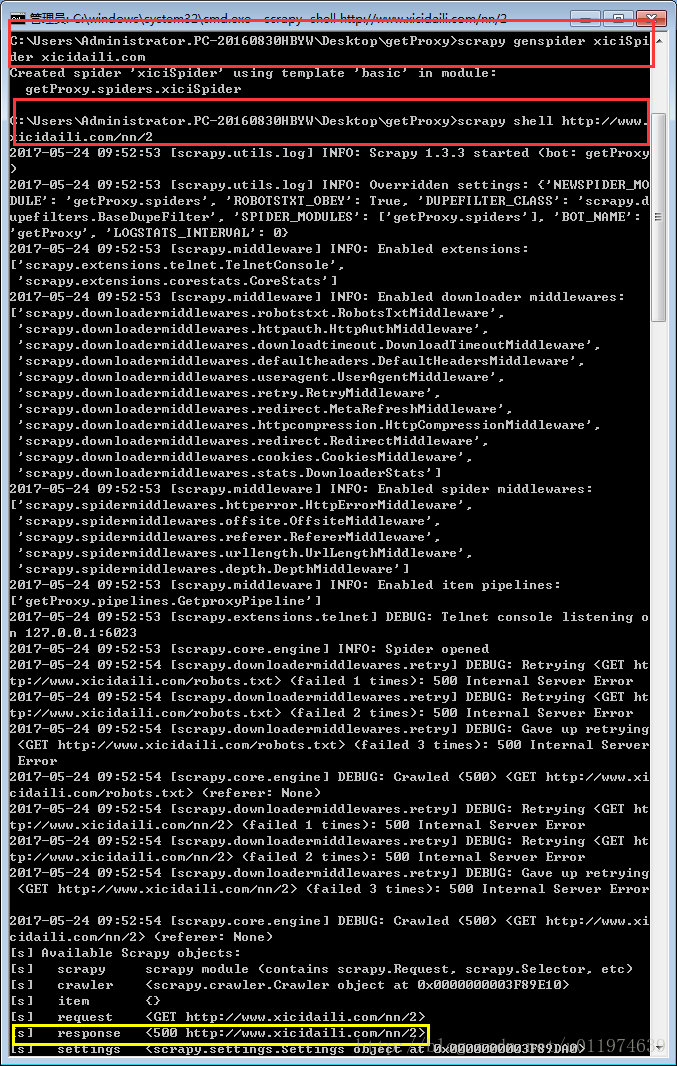
调试程序
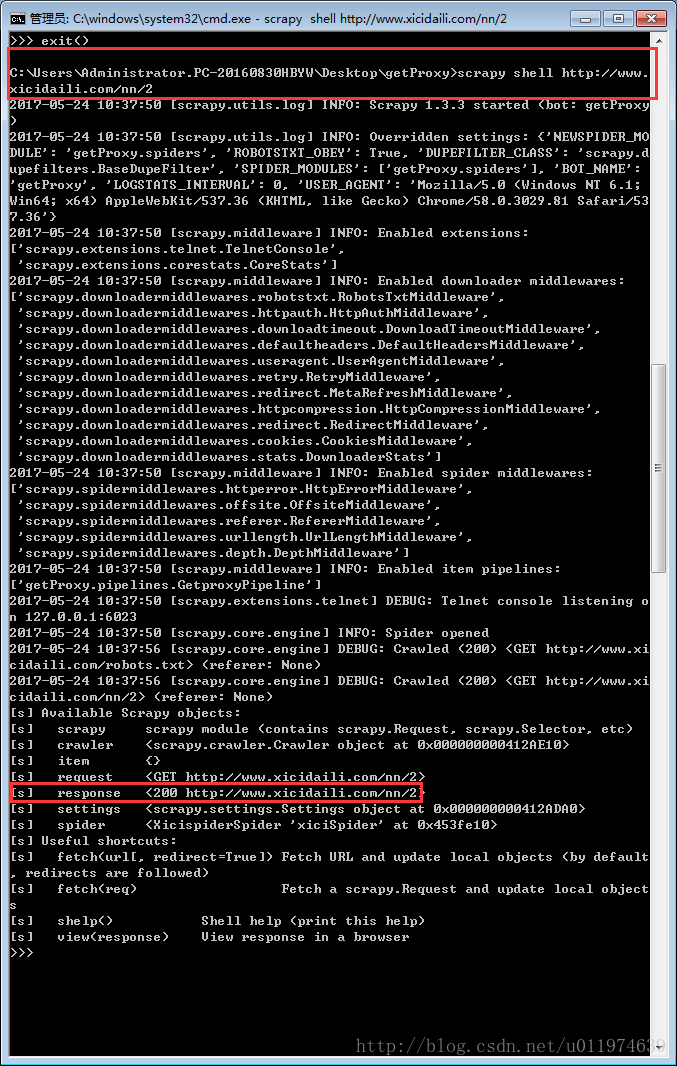
获取页面内容
scrapy shell http://www.xicidaili.com/nn/2response返回值为500,是否是服务器错误?
此网站在浏览器打开正常,scrapy打不开.在网络上或者服务器是没问题,应该是服务器 主动拒绝请求.
在客户机发送请求有几种情况.
不需要账号登录:
- 携带账号密码,或者cookie (排除)
- Header (问题在这)
- 屏蔽IP (排除)
- Data或者Referrer来判定(分析浏览器请求可以排除没有额外的Data)
需要账号登录:
- 携带账号密码,或者cookie (排除)
- Header
- 屏蔽IP
- Data或者Referrer来判定
分析原因,是请求的Header中User-Agent问题,浏览器默认携带的是
User-Agent:
Mozilla/5.0 (Windows NT 6.1; Win64; x64) AppleWebKit/537.36 (KHTML, like Gecko) Chrome/58.0.3029.81 Safari/537.36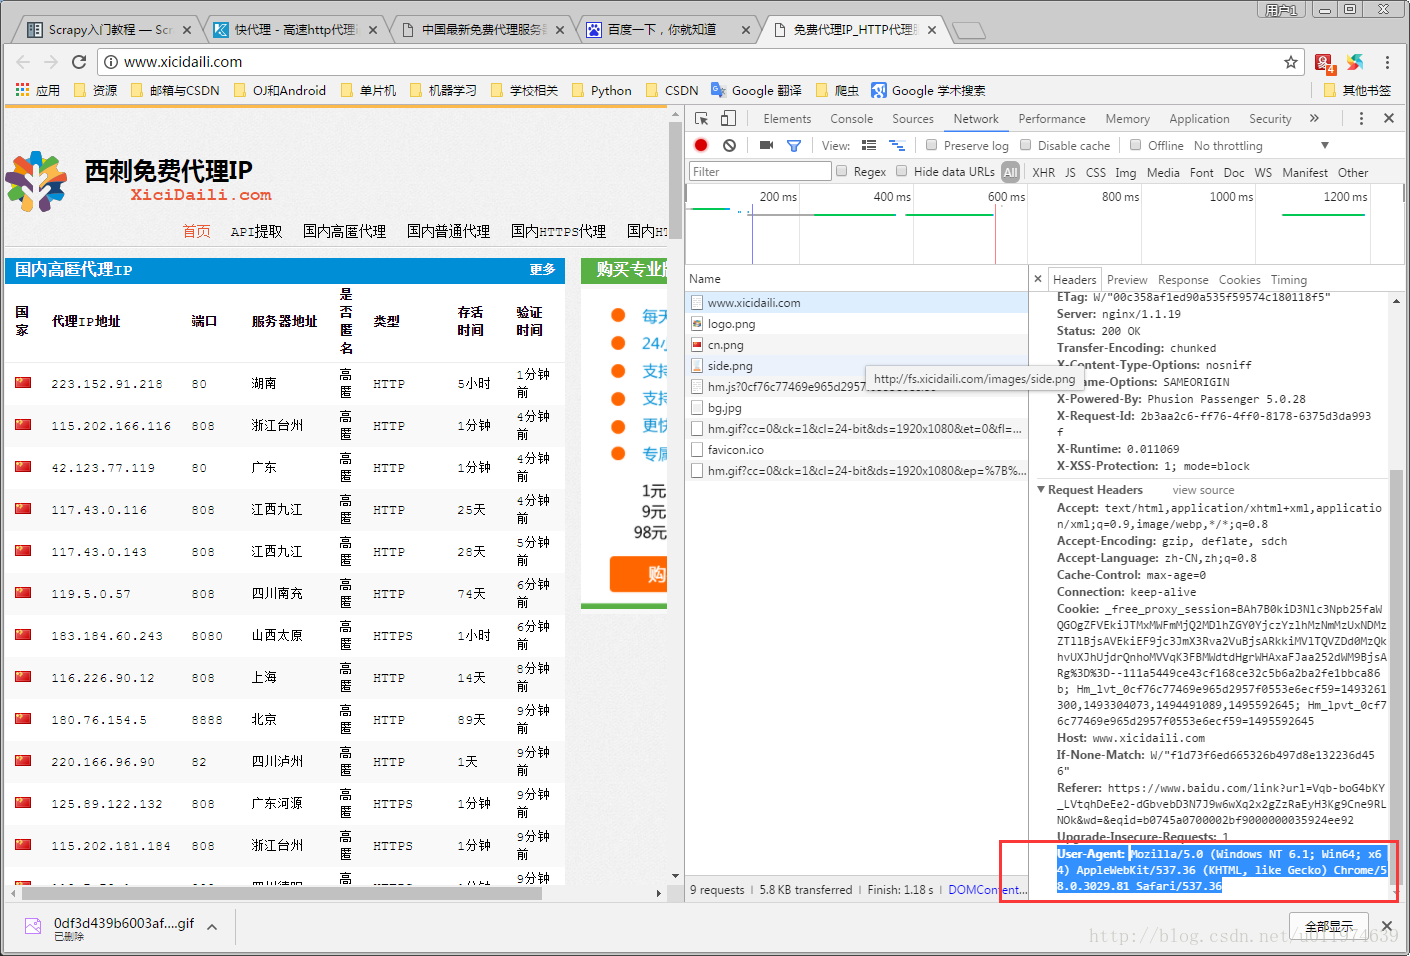
解决方案:
为我们的爬虫添加User-Agent模拟浏览器.在settings.py文件中添加
USER_AGENT='Mozilla/5.0 (Windows NT 6.1; Win64; x64) AppleWebKit/537.36 (KHTML, like Gecko) Chrome/58.0.3029.81 Safari/537.36'再次获取页面内容
编写Spider代码
# -*- coding: utf-8 -*-
import scrapy
from getProxy.items import GetproxyItem

class XicispiderSpider(scrapy.Spider):
    name = "xiciSpider"
    allowed_domains = ["xicidaili.com"]
    start_urls = []
    #wds=['nn','nt','wn','wt']
    wds=['nn',]
    pages=1
    for t in wds:
        for i in xrange(1,pages+1):
            start_urls.append('http://www.xicidaili.com/'+t+'/'+str(i))


    def parse(self, response):
        subSelector = response.xpath('//tr[@class="odd"]|//tr[@class=""]')
        items=[]
        for sub in subSelector:
            item =  GetproxyItem()
            item['ip'] = sub.xpath('.//td[2]/text()').extract()[0]
            item['port'] = sub.xpath('.//td[3]/text()').extract()[0]
            Type = sub.xpath('.//td[5]/text()').extract()
            if Type==[]:
                item['Type'] = 'no resource'
            else:
                item['Type'] = Type

            item['location'] = sub.xpath('.//td[4]/text()').extract()[0]
            item['protocol'] = sub.xpath('.//td[6]/text()').extract()[0]
            item['source'] = 'xiciProxy'
            items.append(item)
        return items
参考资料
《Python网络爬虫实战》-胡松涛


 916
916


 被折叠的 条评论
为什么被折叠?
被折叠的 条评论
为什么被折叠?
 到【灌水乐园】发言


