


原文链接:http://cocoadevcentral.com/articles/000088.php
官方文档:https://developer.apple.com/library/mac/documentation/UserExperience/Reference/ScreenSaver/Classes/ScreenSaverView_Class/index.html

written by Brian Christensen
Writing a screen saver module is surprisingly simple using Mac OS X's screen saver framework. The ScreenSaverView class provides us with an interface for animating the screen saver, drawing the preview view in the System Preferences pane, and displaying a configuration sheet.
I originally wrote this article in 2001 when it was still necessary to jump through a few configuration hoops just to create a new screen saver project. An entire section was dedicated to "Preparing the Project." Thankfully, these steps are no longer required. Ever since the advent of Xcode Apple has included a default screen saver project template to make our lives significantly easier.
Having said that, this is not just a mere recycling of the old article. There is a considerable amount of fresh material which I hope will improve upon the original article.
Part 1: basics on set up, simple bezier path drawing, and user preferences using a configure sheet
Part 2: advanced topics such as setting up and using OpenGL for drawing
First, we'll need to create a new project. Launch Xcode and choose File > New Project. The window depicted below will appear:

From the list of choices you are presented with at this point select Screen Saver located under theStandard Apple Plug-ins category. Proceed to name the project MyScreenSaver (or any other name you prefer) and save it in your desired location. Once you have completed these steps, the project window will open.

Xcode automatically creates two files for us: MyScreenSaverView.h and MyScreenSaverView.m. Take a few minutes to poke around MyScreenSaverView.m and take note of the various methods that are provided for our use.
I have summarized some of these methods below:
| -initWithFrame: isPreview: | initializes the view with the given frame rect |
| -setAnimationTimeInterval: | sets the animation rate in seconds |
| -startAnimation: | invoked by the screen saver engine when animation should begin |
| -stopAnimation: | invoked by the screen saver engine when animation should stop |
| -drawRect: | draws the view |
| -animateOneFrame | advances the animation by one frame at the rate set by the preceding method (this can be used for drawing instead of drawRect:) |
| -hasConfigureSheet | returns true if the module has a configure sheet |
| -configureSheet | returns the module's associated configure sheet |
We want to draw a bunch of shapes of random type, size, color, and location. This drawing magic must occur either in the drawRect: or animateOneFrame method. Since animateOneFrame is slightly easier to use and better suits our purpose, this is the method we will be using.
Open the "MyScreenSaverView.m" file to edit it. Scroll to the animateOneFrame method and add the following code:
First of all, we want to obtain the screen's boundaries for later use. To do this, we use the boundsmethod. This returns an NSRect from which we will obtain the size property.
Since we want our shapes to have random sizes, we can use the specially suppliedSSRandomFloatBetween() function for this. For those who are wondering, it is automatically seeded by the screen saver framework, so there is no need to manually deal with that.
Now we want to calculate a random origin point for our shape. To do this, we use the handySSRandomPointForSizeWithinRect() function, which will do all the work for us.
In simple terms, an NSBezierPath object lets you draw paths consisting of straight and curved line segments. When put together these can form shapes such as rectangles, ovals, arcs, and glyphs. We will be using the first three in our code.

We want to randomly decide whether to create our NSBezierPath object as a rectangle, oval, or arc. In order to provide for greater flexibibility should you choose to invent additional shape types at a later time, we will utilize a switch statement.

The arc case is a bit more complicated, so we will go through it step-by-step. An arc consists of a center, a radius, a starting angle, an ending angle, and a direction. First, we will select random starting and ending angles between 0 and 360 degrees. (Naturally, as you can see in the code below, it wouldn't make sense for the ending angle to start before the starting angle. Hence, it will not necessarily fall between 0 and 360 degrees. It is actually chosen to be somewhere between the starting angle value and the starting angle value plus 360.)
Similarly, we now choose a random radius. Since we already did a calculation earlier to determine a random rectangle size, we will simply use either the width or the height of that size, whichever is the smallest. In addition, we also calculate a center point using previously generated origin and size values.
Finally, we are ready to construct our path. Unlike the above rectangle and oval cases, here we must first create an empty bezier path and then append the arc path to it.
Naturally, we want to use random colors for our shapes, too. Take special note of the alpha parameter, which will create a nice transparency effect.
Last, but not least, use the set method to set the color used to draw our shape to the screen. In keeping with the tradition we have established so far, we will again randomly determine whether to draw a filled shape or an outlined shape (using either fill or stroke).
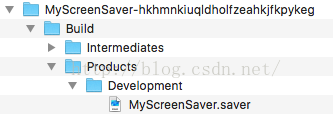
It's time to test the screen saver. Select Build > Build. When the process is finished, go to the Finder and open the build folder located inside of your MyScreenSaver project folder. You should see a MyScreeSaver.saver file in there.
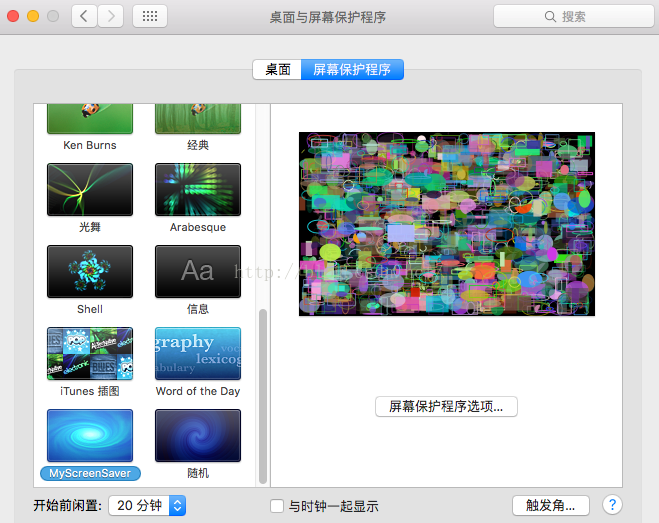
To test your screen saver simply double-click the file. This will open System Preferences and present you with a dialog to allow you to automatically install the screen saver.

If you make changes in the code and rebuild your project later, the next time you double-click the file System Preferences will conveniently ask you if you want to replace the old version. (Please note that you may need to quit and relaunch System Preferences for it to reload your screen saver module.)

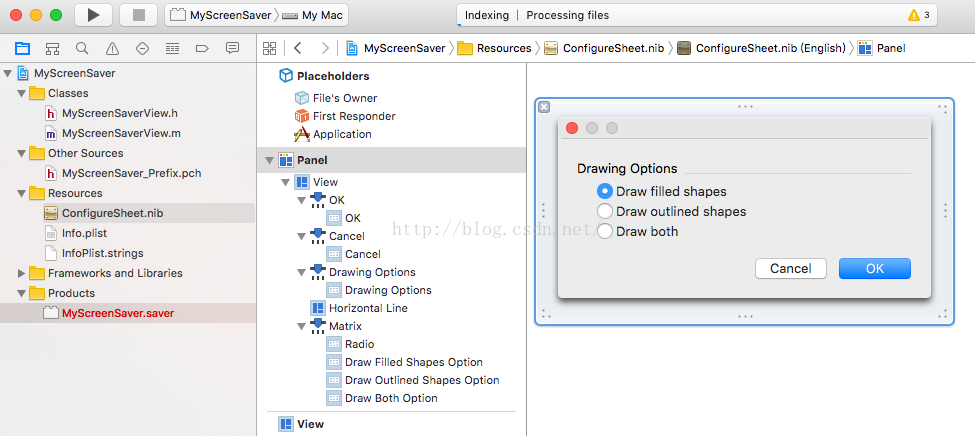
Although we could actually stop here since we now have a fully functioning screen saver, we, of course, will not. We want to make our screen saver even better by providing a few customization options through the use of a so-called "configure sheet." To save a bit of work, I have prepared the NIB file.
This NIB file has a bunch of outlets which we need to let our screen saver view know about. EditMyScreenSaverView.h and add the following code:
To let the "Desktop & Screen Saver" system preference pane know that it should enable the "Options" button for our screen saver, we need to change our hasConfigureSheet method to returnYES.
Furthermore, we need to load our NIB file and return a pointer to our sheet, which we do by implementing the following code in our configureSheet method.
Before we can do a quick sanity check test run, we need to add one more method.
To make sure that everything has gone smoothly so far, build the project and double-click the resulting MyScreenSaver.saver file to install it. Once System Preferences has opened, click the "Options" button for our screen saver and the configure sheet should appear.

Now that we have a working configure sheet, we'd like it to actually do something useful. Fortunately, implementing preferences in screen savers is not significantly different than in any other Cocoa application. We will use the ScreenSaverDefaults class, a subclass of NSUserDefaults. This is a convenient and simple way of dealing with user preferences.
The first step is to register our default values, the factory settings. First, add this constant somewhere towards the top of our ".m" file (directly under @implementation, for instance, would be fine):
(N.B.: Ideally, the com.yournamehere.MyScreenSaver string should match the corresponding string you are using in your project settings.)
Now, add the missing lines to the initWithFrame:isPreview: method so that it looks like this:
Trudging on, let's implement the okClick: method. This is the method that will be invoked when the user clicks "OK" in the configuration sheet, so what we need to do is simply update the defaults to reflect the settings selected in the sheet.
Lastly, we want the sheet to reflect the values in the preferences file when it is displayed. Navigate to the configureSheet method and update it as necessary to contain the following code:
Now that we have the defaults set up and ready to go, we want to actually utilize them during our animation drawing. As you will see, doing so is quite simple. Scroll to the animateOneFramemethod and add the following line to the list of local method variables:
Continue scrolling down to the last section of code in the same method, which should be this:
Replace the above block with the following:
That's it. Hit build and take your new screen saver module for a test run.

You've written your first screen saver for Mac OS X. Certainly you must be hungry for more, so take a look at Write a Screen Saver: Part II, which covers more advanced topics including the use of OpenGL to do the drawing. It also explains important issues regarding symbol clashes and what conventions to use to prevent such problems (of which you should be aware before you release a screen saver into the wild).
As always, let us know what you think about the tutorial.
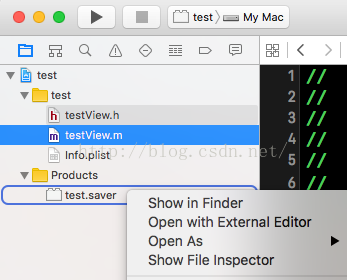
安装步骤:
1、项目左侧---Products----show in Finder
2、安装,输入密码
3、预览
 Feedback
written by Brian Christensen
In part I of this article we learned how to create a screen saver module, how to do some simple animations with NSBezierPath, and how to set up a configure sheet. Although interesting effects can certainly be achieved using NSBezierPath, more complex animations are usually done through OpenGL. An introduction to OpenGL itself is beyond the scope of this article; however, there are a number of basic steps that have to be taken to set up a useable OpenGL environment, which are outlined in this tutorial.
Furthermore, even if you aren't interested in OpenGL, you should skip down to the section titledPrevent Symbol Clashes for some critical information on how to avoid a potential problem. Additionally, we briefly discuss how to make a screen saver module universal to get it ready for the coming onslaught of Intel-based Macs.
Part 1: basics on set up, simple bezier path drawing, and user preferences using a configure sheet
Part 2: advanced topics such as setting up and using OpenGL for drawing

The first order of business is to create a new screen saver project. Name the project CoolScreenSaver (or any other name you like). Once the project window opens, selectLinked Frameworks under the Frameworks and Librariesgroup.
Proceed to choose Project > Add to Project... and navigate your way to /System/Library/Frameworks. Add theOpenGL.framework file.
Additionally, we need to import the appropriate OpenGL headers as well. OpenCoolScreenSaverView.h and add the following lines:
While we have the header file open, we might as well add the couple of code bits we're going to need. Add the appropriate statements so that your file looks like this:
The way OpenGL is conventionally handled when used in screen saver modules is by adding an NSOpenGLView instance as a subview of the ScreenSaverView. We will do this inside ourinitWithFrame:isPreview: method. Let's begin by adding the first piece of code to the aforementioned method.
At this point it is worth mentioning that one could actually pass nil as the pixel format for the NSOpenGLView. This would cause some form of default pixel format to be established for us. However, this behavior does not appear to be officially documented anywhere and, more importantly, if we want such basic features as depth testing we will need to specifiy our own format anyway.
We continue by instantiating our OpenGL view with a NSZeroRect frame size and the pixel format we just created. Then we add that view as a subview of our regular ScreenSaverView, invoke our set up method, and set the animation time interval.
We might as well get the dealloc method out of the way:
Recall that in our initWithFrame:isPreview: method we made an invocation to setUpOpenGL. This is where we will perform our initial OpenGL initialization.
The first thing we need to do is set the OpenGL context. You should invoke makeCurrentContextwhenever you make OpenGL calls to ensure that the proper context is ready to receive commands.
Next, we do the usual OpenGL set up:
Finally, initialize our rotation variable. We will be using this for our animation.
What would typically be in a reshape() function in regular OpenGL programs will go in oursetFrameSize: method. setFrameSize: is invoked at least once after the view is initialized, and may be invoked again at any time if the view resizes for some reason. This is perfect for our situation and is exactly when the reshape() function is normally called as well.
It is generally a good idea to keep the actual drawing of our animation separate from our internal state. What this means is that drawRect: should be used to execute the necessary OpenGL commands to draw our animation to screen, and that animateOneFrame should update the state of our animation.
In the first article we didn't bother with this distinction since it was such a trivial example. However, animateOneFrame really has more to do with the screen saver engine's timer firing than an actual view update being necessary. If our drawing is kept in drawRect: then it is guaranteed that we are always updating our view at the right time. Similarly, since animateOneFrame is tied to the timer, we will always be updating our internal state at the appropriate time interval.
The animateOneFrame method being, in our case, the simpler of the two methods, we will take a crack at it first. The following code simply updates our rotation variable and then invokessetNeedsDisplay. Whenever drawing is done in drawRect: instead of in animateOneFrame, this invocation is required.
Since interesting OpenGL animations tend to get quite complex and learning OpenGL is beyond the scope of this article, we will limit ourselves to drawing a trivial pyramid. (This was taken straight from one of the famed NeHe OpenGL Tutorials. If you want a more detailed explanation of what's going on in the code below, you are encouraged to check out that site.)
At this point you could build and try testing your screen saver. However, if you do, you will find with great disappointment that all you get is a blank screen. There is an interesting story going here with the way AppKit's view drawing is implemented. The drawRect: method is invoked up the view hierarchy until an opaque view is found. Given that our NSOpenGLView is a subview of the CoolScreenSaverView, and that NSOpenGLView is an opaque view (at least as of recent Mac OS X releases), the drawRect: invocation chain gets broken right there and never reaches the drawRect:we just implemented above. Hence the reason you were staring at a blank screen if you tried running your screen saver just now.
Fortunately, there is a pretty simple fix to this problem. Select File > New File... and create a newObjective-C class. Name it MyOpenGLView.m (and, of course, have it create the corresponding .h file along with it). Open MyOpenGLView.h and change it to be a subclass of NSOpenGLView.
Proceed to open the corresponding .m file and add the following method:
Now go back to our CoolScreenSaverView.h file and add the following #import directive:
Furthermore, change the type of our glView instance variable from NSOpenGLView to MyOpenGLView:
Correspondingly, CoolScreenSaverView.m's initWithFrame:isPreview: must be modified to reflect this change. Find the relevant line and change it the following code:
That's it. As you can see, we are merely using a subclass of NSOpenGLView that says it's non-opaque, therefore ensuring that our own drawRect: method gets a chance to perform its magic.
Unfortunately, that's not all there is to it. Before you release a screen saver out into the wild, you need to take into account the issue of symbol clashes. Screen saver modules are nothing more than regular NSBundle plug-ins. When you open the Desktop & Screen Saver preference pane in the System Preferences application, it loads up all the individual .saver files. In short, this means that all the screen saver modules (meaning all the classes contained therein) end up sharing the same namespace. So, if two readers of this tutorial release screen savers but neglect to use unique class names (ie. they leave the names unchanged and use CoolScreenSaverView andMyOpenGLView), and a user downloads and installs both of those modules, at least one of the modules is not going to work properly. Both of them will probably end up displaying the same animation.
A good strategy for preventing this is to add a unique prefix (preferably a reverse domain name identifier) to every class in your project. So, for our example, we would call our classComCocoaDevCentral_CoolScreenSaverView. The custom NSOpenGLView subclass would be calledComCocoaDevCentral_CoolScreenSaver_MyOpenGLView. Let's modify our above example to reflect these changes. Open the relevant files and change the appropriate lines:
Note that for MyOpenGLView we use an additional project-specific prefix as well. Since you might use the same MyOpenGLView class in several projects, you need it to be unique in each case.
Granted, this does look quite ridiculous and it makes things a bit unwieldy. Luckily, there is a forgotten gem built-in to the Objective-C compiler that will help us out. It's called@compatibility_alias. Go back to MyOpenGLView.h and add the following line to the end of the file (after the @end).
This tells the compiler to replace every instance of MyOpenGLView with our absurdly long actual class name. That way, instead of referencing our glView instance variable as:
We can leave our code unchanged and keep using:
Since we changed our principal class name, we need to make the project settings reflect that change as well. Open the Targets group in the left-hand pane of the project window and double-click the CoolScreenSaver target.

Click the Properties tab and change the Principal Class field to our new class name.

Furthermore, function symbols may also cause problems. The easy way to avoid clashes here is to either mark functions with the keywords static (if you define and use the function from within the same file) or __private_extern__ (if you call the function from multiple files).
You can always check what symbols your module is exporting by using the nm tool. For example, to check on CoolScreenSaver, cd into CoolScreenSaver.saver/Contents/MacOS and run nm -g CoolScreenSaver | grep -v " U ". This will give you the following output:
It is a good idea to run this check every time you are ready to publicly release a screen saver.
As every Mac developer well knows by now, the Intel-powered Macs are just around the corner. Given that screen savers are plug-ins and as such will not be eligible for emulation by the Rosetta environment, it makes sense to start compiling screen savers as universal binaries as soon as possible.
The first step is to double-click the CoolScreenSaver group in the left-hand pane of the project window.

The second step is to click the Build tab and then select the Deployment configuration.

Now change the Architectures property to ppc i386.

Finally, click the General tab and set the Cross-Develop Using Target SDK option to Mac OS X 10.4 (Universal).

Close the window, set your active build configuration to Deployment, and build the project. To verify that your module is in fact a universal binary, you can cd into build/Deployment/CoolScreenSaver.saver/Contents/MacOS and run file CoolScreenSaver. You should see the following result:
That's all there is to it. We now have an OpenGL screen saver free from any potential symbol clash problems, and it is ready to go on PowerPC and Intel Macs to boot.
As always, let us know what you think about the tutorial.
Acknowledgements


 3137
3137


 被折叠的 条评论
为什么被折叠?
被折叠的 条评论
为什么被折叠?
 到【灌水乐园】发言


