


上回我们说到了get_audio_and_transcript函数、pad_sequences函数和sparse_tuple_from函数等3个函数,本回我们分析这3个函数分别实现了哪些功能。
1.get_audio_and_transcript函数
该函数主要通过上文获得的txt_files列表和wav_files列表,得到audio和标记文本数据,具体代码如下:
def get_audio_and_transcript(txt_files, wav_files, n_input, n_context):
    '''
    Loads audio files and text transcriptions from ordered lists of filenames.
    Converts to audio to MFCC arrays and text to numerical arrays.
    Returns list of arrays. Returned audio array list can be padded with
    pad_sequences function in this same module.
    '''
    audio = []
    audio_len = []
    transcript = []
    transcript_len = []

    for txt_file, wav_file in zip(txt_files, wav_files):
        # load audio and convert to features
        audio_data = audiofile_to_input_vector(wav_file, n_input, n_context)
        audio_data = audio_data.astype('float32')

        audio.append(audio_data)
        audio_len.append(np.int32(len(audio_data)))

        # load text transcription and convert to numerical array
        target = normalize_txt_file(txt_file)
        target = text_to_char_array(target)
        transcript.append(target)
        transcript_len.append(len(target))

    audio = np.asarray(audio)
    audio_len = np.asarray(audio_len)
    transcript = np.asarray(transcript)
    transcript_len = np.asarray(transcript_len)
    return audio, audio_len, transcript, transcript_len
由上面代码可以看出,主要是通过audiofile_to_input_vector函数将audio信息转换为可以输入网络中的训练向量的。其中涉及到一些语音处理相关知识,我们首先看看是如何对原始audio进行一些常规的语音处理的。
2.读取wav文件
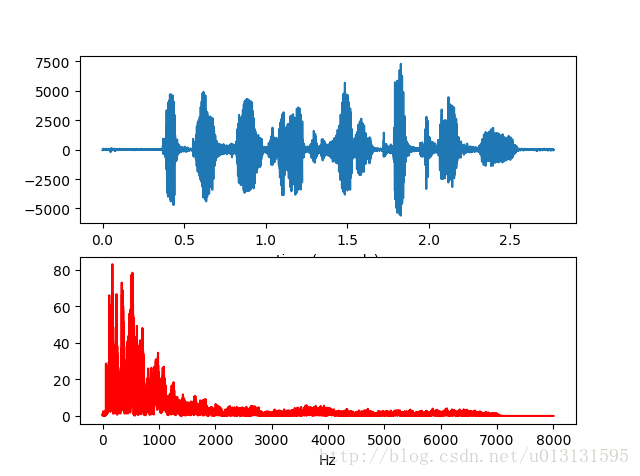
使用如下代码绘制出波形图如下所示:
import wave
import numpy as np
import struct
import pylab as pl

#打开wav文件
#open返回一个的是一个Wave_read类的实例,通过调用它的方法读取WAV文件的格式和数据
f = wave.open(r"777-126732-0068.wav","rb")

#读取格式信息
#一次性返回所有的WAV文件的格式信息,它返回的是一个组元(tuple):声道数, 量化位数(byte单位), 采
#样频率, 采样点数, 压缩类型, 压缩类型的描述。wave模块只支持非压缩的数据,因此可以忽略最后两个信息
params = f.getparams()
nchannels, sampwidth, framerate, nframes = params[:4]
print("channel",nchannels)
print("sample_width",sampwidth)
print("framerate",framerate)
print("numframes",nframes)

#读取波形数据
#读取声音数据,传递一个参数指定需要读取的长度(以取样点为单位)
str_data  = f.readframes(nframes)
wave_data = struct.unpack('{n}h'.format(n=nframes), str_data)
wave_data = np.array(wave_data)
f.close()

time = np.arange(0, nframes) * (1.0 / framerate)

#绘制波形图
pl.subplot(211)
pl.plot(time, wave_data)
pl.xlabel("time (seconds)")

# 采样点数,修改采样点数和起始位置进行不同位置和长度的音频波形分析
N=nframes
start=0 #开始采样位置
df = framerate/(N-1) # 分辨率
freq = [df*n for n in range(0,N)] #N个元素
wave_data2=wave_data[start:start+N]
c=np.fft.fft(wave_data2)*2/N
#常规显示采样频率一半的频谱
d=int(len(c)/2)
pl.subplot(212)
pl.plot(freq[:d-1],abs(c[:d-1]),'r')
pl.xlabel("Hz")
pl.show()
得到波形图和频谱图如下所示:
语音处理通常在频域进行处理,结合到人耳的一些特征,我们并不需要输入所有的频域信息进行我们的训练,只需要计算出其mfcc系数即可。
3. MFCC系数
耳蜗实质上相当于一个滤波器组,耳蜗的滤波作用是在对数频率尺度上进行的,在1000HZ下,人耳的感知能力与频率成线性关系;而在1000HZ以上,人耳的感知能力与频率不构成线性关系,而更偏向于对数关系,这就使得人耳对低频信号比高频信号更敏感。MFCC在一定程度上模拟了人耳对语音的处理特点,应用了人耳听觉感知方面的研究成果,采用这种技术语音识别系统的性能有一定提高。
下面结合几张图来详细了解一个MFCC系数是如何得到的。
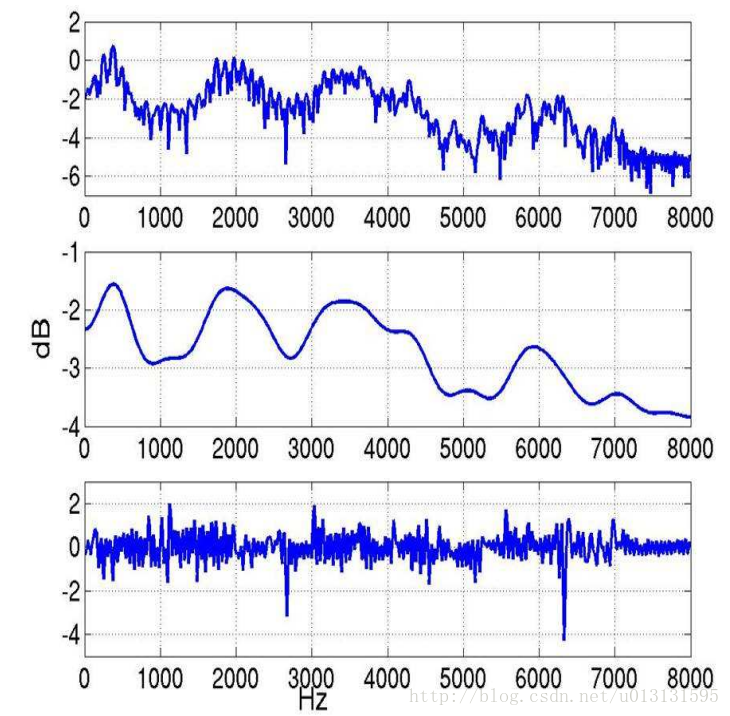
研究表明,人的语音中有用的部分包含在上图频谱中的共振峰上,即频谱的包络中(如上图中)。去掉包络信息,剩下的大部分信息与环境噪声有关,称之为频谱细节。那么我们应该如何将这两部分信息分别提取出来呢?
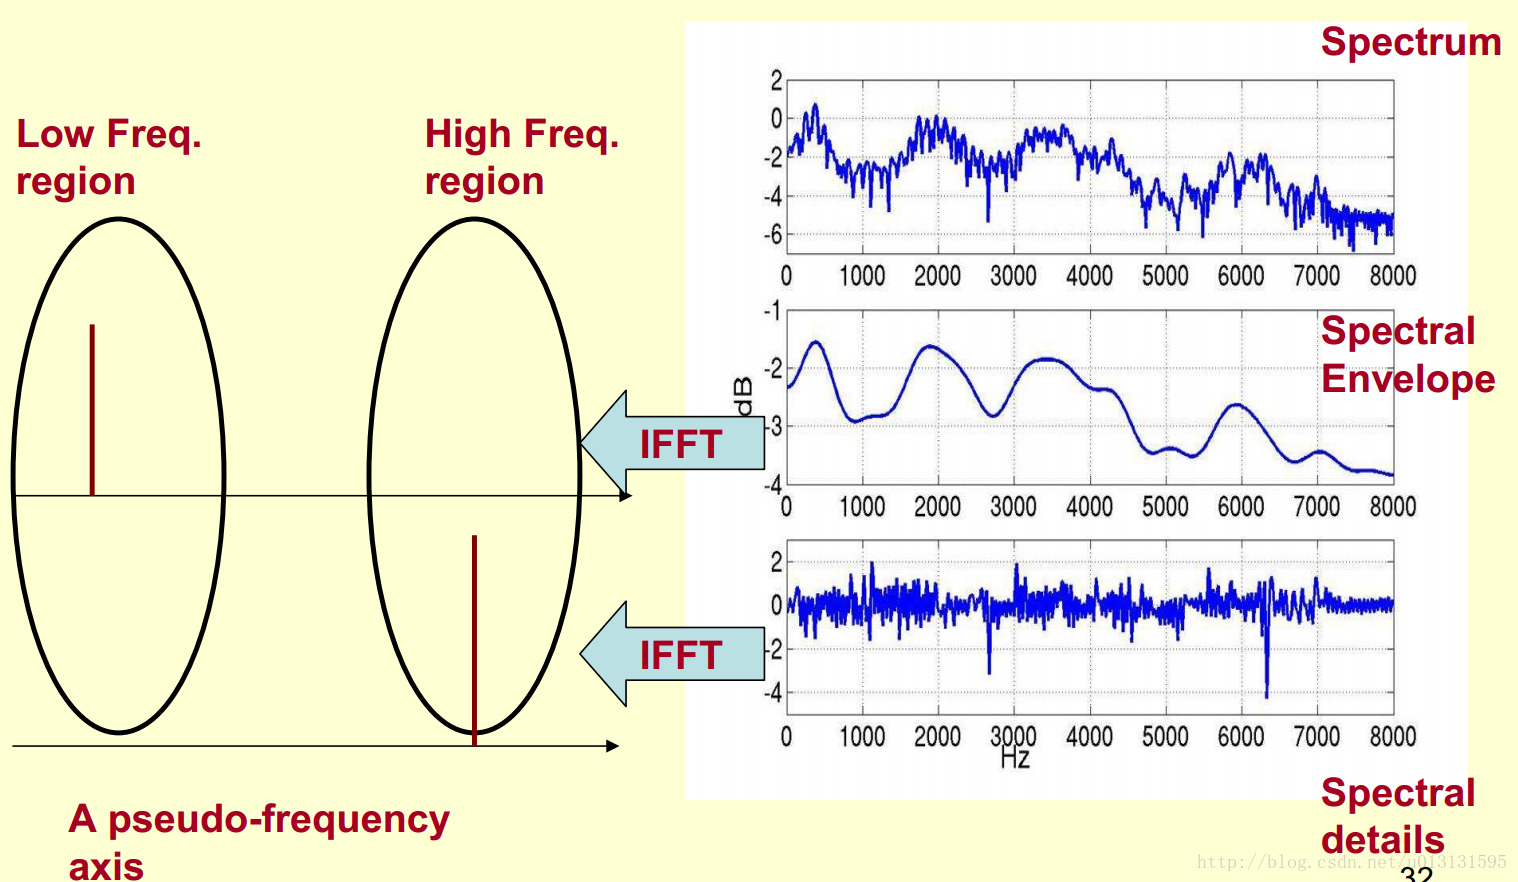
我们观察到频谱包络的频率较低,同时频谱细节的频率较高,因此我们可以对我们得到的频谱做一个FFT。在频谱上做傅里叶变换就相当于逆傅里叶变换Inverse FFT (IFFT)。具体如下图所示:
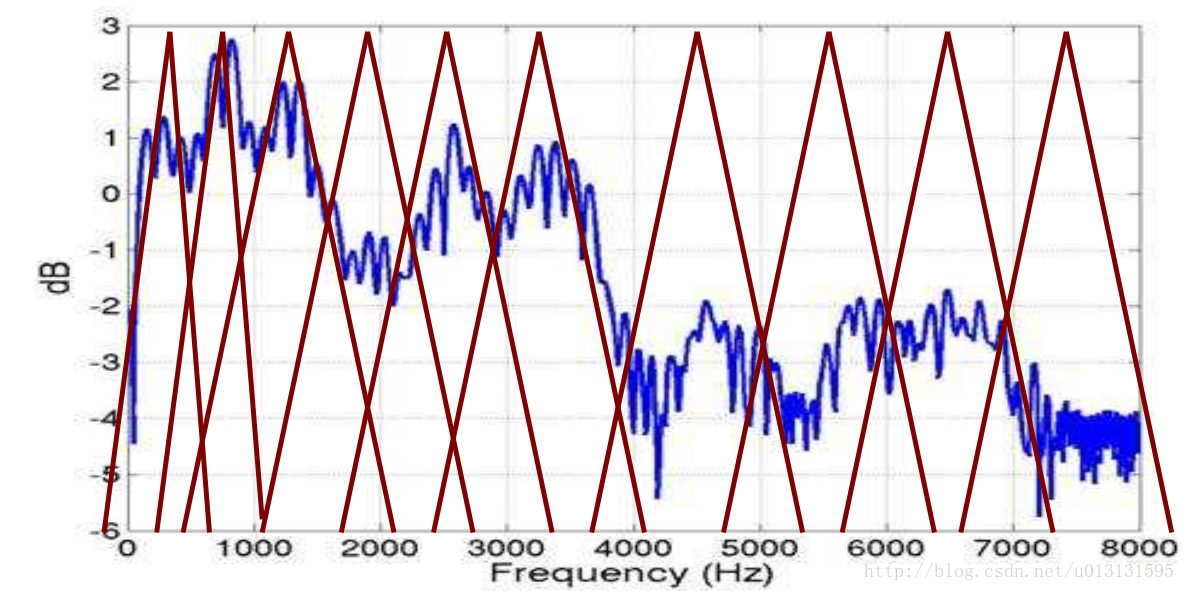
最后根据如下公式我们可以得到一组Mel滤波器组,如下:


滤波器组如下图所示:
4.audiofile_to_input_vector函数
前面介绍了一些背景知识,我们在回到主线上来,我们下面来分析audiofile_to_input_vector函数,代码如下图所示:
def audiofile_to_input_vector(audio_filename, numcep, numcontext):
    # Load wav files
    fs, audio = wav.read(audio_filename)

    # Get mfcc coefficients
    orig_inputs = mfcc(audio, samplerate=fs, numcep=numcep)
    #fs=1.6kHz numcep=26 该处调用python_speech_features包中的mfcc计算相应的MFCC系数

    # We only keep every second feature (BiRNN stride = 2)
    orig_inputs = orig_inputs[::2]

    # For each time slice of the training set, we need to copy the context this makes
    # the numcep dimensions vector into a numcep + 2*numcep*numcontext dimensions
    # because of:
    #  - numcep dimensions for the current mfcc feature set
    #  - numcontext*numcep dimensions for each of the past and future (x2) mfcc feature set
    # => so numcep + 2*numcontext*numcep
    train_inputs = np.array([], np.float32)
    train_inputs.resize((orig_inputs.shape[0], numcep + 2 * numcep * numcontext))

    # Prepare pre-fix post fix context
    empty_mfcc = np.array([])
    empty_mfcc.resize((numcep))

    # Prepare train_inputs with past and future contexts
    time_slices = range(train_inputs.shape[0])
    context_past_min = time_slices[0] + numcontext
    context_future_max = time_slices[-1] - numcontext
    for time_slice in time_slices:
        # Reminder: array[start:stop:step]
        # slices from indice |start| up to |stop| (not included), every |step|

        # Add empty context data of the correct size to the start and end
        # of the MFCC feature matrix

        # Pick up to numcontext time slices in the past, and complete with empty
        # mfcc features
        need_empty_past = max(0, (context_past_min - time_slice))
        empty_source_past = list(empty_mfcc for empty_slots in range(need_empty_past))
        data_source_past = orig_inputs[max(0, time_slice - numcontext):time_slice]
        assert(len(empty_source_past) + len(data_source_past) == numcontext)

        # Pick up to numcontext time slices in the future, and complete with empty
        # mfcc features
        need_empty_future = max(0, (time_slice - context_future_max))
        empty_source_future = list(empty_mfcc for empty_slots in range(need_empty_future))
        data_source_future = orig_inputs[time_slice + 1:time_slice + numcontext + 1]
        assert(len(empty_source_future) + len(data_source_future) == numcontext)

        if need_empty_past:
            past = np.concatenate((empty_source_past, data_source_past))
        else:
            past = data_source_past

        if need_empty_future:
            future = np.concatenate((data_source_future, empty_source_future))
        else:
            future = data_source_future

        past = np.reshape(past, numcontext * numcep)
        now = orig_inputs[time_slice]
        future = np.reshape(future, numcontext * numcep)

        train_inputs[time_slice] = np.concatenate((past, now, future))
        assert(len(train_inputs[time_slice]) == numcep + 2 * numcep * numcontext)

    # Scale/standardize the inputs
    # This can be done more efficiently in the TensorFlow graph
    train_inputs = (train_inputs - np.mean(train_inputs)) / np.std(train_inputs)
    return train_inputs
其中每25ms语音片段我们使用26个MFCC倒谱特征。第25-70行实现将当前25ms语音片段和前后各9个语音片段的494个倒谱系数拼接到一个train_inputs向量中(不存在的前后片段补0)。
这样我们就得到了训练需要的语音信息,下面我们看看训练的标注信息是如何获得的。这部分主要在text.py中实现。
5.normalize_txt_file函数
由get_audio_and_transcript函数代码可知,在调用audiofile_to_input_vector函数获得倒谱数据之后,它紧接着就调用了normalize_txt_file函数。那么这个函数实现了一个什么功能呢?我们马上来看代码,如下所示:
def normalize_txt_file(txt_file, remove_apostrophe=True):
    with codecs.open(txt_file, encoding="utf-8") as open_txt_file:
        return normalize_text(open_txt_file.read(), remove_apostrophe=remove_apostrophe)
可以看到这个函数只是调用了normalize_text函数,我们再看看这个代码,如下所示:
def normalize_text(original, remove_apostrophe=True):
    # convert any unicode characters to ASCII equivalent
    # then ignore anything else and decode to a string
    result = unicodedata.normalize("NFKD", original).encode("ascii", "ignore").decode()
    if remove_apostrophe:
        # remove apostrophes to keep contractions together
        result = result.replace("'", "")
    # return lowercase alphabetic characters and apostrophes (if still present)
    return re.sub("[^a-zA-Z']+", ' ', result).strip().lower()
这段代码主要是去掉文本文件中不支持的字符。
6.text_to_char_array函数
normalize_txt_file函数去掉了文本标注文件中不被支持的字符,现在我们来分析它之后调用的text_to_char_array函数,代码如下:
# Constants
SPACE_TOKEN = '<space>'
SPACE_INDEX = 0
FIRST_INDEX = ord('a') - 1  # 0 is reserved to space

def text_to_char_array(original):
    # Create list of sentence's words w/spaces replaced by ''
    result = original.replace(' ', '  ')
    result = result.split(' ')

    # Tokenize words into letters adding in SPACE_TOKEN where required
    result = np.hstack([SPACE_TOKEN if xt == '' else list(xt) for xt in result])

    # Return characters mapped into indicies
    return np.asarray([SPACE_INDEX if xt == SPACE_TOKEN else ord(xt) - FIRST_INDEX for xt in result])
由这段代码可以看出,text_to_char_array函数将文本标注文件中的字符串表示成了一个数值数组(数值对应着对应字母的ASCII码以及SPACE对应的ASCII码)。
自此我们就得到了我们训练输入输出的所需的全部向量。再次返回到next_batch函数中,我们还有pad_sequences函数和sparse_tuple_from函数需要分析。
7.pad_sequences函数
这段代码主要是将语音输入向量和本次batch最长的序列保持一致,在向量的头部或者尾部补0(由padding参数决定)。
def pad_sequences(sequences, maxlen=None, dtype=np.float32,
                  padding='post', truncating='post', value=0.):
    '''
    Pads each sequence to the same length of the longest sequence.

        If maxlen is provided, any sequence longer than maxlen is truncated to
        maxlen. Truncation happens off either the beginning or the end
        (default) of the sequence. Supports post-padding (default) and
        pre-padding.

        Args:
            sequences: list of lists where each element is a sequence
            maxlen: int, maximum length
            dtype: type to cast the resulting sequence.
            padding: 'pre' or 'post', pad either before or after each sequence.
            truncating: 'pre' or 'post', remove values from sequences larger
            than maxlen either in the beginning or in the end of the sequence
            value: float, value to pad the sequences to the desired value.

        Returns:
            numpy.ndarray: Padded sequences shape = (number_of_sequences, maxlen)
            numpy.ndarray: original sequence lengths
    '''
    lengths = np.asarray([len(s) for s in sequences], dtype=np.int64)

    nb_samples = len(sequences)
    if maxlen is None:
        maxlen = np.max(lengths)

    # take the sample shape from the first non empty sequence
    # checking for consistency in the main loop below.
    sample_shape = tuple()
    for s in sequences:
        if len(s) > 0:
            sample_shape = np.asarray(s).shape[1:]
            break

    x = (np.ones((nb_samples, maxlen) + sample_shape) * value).astype(dtype)
    for idx, s in enumerate(sequences):
        if len(s) == 0:
            continue  # empty list was found
        if truncating == 'pre':
            trunc = s[-maxlen:]
        elif truncating == 'post':
            trunc = s[:maxlen]
        else:
            raise ValueError('Truncating type "%s" not understood' % truncating)

        # check `trunc` has expected shape
        trunc = np.asarray(trunc, dtype=dtype)
        if trunc.shape[1:] != sample_shape:
            raise ValueError('Shape of sample %s of sequence at position %s is different from expected shape %s' %
                             (trunc.shape[1:], idx, sample_shape))

        if padding == 'post':
            x[idx, :len(trunc)] = trunc
        elif padding == 'pre':
            x[idx, -len(trunc):] = trunc
        else:
            raise ValueError('Padding type "%s" not understood' % padding)
    return x, lengths
8.sparse_tuple_from函数
该函数主要获得标注向量的一个稀疏表示,代码如下图所示:
def sparse_tuple_from(sequences, dtype=np.int32):
    """
    Create a sparse representention of ``sequences``.

    Args:
        sequences: a list of lists of type dtype where each element is a sequence
    Returns:
        A tuple with (indices, values, shape)
    """

    indices = []
    values = []

    for n, seq in enumerate(sequences):
        indices.extend(zip([n] * len(seq), range(len(seq))))
        values.extend(seq)

    indices = np.asarray(indices, dtype=np.int64)
    values = np.asarray(values, dtype=dtype)
    shape = np.asarray([len(sequences), indices.max(0)[1] + 1], dtype=np.int64)

    # return tf.SparseTensor(indices=indices, values=values, shape=shape)
    return indices, values, shape
其中,假设sequences有2个,值分别为[1 3 4 9 2]、[ 8 5 7 2]。则indices=[[0 0][0 1][0 2][0 3][0 4][0 0][0 1][0 2][0 3]],values=[1 3 4 9 2 8 5 7 2],shape=[2 6]。
自此,我们就得到了训练的输入输出,接下来我们就正式进入模型的训练代码。


 1万+
1万+


 被折叠的 条评论
为什么被折叠?
被折叠的 条评论
为什么被折叠?
 到【灌水乐园】发言


