


为什么要使用Volley框架
开发android应用很多时候都要涉及网络操作,Android SDK中提供了HttpClient 和 HttpUrlConnection两种方式用来处理网络操作,但当应用比较复杂的时候需要我们编写大量的代码处理很多东西:图像缓存,请求的调度等等;
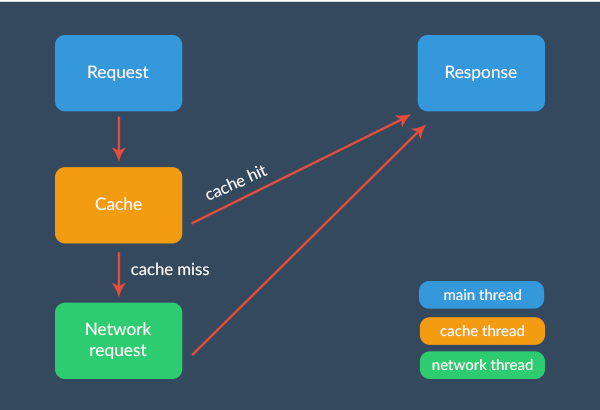
而Volley框架就是为解决这些而生的,它与2013年Google I/O大会上被提出:使得Android应用网络操作更方便更快捷;抽象了底层Http Client等实现的细节,让开发者更专注与产生RESTful Request。另外,Volley在不同的线程上异步执行所有请求而避免了阻塞主线程。
Volley到底有哪些特点呢?
- 自动调度网络请求
- 多个并发的网络连接
- 通过使用标准的HTTP缓存机制保持磁盘和内存响应的一致
- 支持请求优先级
- 支持取消请求的强大API,可以取消单个请求或多个
- 易于定制
- 健壮性:便于正确的更新UI和获取数据
- 包含调试和追踪工具
如何使用Volley
- git clone https://android.googlesource.com/platform/frameworks/volley 或者 https://github.com/mcxiaoke/android-volley
或者到Maven下载http://central.maven.org/maven2/com/mcxiaoke/volley/library/1.0.19/library-1.0.19.jar
Volley中的RequestQueue 和 Request
RequestQueue用来执行请求的请求队列Request用来构造一个请求对象Request对象主要有以下几种类型:
StringRequest响应的主体为字符串JsonArrayRequest发送和接收JSON数组JsonObjectRequest发送和接收JSON对象ImageRequest发送和接收Image
Volley的基本使用
首先我们需要创建一个RequestQueue requestQueue,然后构建一个自己所需要的XXRequest req,之后通过requestQueue.add(req);将请求添加至请求队列;
构建一个RequestQueue
RequestQueue requestQueue=Volley.newRequestQueue(this);//这里的this指的是Context
private final String url="http:/xxxxx"//所需url
    JsonObjectRequest req=new JsonObjectRequest(url,null,new Response.Listener<JsonObject>(){
        @Override
        public void onResponse(JsonObject response){
            //添加自己的响应逻辑,
        }
    },
    new ResponseError.Listener(){
        @Override
        public void onResponseError(VollerError error){
            //错误处理
            L.d("Error Message:","Error is"+error);
        }
    });
将req添加到requestQueue
在构建JsonObjectRequest对象时,需要四个参数,其中第二个参数代表http方法,第三个和第四个分别是响应监听和响应错误监听,分别需要覆写onResponse()和onResponseError()方法;RequestQueue将会执行请求,并将响应回调onResponse()方法,所以需要在onResponse()方法中实现自己的业务逻辑
参考资料 :http://blog.csdn.net/qwm8777411/article/details/45770979
http://www.kwstu.com/ArticleView/kwstu_20144118313429
此博文源码下载地址 https://github.com/Javen205/VolleyDemo.git
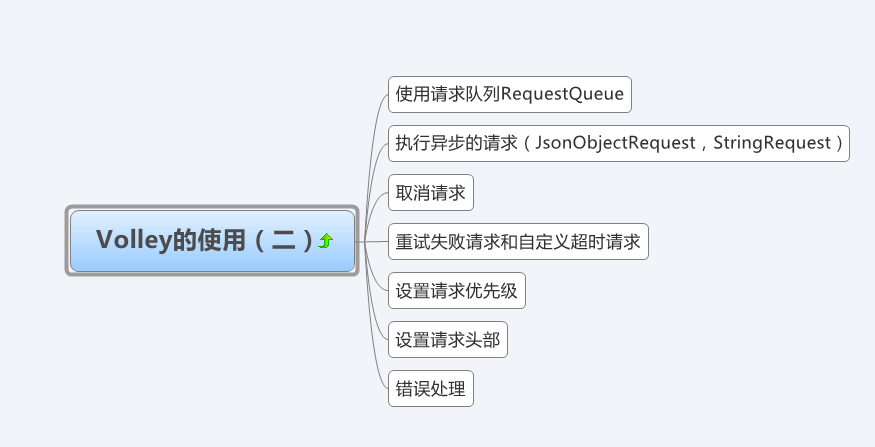
使用请求队列RequestQueue
Volley中的Request都需要添加到RequestQueue中才能执行,所以首先需要创建一个RequestQueue
RequestQueue = Volley.newRequestQueue(mContext);
通常情况在一个应用中需要统一管理一个请求队列,所以采用单例模式(注意:这不是必须的),创建一个类并在这个类中初始化RequestQueue等核心对象,以及实现一些我们所需的方法;
代码如下:
package com.javen.volley;

import android.content.Context;
import android.text.TextUtils;

import com.android.volley.Request;
import com.android.volley.RequestQueue;
import com.android.volley.toolbox.ImageLoader;
import com.android.volley.toolbox.Volley;

public class VolleyController {

    // 创建一个TAG,方便调试或Log
    private static final String TAG = "VolleyController";

    // 创建一个全局的请求队列
    private RequestQueue reqQueue;
    private ImageLoader imageLoader;

    // 创建一个static ApplicationController对象,便于全局访问
    private static VolleyController mInstance;

    private Context mContext;

    private VolleyController(Context context) {
        mContext=context;
    }

    /**
     * 以下为需要我们自己封装的添加请求取消请求等方法
     */

    // 用于返回一个VolleyController单例
    public static VolleyController getInstance(Context context) {
        if (mInstance == null) {
            synchronized(VolleyController.class)
            {
                if (mInstance == null) {
                    mInstance = new VolleyController(context);
                }
            }
        }
        return mInstance;
    }

    // 用于返回全局RequestQueue对象,如果为空则创建它
    public RequestQueue getRequestQueue() {
        if (reqQueue == null){
            synchronized(VolleyController.class)
            {
                if (reqQueue == null){
                    reqQueue = Volley.newRequestQueue(mContext);
                }
            }
        }
        return reqQueue;
    }


//    public ImageLoader getImageLoader(){
//        getRequestQueue();
//        //如果imageLoader为空则创建它,第二个参数代表处理图像缓存的类
//        if(imageLoader==null){
//            imageLoader=new ImageLoader(reqQueue, new LruBitmapCache());
//        }
//        return imageLoader;
//    }


    /**
     * 将Request对象添加进RequestQueue,由于Request有*StringRequest,JsonObjectResquest...
     * 等多种类型,所以需要用到*泛型。同时可将*tag作为可选参数以便标示出每一个不同请求
     */

    public <T> void addToRequestQueue(Request<T> req, String tag) {
        // 如果tag为空的话,就是用默认TAG
        req.setTag(TextUtils.isEmpty(tag) ? TAG : tag);

        getRequestQueue().add(req);
    }

    public <T> void addToRequestQueue(Request<T> req) {
        req.setTag(TAG);
        getRequestQueue().add(req);
    }

    // 通过各Request对象的Tag属性取消请求
    public void cancelPendingRequests(Object tag) {
        if (reqQueue != null) {
            reqQueue.cancelAll(tag);
        }
    }
}
执行异步请求
上篇文章已经提到过,Volley主要提供了以下几种类型的异步请求:
- JsonObjectRequest 用来接收和发送JsonObject类型的数据
- JsonArrayRequest 用来接收和发送JsonArray类型的数据
- StringRequest 用来接收和发送响应主体为String的数据
JsonObjectRequest
这是一个用来发送和接收JSON数据最常用的类,覆写这个类中的一些方法可以发送(GET,POST,DELETE,PUT)等适当的HTTP请求,常见操作代码示例:
final String url="http://xxx";

JsonObjectRequest req=new JsonObjectRequest(url,null,
                            new Response.Listener<JsonObject>(){
    @Override
    public void onResponse(JsonObject response){
    //正确响应时回调此函数
    }

},new ResponseError.Listener(){

    @Override
    public void onErrorResponse(VolleyError error){
            //未正确响应时回调此函数
    }
});
//将请求添加至全局RequestQueue
VolleyController.getInstance(context).addToRequestQueue(req);
发送包含HTTP 请求方法(Post Put Get Delete)的 Request:
如果我们想要发送Post,Delete等请求,可通过一个带请求参数的
JsonObject对象来实现
//用来保存post参数
HashMap<String,String> params=new HashMap<String,String>();
params.put("user","xxx");

//new JsonObject(params) 作为 JsonObjectRequest 参数
JsonObjectRequest req=new JsonObjectRequest(url,
                        new JsonObject(params),
                    new Response.Listener<JsonObject>(){...},
                    new Response.ErrorListener(){...});
发送JsonArrayRequest StringRequest与JsonObjectRequest类似:
JsonArrayRequest req=new JsonArrayRequest(url,
        new Response.Listener<JsonArray>(){..},
        new Response.ErrorListener(){..});
StringRequest req=new StringRequest(url,
        new Response.Listener<String>(){..},
        new Response.ErrorListener(){..});
取消Request
Volley框架提供了强大的API来支持取消正在等待或者运行的一个或多个请求,还记得我们先前提到的setTag()方法吗,正是通过Tag来标示每个Request,我们特可以通过这个Tag来取消Request
//可以通过setTag方法为每一个Request添加tag
req.setTag("Tag");
//也可以在我们实现的添加进RequestQueue的时候设置
VolleyController.getInstance(context).cancelPendingRequests("Tag");

//取消Request
reqQueue.cancelAll("Tag");
//我们前面实现的方法
VolleyController.getInstance(context).cancelPendingRequests("Tag");
》》》》》》》》》》》》》》》》》》》》》》》》》》》》》》》》》》》》》》》》》》》》》》》》》》》》》》》》》》》》》》》》》》》》》》》》》》》》》》》
学习完上面三个方面的知识,我们就已经差不多掌握了Volley最常用的方法,如果想让你的应用更健壮,还需要了解Volley中的错误处理,设置请求失败重试机制和超时机制,设置请求优先级,设置请求头部等等
拓展部分
请求失败时的重试和请求自定义超时
Volley中提供了一个方案:可以通过Request对象调用setRetryPolicy()方法,设置超时和重试请求
// 第一个代表超时时间:即超过20S认为超时,第三个参数代表最大重试次数,这里设置为1.0f代表如果超时,则不重试
        req.setRetryPolicy(new DefaultRetryPolicy(20 * 1000, 1, 1.0f));
设置请求优先级
在实际开发中我们常常需要提高一些请求的优先级以便优先执行,可以通过覆写getPrioriity()方法
//优先级有LOW,NORMAL,HIGH,IMMEDIATE
private Priority priority = Priority.HIGH;

StringRequest strReq = new StringRequest(Method.GET,
          Const.URL_STRING_REQ,
          new Response.Listener<String>() {

     @Override
     public void onResponse(String response) {
             Log.d(TAG, response.toString());
             msgResponse.setText(response.toString());
             hideProgressDialog();
         }
     }, new Response.ErrorListener() {

      @Override
      public void onErrorResponse(VolleyError error) {
              VolleyLog.d(TAG, "Error: " + error.getMessage());
              hideProgressDialog();
      }
  }) {
     @Override
      public Priority getPriority() {
           return priority;
      }
};
设置请求头部(HTTP 头部)
很多时候需要给HTTP Request添加头部,一个典型的场景就是基本的HTTP 授权认证,Request类中提供了getHeaders()方法,你需要覆写并添加自己的自定义头部
@Override
public Map<String, String> getHeaders() throws AuthFailureError {
    HashMap<String, String> headers = new HashMap<String, String>();
    headers.put("CUSTOM_HEADER", "Yahoo");
    headers.put("ANOTHER_CUSTOM_HEADER", "Google");
    return headers;
}
错误处理
你可能已经注意到了在创建Request对象时,构造参数中有
new Response.ErrorListener(),这就是典型的错误处理
volley中错误主要有以下几类:
- AuthFailureError — 基本的Http身份认证(授权)错误.
- NetworkError — 网络错误
- NoConnectionError — 网络连接错误.
- ParseError — 数据解析错误.
- ServerError — 服务端错误.
- TimeoutError — 超时错误.
你可以实现自己的错误处理类,用来返回具体的错误信息
public class VolleyErrorHelper {

     //用于返回具体错误信息,分辨错误类别
      public static String getMessage(Object error, Context context) {
        if (error instanceof TimeoutError) {
            return context.getResources().getString(R.string.generic_server_down);
            }else if (isServerProblem(error)) {
                return handleServerError(error, context);
            }else if (isNetworkProblem(error)) {
                return context.getResources().getString(R.string.no_internet);
            }
            return context.getResources().getString(R.string.generic_error);
        }

        //判断是否是网络错误
        private static boolean isNetworkProblem(Object error) {
            return (error instanceof NetworkError) ||
                (error instanceof NoConnectionError);
        }

        //判断是否是服务端错误
        private static boolean isServerProblem(Object error) {
            return (error instanceof ServerError) ||
                (error instanceof AuthFailureError);
        }

        //处理服务端错误
        private static String handleServerError(Object err, Context context) {
            VolleyError error = (VolleyError) err;

            NetworkResponse response = error.networkResponse;

            if (response != null) {
                switch (response.statusCode) {
                    case 404:
                    case 422:
                    case 401:
                        try {
                        // server might return error like this { "error": "Some error occured" }
                        // Use "Gson" to parse the result
                        HashMap<String, String> result = new Gson().fromJson(new String(response.data),
                        new TypeToken<Map<String, String>>() {}.getType());

            if (result != null && result.containsKey("error")) {
                return result.get("error");
            }

            } catch (Exception e) {
                e.printStackTrace();
            }

            return error.getMessage();

            default:
                return context.getResources().getString(R.string.generic_server_down);
            }
        }
        return context.getResources().getString(R.string.generic_error);
      }
    }
Image Request
为了更方便的使用Volley中的图片请求,我们同样先在VolleyController类中封装一个ImageLoader
public class LruBitmapCache extends LruCache<String,Bitmap> implements ImageCache{
        public static int getDefaultLruCacheSize(){
            final int maxMemory=(int)(Runtime.getRuntime().maxMemory/1024);
            final int cacheSize=maxMemory/8;
            return cacheSize;
        }

        public LruBitmapCache(){
            this(getDefaultLruBitmapCacheSize);
        }

        public LruBitmapCache(int sizeInKiloBytes){
            super(sizeInkiloBytes);
        }

        @Override
        public int sizeOf(String key,Bitmap Value){
            return value.getRowBytes()*value.getHeight()/1024;
        }

        @Override
        public Bitmap getBitmap(String url){
            return get(url);
        }

        @Override
        public void putBitmap(String url,Bitmap bitmap){
            put(url,bitmap);
        }
    }
package com.javen.volley;

import android.content.Context;
import android.text.TextUtils;

import com.android.volley.Request;
import com.android.volley.RequestQueue;
import com.android.volley.toolbox.ImageLoader;
import com.android.volley.toolbox.Volley;

public class VolleyController {

    // 创建一个TAG,方便调试或Log
    private static final String TAG = "VolleyController";

    // 创建一个全局的请求队列
    private RequestQueue reqQueue;
    private ImageLoader imageLoader;

    // 创建一个static ApplicationController对象,便于全局访问
    private static VolleyController mInstance;

    private Context mContext;

    private VolleyController(Context context) {
        mContext=context;
    }

    /**
     * 以下为需要我们自己封装的添加请求取消请求等方法
     */

    // 用于返回一个VolleyController单例
    public static VolleyController getInstance(Context context) {
        if (mInstance == null) {
            synchronized(VolleyController.class)
            {
                if (mInstance == null) {
                    mInstance = new VolleyController(context);
                }
            }
        }
        return mInstance;
    }

    // 用于返回全局RequestQueue对象,如果为空则创建它
    public RequestQueue getRequestQueue() {
        if (reqQueue == null){
            synchronized(VolleyController.class)
            {
                if (reqQueue == null){
                    reqQueue = Volley.newRequestQueue(mContext);
                }
            }
        }
        return reqQueue;
    }


    public ImageLoader getImageLoader(){
        getRequestQueue();
        //如果imageLoader为空则创建它,第二个参数代表处理图像缓存的类
        if(imageLoader==null){
            imageLoader=new ImageLoader(reqQueue, new LruBitmapCache());
        }
        return imageLoader;
    }


    /**
     * 将Request对象添加进RequestQueue,由于Request有*StringRequest,JsonObjectResquest...
     * 等多种类型,所以需要用到*泛型。同时可将*tag作为可选参数以便标示出每一个不同请求
     */

    public <T> void addToRequestQueue(Request<T> req, String tag) {
        // 如果tag为空的话,就是用默认TAG
        req.setTag(TextUtils.isEmpty(tag) ? TAG : tag);

        getRequestQueue().add(req);
    }

    public <T> void addToRequestQueue(Request<T> req) {
        req.setTag(TAG);
        getRequestQueue().add(req);
    }

    // 通过各Request对象的Tag属性取消请求
    public void cancelPendingRequests(Object tag) {
        if (reqQueue != null) {
            reqQueue.cancelAll(tag);
        }
    }
}
- 完成上述步骤后,在使用的时候我们首先需要获取ImageLoader对象
ImageLoader imageLoader=VolleyController.getInstance(context).getImageLoader();
- 将图片载入ImageView 可以使用Volley自己提供的一个Image视图,
NetworkImageView,几行代码就可以搞定
//将NetworkImageView布局在布局文件中
NetworkImageView imageView=(NetworkImageView)findViewById(R.id.networkimageview);
 //需要用到imageLoader
 imageView.setImageUrl(url,imageLoader);
如果要将图片直接载入ImageView,可以通过以下方法:
ImageLoader imageLoader=VolleyController.getInstance(context).getImageLoader();

        imageLoader.get(url,new ImageListener(){
           @Override
           public void onResponse(ImageContainer response,boolean arg)  {
                if(response.getBitmap()!=null){
                //设置imageView
                //    imageView.setImageBitmap(response.getBitmap());

                }
            }
            @Override
            public void onErrorResponse(VolleyError error){
                L.e("Image Error"+error.getMessage());
                }
            });
Volley Cache
Volley有着强大的缓存机制用来维护请求到的缓存,这节省了不必要的网络消耗和等待时间,下面是一些关于缓存的常用方法
- 从缓存中读取请求:即先从缓存读取看是否有缓存数据,如果没有则请求网络数据
Cache cache=VolleyController.getInstance(context).getRequestQueue().getCache();
        Entry entry=cache.get(url);
        if(entry!=null){
            try{
                String data=new String(entry.data,"Utf-8");
                //处理data,将其转化为JSON,XML,Bitmap等等
                }catch(Exception e){
                    e.printStackTrace();
                }
        }else{
            //缓存中不存在,做网络请求
        }
- 缓存失效:缓存失效并不意味这删除缓存,volley仍将使用缓存对象,直到服务器返回新数据,一旦接收到新数据,将覆盖原来的缓存
VolleyController.getInstance(context).getRequestQueue().getCache().invalidate(url,true); - 关闭缓存:如果你想禁用特定Url的缓存可以使用以下方法
VolleyController.getInstance(context).getRequestQueue().getCache().remove(url);
- 删除来自特定url的缓存
VolleyController.getInstance(context).getRequestQueue().getCache().remove(url);
- 删除所有缓存
VolleyController.getInstance(context).getRequestQueue().getCache()clear(url);
总结:
综上,已经学完了Volley框架的使用,在实际应用中遇到具体的问题需要具体考虑,必要时要学会查阅资料,除了以上几篇提到的参考资料,最好能FQ去看看google官方关于Volley的文档。
参考资料:Android working with Volley Library blog http://blog.csdn.net/guolin_blog/article/details/17482165


 2万+
2万+


 被折叠的 条评论
为什么被折叠?
被折叠的 条评论
为什么被折叠?
 到【灌水乐园】发言


