


安装参考网站:
http://caffe.berkeleyvision.org/installation.html caffe官网安装教程
http://blog.csdn.net/dawin_2008/article/details/52382237 caffe安装参考CSDN博客
https://developer.nvidia.com/cuda-downloads CUDA8.0下载和安装网址
https://developer.nvidia.com/rdp/cudnn-download cuDNN下载网站
http://docs.opencv.org/2.4/doc/tutorials/introduction/linux_install/linux_install.html#linux-installation opencv 安装教程网站
https://github.com/opencv/opencv opencv-master下载地址
https://www.continuum.io/downloads Anaconda 下载地址
所需软件:
ubuntu-16.04-desktop-amd64
caffe-master
Anaconda2-4.1.1-Linux-x86_64.sh
cuda-repo-ubuntu1604-8-0-local_8.0.44-1_amd64.deb
cudnn-8.0-linux-x64-v5.1
OpenBLAS-0.2.19.tar
opencv-master
安装顺序:
1、 Ubuntu16.04系统安装
2、 CUDA8.0安装
3、 cuDNN-v5.1 安装
4、 OpenBLAS-0.2.19安装
5、 opencv-master安装
6、 Anaconda2-4.1.1 安装
7、 caffe-master安装
安装过程:
第一步:Ubuntu16.04系统安装
可参考http://www.cnblogs.com/zangyu/p/5653041.html 此为window10下安装Ubuntu16.04双系统的博客教程,和单独安装Ubuntu16.04的差不多。可按照博客教程进行安装。
第二步:基础依赖库的安装
输入一下命令行,根据提示安装即可:
$ sudo apt-get install libprotobuf-dev libleveldb-dev libsnappy-dev libopencv-dev libhdf5-serial-dev protobuf-compiler
$ sudo apt-get install --no-install-recommends libboost-all-dev
$ sudo apt-get install libgflags-dev libgoogle-glog-dev liblmdb-dev
第三步:CUDA8.0安装
Ubuntu16.04 要求是CUDA8.0,所以必须安装CUDA8.0,不然后续估计会有很多麻烦。
https://developer.nvidia.com/cuda-downloads 这个网址是CUDA下载的网址,根据选项,找到适合自己的CUDA进行下载。
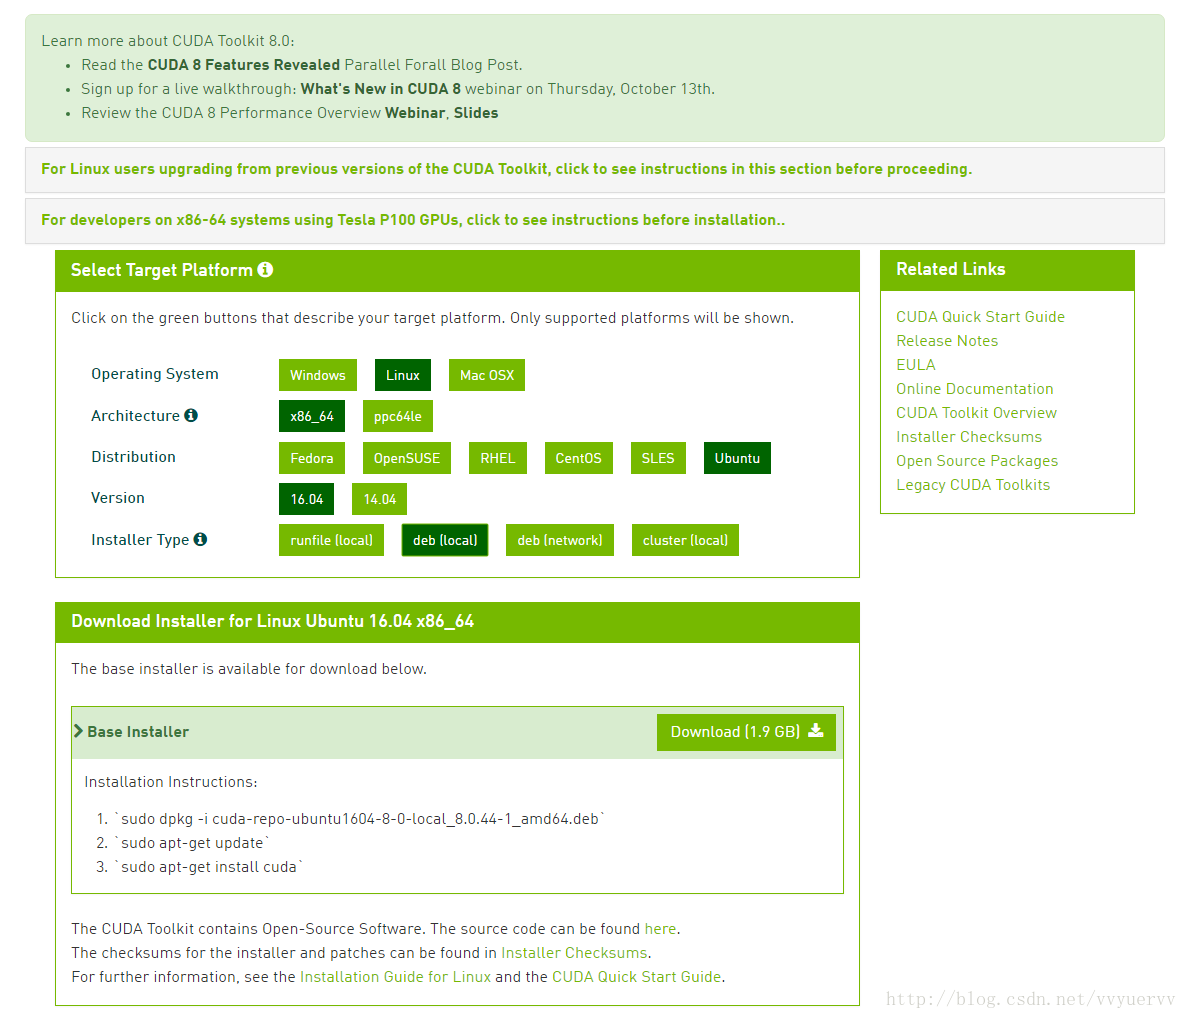
本教程下载的是:cuda-repo-ubuntu1604-8-0-local_8.0.44-1_amd64.deb
下载完成后,根据网页下面的安装教程进行安装:
$ sudo dpkg -i cuda-repo-ubuntu1604-8-0-local_8.0.44-1_amd64.deb
$ sudo apt-get update
$ sudo apt-get install cuda
安装完成后,在/etc/profile 文件中增加两行内容:
(必须以管理员权限打开,否则无法修改保存。打开文件命令:$ sudo gedit /etc/profile)
export PATH=/usr/local/cuda-8.0/bin:$PATH                        #即CUDA8.0所安装路径下的bin文件夹路径,根据自己的安装路径进行修改
export LD_LIBRARY_PATH=/usr/local/cuda-8.0/lib64:$LD_LIBRARY_PATH            #即CUDA8.0所安装路径下的lib64文件夹路径,根据自己的安装路径进行修改
第四步:cuDNN-v5.1 安装
https://developer.nvidia.com/rdp/cudnn-download 该网站为cuDNN下载网站,需要注册才能下载。
登录账号之后,找到下载位置,同意,并找到所需要的版本,本教程使用的是针对CUDA8.0的版本cuDNN v5.1 Library for Linux,如下图所示,直接点击即可下载。

下载完成后,将安装包放到home下(不放也行,但要记得安装包所在路径)进行安装:
$ sudo tar xvf cudnn-8.0-linux-x64-v5.1.tgz                  #使用命令将文件解压,也可自行解压
$ cd cuda/include                                                  #进入解压后的文件夹中的include文件夹中
$ sudo cp *.h /usr/local/include/                               #拷贝文件到/usr/local/include/中
$ cd ../lib64
$ sudo cp lib* /usr/local/lib/
$ cd /usr/local/lib
$ sudo chmod +r libcudnn.so.5.1.5
$ sudo ln -sf libcudnn.so.5.1.5 libcudnn.so.5
$ sudo ln -sf libcudnn.so.5 libcudnn.so
$ sudo ldconfig
安装完成后,参照第三步的方法,将
export PATH=/usr/local/cuda/bin:$PATH
export LD_LIBRARY_PATH=/usr/local/cuda/lib64:$LD_LIBRARY_PATH
添加到/etc/profile 文件中。
使用命令,使得文件生效。
$ source /etc/profile验证安装情况:
1) 进入/usr/local/cuda/samples文件夹下
2) 使用命令$ sudo make all –j $(nproc) 编译例子
3) 编译完成后,进入 /usr/local/cuda/samples/bin/x86_64/linux/release 文件夹下
$ ./deviceQuery #运行编译后的文件运行完成后可看到CUDA以及GPU的版本信息。Result = PASS表示通过,安装成功。
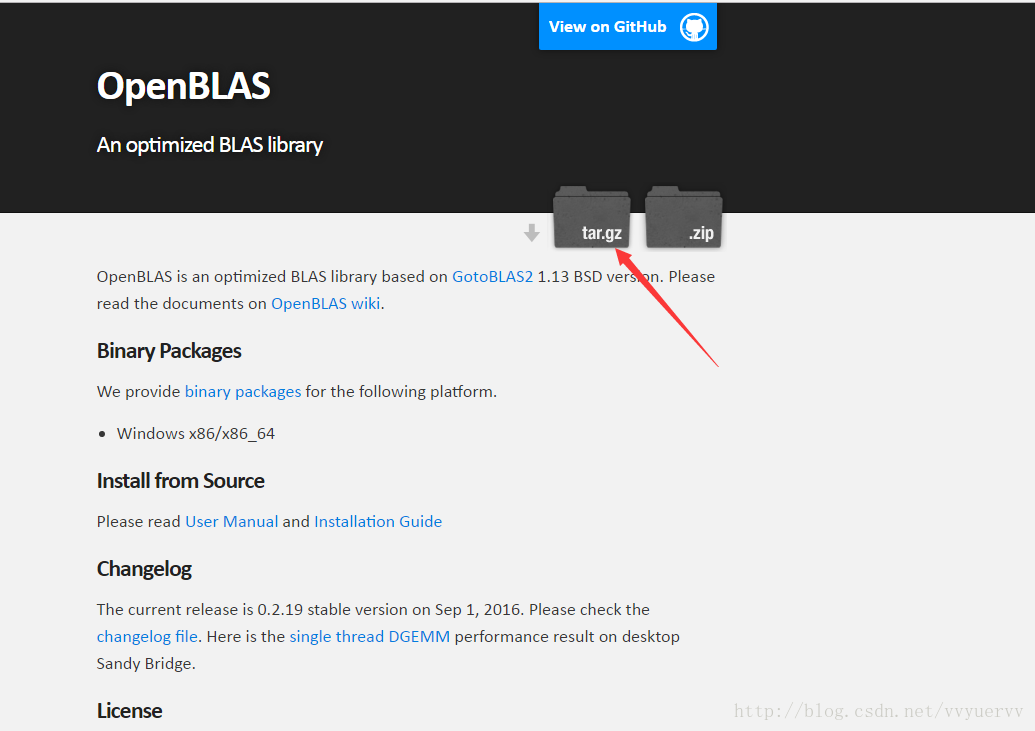
第五步:OpenBLAS-0.2.19安装
下载地址: http://www.openblas.net/
安装过程:
1> 使用命令解压文件
tarzxvfOpenBLAS−0.2.19.tar.gz2>将路径cd到解压文件夹下(我这里是/your/path/OpenBLAS,所以使用命令为
cd ~/OpenBLAS)
3> 编译
$ make
$ make PREFIX=/home/username/yourpath/OpenBLAS #根据解压路径进行路径修改将路径添加到~/.bashrc文件中(打开方式:$ sudo gedit ~/.bashrc ):
$ export LD_LIBRARY_PATH=/home/username/yourpath/OpenBLAS:$LD_LIBRARY_PATH第六步:opencv-master安装
Opencv官网安装教程:http://docs.opencv.org/2.4/doc/tutorials/introduction/linux_install/linux_install.html#linux-installation
Opencv下载地址 :https://github.com/opencv/opencv
官网上下载的opencv可能不适合该环境下安装,我尝试过几个版本(opencv3.0、opencv3.1、opencv2.4)均编译失败,使用本版本可以编译通过。
根据官网的提示,安装opencv的教程大致如下:
先安装基本依赖库:
$ sudo apt-get install build-essential
$ sudo apt-get install cmake git libgtk2.0-dev pkg-config libavcodec-dev libavformat-dev libswscale-dev
$ sudo apt-get install python-dev python-numpy libtbb2 libtbb-dev libjpeg-dev libpng-dev libtiff-dev libjasper-dev libdc1394-22-dev
然后创建一个文件夹opencv,进入创建的文件夹下
$ cd opencv将下载的opencv-master压缩文件解压到新建的opencv文件夹中
在opencv文件夹中新建一个release文件夹,并进入其中,进行编译:
$ mkdir release
$ cd release
$ cmake -D CMAKE_BUILD_TYPE=RELEASE -D CMAKE_INSTALL_PREFIX=/usr/local ..
$ make
$ sudo make install安装过程中可能会卡在下载ippicv_linux_20151201中,这时可以自己下载,之后将自行下载的ippicv_linux_20151201文件放在/opencv/3rdparty/ippicv/download/ linux-808b791a6eac9ed78d32a7666804320e/文件下路径下。不同opencv版本对应的ippicv_linux文件不同,但方法都一样。
重复编译opencv时,需要先进行清理,即使用make clean 命令将之前编译过的文件进行清理。
第七步:Anaconda2-4.1.1 安装
Anaconda 下载地址 :https://www.continuum.io/downloads
Anaconda下载之后是一个可执行的shell脚本文件,可直接$ bash Anaconda2-4.1.1-Linux-x86_64.sh示进行安装。
安装完成之后,修改~/.bashrc文件,在文件里加入:
$ sudo gedit ~/.bashrc                  #打开方式
$ export PATH=/home/username/yourpath/anaconda2/bin:$PATH                   #需要添加的内容
第八步:caffe-master安装
caffe-master下载地址:https://github.com/BVLC/caffe
caffe-master官方安装参考: http://caffe.berkeleyvision.org/installation.html
安装过程:
首先将下载的caffe-master压缩文件解压到caffe文件夹(自己新建的文件夹)中。
然后将当前路径cd到caffe文件夹下。
$ cd /home/username/yourpath/caffe执行以下命令:
$ cp Makefile.config.example Makefile.config之后调整配置文件Makefile.config,根据安装过的文件版本进行修改。文章后面会贴出本文配置下的Makefile.config文件配置。
配置完成后执行以下命令进行编译:
$ make all
$ make test
$ make runtest
也可以使用官网提供的另外一种安装方式,这里不再给出,可以在caffe-master官方安装参考链接中找到。
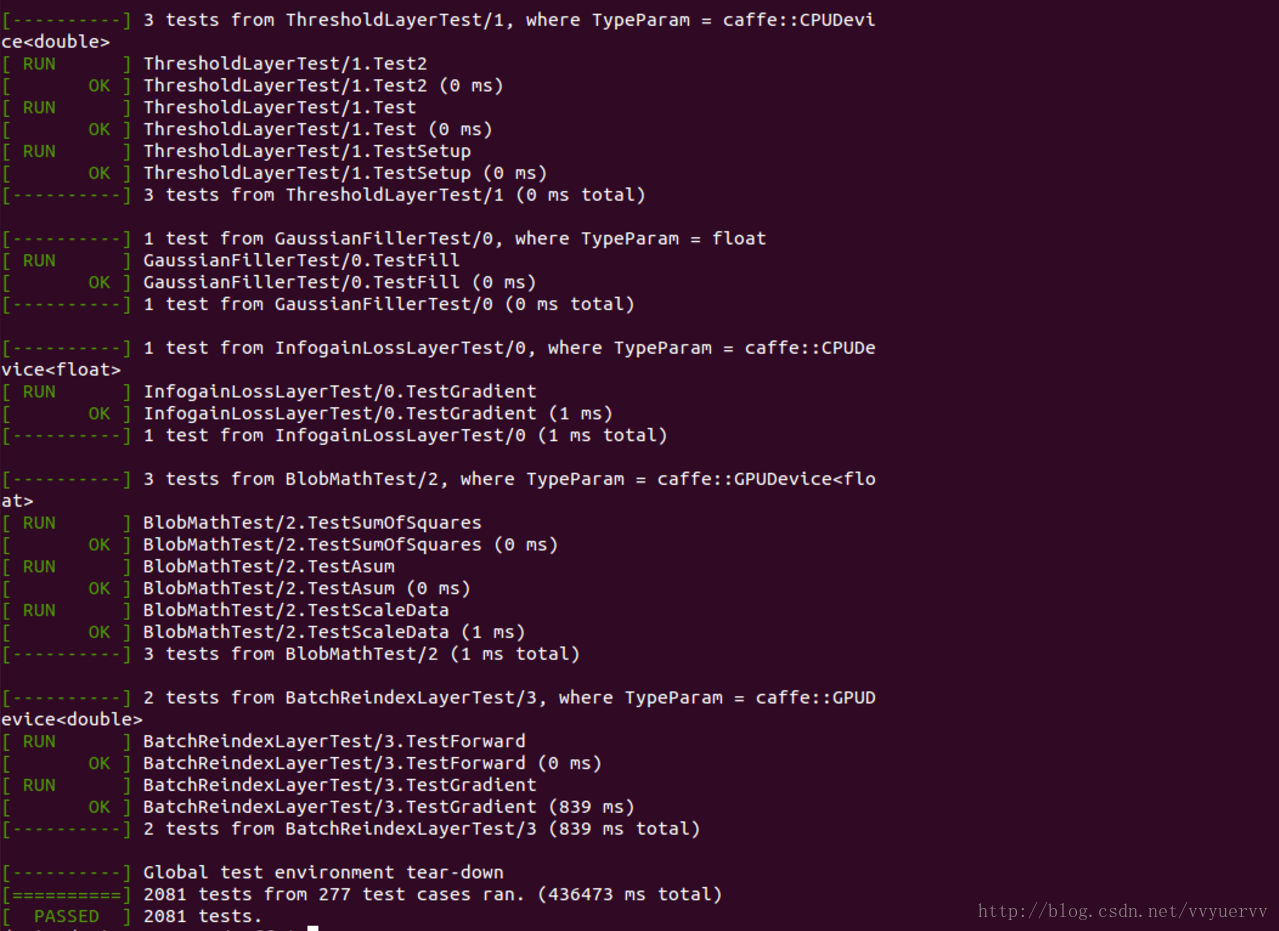
在进行make runtest时可以会出现下面的错误:
error while loading shared libraries: libhdf5_hl.so.10: cannot open shared object file: No such file or directory错误显示该文件不存在,实际上该文件时存在的。此时的解决方案是:
在~/.bashrc 文件中加入以下语句:
export PATH=/usr/local/cuda/bin:$PATH
export LD_LIBRARY_PATH=/usr/local/cuda/lib64:$LD_LIBRARY_PATH
export LD_LIBRARY_PATH=/home/username/yourpath/anaconda2/lib:$LD_LIBRARY_PATH
export LD_LIBRARY_PATH=/home/username/yourpath/OpenBLAS:$LD_LIBRARY_PATH之后再进行make runtest,成功后会显示下图状态:
第九步:编译Python wrapper
直接在caffe根目录下进行如下命令即可:
$ make pycaffe在使用Python进行import caffe时,可能会出现
ImportError: No module named google.protobuf.internal错误,此时只需下载安装protobuf文件即可:
$ pip install protobuf也可直接将该文件下载下来进行安装
$ pip install protobuf-3.1.0.post1-py2.py3-none-any.whl以上安装方法为回忆版,所以安装过程中的截图没有给出,安装过成中的细节也没能全部写出。如有疑问或者安装过程中遇到问题可以随时留言给我 .大家共同探讨。
/.bashrc文件内容:
# ~/.bashrc: executed by bash(1) for non-login shells.
# see /usr/share/doc/bash/examples/startup-files (in the package bash-doc)
# for examples

# If not running interactively, don't do anything
case $- in
    *i*) ;;
      *) return;;
esac

# don't put duplicate lines or lines starting with space in the history.
# See bash(1) for more options
HISTCONTROL=ignoreboth

# append to the history file, don't overwrite it
shopt -s histappend

# for setting history length see HISTSIZE and HISTFILESIZE in bash(1)
HISTSIZE=1000
HISTFILESIZE=2000

# check the window size after each command and, if necessary,
# update the values of LINES and COLUMNS.
shopt -s checkwinsize

# If set, the pattern "**" used in a pathname expansion context will
# match all files and zero or more directories and subdirectories.
#shopt -s globstar

# make less more friendly for non-text input files, see lesspipe(1)
[ -x /usr/bin/lesspipe ] && eval "$(SHELL=/bin/sh lesspipe)"

# set variable identifying the chroot you work in (used in the prompt below)
if [ -z "${debian_chroot:-}" ] && [ -r /etc/debian_chroot ]; then
    debian_chroot=$(cat /etc/debian_chroot)
fi

# set a fancy prompt (non-color, unless we know we "want" color)
case "$TERM" in
    xterm-color|*-256color) color_prompt=yes;;
esac

# uncomment for a colored prompt, if the terminal has the capability; turned
# off by default to not distract the user: the focus in a terminal window
# should be on the output of commands, not on the prompt
#force_color_prompt=yes

if [ -n "$force_color_prompt" ]; then
    if [ -x /usr/bin/tput ] && tput setaf 1 >&/dev/null; then
    # We have color support; assume it's compliant with Ecma-48
    # (ISO/IEC-6429). (Lack of such support is extremely rare, and such
    # a case would tend to support setf rather than setaf.)
    color_prompt=yes
    else
    color_prompt=
    fi
fi

if [ "$color_prompt" = yes ]; then
    PS1='${debian_chroot:+($debian_chroot)}\[\033[01;32m\]\u@\h\[\033[00m\]:\[\033[01;34m\]\w\[\033[00m\]\$ '
else
    PS1='${debian_chroot:+($debian_chroot)}\u@\h:\w\$ '
fi
unset color_prompt force_color_prompt

# If this is an xterm set the title to user@host:dir
case "$TERM" in
xterm*|rxvt*)
    PS1="\[\e]0;${debian_chroot:+($debian_chroot)}\u@\h: \w\a\]$PS1"
    ;;
*)
    ;;
esac

# enable color support of ls and also add handy aliases
if [ -x /usr/bin/dircolors ]; then
    test -r ~/.dircolors && eval "$(dircolors -b ~/.dircolors)" || eval "$(dircolors -b)"
    alias ls='ls --color=auto'
    #alias dir='dir --color=auto'

    #alias vdir='vdir --color=auto'

    alias grep='grep --color=auto'
    alias fgrep='fgrep --color=auto'
    alias egrep='egrep --color=auto'
fi

# colored GCC warnings and errors
#export GCC_COLORS='error=01;31:warning=01;35:note=01;36:caret=01;32:locus=01:quote=01'

# some more ls aliases
alias ll='ls -alF'
alias la='ls -A'
alias l='ls -CF'

# Add an "alert" alias for long running commands.  Use like so:
#   sleep 10; alert
alias alert='notify-send --urgency=low -i "$([ $? = 0 ] && echo terminal || echo error)" "$(history|tail -n1|sed -e '\''s/^\s*[0-9]\+\s*//;s/[;&|]\s*alert$//'\'')"'

# Alias definitions.
# You may want to put all your additions into a separate file like
# ~/.bash_aliases, instead of adding them here directly.
# See /usr/share/doc/bash-doc/examples in the bash-doc package.

if [ -f ~/.bash_aliases ]; then
    . ~/.bash_aliases
fi

# enable programmable completion features (you don't need to enable
# this, if it's already enabled in /etc/bash.bashrc and /etc/profile
# sources /etc/bash.bashrc).
if ! shopt -oq posix; then
  if [ -f /usr/share/bash-completion/bash_completion ]; then
    . /usr/share/bash-completion/bash_completion
  elif [ -f /etc/bash_completion ]; then
    . /etc/bash_completion
  fi
fi

# added by Anaconda2 4.1.1 installer
export PATH="/home/z/anaconda2/bin:$PATH"

export PATH="/home/z/anaconda2/lib:$PATH"
export PATH=/usr/local/cuda/bin:$PATH
export LD_LIBRARY_PATH=/usr/local/cuda/lib64:$LD_LIBRARY_PATH
export LD_LIBRARY_PATH=/home/z/OpenBLAS:$LD_LIBRARY_PATH
export LD_LIBRARY_PATH=/home/z/anaconda2/lib:$LD_LIBRARY_PATH
export LD_LIBRARY_PATH=/home/z/anaconda2:$LD_LIBRARY_PATH
/etc/profile文件内容:
# /etc/profile: system-wide .profile file for the Bourne shell (sh(1))
# and Bourne compatible shells (bash(1), ksh(1), ash(1), ...).

if [ "$PS1" ]; then
  if [ "$BASH" ] && [ "$BASH" != "/bin/sh" ]; then
    # The file bash.bashrc already sets the default PS1.
    # PS1='\h:\w\$ '
    if [ -f /etc/bash.bashrc ]; then
      . /etc/bash.bashrc
    fi
  else
    if [ "`id -u`" -eq 0 ]; then
      PS1='# '
    else
      PS1='$ '
    fi
  fi
fi

if [ -d /etc/profile.d ]; then
  for i in /etc/profile.d/*.sh; do
    if [ -r $i ]; then
      . $i
    fi
  done
  unset i
fi

export PATH=/usr/local/cuda-8.0/bin:$PATH
export LD_LIBRARY_PATH=/usr/local/cuda-8.0/lib64:$LD_LIBRARY_PATH

export PATH=/usr/local/cuda/bin:$PATH
export LD_LIBRARY_PATH=/usr/local/cuda/lib64:$LD_LIBRARY_PATH
Makefile.config配置文件内容:
## Refer to http://caffe.berkeleyvision.org/installation.html
# Contributions simplifying and improving our build system are welcome!

# cuDNN acceleration switch (uncomment to build with cuDNN).
USE_CUDNN := 1

# CPU-only switch (uncomment to build without GPU support).
# CPU_ONLY := 1

# uncomment to disable IO dependencies and corresponding data layers
# USE_OPENCV := 0
# USE_LEVELDB := 0
# USE_LMDB := 0

# uncomment to allow MDB_NOLOCK when reading LMDB files (only if necessary)
#   You should not set this flag if you will be reading LMDBs with any
#   possibility of simultaneous read and write
# ALLOW_LMDB_NOLOCK := 1

# Uncomment if you're using OpenCV 3
OPENCV_VERSION := 3

# To customize your choice of compiler, uncomment and set the following.
# N.B. the default for Linux is g++ and the default for OSX is clang++
CUSTOM_CXX := g++

# CUDA directory contains bin/ and lib/ directories that we need.
CUDA_DIR := /usr/local/cuda
# On Ubuntu 14.04, if cuda tools are installed via
# "sudo apt-get install nvidia-cuda-toolkit" then use this instead:
# CUDA_DIR := /usr

# CUDA architecture setting: going with all of them.
# For CUDA < 6.0, comment the *_50 lines for compatibility.
CUDA_ARCH := -gencode arch=compute_20,code=sm_20 \
        -gencode arch=compute_20,code=sm_21 \
        -gencode arch=compute_30,code=sm_30 \
        -gencode arch=compute_35,code=sm_35 \
        -gencode arch=compute_50,code=sm_50 \
        -gencode arch=compute_50,code=compute_50

# BLAS choice:
# atlas for ATLAS (default)
# mkl for MKL
# open for OpenBlas
BLAS := open
# Custom (MKL/ATLAS/OpenBLAS) include and lib directories.
# Leave commented to accept the defaults for your choice of BLAS
# (which should work)!
BLAS_INCLUDE := /home/z/OpenBLAS/include
BLAS_LIB := /home/z/OpenBLAS/lib

# Homebrew puts openblas in a directory that is not on the standard search path
# BLAS_INCLUDE := $(shell brew --prefix openblas)/include
# BLAS_LIB := $(shell brew --prefix openblas)/lib

# This is required only if you will compile the matlab interface.
# MATLAB directory should contain the mex binary in /bin.
# MATLAB_DIR := /usr/local
# MATLAB_DIR := /Applications/MATLAB_R2012b.app

# NOTE: this is required only if you will compile the python interface.
# We need to be able to find Python.h and numpy/arrayobject.h.
#PYTHON_INCLUDE := /usr/include/python2.7 \
        /usr/lib/python2.7/dist-packages/numpy/core/include
# Anaconda Python distribution is quite popular. Include path:
# Verify anaconda location, sometimes it's in root.
ANACONDA_HOME := /home/z/anaconda2
PYTHON_INCLUDE := $(ANACONDA_HOME)/include \
          $(ANACONDA_HOME)/include/python2.7 \
          $(ANACONDA_HOME)/lib/python2.7/site-packages/numpy/core/include \

# Uncomment to use Python 3 (default is Python 2)
# PYTHON_LIBRARIES := boost_python3 python3.5m
# PYTHON_INCLUDE := /usr/include/python3.5m \
#                 /usr/lib/python3.5/dist-packages/numpy/core/include

# We need to be able to find libpythonX.X.so or .dylib.
#PYTHON_LIB := /usr/lib
PYTHON_LIB := $(ANACONDA_HOME)/lib

# Homebrew installs numpy in a non standard path (keg only)
# PYTHON_INCLUDE += $(dir $(shell python -c 'import numpy.core; print(numpy.core.__file__)'))/include
# PYTHON_LIB += $(shell brew --prefix numpy)/lib

# Uncomment to support layers written in Python (will link against Python libs)
# WITH_PYTHON_LAYER := 1

# Whatever else you find you need goes here.
INCLUDE_DIRS := $(PYTHON_INCLUDE) /usr/local/include
LIBRARY_DIRS := $(PYTHON_LIB) /usr/local/lib /usr/lib

# If Homebrew is installed at a non standard location (for example your home directory) and you use it for general dependencies
# INCLUDE_DIRS += $(shell brew --prefix)/include
# LIBRARY_DIRS += $(shell brew --prefix)/lib

# Uncomment to use `pkg-config` to specify OpenCV library paths.
# (Usually not necessary -- OpenCV libraries are normally installed in one of the above $LIBRARY_DIRS.)
# USE_PKG_CONFIG := 1

# N.B. both build and distribute dirs are cleared on `make clean`
BUILD_DIR := build
DISTRIBUTE_DIR := distribute

# Uncomment for debugging. Does not work on OSX due to https://github.com/BVLC/caffe/issues/171
# DEBUG := 1

# The ID of the GPU that 'make runtest' will use to run unit tests.
TEST_GPUID := 0

# enable pretty build (comment to see full commands)
Q ?= @


 341
341


 被折叠的 条评论
为什么被折叠?
被折叠的 条评论
为什么被折叠?
 到【灌水乐园】发言


