


一,安装
Google官方在11月29号的开发者博客中宣布新的版本(0.12)将 增加对Windows的支持,所以对于windows的用户来说,安装TensorFlow将会轻松很多,安装过程非常简单,不过也有一些需要手动调整。
TensorFlow 有两个版本:CPU 版本和 GPU 版本。GPU 版本需要 CUDA 和 cuDNN 的支持,CPU 版本不需要。如果你要安装 GPU 版本,请先在这里 确认你的显卡支持 CUDA。
CPU的版本安装很简单,我是在Anaconda下采样pip的方式安装的:
在Anaconda Prompt模式下,使用命令:
pip install tensorflow
可以使用如下代码来测试,安装情况:
>>>import tensorflow as tf
>>>sess = tf.Session()
>>>a = tf.constant(10)
>>>b = tf.constant(22)
>>>print(sess.run(a + b))
32
二,基本概念
1,选择TensorFlow的原因:
a,Google 很强大; b,Python接口; c,高移植性; d,可视化强; e,社区强大
2,TensorFlow的核心概念:Graph和Session
TensorFlow:张量在图中流动。
类似于spark的惰性计算,TensorFlow是先定义图,然后再计算的。这种计算的定义和执行被分割开来的操作,有利于做分布式处理。
Tensor+Flow:张量在图中通过运算(op)进行传递和变换。Tensor可以被理解成n维矩阵。
模型跑起来, 你需要2步:一,描绘整幅图(定义计算);二, 在session当中执行图中的运算
1,Session与Graph
    import tensorflow as tf
    a = tf.add(3,5)
    sess = tf.Session()
    print sess.run(a)
sess.close()为了便捷建议写法如下:
   import tensorflow as tf
   a = tf.add(3,5)
   with tf.Session() as sess:
       print sess.run(a)
使用with语句,程序最后会自动关闭Session。
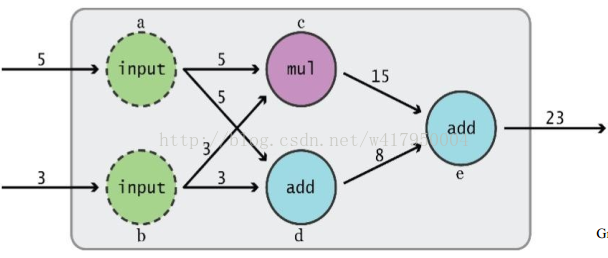
假如要计算的表达式是:(x*y)的(x+y次幂)。
图构建如下:
代码如下:
    x= 2
    y= 3
    op1=tf.add(x, y)
    op2=tf.mul(x, y)
    op3=tf.pow(op2,	op1)
    with tf.Session() as sess:
        op3= sess.run(op3)
    with tf.Session() as sess:
        z, not_useless	= sess.run([pow_op, useless])
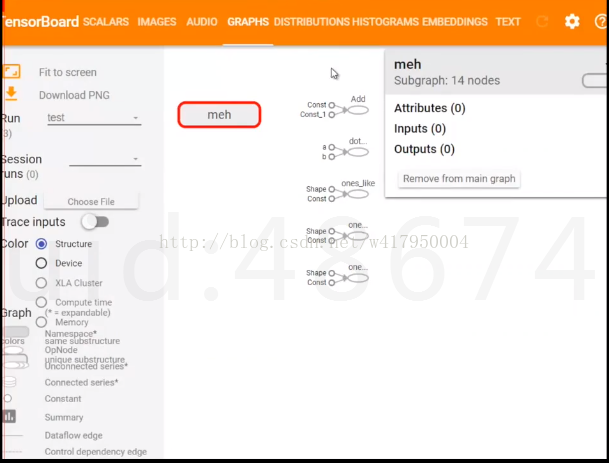
三,了解tesnorboard
tesnorboard 是TensorFlow可视化的利器,其原理就是TF在运行的过程中不断的将session写入到日志文件中,然 后tesnorboard 从日志文件中读取数据,最后做可视化。如下代码所示:
  import tensorflow as tf
	a = tf.constant(2)
	b = tf.constant(3)
	x = tf.add(a, b)
	with tf.Session() as sess:
   	 #写到日志文件里
   	 writer = tf.summary.FileWriter('./graphs, sess.graph)
  print sess.run(x) writer.close() # 关闭writer
    显示时在命令行端运行如下代码:
	$ python [yourprogram].py
$ tensorboard --logdir="./graphs" --port 7001 打开google浏览器访问: http://localhost:7001/ 就能看到下图:
四,TensorFlow的常量、变量和操作
TensorFlow和numpy其实很像。
1,常量
常量的定义:
常量的定义:tf.constant(value,dtype=None, shape=None,name='Const', verify_shape=False)
	a = tf.constant([2, 2], name="a")
	b = tf.constant([[0, 1], [2, 3]], name="b")
	x = tf.add(a, b, name="add")
	y = tf.mul(a, b, name="mul")
	with tf.Session() as sess:
		x, y = sess.run([x, y])
		print x, y
	# >> [5 8] [6 12]
2,变量
tf.constant是op, 而tf.Variable是一个类, 初始化的对象有多个op
#create	variable a with	scalar value
a=tf.Variable(2, name="scalar")
#create	variable b as a vector	值为2,3的向量
b = tf.Variable([2, 3], name="vector")
#create	variable c as a	2x2 matrix 值为0,1,2,3的矩阵
c = tf.Variable([[0, 1], [2, 3]], name="matrix")
# create variable W as 784 x 10	tensor,	filled	with zeros
W = tf.Variable(tf.zeros([784,10]))
变量的创建只是创建,在使用变量之前,一定要初始化!!
初始化的方法有三种:
a,最简单的初始化全部变量方法:
init	= tf.global_variables_initializer()
with	tf.Session()	as sess:
sess.run(init)
init_ab	=	tf.variables_initializer([a,	b], name="init_ab")
with	tf.Session()	as sess:
sess.run(init_ab)
c,初始化单个变量
W	= tf.Variable(tf.zeros([784,10]))
with	tf.Session()	as sess:
sess.run(W.initializer)
输出变量内容: Eval ( ) 函数
3,操作
在tensor上可以进行各种运算/变换
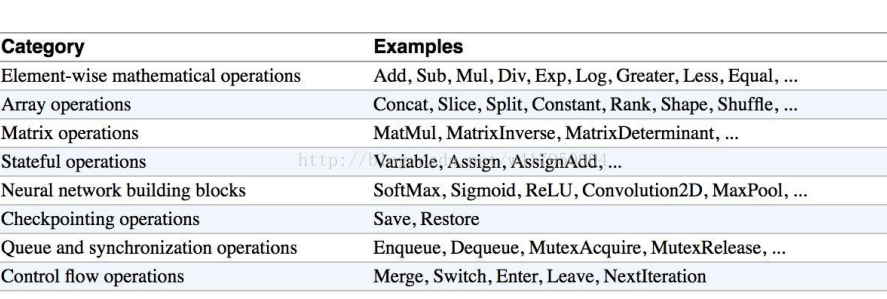
常用的操作
a	=	tf.constant([3, 6])
b	=	tf.constant([2, 2])
tf.add(a,	b)	#>>	[5 8]
tf.add_n([a,	b,	b])	#>>	[7	10]
tf.mul(a,	b)	#>>	[6	12]
tf.matmul(a,	b)	#>> ValueError
tf.matmul(tf.reshape(a,[1,	2]),	tf.reshape(b,[2,	1]))	#>> [[18]]
tf.div(a,	b)	#>>	[1 3]
tf.mod(a, b) #>> [1 0] 4,placeholder
通过placeholder可以存放用于训练的数据 :tf.placeholder(dtype, shape=None, name=None)
#	create	a	placeholder	of	type	float	32-bit,	shape	is	a	vector	of	3 elements
a	=	tf.placeholder(tf.float32, shape=[3])
#	create	a	constant	of	type	float	32-bit,	shape	is	a	vector	of	3 elements
b	=	tf.constant([5,	5,	5], tf.float32)
#	use	the	placeholder	as	you	would	a	constant	or	a variable
c	=	a + b #	Short	for	tf.add(a, b)
with	tf.Session()	as sess:
#	feed	[1,	2,	3]	to	placeholder	a	via	the	dict	{a:	[1,	2, 3]}
print	sess.run(c,	{a:	[1,	2,	3]})
#	the	tensor	a	is	the	key,	not	the	string ‘a’
#	>>	[6,	7, 8]
# create operations, tensors, etc (using the default graph)
a = tf.add(2, 5)
b = tf.mul(a, 3)
with tf.Session() as sess:
# define a dictionary that says to replace the value of 'a' with 15
replace_dict = {a: 15}
# Run the session, passing in 'replace_dict' as the value to 'feed_dict'
sess.run(b, feed_dict=replace_dict)
# returns 45
TEST


 2万+
2万+


 被折叠的 条评论
为什么被折叠?
被折叠的 条评论
为什么被折叠?
 到【灌水乐园】发言


