


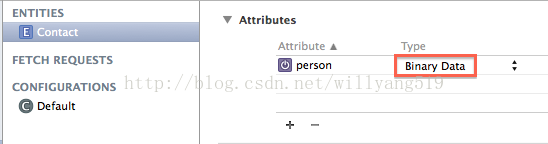
思路:将NSObject转化为NSData,然后将NSData存入到Core Data中
Core Data实现
添加数据:
    AppDelegate *appDelegate = [[UIApplication sharedApplication] delegate];
    NSManagedObjectContext *context = [appDelegate managedObjectContext];
    NSManagedObject *newContact;
    newContact = [NSEntityDescription insertNewObjectForEntityForName:@"Contact" inManagedObjectContext:context];

    Person *person = [[Person alloc] init];
    person.name = @"Xiaoming";
    person.number = @"1008610086";

    Birthday *birthday = [[Birthday alloc] init];
    birthday.year = @"2000";
    birthday.month = @"January";
    birthday.day = @"1st";
    person.birthday = birthday;

    NSData *data = [NSKeyedArchiver archivedDataWithRootObject:person];
    [newContact setValue:data forKey:@"person"];

    NSError *error;
[context save:&error]; AppDelegate *appDelegate = [[UIApplication sharedApplication] delegate];
NSFetchRequest *request = [[NSFetchRequest alloc] init];
NSManagedObjectContext *context = [appDelegate managedObjectContext];
NSEntityDescription *entityDesc = [NSEntityDescription entityForName:@"Contact" inManagedObjectContext:context];
[request setEntity:entityDesc];
NSManagedObject *matches = nil;
NSError *error;
NSArray *objects = [context executeFetchRequest:request
error:&error];
if ([objects count] == 0)
{
NSLog(@"No matches");
}
else
{
for (int i = 0; i < [objects count]; i++)
{
matches = objects[i];
NSData *data = [matches valueForKey:@"person"];
Person *person = [NSKeyedUnarchiver unarchiveObjectWithData:data];
NSLog(@"My name is %@. I was born on %@ %@, %@. My phone number is %@", person.name, person.birthday.month, person.birthday.day, person.birthday.year, person.number);
}
}
Person和Birthday这两个自定的NSObject,都需要使用NSCoding,实现initWithCoder和encodeWithCoder两个方法
Person
//
//  Person.h
//  CoreDataTest
//

#import <Foundation/Foundation.h>
#import "Birthday.h"

@interface Person : NSObject<NSCoding>

@property (strong, nonatomic) NSString *name;
@property (strong, nonatomic) NSString *number;
@property (strong, nonatomic) Birthday *birthday;

- (id)init;

@end
//
// Person.m
// CoreDataTest
//
#import "Person.h"
@implementation Person
- (id)init{
self.name = nil;
self.number = nil;
return self;
}
- (id)initWithCoder:(NSCoder *)decoder{
if (self = [super init]){
self.name = [decoder decodeObjectForKey: @"name"];
self.number = [decoder decodeObjectForKey: @"number"];
self.birthday = [decoder decodeObjectForKey: @"birthday"];
}
return self;
}
- (void)encodeWithCoder:(NSCoder *)encoder{
[encoder encodeObject:self.name forKey:@"name"];
[encoder encodeObject:self.number forKey:@"number"];
[encoder encodeObject:self.birthday forKey:@"birthday"];
}
@end//
// Birthday.h
// CoreDataTest
//
#import <Foundation/Foundation.h>
@interface Birthday : NSObject<NSCoding>
@property (strong, nonatomic) NSString *year;
@property (strong, nonatomic) NSString *month;
@property (strong, nonatomic) NSString *day;
- (id)init;
@end//
// Birthday.m
// CoreDataTest
//
#import "Birthday.h"
@implementation Birthday
- (id)init{
self.year = nil;
self.month = nil;
self.day = nil;
return self;
}
- (id)initWithCoder:(NSCoder *)decoder{
if (self = [super init]){
self.year = [decoder decodeObjectForKey: @"year"];
self.month = [decoder decodeObjectForKey: @"month"];
self.day = [decoder decodeObjectForKey: @"day"];
}
return self;
}
- (void)encodeWithCoder:(NSCoder *)encoder{
[encoder encodeObject:self.year forKey:@"year"];
[encoder encodeObject:self.month forKey:@"month"];
[encoder encodeObject:self.day forKey:@"day"];
}
@end参考链接:
http://sam.roon.io/archiving-objective-c-objects-with-nscoding
https://coderwall.com/p/mx_wmq/how-to-save-a-nsarray-nsmutablearray-in-core-data
http://pinkstone.co.uk/how-to-save-a-uiimage-in-core-data-and-retrieve-it/


 416
416


 被折叠的 条评论
为什么被折叠?
被折叠的 条评论
为什么被折叠?
 到【灌水乐园】发言


