


继续新的翻译:
技巧3 创建自定义的ViewGroup
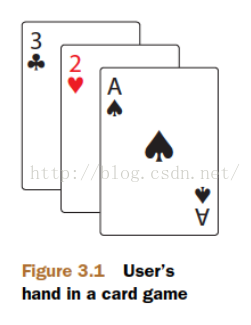
在你设计你的应用程序时,你可能需要不同的Activity显示复杂的视图。假如你在创建一个桥牌游戏,你想像图标3.1所示一样在layout中显示用户手中的牌。那么你怎么创建这样一个layout?
你可能会说使用margins足够做出这种layout。说的对。我们可以使用RelativeLayout并在它的子项目中增加margins来做一个类似图表。XML文件列表如下:
<?xml version="1.0" encoding="utf-8"?>
<RelativeLayout xmlns:android="http://schemas.android.com/apk/res/android"
    android:layout_width="fill_parent"
    android:layout_height="fill_parent" >

    <View
        android:layout_width="100dp"
        android:layout_height="150dp"
        android:background="#FF0000" />

    <View
        android:layout_width="100dp"
        android:layout_height="150dp"
        android:layout_marginLeft="30dp"
        android:layout_marginTop="20dp"
        android:background="#00FF00" />

    <View
        android:layout_width="100dp"
        android:layout_height="150dp"
        android:layout_marginLeft="60dp"
        android:layout_marginTop="40dp"
        android:background="#0000FF" />

</RelativeLayout>
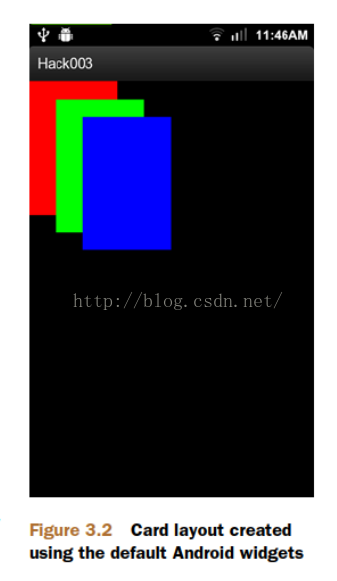
上面XML的结果显示在图3.2中。
在该技巧中,我们可以看到创建相同类型的布局的另外一种方法,我们要创建一个自定义的ViewGroup。在XML中这样做而不使用手动设定margins的好处是:
●如果在不同的activity中使用,维护简单。
●你能用自定义的属性来定义ViewGroup子控件的位置。
●因为简洁,XML文件容易理解。
●如果你要修改margins,你不用手动计算每一个控件的margin。
让我们看看安卓怎么画view。
3.1 理解安卓怎么画view
为了创建一个自定义的viewGroup,你需要理解安卓怎么画view。我不会讲的很细节化,但是你需要从文档里(第3.5节)理解以下的段落,因为它解释了如何画一个布局:
画布局是一个两步的过程:一个测量过程和一个布局过程。测量过程执行measure(int,int),并且在视图树中是一个自顶向下的过程。每个视图把尺寸规格循环记入视图树。在测量过程的结尾,每个view都存入了它们的尺寸。第二个过程发生在layout(int,int,int,int),也是自顶向下的。在此过程中,父窗口负责使用测量出的尺寸按位置布置所有的子控件。
为了理解概念,我们分析一下画ViewGroup的方法。第一步是在onMeasure()方法中测量它的宽度和高度。该方法中,ViewGroup通过检查所有的子控件来计算它的尺寸。我们将在onLayout()方法中执行最后的过程。在第二个方法中,ViewGroup依靠在onMeasure()过程中得到的信息布置子控件。
3.2 创建CascadeLayout
本节,我们会编码自定义ViewGroup。我们将完成图3.2中的结果。自定义的ViewGroup叫做:CascadeLayout。其XML如下:
<?xml version="1.0" encoding="utf-8"?>
<FrameLayout xmlns:cascade="http://schemas.android.com/apk/res/com.manning.androidhacks.hack003"
    xmlns:android="http://schemas.android.com/apk/res/android"
    android:layout_width="fill_parent"
    android:layout_height="fill_parent" >

    <com.manning.androidhacks.hack003.view.CascadeLayout
        android:layout_width="fill_parent"
        android:layout_height="fill_parent"
        cascade:horizontal_spacing="30dp"
        cascade:vertical_spacing="20dp" >

        <View
            android:layout_width="100dp"
            android:layout_height="150dp"
            cascade:layout_vertical_spacing="90dp"
            android:background="#FF0000" />

        <View
            android:layout_width="100dp"
            android:layout_height="150dp"
            android:background="#00FF00" />

        <View
            android:layout_width="100dp"
            android:layout_height="150dp"
            android:background="#0000FF" />
    </com.manning.androidhacks.hack003.view.CascadeLayout>

</FrameLayout>
既然你已经知道了要创建什么,那么就开始吧。我们要做的第一件事情就是定义自定义属性。所以,我们需要创建一个叫attrs.xml的文件,它位于res/values文件夹下,代码如下:
<?xml version="1.0" encoding="utf-8"?>
<resources>
    <declare-styleable name="CascadeLayout">
        <attr name="horizontal_spacing" format="dimension" />
        <attr name="vertical_spacing" format="dimension" />
    </declare-styleable>
</resources>
如果用户没有为水平和垂直空间指定数值,我们需要使用默认值。我们要把默认值定义到dimens.xml文件中,它位于res/values文件夹,内容如下:
<?xml version="1.0" encoding="utf-8"?>
<resources>
    <dimen name="cascade_horizontal_spacing">10dp</dimen>
    <dimen name="cascade_vertical_spacing">10dp</dimen>
</resources>
<p>    理解了安卓如何画视图,你会想到你需要创建一个名叫CascadeLayout并继承于ViewGroup的类,并重写onMeasure()和onLayout()方法。因为代码有点长,让我们分开块来分析:构造函数,onMeasure()方法,onLayout()方法。以下是构造函数的代码:</p><p align="left"><strong><span style="color:#7F0055;">public</span><span style="color:#7F0055;">class</span></strong><span style="color:black;"> CascadeLayout </span><strong><span style="color:#7F0055;">extends</span></strong><span style="color:black;"> ViewGroup {</span></p><p align="left"> </p><p align="left"><span style="color:black;">  </span><strong><span style="color:#7F0055;">private</span><span style="color:#7F0055;">int</span></strong><span style="color:#0000C0;">mHorizontalSpacing</span><span style="color:black;">;</span></p><p align="left"><span style="color:black;">  </span><strong><span style="color:#7F0055;">private</span><span style="color:#7F0055;">int</span></strong><span style="color:#0000C0;">mVerticalSpacing</span><span style="color:black;">;</span></p><p align="left"> </p><p align="left"><span style="color:black;">  </span><strong><span style="color:#7F0055;">public</span></strong><span style="color:black;"> CascadeLayout(Context context, AttributeSet attrs) {</span></p><p align="left"><span style="color:black;">    </span><strong><span style="color:#7F0055;">super</span></strong><span style="color:black;">(context, attrs);</span></p><p align="left"> </p><p align="left"><span style="color:black;">    </span>TypedArray a =context.obtainStyledAttributes(attrs,</p><p align="left"><span style="color:black;">        </span>R.styleable.<em><span style="color:#0000C0;">CascadeLayout</span></em><span style="color:black;">);</span></p><p align="left"> </p><p align="left"><span style="color:black;">    </span><strong><span style="color:#7F0055;">try</span></strong><span style="color:black;"> {</span></p><p align="left"><span style="color:black;">      </span><span style="color:#0000C0;">mHorizontalSpacing</span><span style="color:black;"> = a.getDimensionPixelSize(</span></p><p align="left"><span style="color:black;">          </span>R.styleable.<em><span style="color:#0000C0;">CascadeLayout_horizontal_spacing</span></em><span style="color:black;">,</span></p><p align="left"><span style="color:black;">          </span>getResources().getDimensionPixelSize(</p><p align="left"><span style="color:black;">              </span>R.dimen.<em><span style="color:#0000C0;">cascade_horizontal_spacing</span></em><span style="color:black;">));</span></p><p align="left"> </p><p align="left"><span style="color:black;">      </span><span style="color:#0000C0;">mVerticalSpacing</span><span style="color:black;"> = a.getDimensionPixelSize(</span></p><p align="left"><span style="color:black;">          </span>R.styleable.<em><span style="color:#0000C0;">CascadeLayout_vertical_spacing</span></em><span style="color:black;">, getResources()</span></p><p align="left"><span style="color:black;">              </span>.getDimensionPixelSize(R.dimen.<em><span style="color:#0000C0;">cascade_vertical_spacing</span></em><span style="color:black;">));</span></p><p align="left"><span style="color:black;">    </span>} <strong><span style="color:#7F0055;">finally</span></strong><span style="color:black;"> {</span></p><p align="left"><span style="color:black;">      </span>a.recycle();</p><p align="left"><span style="color:black;">    </span>}</p><p><span style="color:black;">  </span>...</p><p>        在编写onMeasure()方法之前,我们先创建一个自定义的LayoutParams.该类有两个位置变量x,y,表示每个子类的位置。该LayoutParams类是CascadeLayout的内部类。该类代码如下:</p><p></p><p align="left"><strong><span style="color:#7F0055;">public</span><span style="color:#7F0055;">static</span><span style="color:#7F0055;">class</span></strong><span style="color:black;"> LayoutParams </span><strong><span style="color:#7F0055;">extends</span></strong><span style="color:black;">ViewGroup.LayoutParams {</span></p><p align="left"><span style="color:black;">    </span><strong><span style="color:#7F0055;">int</span></strong><span style="color:#0000C0;">x</span><span style="color:black;">;</span></p><p align="left"><span style="color:black;">    </span><strong><span style="color:#7F0055;">int</span></strong><span style="color:#0000C0;">y</span><span style="color:black;">;</span></p><p align="left"> </p><p align="left"><span style="color:black;">    </span><strong><span style="color:#7F0055;">public</span></strong><span style="color:black;"> LayoutParams(Context context, AttributeSetattrs) {</span></p><p align="left"><span style="color:black;">      </span><strong><span style="color:#7F0055;">super</span></strong><span style="color:black;">(context, attrs);</span></p><p align="left"><span style="color:black;">    </span>  } </p><p align="left"> </p><p align="left"><span style="color:black;">    </span><strong><span style="color:#7F0055;">public</span></strong><span style="color:black;"> LayoutParams(</span><strong><span style="color:#7F0055;">int</span></strong><span style="color:black;"> w, </span><strong><span style="color:#7F0055;">int</span></strong><span style="color:black;"> h) {</span></p><p align="left"><span style="color:black;">      </span><strong><span style="color:#7F0055;">super</span></strong><span style="color:black;">(w, h);</span></p><p><span style="color:black;">}</span></p><p><span style="color:black;">   </span>}</p><p>      为了使用新的CascadeLayout.LayoutParams类,我们需要重写CascadeLayout中的几个方法。他们是checkLayoutParams(), generateDefaultLayoutParams(), generateLayoutParams(AttributeSetattrs), 和generateLayoutParams(ViewGroup.LayoutParamsp)。这些方法的代码基本和ViewGroups里的一样。如果你对这些内容感兴趣,你能在示例代码中找到。</p><p>       下一步是编码onMeasure()方法。这是该类的关键部分。代码如下:</p><p><span style="color:#646464;background:blue;">@</span><span style="color:#646464;background:silver;">Override</span></p><p align="left"><strong><span style="color:#7F0055;">protected</span><span style="color:#7F0055;">void</span></strong><span style="color:black;"> onMeasure(</span><strong><span style="color:#7F0055;">int</span></strong><span style="color:black;"> widthMeasureSpec, </span><strong><span style="color:#7F0055;">int</span></strong><span style="color:black;"> heightMeasureSpec) {</span></p><p align="left"><span style="color:black;">    </span><strong><span style="color:#7F0055;">int</span></strong><span style="color:black;"> width = 0;</span></p><p align="left"><span style="color:black;">    </span><strong><span style="color:#7F0055;">int</span></strong><span style="color:black;"> height = getPaddingTop();</span></p><p align="left"><span style="color:black;">   </span>     </p><p align="left"><span style="color:black;">    </span><strong><span style="color:#7F0055;">final</span><span style="color:#7F0055;">int</span></strong><span style="color:black;"> count = getChildCount();</span></p><p align="left"><span style="color:black;">    </span><strong><span style="color:#7F0055;">for</span></strong><span style="color:black;"> (</span><strong><span style="color:#7F0055;">int</span></strong><span style="color:black;"> i = 0; i < count; i++) {</span></p><p align="left"><span style="color:black;">       </span>View child = getChildAt(i);</p><p align="left"><span style="color:black;">      </span>measureChild(child, widthMeasureSpec,heightMeasureSpec);</p><p align="left"> </p><p align="left"><span style="color:black;">      </span>LayoutParams lp = (LayoutParams)child.getLayoutParams();</p><p align="left"><span style="color:black;">      </span>width = getPaddingLeft() + <span style="color:#0000C0;">mHorizontalSpacing</span><span style="color:black;"> * i;</span></p><p align="left"> </p><p align="left"><span style="color:black;">      </span>lp.<span style="color:#0000C0;">x</span><span style="color:black;"> = width;</span></p><p align="left"><span style="color:black;">      </span>lp.<span style="color:#0000C0;">y</span><span style="color:black;"> = height;</span></p><p align="left"> </p><p align="left"><span style="color:black;">      </span>width += child.getMeasuredWidth();</p><p align="left"><span style="color:black;">      </span>height += verticalSpacing;</p><p align="left"><span style="color:black;">    </span>}</p><p align="left"> </p><p align="left"><span style="color:black;">    </span>width += getPaddingRight();</p><p align="left"><span style="color:black;">    </span>height += getChildAt(getChildCount() -1).getMeasuredHeight()</p><p align="left"><span style="color:black;">  </span>      +getPaddingBottom();</p><p align="left"> </p><p align="left"><span style="color:black;">    </span>setMeasuredDimension(<em>resolveSize</em>(width,widthMeasureSpec),</p><p align="left"><span style="color:black;">        </span><em>resolveSize</em>(height,heightMeasureSpec));</p><p align="left"><span style="color:black;">  </span>}</p><p> </p><p>最后一步是创建onLayout()方法,一起看看代码:</p><p align="left"><span style="color:#646464;">@Override</span></p><p align="left"><strong><span style="color:#7F0055;">protected</span><span style="color:#7F0055;">void</span></strong><span style="color:black;"> onLayout(</span><strong><span style="color:#7F0055;">boolean</span></strong><span style="color:black;"> changed, </span><strong><span style="color:#7F0055;">int</span></strong><span style="color:black;"> l, </span><strong><span style="color:#7F0055;">int</span></strong><span style="color:black;"> t, </span><strong><span style="color:#7F0055;">int</span></strong><span style="color:black;"> r, </span><strong><span style="color:#7F0055;">int</span></strong><span style="color:black;"> b){</span></p><p align="left"> </p><p align="left"><span style="color:black;"> </span>   <strong><span style="color:#7F0055;">final</span><span style="color:#7F0055;">int</span></strong><span style="color:black;"> count = getChildCount();</span></p><p align="left"><span style="color:black;">    </span><strong><span style="color:#7F0055;">for</span></strong><span style="color:black;"> (</span><strong><span style="color:#7F0055;">int</span></strong><span style="color:black;"> i = 0; i < count; i++) {</span></p><p align="left"><span style="color:black;">      </span>View child = getChildAt(i);</p><p align="left"><span style="color:black;">      </span>LayoutParams lp = (LayoutParams)child.getLayoutParams();</p><p align="left"> </p><p align="left"><span style="color:black;">      </span>child.layout(lp.<span style="color:#0000C0;">x</span><span style="color:black;">, lp.</span><span style="color:#0000C0;">y</span><span style="color:black;">, lp.</span><span style="color:#0000C0;">x</span><span style="color:black;"> + child.getMeasuredWidth(), lp.</span><span style="color:#0000C0;">y</span><span style="color:black;">+ child.getMeasuredHeight());</span></p><p align="left"><span style="color:black;">    </span>}</p><p><span style="color:black;">  </span>}</p><p>如你所见,代码是非常的简单。每个子类的layout()方法使用onMeasure()方法中计算得出的值。</p><p>3.3 给子类增加自定义的属性</p><p>在最后一节里,你会学到怎样给子类视图增加自定义属性。在示例中,我们将为一个特定的子类重写垂直空间。在图3.3中你会看到这样的结果。</p><p>首先我们要做的是在attrs.xml中增加一个新的属性:</p><img src="https://img-blog.csdn.net/20150929171236685?watermark/2/text/aHR0cDovL2Jsb2cuY3Nkbi5uZXQv/font/5a6L5L2T/fontsize/400/fill/I0JBQkFCMA==/dissolve/70/gravity/Center" alt="" /><p></p><p>首先我们要做的是在attrs.xml中增加一个新的属性:</p><pre name="code" class="html"><declare-styleable name="CascadeLayout_LayoutParams">
       <attr name="layout_vertical_spacing" format="dimension" />
</declare-styleable>
因为属性名以Layout_开始,而非包含一个view属性,所以它被增加到LayoutParams属性,我们会在LayoutParams的构造函数中读取这个属性,就像我们在CascadeLayout中读取一样。代码如下:
public LayoutParams(Context context, AttributeSetattrs) {
super(context, attrs);
TypedArray a =context.obtainStyledAttributes(attrs,
R.styleable.CascadeLayout_LayoutParams);
try {
verticalSpacing = a.getDimensionPixelSize(
R.styleable.CascadeLayout_LayoutParams_layout_vertical_spacing,
-1);
} finally {
a.recycle();
}
}
verticalSpacing是一个公共变量,我们将在CascadeLayout的onMeasure()方法中使用它。如果子类的LayoutParams包含verticalSpacing,我们就能用到它。源代码如下:
verticalSpacing=mVerticalSpacing;
…
LayoutParams lp=(LayoutParams)child.getLayoutParams();
If(lp.verticalSpacing>=0){
verticalSpacing=lp.verticalSpacing;
}
…
width+=child.getMeasuredWidth();
height+=verticalSpacing;
3.4概述
使用自定义的Views和ViewGroup是一种非常棒的组织应用程序布局的方法。自定义组件也允许你提供自定义的方法。下次要创建复杂的布局时,看看使用自定义iewgroup是否是一个更好的方法。可能在最初要花更多的工作,但最终的结果很值。


 1529
1529


 被折叠的 条评论
为什么被折叠?
被折叠的 条评论
为什么被折叠?
 到【灌水乐园】发言


