


一、RESTful介绍
1、RESTful Web Service介绍
网络应用程序,分为前端和后端两个部分。当前的发展趋势,就是前端设备层出不穷(手机、平板、桌面电脑、其他专用设备......)。因此,必须有一种统一的机制,方便不同的前端设备与后端进行通信。
RESTful就是REST式,RESTful Web Servie是遵守了REST风格的web服务,是目前互联网web世界所使用的一种比较常用的一种设计风格。
RESTful 是一种设计风格。它不是一种标准,也不是一种软件,而是一种思想。
通常基于使用HTTP,URI,和XML,JSON以及HTML这些现有的广泛流行的协议和标准。是一种轻量级、跨平台、跨语言的架构设计
两种主要的互联网软件通讯架构
JAX-RS RESTful Web Service
JAX-WS Web Service
2、RESTful接口结构
(1)、协议
API与用户的通信协议,例如http或者https协议。
(2)、域名
应该尽量将API部署在专用域名之下。例如:https://example.org/user/
(3)、路径
在RESTful架构中,每个网址代表一种资源(resource),所以网址中不能有动词,只能有名词,而且所用的名词往往与数据库的表格名对应。
例如:https://rest.example.com/user
(4)、HTTP动词(REST资源操作)
对于资源的具体操作类型,由HTTP动词表示。
常用的HTTP动词有下面四个(括号里是对应的SQL命令)。
GET(SELECT):从服务器取出资源(一项或多项)。
POST(CREATE):在服务器新建一个资源。
PUT(UPDATE):在服务器更新资源(客户端提供改变后的完整资源)。
DELETE(DELETE):从服务器删除资源。
还有三个不常用的HTTP动词。
PATCH(UPDATE):在服务器更新资源(客户端提供改变的属性)。
HEAD:获取资源的元数据。
OPTIONS:获取信息,关于资源的哪些属性是客户端可以改变的。
下面是一些例子。
GET /user:列出所有用户
POST /user:新建一个用户
GET /user/{id}:获取某个指定用户的信息
PUT /user/{id}:更新某个指定用户的信息(提供该用户的全部信息)
DELETE /user/{id}:删除某个用户
原来的方式
http://127.0.0.1/user/queryUser?id=1 GET方法,根据用户id获取数据
http://127.0.0.1/user/updateUser POST方法,用户修改
http://127.0.0.1/user/saveUser POST方法,用户新增
http://127.0.0.1/user/deleteUser?id=1 GET/POST方法,用户根据id删除
RESTful
http://127.0.0.1/user/{id} GET方法,根据用户id获取数据
http://127.0.0.1/user/ PUT方法,用户修改
http://127.0.0.1/user/ POST方法,用户新增
http://127.0.0.1/user/{id} DELETE方法,用户根据id删除
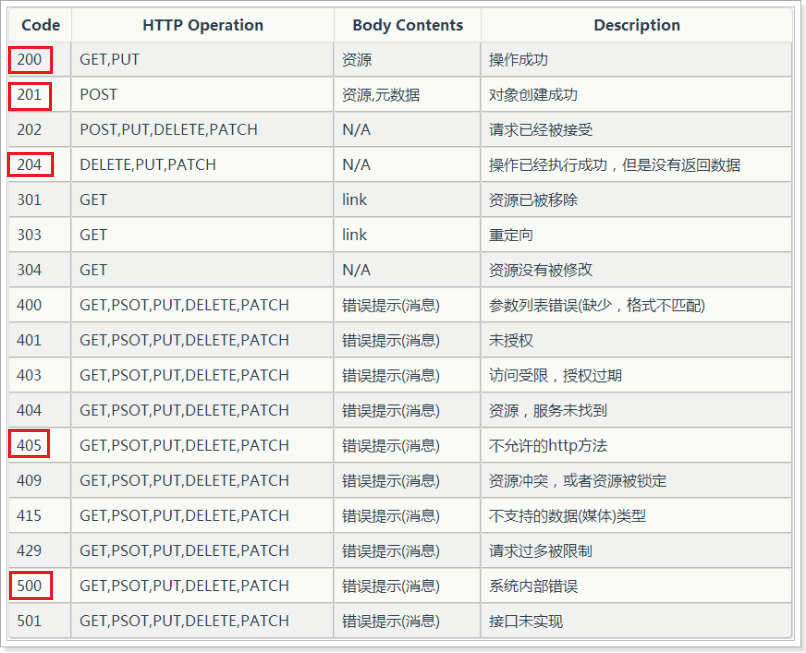
3、HTTP状态码
4、最佳实践
(1)、REST接口设计
• URL的组成
网络协议(http、https)
服务器地址
接口名称
参数列表
• URL定义限定
不要使用大写字母
使用中线 - 代替下划线 _
参数列表应该被encode过
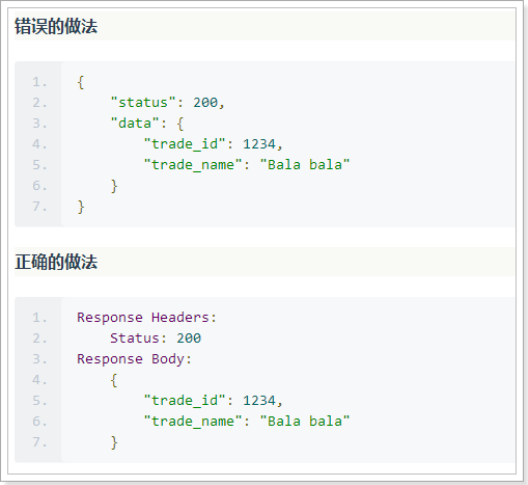
(2)、响应设计
• Content body 仅仅用来传输数据
• 数据要做到拿来就可用的原则,不需要“拆箱”的过程
• 用来描述数据或者请求的元数据放Header中

5、springmvc实现RESTful风格的服务
SpringMVC原生态的支持了REST风格的架构设计。
所涉及到的注解:
@RequestMapping
@PathVariable
ResponseEntity
二、使用RESTful风格开发商品接口
1、编写接口代码
(1)、编写RESTful风格的商品查询接口
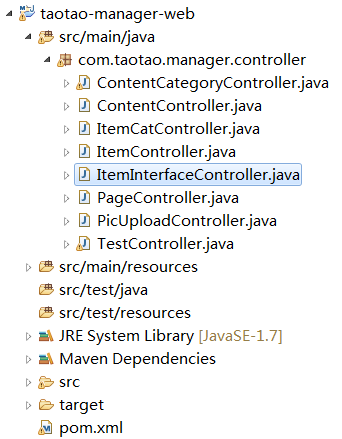
package com.taotao.manager.controller;

import org.springframework.beans.factory.annotation.Autowired;
import org.springframework.http.HttpStatus;
import org.springframework.http.ResponseEntity;
import org.springframework.stereotype.Controller;
import org.springframework.web.bind.annotation.PathVariable;
import org.springframework.web.bind.annotation.RequestMapping;
import org.springframework.web.bind.annotation.RequestMethod;
import org.springframework.web.bind.annotation.ResponseBody;

import com.taotao.manager.pojo.Item;
import com.taotao.manager.service.ItemService;

/**
 * 使用RESTful风格进行商品管理
 *
 * @author Administrator
 *
 */
@Controller
@RequestMapping("item/interface")
public class ItemInterfaceController {

	@Autowired
	private ItemService itemService;

	/**
	 * 查询商品
	 * GET
	 * http://manager.taotao.com/rest/item/interface/{id}
	 *
	 * @param id
	 * @return 注意:如果加入@ResponseBody注解或者返回的类型是ResponseEntit,就不会走试图解析器
	 */
	@RequestMapping(value = "{id}", method = RequestMethod.GET)
	@ResponseBody
	public ResponseEntity<Item> queryItemById(@PathVariable Long id) {
		try {
			Item item = this.itemService.queryById(id);
			// 查询成功,设置状态码并返回
			// return ResponseEntity.status(HttpStatus.OK).body(item); 方式1
			// return ResponseEntity.ok().body(item); 方式2
			// 最简洁的返回值方式3
			return ResponseEntity.ok(item);
		} catch (Exception e) {
			e.printStackTrace();
		}
		// 如果服务器出错,就返回500
		return ResponseEntity.status(HttpStatus.INTERNAL_SERVER_ERROR).body(null);
	}


}
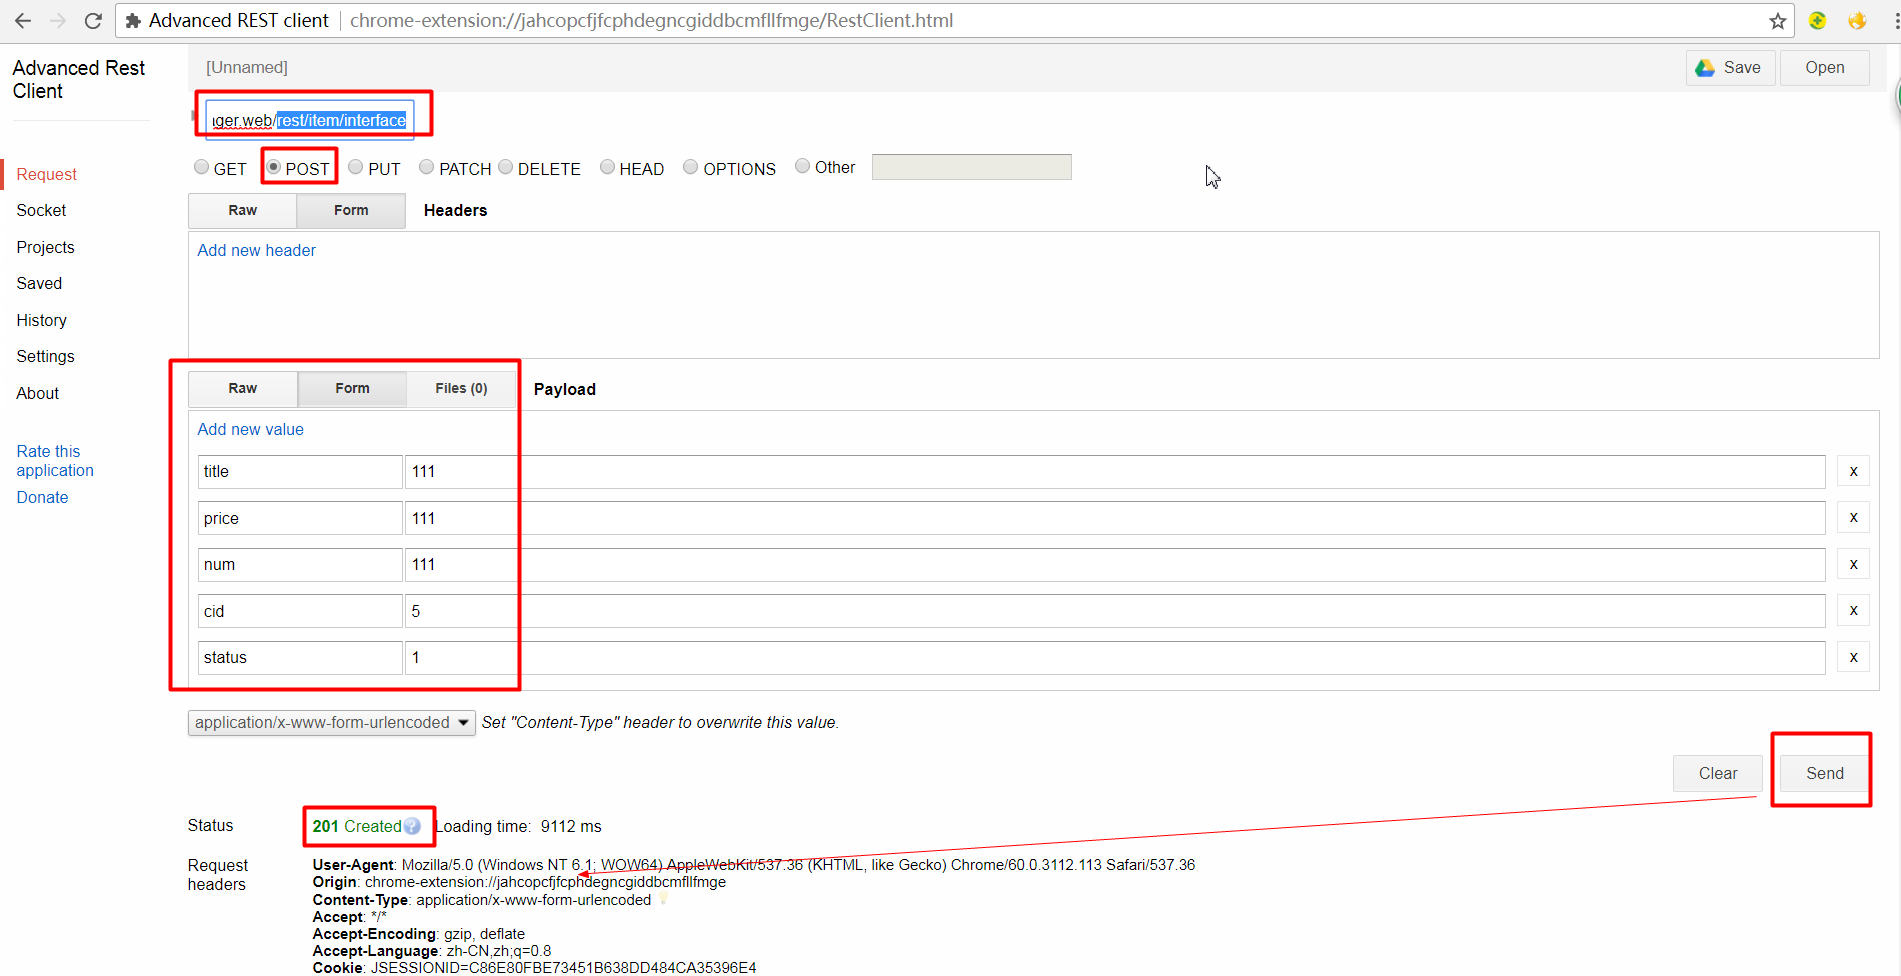
(2)、编写RESTful风格的商品新增接口
	/**
	 * 新增商品
	 * POST
	 * http://manager.taotao.com/rest/item/interface
	 *
	 * @return
	 */
	@RequestMapping(method = RequestMethod.POST)
	@ResponseBody
	public ResponseEntity<Void> saveItem(Item item) {
		try {
			this.itemService.save(item);
			// 保存成功,返回201
			return ResponseEntity.status(HttpStatus.CREATED).build();
		} catch (Exception e) {
			e.printStackTrace();
		}
		// 如果服务器出错,就返回500
		return ResponseEntity.status(HttpStatus.INTERNAL_SERVER_ERROR).body(null);
	}
(3)、编写RESTful风格的商品修改接口
/**
* 修改商品
* PUT
* http://manager.taotao.com/rest/item/interface
*
* @param item
* @return
*/
@RequestMapping(method = RequestMethod.PUT)
public ResponseEntity<Void> updateItem(Item item) {
try {
this.itemService.updateByIdSelective(item);
// 修改成功,返回204
return ResponseEntity.status(HttpStatus.NO_CONTENT).build();
} catch (Exception e) {
e.printStackTrace();
}
// 如果服务器出错,就返回500
return ResponseEntity.status(HttpStatus.INTERNAL_SERVER_ERROR).body(null);
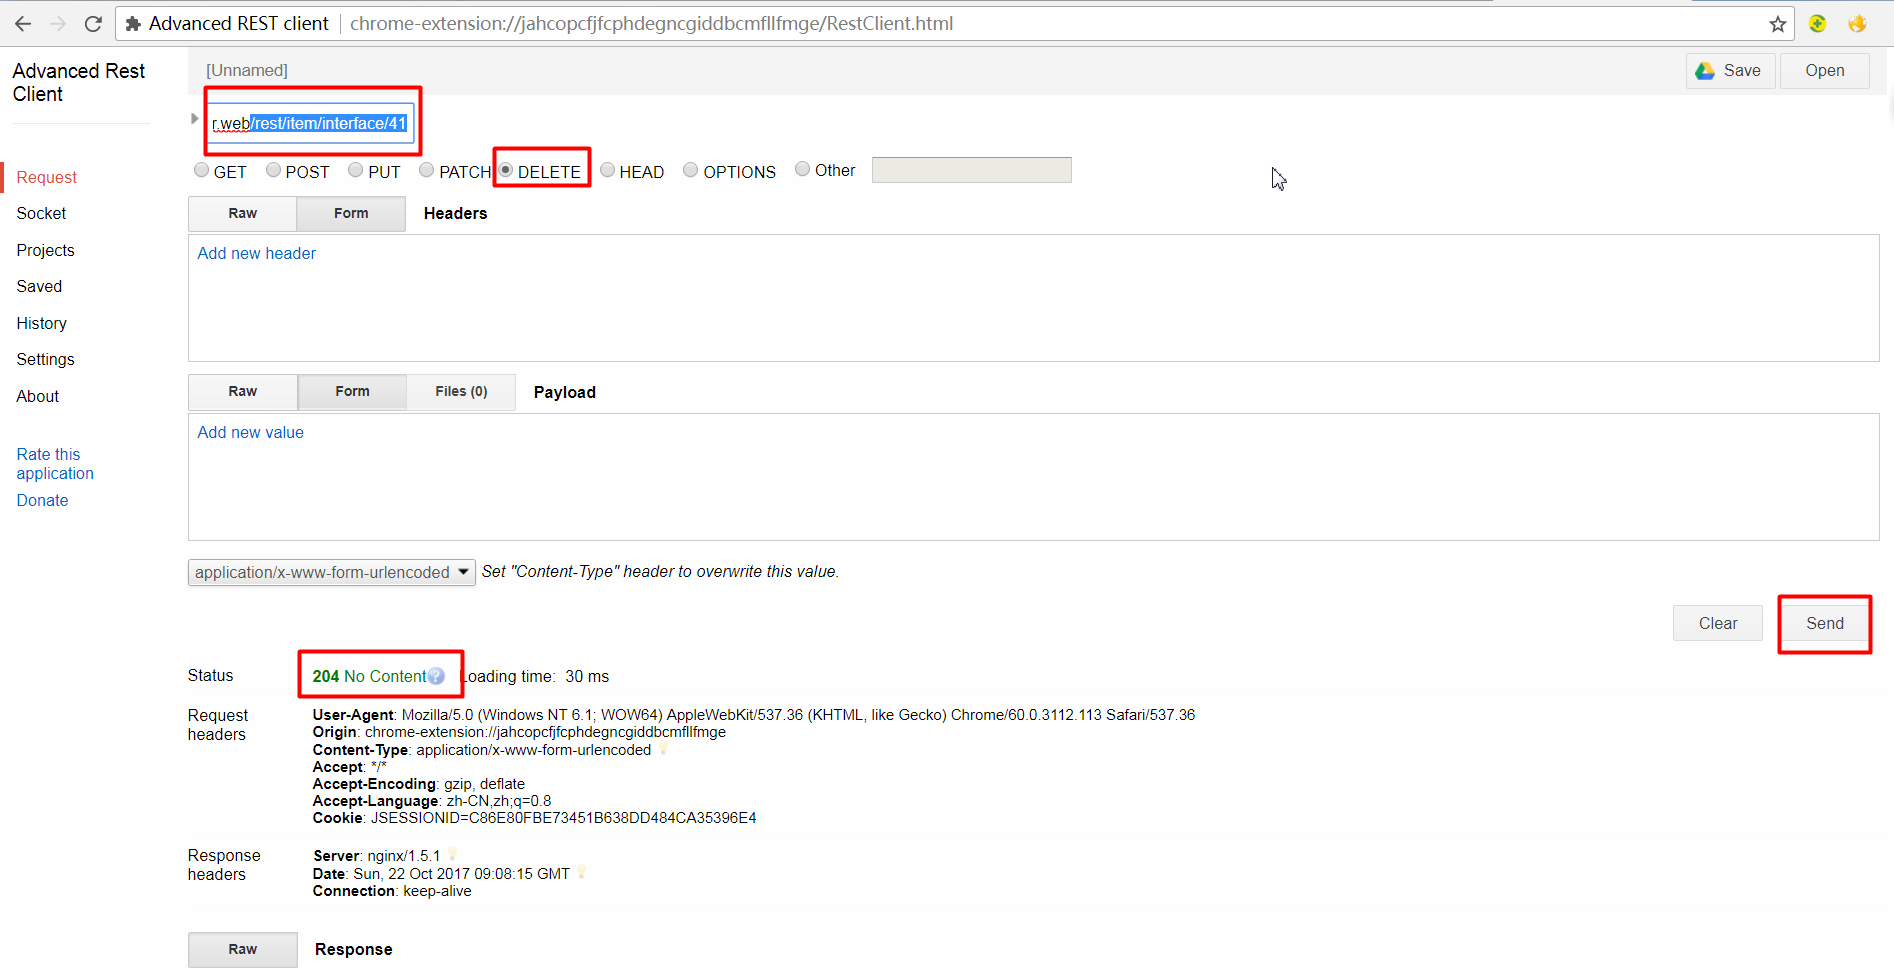
}(4)、编写RESTful风格的商品删除接口
	/**
	 * 删除商品
	 * DELETE
	 * http://manager.taotao.com/rest/item/interface/{id}
	 *
	 * @param id
	 * @return
	 */
	@RequestMapping(value = "{id}", method = RequestMethod.DELETE)
	public ResponseEntity<Void> delteItemById(@PathVariable Long id) {
		try {
			// 调用方法删除商品信息
			this.itemService.deleteById(id);
			// 删除成功,返回状态码204
			return ResponseEntity.status(HttpStatus.NO_CONTENT).build();
		} catch (Exception e) {
			e.printStackTrace();
		}
		// 如果服务器出错,就返回500
		return ResponseEntity.status(HttpStatus.INTERNAL_SERVER_ERROR).body(null);
	}
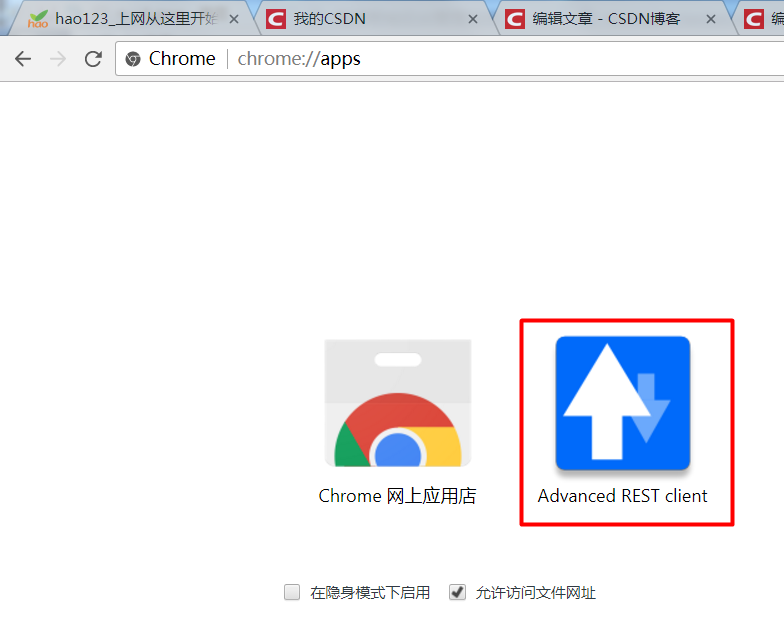
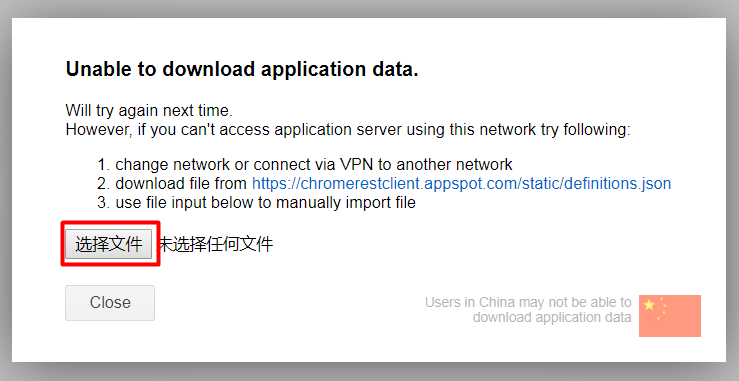
2、在Chrom浏览器中添加测试RESTful方法的工具
(1)、安装插件

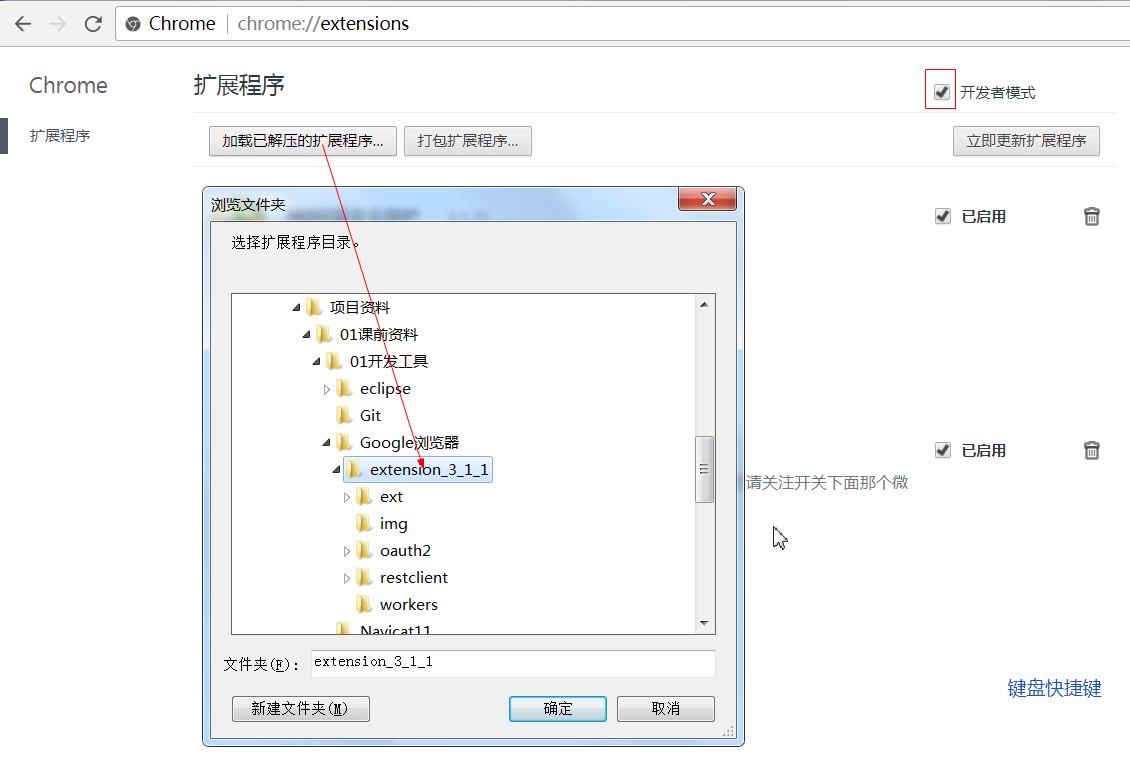
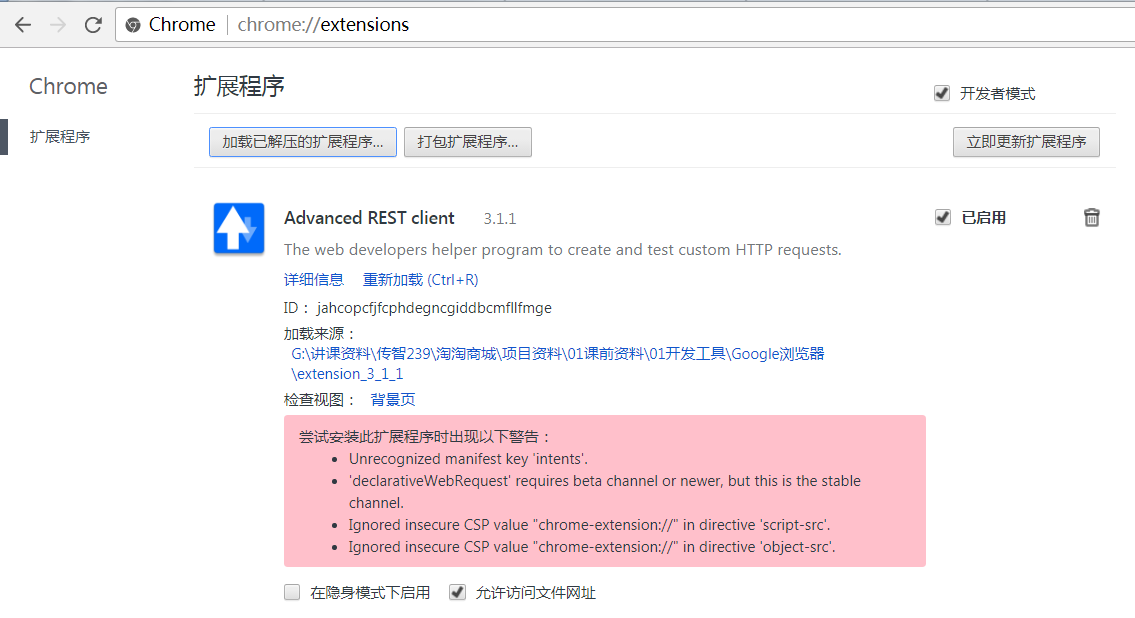
(2)、添加数据文件
注意:需要在断网的状态下才能安装本地的数据文件


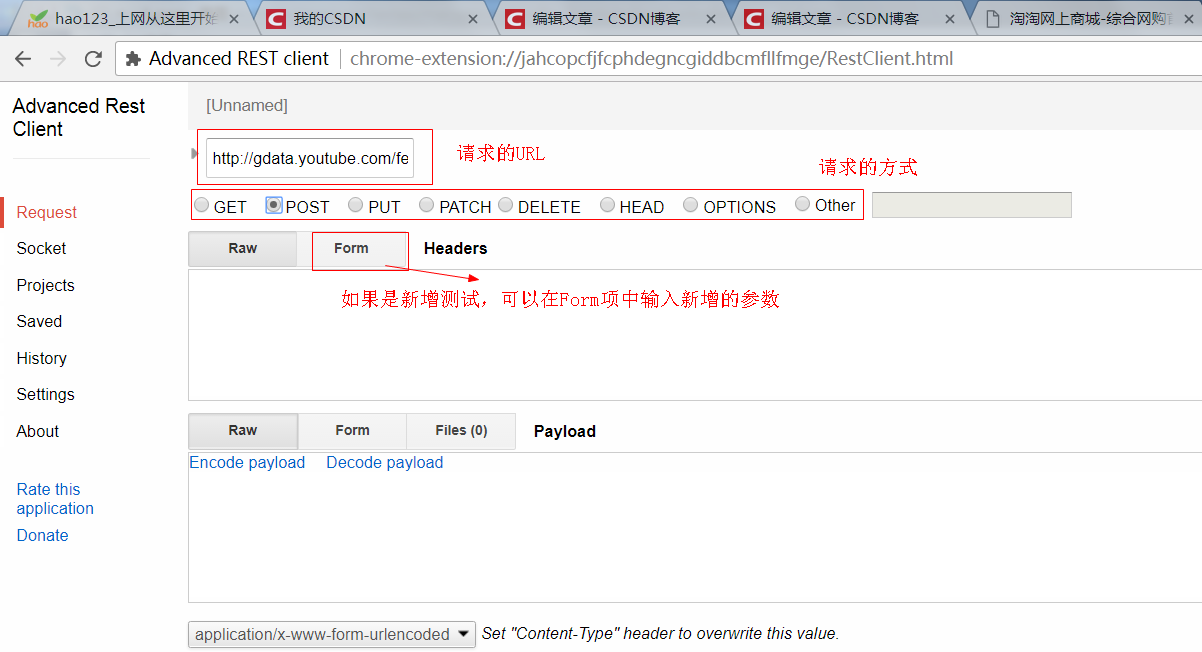
3、进行RESTful风格测试
(1)、POST方式
(2)、PUT方式
注意:测试结果为数据并没有被修改,打断点查看接收的参数发现,所有参数都为NULL
原因:RESTful风格开始时,PUT和DELETE方式请求的时候,无法获取表单提交的数据,需要在web.xml中配置接收数据的过滤器
	<!-- 配置过滤器,解决RESTful方式中不能接收PUT和DELETE请求的表单数据的问题 -->
	<filter>
		<filter-name>HttpMethodFilter</filter-name>
		<filter-class>org.springframework.web.filter.HttpPutFormContentFilter</filter-class>
	</filter>
	<filter-mapping>
		<filter-name>HttpMethodFilter</filter-name>
		<url-pattern>/*</url-pattern>
	</filter-mapping>

(3)、DELETE方式
三、HttpClient学习
1、httpClient简介
(1)、HttpClient 是 Apache Jakarta Common 下的子项目,可以用来提供高效的、最新的、功能丰富的支持 HTTP 协议的客户端编程工具包,并且它支持 HTTP 协议最新的版本和建议。
(2)、HttpClient 提供的主要的功能
实现了所有 HTTP 的方法(GET,POST,PUT,DELETE 等)
支持自动转向
支持 HTTPS 协议
支持代理服务器等
(3)、我们所用的solrj就封装了HttpClient
2、学习httpClient
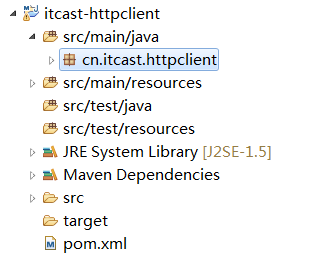
(1)、创建httpClient的maven项目,打包方式为jar,在pom.xml中添加依赖
<project xmlns="http://maven.apache.org/POM/4.0.0" xmlns:xsi="http://www.w3.org/2001/XMLSchema-instance"
	xsi:schemaLocation="http://maven.apache.org/POM/4.0.0 http://maven.apache.org/xsd/maven-4.0.0.xsd">
	<modelVersion>4.0.0</modelVersion>
	<groupId>cn.itcast.httpclient</groupId>
	<artifactId>itcast-httpclient</artifactId>
	<version>0.0.1-SNAPSHOT</version>
	<dependencies>
		<dependency>
			<groupId>org.apache.httpcomponents</groupId>
			<artifactId>httpclient</artifactId>
			<version>4.3.5</version>
		</dependency>
		<dependency>
			<groupId>org.slf4j</groupId>
			<artifactId>slf4j-log4j12</artifactId>
			<version>1.7.7</version>
		</dependency>
	</dependencies>
</project>
(2)、不带参数的GET方式请求
package cn.itcast.httpclient;

import org.apache.http.client.methods.CloseableHttpResponse;
import org.apache.http.client.methods.HttpGet;
import org.apache.http.impl.client.CloseableHttpClient;
import org.apache.http.impl.client.HttpClients;
import org.apache.http.util.EntityUtils;

/**
 * 不带参数的GET方式HttpClient请求
 * @author Administrator
 *
 */
public class DoGET {

	public static void main(String[] args) throws Exception {

		// 创建Httpclient对象
		CloseableHttpClient httpclient = HttpClients.createDefault();

		// 创建http GET请求
		HttpGet httpGet = new HttpGet("http://www.baidu.com/");

		CloseableHttpResponse response = null;
		try {
			// 执行请求
			response = httpclient.execute(httpGet);
			// 判断返回状态是否为200
			if (response.getStatusLine().getStatusCode() == 200) {
				String content = EntityUtils.toString(response.getEntity(), "UTF-8");
				System.out.println("内容长度:" + content.length());
				System.out.println("-----------------------------------------");
				System.out.println("内容:" + content);
			}
		} finally {
			if (response != null) {
				response.close();
			}
			httpclient.close();
		}

	}

}
(3)、带参数的GET方式请求
package cn.itcast.httpclient;

import java.net.URI;

import org.apache.http.client.methods.CloseableHttpResponse;
import org.apache.http.client.methods.HttpGet;
import org.apache.http.client.utils.URIBuilder;
import org.apache.http.impl.client.CloseableHttpClient;
import org.apache.http.impl.client.HttpClients;
import org.apache.http.util.EntityUtils;

/**
 * 带参数的HttpClient的GET方式请求
 * @author Administrator
 *
 */
public class DoGETParam {

	public static void main(String[] args) throws Exception {

		// 创建Httpclient对象
		CloseableHttpClient httpclient = HttpClients.createDefault();

		// 定义请求的参数
		URI uri = new URIBuilder("http://taotao.manager.com/rest/item").setParameter("page", "1")
				.setParameter("rows", "20").build();

		System.out.println(uri);

		// 创建http GET请求
		HttpGet httpGet = new HttpGet(uri);

		// 创建HttpGet的第二中方式
		// HttGet httpGet = new HttpGet("http://taotao.manager.com/rest/item?page=1&rows=20");

		CloseableHttpResponse response = null;
		try {
			// 执行请求
			response = httpclient.execute(httpGet);
			// 判断返回状态是否为200
			if (response.getStatusLine().getStatusCode() == 200) {
				String content = EntityUtils.toString(response.getEntity(), "UTF-8");
				System.out.println(content);
			}
		} finally {
			if (response != null) {
				response.close();
			}
			httpclient.close();
		}

	}

}
(4)、不带参数的POST方式请求
package cn.itcast.httpclient;

import org.apache.http.client.methods.CloseableHttpResponse;
import org.apache.http.client.methods.HttpPost;
import org.apache.http.impl.client.CloseableHttpClient;
import org.apache.http.impl.client.HttpClients;
import org.apache.http.util.EntityUtils;

/**
 * POST无参数方式提交的HttpClient
 *
 * @author Administrator
 *
 */
public class DoPOST {

	public static void main(String[] args) throws Exception {

		// 创建Httpclient对象
		CloseableHttpClient httpclient = HttpClients.createDefault();

		// 创建http POST请求
		HttpPost httpPost = new HttpPost("http://www.oschina.net/");

		// 解决开源中国POST访问对于请求头限制的问题
		httpPost.setHeader("User-Agent", "");

		CloseableHttpResponse response = null;
		try {
			// 执行请求
			response = httpclient.execute(httpPost);
			// 判断返回状态是否为200
			if (response.getStatusLine().getStatusCode() == 200) {
				String content = EntityUtils.toString(response.getEntity(), "UTF-8");
				System.out.println(content);
			}
		} finally {
			if (response != null) {
				response.close();
			}
			httpclient.close();
		}

	}

}
(5)、带参数的POST方式请求
package cn.itcast.httpclient;

import java.util.ArrayList;
import java.util.List;

import org.apache.http.NameValuePair;
import org.apache.http.client.entity.UrlEncodedFormEntity;
import org.apache.http.client.methods.CloseableHttpResponse;
import org.apache.http.client.methods.HttpPost;
import org.apache.http.impl.client.CloseableHttpClient;
import org.apache.http.impl.client.HttpClients;
import org.apache.http.message.BasicNameValuePair;
import org.apache.http.util.EntityUtils;

/**
 * 带参数的POST方式提交的HttpClient
 *
 * @author Administrator
 *
 */
public class DoPOSTParam {

	public static void main(String[] args) throws Exception {

		// 创建Httpclient对象
		CloseableHttpClient httpclient = HttpClients.createDefault();

		// 创建http POST请求
		HttpPost httpPost = new HttpPost("http://taotao.manager.web/rest/item/interface");

		// 创建参数集合
		List<NameValuePair> parameters = new ArrayList<NameValuePair>(0);
		// 设置参数,BasicNameValuePair参数意义:参数1:相当于form表单中的name属性
		// 参数2:相当于form表单中的value值)
		// <input name="" value="">
		parameters.add(new BasicNameValuePair("title", "HttpClient 的post带参数的方式提交"));
		parameters.add(new BasicNameValuePair("price", "99"));
		parameters.add(new BasicNameValuePair("num", "15"));
		parameters.add(new BasicNameValuePair("cid", "7"));
		parameters.add(new BasicNameValuePair("status", "1"));
		// 构造一个form表单式的实体
		UrlEncodedFormEntity formEntity = new UrlEncodedFormEntity(parameters, "UTF-8");
		// 将请求实体设置到httpPost对象中
		httpPost.setEntity(formEntity);

		CloseableHttpResponse response = null;
		try {
			// 执行请求
			response = httpclient.execute(httpPost);
			// 判断返回状态是否为200
			if (response.getStatusLine().getStatusCode() == 200) {
				String content = EntityUtils.toString(response.getEntity(), "UTF-8");
				System.out.println(content);
			}
		} finally {
			if (response != null) {
				response.close();
			}
			httpclient.close();
		}

	}

}
3、封装HttpClient的API
(1)、创建返回结果集POJO类
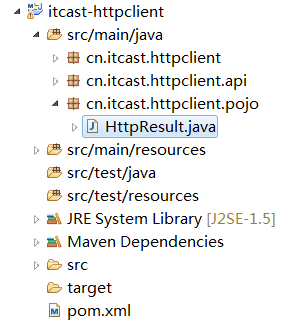
package cn.itcast.httpclient.pojo;

public class HttpResult {

	private int code;
	private String body;

	public HttpResult(int code, String body) {
		super();
		this.code = code;
		this.body = body;
	}

	public HttpResult() {
		super();
	}

	public int getCode() {
		return code;
	}

	public void setCode(int code) {
		this.code = code;
	}

	public String getBody() {
		return body;
	}

	public void setBody(String body) {
		this.body = body;
	}

}
(2)、HttpClient的API封装类
package cn.itcast.httpclient.api;

import java.util.ArrayList;
import java.util.List;
import java.util.Map;

import org.apache.http.HttpResponse;
import org.apache.http.NameValuePair;
import org.apache.http.client.HttpClient;
import org.apache.http.client.entity.UrlEncodedFormEntity;
import org.apache.http.client.methods.HttpDelete;
import org.apache.http.client.methods.HttpGet;
import org.apache.http.client.methods.HttpPost;
import org.apache.http.client.methods.HttpPut;
import org.apache.http.client.utils.URIBuilder;
import org.apache.http.impl.client.HttpClients;
import org.apache.http.message.BasicNameValuePair;
import org.apache.http.util.EntityUtils;

import cn.itcast.httpclient.pojo.HttpResult;

/**
 * 封装HttpClient
 *
 * @author Administrator
 *
 */
public class HttpClientServiceAPI {

	private HttpClient httpClient;

	public HttpClientServiceAPI() {
		super();
		// 打开浏览器
		this.httpClient = HttpClients.createDefault();
	}

	/**
	 * 带参数的httpGet请求
	 *
	 * @param url
	 * @param map
	 * @return
	 * @throws Exception
	 */
	public HttpResult doGetParam(String url, Map<String, Object> map) throws Exception {
		// 输入访问地址
		// 声明URIBuilder
		URIBuilder uriBuilder = new URIBuilder(url);
		// 判断map是否为null
		if (map != null) {
			// 遍历map
			for (Map.Entry<String, Object> entry : map.entrySet()) {
				// 设置请求参数
				uriBuilder.setParameter(entry.getKey(), entry.getValue().toString());
			}
		}

		// 创建httpGet
		HttpGet httpGet = new HttpGet(uriBuilder.build());
		// 发起请求
		HttpResponse response = this.httpClient.execute(httpGet);
		// 获取响应数据
		HttpResult result = null;
		if (response.getEntity() != null) {
			result = new HttpResult(response.getStatusLine().getStatusCode(),
					EntityUtils.toString(response.getEntity(), "UTF-8"));
		} else {
			// 如果响应体没有数据,直接设置为null
			result = new HttpResult(response.getStatusLine().getStatusCode(), null);
		}
		return result;
	}

	/**
	 * 不带参数的httpClient的GET方式请求
	 *
	 * @param url
	 * @return
	 * @throws Exception
	 */
	public HttpResult doGet(String url) throws Exception {
		HttpResult httpResult = this.doGetParam(url, null);
		return httpResult;
	}

	/**
	 * 带参数的POST请求
	 *
	 * @param url
	 * @param param
	 * @return
	 * @throws Exception
	 */
	public HttpResult doPostParam(String url, Map<String, Object> param) throws Exception {
		// 设置请求地址
		HttpPost httpPost = new HttpPost(url);
		// 判断参数是否为null
		if (param != null) {
			// 声明存放参数的集合
			List<NameValuePair> list = new ArrayList<NameValuePair>();
			// 设置参数
			for (Map.Entry<String, Object> entry : param.entrySet()) {
				list.add(new BasicNameValuePair(entry.getKey(), entry.getValue().toString()));
			}
			// 封装form表单的Entity
			UrlEncodedFormEntity entity = new UrlEncodedFormEntity(list, "UTF-8");
			// 把form表单的Entity放到请求中
			httpPost.setEntity(entity);
		}
		// 发起请求
		HttpResponse response = this.httpClient.execute(httpPost);

		// 封装返回数据
		HttpResult result = null;
		if (response.getEntity() != null) {
			result = new HttpResult(response.getStatusLine().getStatusCode(),
					EntityUtils.toString(response.getEntity(), "UTF-8"));
		} else {
			result = new HttpResult(response.getStatusLine().getStatusCode(), null);
		}

		return result;
	}

	/**
	 * 不带参数的post请求
	 *
	 * @param url
	 * @return
	 * @throws Exception
	 */
	public HttpResult doPost(String url) throws Exception {
		return this.doGetParam(url, null);
	}

	/**
	 * httpClient的put请求
	 *
	 * @param url
	 * @param param
	 * @return
	 * @throws Exception
	 */
	public HttpResult doPut(String url, Map<String, Object> param) throws Exception {
		// 设置请求地址
		HttpPut httpPut = new HttpPut(url);
		// 判断参数是否为null
		if (param != null) {
			// 声明存放参数的集合
			List<NameValuePair> list = new ArrayList<NameValuePair>();
			// 设置参数
			for (Map.Entry<String, Object> entry : param.entrySet()) {
				list.add(new BasicNameValuePair(entry.getKey(), entry.getValue().toString()));
			}
			// 封装form表单的Entity
			UrlEncodedFormEntity entity = new UrlEncodedFormEntity(list, "UTF-8");
			// 把form表单的Entity放到请求中
			httpPut.setEntity(entity);
		}
		// 发起请求
		HttpResponse response = this.httpClient.execute(httpPut);

		// 封装返回数据
		HttpResult result = null;
		if (response.getEntity() != null) {
			result = new HttpResult(response.getStatusLine().getStatusCode(),
					EntityUtils.toString(response.getEntity(), "UTF-8"));
		} else {
			result = new HttpResult(response.getStatusLine().getStatusCode(), null);
		}

		return result;
	}

	/**
	 * 带参数的Delete请求
	 *
	 * @param url
	 * @param map
	 * @return
	 * @throws Exception
	 */
	public HttpResult doDelete(String url, Map<String, Object> map) throws Exception {
		// 输入访问地址
		// 声明URIBuilder
		URIBuilder uriBuilder = new URIBuilder(url);
		// 判断map是否为null
		if (map != null) {
			// 遍历map
			for (Map.Entry<String, Object> entry : map.entrySet()) {
				// 设置请求参数
				uriBuilder.setParameter(entry.getKey(), entry.getValue().toString());
			}
		}

		// 创建httpGet
		HttpDelete httpDelete = new HttpDelete(uriBuilder.build());
		// 发起请求
		HttpResponse response = this.httpClient.execute(httpDelete);
		// 获取响应数据
		HttpResult result = null;
		if (response.getEntity() != null) {
			result = new HttpResult(response.getStatusLine().getStatusCode(),
					EntityUtils.toString(response.getEntity(), "UTF-8"));
		} else {
			// 如果响应体没有数据,直接设置为null
			result = new HttpResult(response.getStatusLine().getStatusCode(), null);
		}
		return result;
	}

}
4、测试封装的HttpClient的API
package cn.itcast.httpclient.test;

import java.util.HashMap;
import java.util.Map;

import org.junit.Before;
import org.junit.Test;

import cn.itcast.httpclient.api.HttpClientServiceAPI;
import cn.itcast.httpclient.pojo.HttpResult;

/**
 * 测试封装的HttpClient的API
 *
 * @author Administrator
 *
 */
public class HttpApiTest {

	private HttpClientServiceAPI serviceApi;

	@Before
	public void init() {
		this.serviceApi = new HttpClientServiceAPI();
	}

	/**
	 * 测试查询商品
	 *
	 * @throws Exception
	 */
	@Test
	public void testQuery() throws Exception {
		// 声明url地址
		String url = "http://taotao.manager.web/rest/item/interface/42";
		// 调用接口
		HttpResult result = serviceApi.doGet(url);
		// 打印结果
		System.out.println(result.toString());
	}

	/**
	 * 保存的方法
	 *
	 * @throws Exception
	 */
	@Test
	public void testSave() throws Exception {
		// 声明url
		String url = "http://taotao.manager.web/rest/item/interface";
		// 创建容器,封装参数
		Map<String, Object> map = new HashMap<String, Object>();
		map.put("title", "HttpClientServiceApi测试");
		map.put("price", 1000);
		map.put("num", 10);
		map.put("cid", 10);
		map.put("status", 1);
		// 调用接口存储
		HttpResult result = this.serviceApi.doPostParam(url, map);
		// 打印结果
		System.out.println(result.toString());
	}

	/**
	 * 更新的方法
	 *
	 * @throws Exception
	 */
	@Test
	public void testUpdate() throws Exception {
		// 声明url
		String url = "http://taotao.manager.web/rest/item/interface";
		// 创建容器,封装参数
		Map<String, Object> map = new HashMap<String, Object>();
		map.put("title", "HttpClientServiceApi测试upadte");
		map.put("id", 43);
		// 调用接口存储
		HttpResult result = this.serviceApi.doPut(url, map);
		// 打印结果
		System.out.println(result.toString());
	}

	/**
	 * 删除的方法
	 *
	 * @throws Exception
	 */
	@Test
	public void testDelete() throws Exception {
		// 声明url
		String url = "http://taotao.manager.web/rest/item/interface/40";
		// 调用接口
		HttpResult result = this.serviceApi.doDelete(url, null);
		// 打印结果
		System.out.println(result.toString());
	}
}
四、单点登录介绍及分析
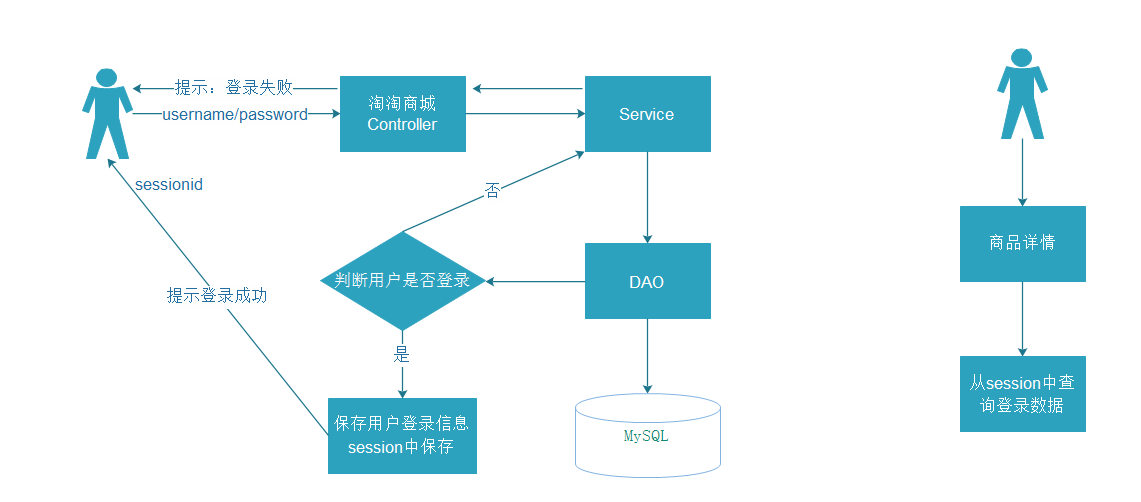
1、以前的登录流程
2、集群登录分析
使用集群出现的问题:每次访问新的服务器都需要登录

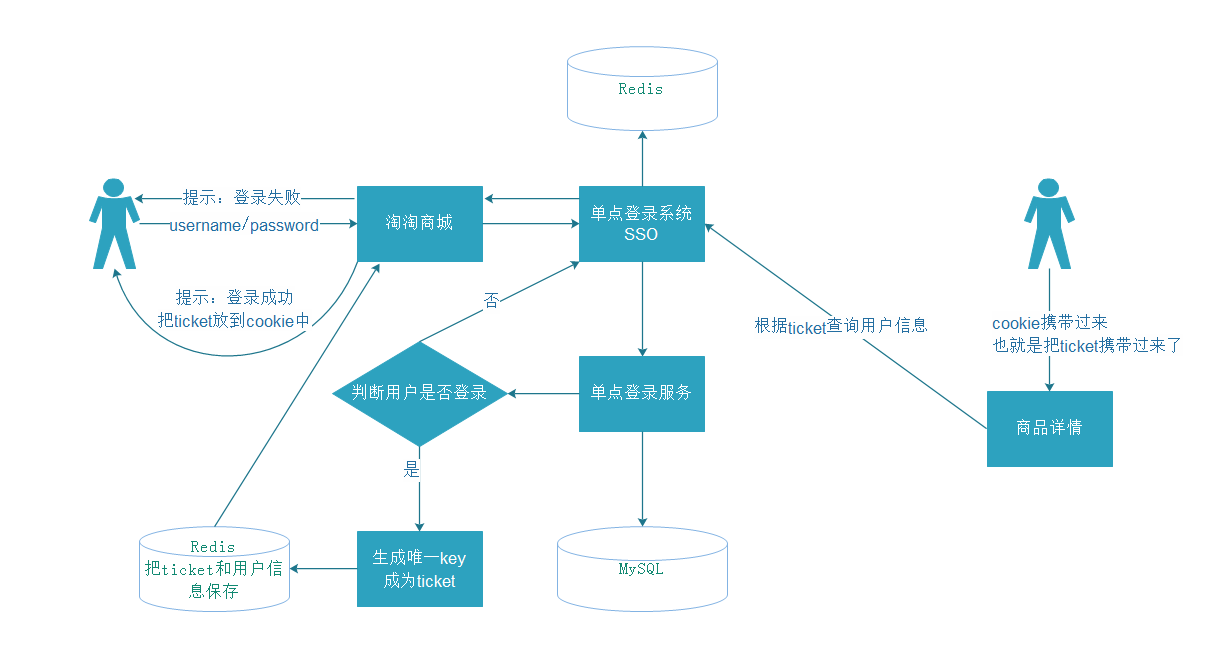
3、现在的登录流程
五、搭建SSO系统
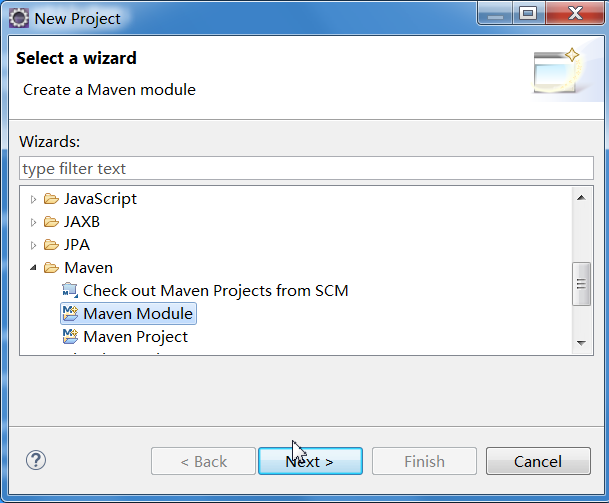
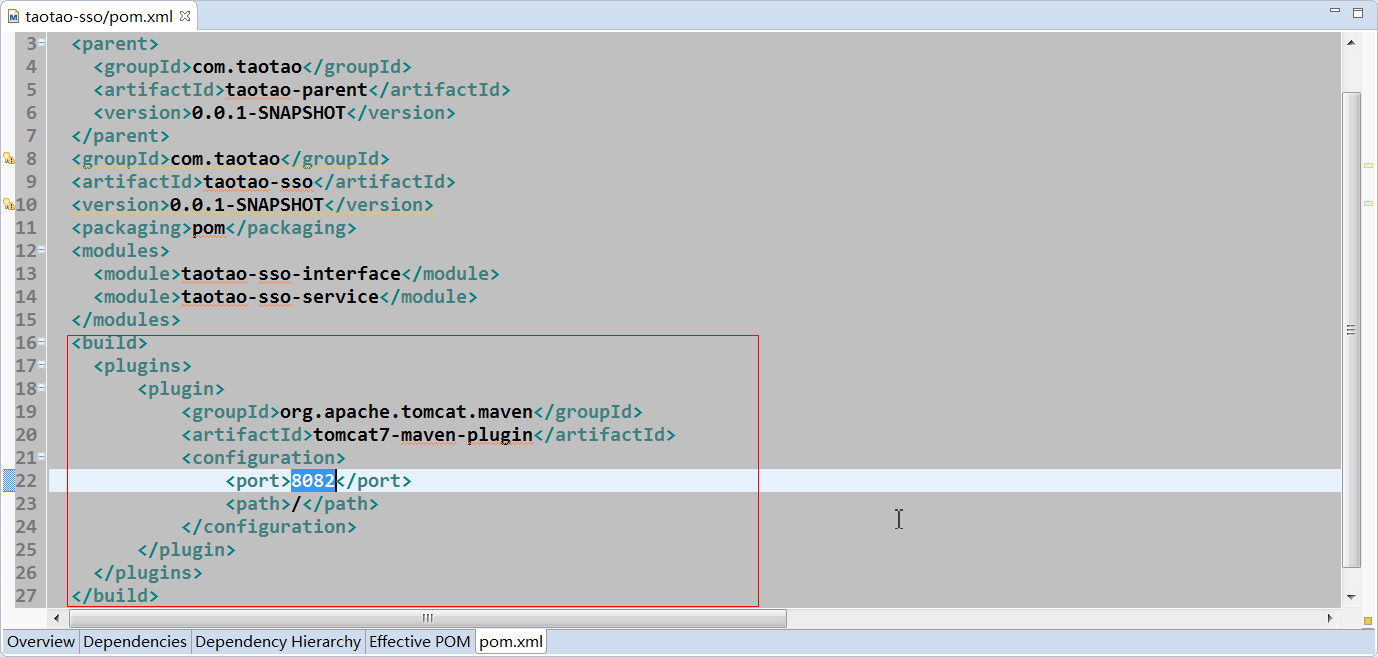
1、搭建聚合工程的父工程taotao-sso

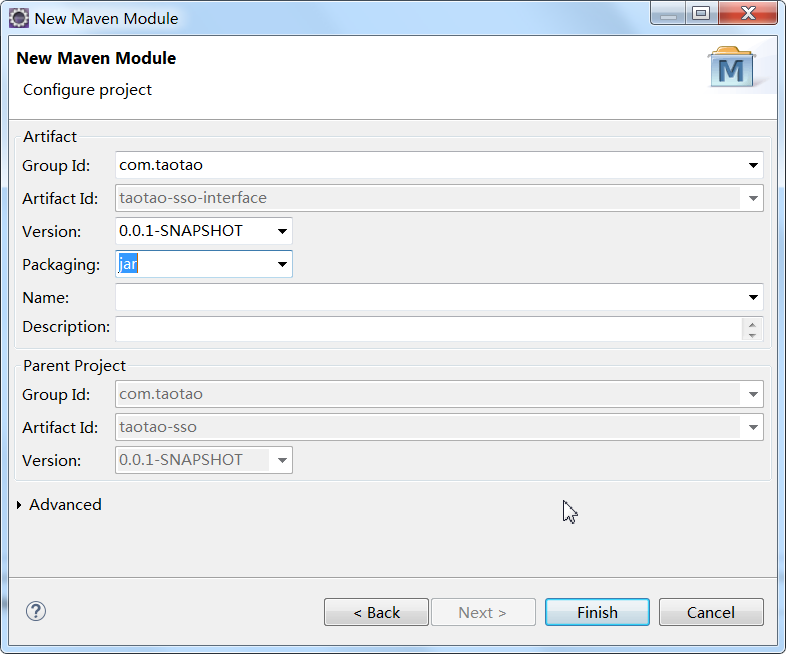
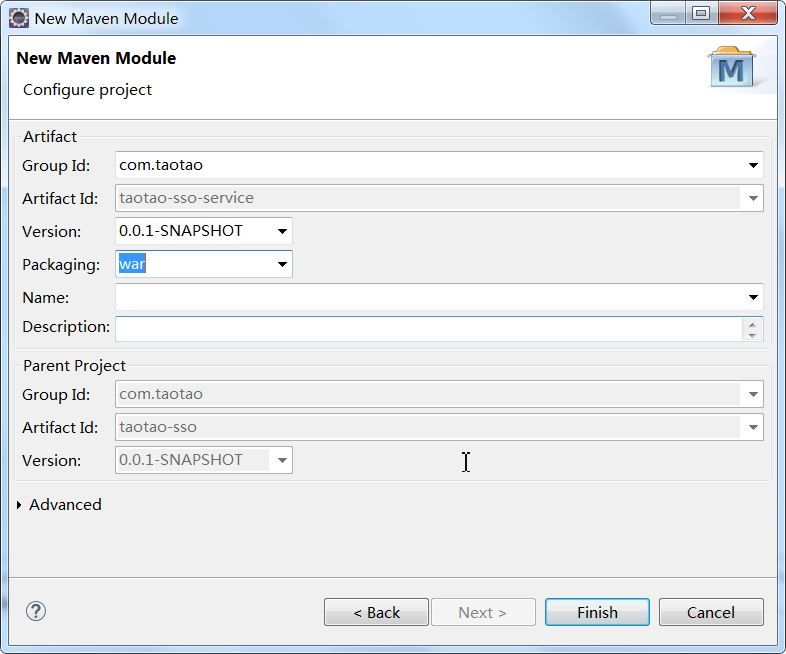
2、创建聚合工程的子工程taotao-sso-interface、taotao-sso-service
3、搭建独立的web工程taotao-sso-web


4、搭建完成后的项目结构

5、加入相互之间的依赖
taotao-sso-interface 依赖 taotao-manager-pojo
taotao-sso-service 依赖 taotao-sso-interface 和 taotao-manager-mapper
taotao-sso-web 依赖 taotao-sso-interface
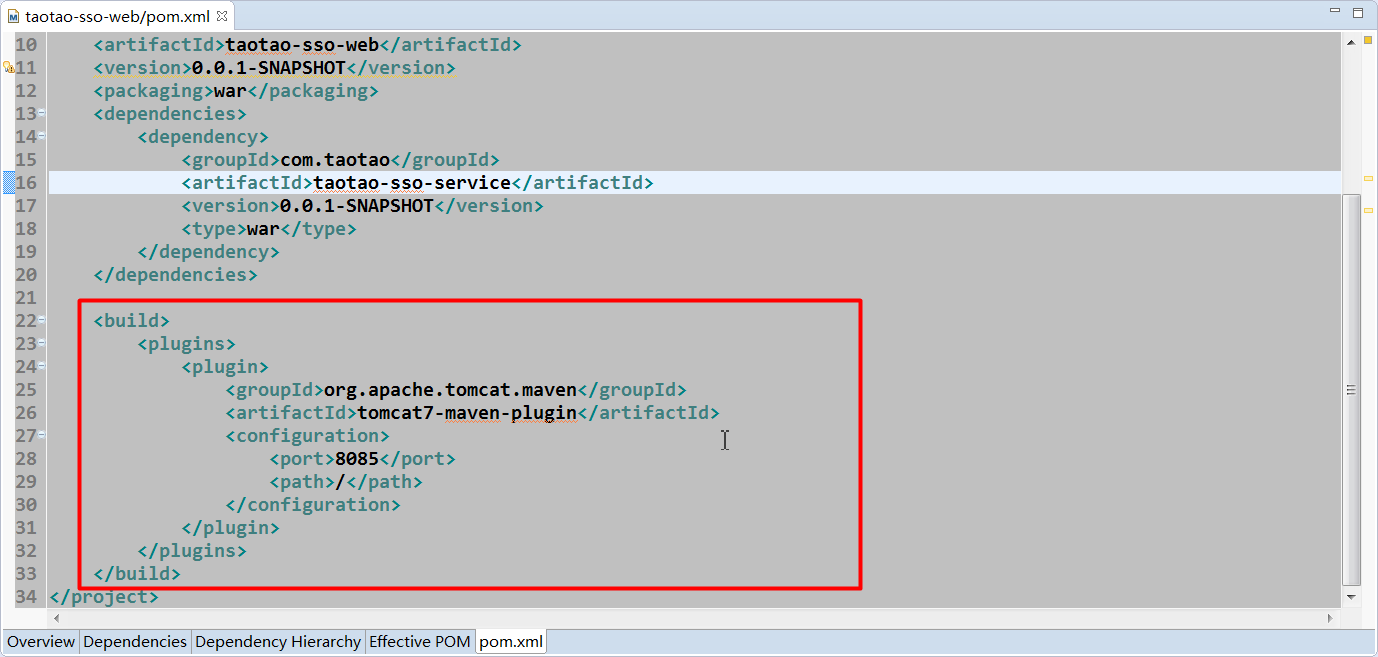
6、在taotao-sso和taotao-sso-web中加入tomcat插件
7、taotao-sso-service项目中加入配置文件
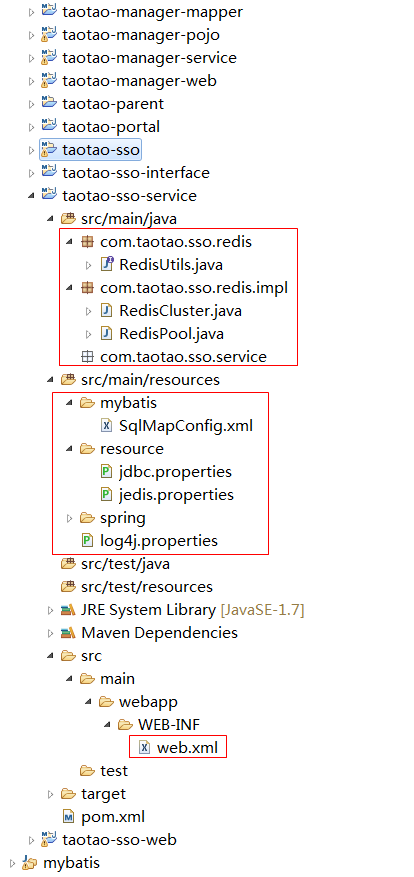
注意:所有配置文件参照taotao-manager-service项目中配置文件拷入,需要将manager改为sso
8、在taotao-sso-web项目中加入配置文件
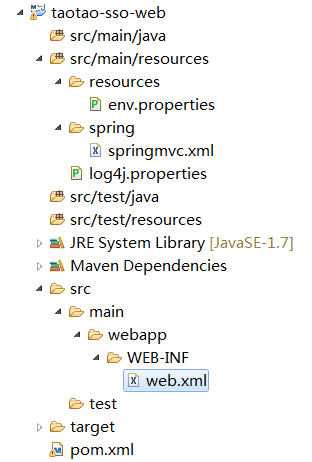
注意:所有配置文件参照taotao-portal项目中配置文件拷入,需要将manager改为sso
web.xml
<?xml version="1.0" encoding="UTF-8"?>
<web-app xmlns:xsi="http://www.w3.org/2001/XMLSchema-instance"
	xmlns="http://java.sun.com/xml/ns/javaee"
	xsi:schemaLocation="http://java.sun.com/xml/ns/javaee http://java.sun.com/xml/ns/javaee/web-app_2_5.xsd"
	version="2.5">
	<display-name>taotao-sso-web</display-name>
	<welcome-file-list>
		<welcome-file>index.html</welcome-file>
		<welcome-file>index.htm</welcome-file>
		<welcome-file>index.jsp</welcome-file>
		<welcome-file>default.html</welcome-file>
		<welcome-file>default.htm</welcome-file>
		<welcome-file>default.jsp</welcome-file>
	</welcome-file-list>

	<!-- 解决POST乱码问题 -->
	<filter>
		<filter-name>encoding</filter-name>
		<filter-class>org.springframework.web.filter.CharacterEncodingFilter</filter-class>
		<init-param>
			<param-name>encoding</param-name>
			<param-value>UTF-8</param-value>
		</init-param>
	</filter>
	<filter-mapping>
		<filter-name>encoding</filter-name>
		<url-pattern>/*</url-pattern>
	</filter-mapping>

	<!-- 配置springMVC前端控制器 -->
	<servlet>
		<servlet-name>taotao-sso-web</servlet-name>
		<servlet-class>org.springframework.web.servlet.DispatcherServlet</servlet-class>
		<init-param>
			<!-- springMVC全局配置文件 -->
			<param-name>contextConfigLocation</param-name>
			<param-value>classpath:spring/springmvc.xml</param-value>
		</init-param>
		<!-- springmvc随着容器的启动而启动 -->
		<load-on-startup>1</load-on-startup>
	</servlet>

	<servlet-mapping>
		<servlet-name>taotao-sso-web</servlet-name>
		<!-- 拦截所有除jsp之外的所有请求 -->
		<url-pattern>/</url-pattern>
	</servlet-mapping>
</web-app>


 368
368


 被折叠的 条评论
为什么被折叠?
被折叠的 条评论
为什么被折叠?
 到【灌水乐园】发言


