


 本文深入解析Android中的消息处理机制,包括Looper、Handler和Message的工作原理。详细介绍了Looper如何将普通线程转换为循环线程,Handler如何实现消息的发送与处理,以及Message作为消息载体的使用技巧。
前言
虽然一直在做应用层开发,但是我们组是核心系统BSP,了解底层了解Android的运行机制还是很有必要的。就应用程序而言,Android系统中的Java应用程序和其他系统上相同,都是靠消息驱动来工作的,它们大致的工作原理如下:
- 有一个消息队列,可以往这个消息队列中投递消息。
- 有一个消息循环,不断从消息队列中取出消息,然后处理 。
为了更深入的理解Android的消息处理机制,这几天空闲时间,我结合《深入理解Android系统》看了Handler、Looper、Message这几个类的源码,这里分享一下学习心得。
Looper类分析
在分析之前,我先把Looper类的源码show出来,非常精简的代码,源码如下(frameworks/base/core/java/android/os/Looper.java):
public final class Looper {
    private static final String TAG = "Looper";

    // sThreadLocal.get() will return null unless you've called prepare().
    static final ThreadLocal<Looper> sThreadLocal = new ThreadLocal<Looper>();
    private static Looper sMainLooper;  // guarded by Looper.class

    final MessageQueue mQueue;
    final Thread mThread;

    private Printer mLogging;

     /** Initialize the current thread as a looper.
      * This gives you a chance to create handlers that then reference
      * this looper, before actually starting the loop. Be sure to call
      * {@link #loop()} after calling this method, and end it by calling
      * {@link #quit()}.
      */
    public static void prepare() {
        prepare(true);
    }

    private static void prepare(boolean quitAllowed) {
        if (sThreadLocal.get() != null) {
            throw new RuntimeException("Only one Looper may be created per thread");
        }
        sThreadLocal.set(new Looper(quitAllowed));
    }

    /**
     * Initialize the current thread as a looper, marking it as an
     * application's main looper. The main looper for your application
     * is created by the Android environment, so you should never need
     * to call this function yourself.  See also: {@link #prepare()}
     */
    public static void prepareMainLooper() {
        prepare(false);
        synchronized (Looper.class) {
            if (sMainLooper != null) {
                throw new IllegalStateException("The main Looper has already been prepared.");
            }
            sMainLooper = myLooper();
        }
    }

    /** Returns the application's main looper, which lives in the main thread of the application.
     */
    public static Looper getMainLooper() {
        synchronized (Looper.class) {
            return sMainLooper;
        }
    }

    /**
     * Run the message queue in this thread. Be sure to call
     * {@link #quit()} to end the loop.
     */
    public static void loop() {
        final Looper me = myLooper();
        if (me == null) {
            throw new RuntimeException("No Looper; Looper.prepare() wasn't called on this thread.");
        }
        final MessageQueue queue = me.mQueue;

        // Make sure the identity of this thread is that of the local process,
        // and keep track of what that identity token actually is.
        Binder.clearCallingIdentity();
        final long ident = Binder.clearCallingIdentity();

        for (;;) {
            Message msg = queue.next(); // might block
            if (msg == null) {
                // No message indicates that the message queue is quitting.
                return;
            }

            // This must be in a local variable, in case a UI event sets the logger
            Printer logging = me.mLogging;
            if (logging != null) {
                logging.println(">>>>> Dispatching to " + msg.target + " " +
                        msg.callback + ": " + msg.what);
            }

            msg.target.dispatchMessage(msg);

            if (logging != null) {
                logging.println("<<<<< Finished to " + msg.target + " " + msg.callback);
            }

            // Make sure that during the course of dispatching the
            // identity of the thread wasn't corrupted.
            final long newIdent = Binder.clearCallingIdentity();
            if (ident != newIdent) {
                Log.wtf(TAG, "Thread identity changed from 0x"
                        + Long.toHexString(ident) + " to 0x"
                        + Long.toHexString(newIdent) + " while dispatching to "
                        + msg.target.getClass().getName() + " "
                        + msg.callback + " what=" + msg.what);
            }

            msg.recycle();
        }
    }

    /**
     * Return the Looper object associated with the current thread.  Returns
     * null if the calling thread is not associated with a Looper.
     */
    public static Looper myLooper() {
        return sThreadLocal.get();
    }

    public void setMessageLogging(Printer printer) {
        mLogging = printer;
    }

    /**
     * Return the {@link MessageQueue} object associated with the current
     * thread.  This must be called from a thread running a Looper, or a
     * NullPointerException will be thrown.
     */
    public static MessageQueue myQueue() {
        return myLooper().mQueue;
    }

    private Looper(boolean quitAllowed) {
        mQueue = new MessageQueue(quitAllowed);
        mThread = Thread.currentThread();
    }

    /**
     * Returns true if the current thread is this looper's thread.
     * @hide
     */
    public boolean isCurrentThread() {
        return Thread.currentThread() == mThread;
    }

    public void quit() {
        mQueue.quit(false);
    }

    public void quitSafely() {
        mQueue.quit(true);
    }

    public int postSyncBarrier() {
        return mQueue.enqueueSyncBarrier(SystemClock.uptimeMillis());
    }

    public void removeSyncBarrier(int token) {
        mQueue.removeSyncBarrier(token);
    }

    /**
     * Return the Thread associated with this Looper.
     */
    public Thread getThread() {
        return mThread;
    }

    /** @hide */
    public MessageQueue getQueue() {
        return mQueue;
    }

    /**
     * Return whether this looper's thread is currently idle, waiting for new work
     * to do.  This is intrinsically racy, since its state can change before you get
     * the result back.
     * @hide
     */
    public boolean isIdling() {
        return mQueue.isIdling();
    }

    public void dump(Printer pw, String prefix) {
        pw.println(prefix + toString());
        mQueue.dump(pw, prefix + "  ");
    }

    public String toString() {
        return "Looper (" + mThread.getName() + ", tid " + mThread.getId()
                + ") {" + Integer.toHexString(System.identityHashCode(this)) + "}";
    }
}
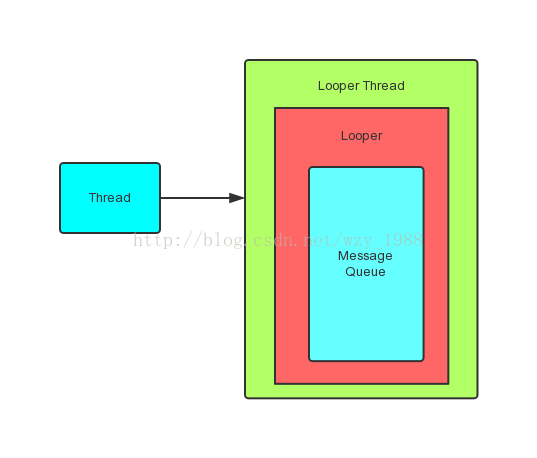
Looper字面意思是“循环”,它被设计用来将一个普通的Thread线程变成Looper Thread线程。所谓Looper线程就是循环工作的线程,在程序开发(尤其是GUI开发)中,我们经常会使用到一个循环执行的线程,有新任务就立刻执行,没有新任务就循环等待。使用Looper创建Looper Thread很简单,示例代码如下:
package com.example.testlibrary;

import android.os.Handler;
import android.os.Looper;

public class LooperTheread extends Thread{
	public Handler mhHandler;

	@Override
	public void run() {
		// 1. 调用Looper
		Looper.prepare();

		// ... 其他处理,例如实例化handler

		// 2. 进入消息循环
		Looper.loop();
	}

}Looper.prepare()
在调用prepare的线程中,new了一个Looper对象,并将这个Looper对象保存在这个调用线程的ThreadLocal中。而Looper对象内部封装了一个消息队列。
我们来看一下Looper类的源码。第一个调用函数是Looper的prepare函数,它的源码如下:
    // 每个线程中的Looper对象其实是一个ThreadLocal,即线程本地存储(TLS)对象
    static final ThreadLocal<Looper> sThreadLocal = new ThreadLocal<Looper>();

    public static void prepare() {
        prepare(true);
    }

    private static void prepare(boolean quitAllowed) {
        if (sThreadLocal.get() != null) {
            throw new RuntimeException("Only one Looper may be created per thread");
        }
        sThreadLocal.set(new Looper(quitAllowed));
} private Looper(boolean quitAllowed) {
mQueue = new MessageQueue(quitAllowed);
mThread = Thread.currentThread();
}Looper循环
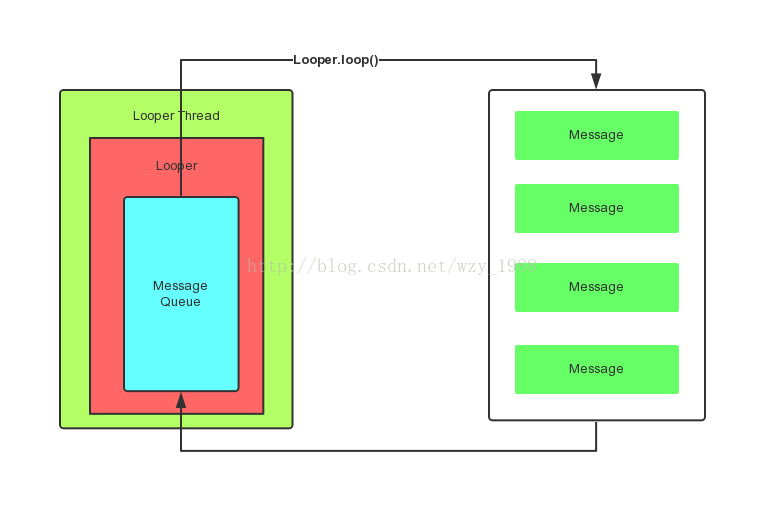
调用了Loop方法后,Looper线程就开始真正的工作了,它不断从自己的MessageQueue中取出对头的信息(也叫任务)执行,如图所示:
其实现源码如下所示(这里我做了一些修整,去掉不影响主线的代码):
    /**
     * Run the message queue in this thread. Be sure to call
     * {@link #quit()} to end the loop.
     */
    public static void loop() {
        final Looper me = myLooper();
        if (me == null) {
            throw new RuntimeException("No Looper; Looper.prepare() wasn't called on this thread.");
        }
        // 取出这个Looper的消息队列
        final MessageQueue queue = me.mQueue;

        for (;;) {
            Message msg = queue.next(); // might block
            if (msg == null) {
                // No message indicates that the message queue is quitting.
                return;
            }

            // 处理消息,Message对象中有一个target,它是Handler类型
            msg.target.dispatchMessage(msg);
            msg.recycle();
        }
    }

    /**
     * Return the Looper object associated with the current thread.  Returns
     * null if the calling thread is not associated with a Looper.
     */
    public static Looper myLooper() {
        return sThreadLocal.get();
}- 封装了一个消息队列。
- Looper的prepare函数把这个Looper和调用prepare的线程(也就是最终处理的线程)绑定在一起,通过ThreadLocal机制实现的。
- 处理线程调用loop函数,处理来自该消息队列的消息。
如何往MessageQueue里添加消息,是由Handler实现的,下面来分析一下Handler。
Handler分析
什么是handler?handler扮演了往MessageQueue里添加消息和处理消息的角色(只处理由自己发出的消息),即通过MessageQueue它要执行一个任务(sendMessage),并在loop到自己的时候执行该任务(handleMessage),整个过程是异步的。初识Handler
Handler中的所包括的成员变量:
    final MessageQueue mQueue;	// Handler中也有一个消息队列
    final Looper mLooper;	// 也有一个Looper
final Callback mCallback; // 有一个回调类 public Handler() {
this(null, false);
}
/**
* Use the {@link Looper} for the current thread with the specified callback interface
* and set whether the handler should be asynchronous.
*
* Handlers are synchronous by default unless this constructor is used to make
* one that is strictly asynchronous.
*
* Asynchronous messages represent interrupts or events that do not require global ordering
* with represent to synchronous messages. Asynchronous messages are not subject to
* the synchronization barriers introduced by {@link MessageQueue#enqueueSyncBarrier(long)}.
*
* @param callback The callback interface in which to handle messages, or null.
* @param async If true, the handler calls {@link Message#setAsynchronous(boolean)} for
* each {@link Message} that is sent to it or {@link Runnable} that is posted to it.
*
* @hide
*/
public Handler(Callback callback, boolean async) {
if (FIND_POTENTIAL_LEAKS) {
final Class<? extends Handler> klass = getClass();
if ((klass.isAnonymousClass() || klass.isMemberClass() || klass.isLocalClass()) &&
(klass.getModifiers() & Modifier.STATIC) == 0) {
Log.w(TAG, "The following Handler class should be static or leaks might occur: " +
klass.getCanonicalName());
}
}
mLooper = Looper.myLooper();
if (mLooper == null) {
throw new RuntimeException(
"Can't create handler inside thread that has not called Looper.prepare()");
}
mQueue = mLooper.mQueue;
mCallback = callback;
mAsynchronous = async;
}
通过上面的构造函数,我们可以发现,当前Handler中的mLooper是从Looper.myLooper()函数获取来的,而这个函数的定义我再复制一下,如下所示:
    /**
     * Return the Looper object associated with the current thread.  Returns
     * null if the calling thread is not associated with a Looper.
     */
    public static Looper myLooper() {
        return sThreadLocal.get();
}Handler真面目
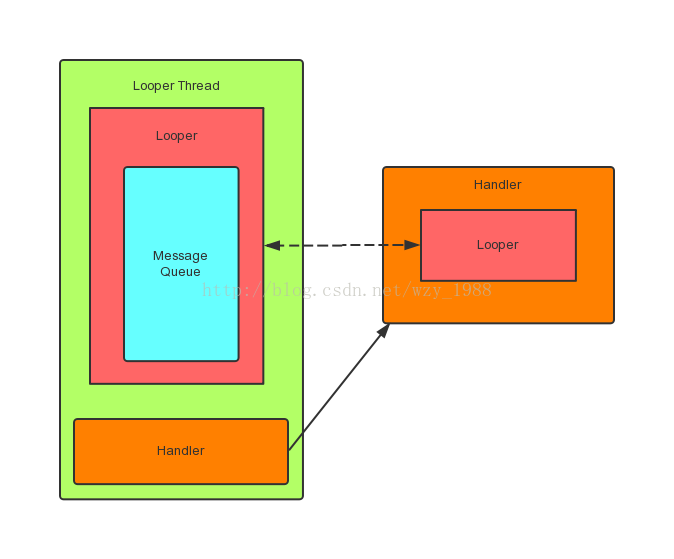
由上面分析可知,Handler中的消息队列实际上就是Handler所属线程的Looper对象的消息队列,我们可以为之前的LooperThread类增加Handler,代码如下:
public class LooperThread extends Thread{
	public Handler mhHandler;

	@Override
	public void run() {
		// 1. 调用Looper
		Looper.prepare();

		// ... 其他处理,例如实例化handler
		Handler handler = new Handler();

		// 2. 进入消息循环
		Looper.loop();
	}

}
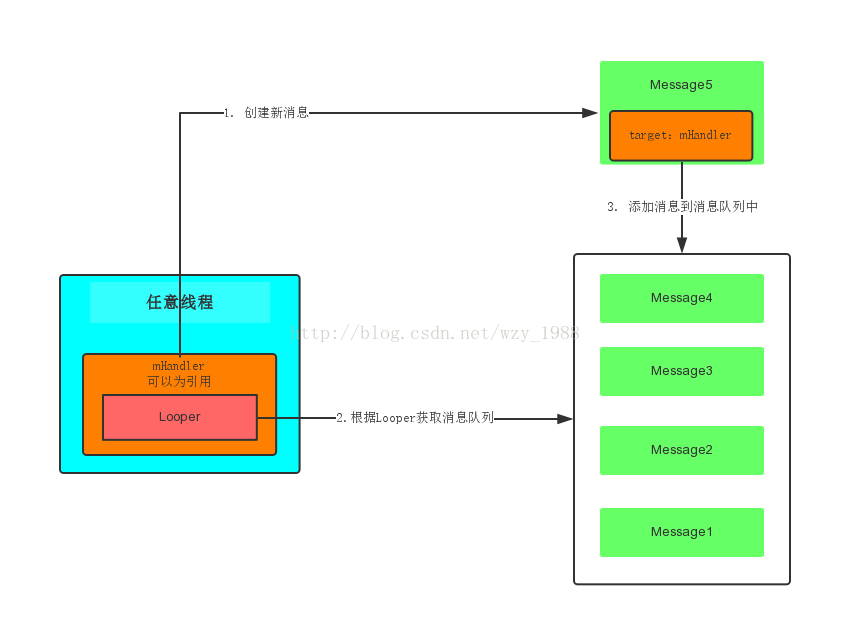
问一个问题,假设没有Handler,我们该如何往Looper的MessageQueue里插入消息呢?这里我说一个原始的思路:
- 调用Looper的myQueue,它将返回消息队列对象MessageQueue。
- 构造一个Message,填充它的成员,尤其是target对象。
- 调用MessageQueue的enqueueMessage,将消息插入到消息队列中。
上面的方法虽然能工作,但是非常原始,有了Handler以后,它像一个辅助类,提供了一系列API调用,帮我们简化编程工作。常用API如下:
- post(Runnable)
- postAtTime(Runnable, long)
- postDelayed(Runnable, long)
- sendEmptyMessage(int)
- sendMessage(Message)
- sendMessageAtTime(Message, long)
- sendMessageDelayed(Message, long)
光看以上的API,你会认为handler可能会发送两种信息,一种是Runnable对象,一种是Message对象,这是主观的理解,但是从源码中我们可以看到,post发出的Runnable对象最后都被封装成了Message对象,源码如下:
    public final boolean post(Runnable r)
    {
       return  sendMessageDelayed(getPostMessage(r), 0);
    }

    private static Message getPostMessage(Runnable r) {
        Message m = Message.obtain();	// 得到空的message
        m.callback = r;	// 将runnable设置为message的callback
        return m;
    }

    public final boolean sendMessageDelayed(Message msg, long delayMillis)
    {
        if (delayMillis < 0) {
            delayMillis = 0;
        }
        return sendMessageAtTime(msg, SystemClock.uptimeMillis() + delayMillis);
} public boolean sendMessageAtTime(Message msg, long uptimeMillis) {
MessageQueue queue = mQueue;
if (queue == null) {
RuntimeException e = new RuntimeException(
this + " sendMessageAtTime() called with no mQueue");
Log.w("Looper", e.getMessage(), e);
return false;
}
return enqueueMessage(queue, msg, uptimeMillis);
}
private boolean enqueueMessage(MessageQueue queue, Message msg, long uptimeMillis) {
msg.target = this; // 将Message的target设置为当前的Handler,然后将消息自己加到消息队列中
if (mAsynchronous) {
msg.setAsynchronous(true);
}
return queue.enqueueMessage(msg, uptimeMillis);
}Handler处理消息
讲完了消息发送,再看一下Handler是如何处理消息的。消息的处理是通过核心方法dispatchMessage(Message msg)与钩子方法handleMessage(Message msg)完成的,源码如下: /**
* Handle system messages here.
*/
public void dispatchMessage(Message msg) {
if (msg.callback != null) {
handleCallback(msg);
} else {
if (mCallback != null) {
if (mCallback.handleMessage(msg)) {
return;
}
}
handleMessage(msg);
}
}
private static void handleCallback(Message message) {
message.callback.run();
}
/**
* Subclasses must implement this to receive messages.
*/
public void handleMessage(Message msg) {
}- 如果Message自带了callback处理,则交给callback处理。例如上文分析的,Handler里通过post(Runnable r)发生一个Runnable对象,则msg的callback对象就被赋值为Runnable对象。
- 如果Handler设置了全局的mCallback,则交给mCallback处理。
- 如果上述都没有,该消息会被交给Handler子类实现的handlerMessage(Message msg)来处理。当然,这需要从Handler派生并重写HandlerMessage函数。
在通过情况下,我们一般都是采用第三种方法,即在子类中通过重载handlerMessage来完成处理工作。
Handler的用处
看完了Handler的发送消息和处理消息,我们来学习一下Handler被称为异步处理大师的真正牛逼之处。Hanlder有两个重要的特点:
1. handler可以在任意线程上发送消息,这些消息会被添加到Handler所属线程的Looper对象的消息队列里。
2. handler是在实例化它的线程中处理消息的。

这解决了Android经典的不能在非主线程中更新UI的问题。Android的主线程也是一个Looper线程,我们在其中创建的Handler将默认关联主线程Looper的消息队列。因此,我们可以在主线程创建Handler对象,在耗时的子线程获取UI信息后,通过主线程的Handler对象引用来发生消息给主线程,通知修改UI,当然消息了还可以包含具体的UI数据。
Message
在整个消息处理机制中,Message又叫做task,封装了任务携带的消息和处理该任务的handler。Message的源码比较简单,源码位置(frameworks/base/core/java/android/os/Message.java)这里简单说明几点注意事项:
1. 尽管Message有public的默认构造方法,但是你应该通过Message.obtain()来从消息池中获得空消息对象,以节省资源,源码如下:
    /**
     * Return a new Message instance from the global pool. Allows us to
     * avoid allocating new objects in many cases.
     */
    public static Message obtain() {
        synchronized (sPoolSync) {
            if (sPool != null) {
                Message m = sPool;
                sPool = m.next;
                m.next = null;
                sPoolSize--;
                return m;
            }
        }
        return new Message();
    }
    /** Constructor (but the preferred way to get a Message is to call {@link #obtain() Message.obtain()}).
    */
    public Message() {
    }
2. 如果你的Message只需要携带简单的int信息,应该优先使用Message.arg1和Message.arg2来传递信息,这比使用Bundler节省内存。
    /**
     * arg1 and arg2 are lower-cost alternatives to using
     * {@link #setData(Bundle) setData()} if you only need to store a
     * few integer values.
     */
    public int arg1;

    /**
     * arg1 and arg2 are lower-cost alternatives to using
     * {@link #setData(Bundle) setData()} if you only need to store a
     * few integer values.
     */
    public int arg2;

    /**
     * Sets a Bundle of arbitrary data values. Use arg1 and arg1 members
     * as a lower cost way to send a few simple integer values, if you can.
     * @see #getData()
     * @see #peekData()
     */
    public void setData(Bundle data) {
        this.data = data;
}示例代码
写了一个子线程利用主线程Handler更新UI的示例代码,如下:
public class MainActivity extends Activity {
	TextView mTextView;
	MyHandler mHandler = new MyHandler();


	@Override
	protected void onCreate(Bundle savedInstanceState) {
		super.onCreate(savedInstanceState);
		setContentView(R.layout.activity_main);

		mTextView = (TextView)findViewById(R.id.test1);
		new Thread(new UpdateTitleTask(mHandler)).start();
	}

	private class MyHandler extends Handler {

		@Override
		public void handleMessage(Message msg) {
			Bundle bundle = msg.getData();
			mTextView.setText(bundle.getString("title", ""));
		}

	}
}
public class UpdateTitleTask implements Runnable{
private Handler handler;
public UpdateTitleTask(Handler handler) {
this.handler = handler;
}
private Message prepareMsg() {
Message msg = Message.obtain();
Bundle bundle = new Bundle();
bundle.putString("title", "From Update Task");;
msg.setData(bundle);
return msg;
}
@Override
public void run() {
try {
Thread.sleep(2000);
Message msg = prepareMsg();
handler.sendMessage(msg);
} catch (InterruptedException e) {
}
}
}参考文献
1. 《深入理解Android 卷一》
2. http://www.cnblogs.com/codingmyworld/archive/2011/09/12/2174255.html


 2800
2800

 被折叠的 条评论
为什么被折叠?
被折叠的 条评论
为什么被折叠?
 到【灌水乐园】发言


