


(接上文《线程基础:线程池(6)——基本使用(中)》,我要加快进度,以便在2月份恢复“系统间通信技术”专栏的写作)
5、扩展ThreadPoolExecutor线程池
实际上JAVA中提供的ThreadPoolExecutor线程池是鼓励各位程序员进行扩展的(虽然大多数情况下您无需扩展),并且JBOSS(Netty)、Apache(Camel)也正是这样在做。下面我们看看一些由ThreadPoolExecutor提供的扩展方式。
5-1、Hook methods
在ThreadPoolExecutor中提供了三个专门供子类覆盖/重写的方法:beforeExecute(Thread t, Runnable r)、afterExecute(Runnable r, Throwable t)和terminated()。这三个方法可以帮助程序员,在线程池处理任务的不同阶段,进行额外的业务处理操作:
beforeExecute:当线程池正要开始执行某个任务的时候(注意不是任务进入等待队列的时候,是将要开始正式在线程池中执行的时候),线程池会触发这个方法的调用。
afterExecute:当线程池完成了某一个任务的执行后,线程池就会触发这个方法。
terminated:当线程池本身停止执行的时候,该方法就会被调用。
下面我们给出一段测试代码,用来为各位读者演示以上几个扩展方法的使用效果:
package test.thread.pool;

import java.util.concurrent.ArrayBlockingQueue;
import java.util.concurrent.BlockingQueue;
import java.util.concurrent.ThreadPoolExecutor;
import java.util.concurrent.TimeUnit;

import org.apache.commons.logging.Log;
import org.apache.commons.logging.LogFactory;
import org.apache.log4j.BasicConfigurator;


/**
 * 一个扩展的线程池,用于测试ThreadPoolExecutor中的扩展方法
 * @author yinwenjie
 *
 */
public class ExtendsPool extends ThreadPoolExecutor {

    static {
        BasicConfigurator.configure();
    }

    /**
     * 日志
     */
    private static Log LOGGER = LogFactory.getLog(ExtendsPool.class);

    public ExtendsPool(int corePoolSize, int maximumPoolSize, long keepAliveTime, TimeUnit unit, BlockingQueue<Runnable> workQueue) {
        super(corePoolSize, maximumPoolSize, keepAliveTime, unit, workQueue);
    }

    /* (non-Javadoc)
     * @see java.util.concurrent.ThreadPoolExecutor#beforeExecute(java.lang.Thread, java.lang.Runnable)
     */
    @Override
    protected void beforeExecute(Thread t, Runnable r) {
        TestRunnable testRunnable = (TestRunnable)r;
        ExtendsPool.LOGGER.info("beforeExecute(Thread t, Runnable r) : " + testRunnable.getIndex());
    }

    /* (non-Javadoc)
     * @see java.util.concurrent.ThreadPoolExecutor#afterExecute(java.lang.Runnable, java.lang.Throwable)
     */
    @Override
    protected void afterExecute(Runnable r, Throwable t) {
        TestRunnable testRunnable = (TestRunnable)r;
        ExtendsPool.LOGGER.info("afterExecute(Runnable r, Throwable t) : " + testRunnable.getIndex());
    }

    /* (non-Javadoc)
     * @see java.util.concurrent.ThreadPoolExecutor#terminated()
     */
    @Override
    protected void terminated() {
        ExtendsPool.LOGGER.info("terminated() !!");
    }

    public static void main(String[] args) throws Throwable {
        // 这个做法,是故意让后续index == 5 - 9的线程进入等待队列。以便观察执行现象
        ExtendsPool extendsPool = new ExtendsPool(5, 5, 10000, TimeUnit.MILLISECONDS, new ArrayBlockingQueue<Runnable>(5));
        for(int index = 0 ; index < 10 ; index ++) {
            // 一定要使用execute,不要使用submit。后文讲解原因
            extendsPool.execute(new TestRunnable(index));
        }

        // 发出停止指令。注意停止指令本身不会等待,要使用awaitTermination进行等待。
        // 注意,按照我们上文讲过的线程池的工作原理,线程池在收到shutdown终止指令后
        // 就不会再接受提交过来的任务了,无论“核心线程”、等待队列处于什么样的状态!
        extendsPool.shutdown();
        // 当所有任务执行完成后,终止线程池的运行
        extendsPool.awaitTermination(Long.MAX_VALUE, TimeUnit.MINUTES);
    }

    /**
     * 这个就是测试用的线程
     * @author yinwenjie
     */
    private static class TestRunnable implements Runnable {

        /**
         * 记录任务的唯一编号,这样在日志中好做识别
         */
        private Integer index;

        public TestRunnable(int index) {
            this.index = index;
        }

        /**
         * @return the index
         */
        public Integer getIndex() {
            return index;
        }

        @Override
        public void run() {
            /*
             * 线程中,就只做一件事情:
             * 等待10秒钟的事件,以便模拟业务操作过程
             * */
            Thread currentThread  = Thread.currentThread();
            synchronized (currentThread) {
                try {
                    currentThread.wait(10000);
                } catch (InterruptedException e) {
                    e.printStackTrace(System.out);
                }
            }
        }
    }
}
以上代码中,我们一共有10个任务,编号分别任0-9。我们使用的线程池只会有5个核心线程,这样是为了让后续index为5-9的任务先进入ArrayBlockingQueue等待队列。我们的意图是将者10个任务分成两批送入线程池中进行运行,并且在10个任务都执行结束后,终止线程池的运行。
以下为上面示例代码的执行效果:
0 [pool-1-thread-2] INFO test.thread.pool.ExtendsPool  - beforeExecute(Thread t, Runnable r) : 1
2 [pool-1-thread-4] INFO test.thread.pool.ExtendsPool  - beforeExecute(Thread t, Runnable r) : 3
1 [pool-1-thread-5] INFO test.thread.pool.ExtendsPool  - beforeExecute(Thread t, Runnable r) : 4
0 [pool-1-thread-1] INFO test.thread.pool.ExtendsPool  - beforeExecute(Thread t, Runnable r) : 0
0 [pool-1-thread-3] INFO test.thread.pool.ExtendsPool  - beforeExecute(Thread t, Runnable r) : 2
10004 [pool-1-thread-2] INFO test.thread.pool.ExtendsPool  - afterExecute(Runnable r, Throwable t) : 1
10004 [pool-1-thread-4] INFO test.thread.pool.ExtendsPool  - afterExecute(Runnable r, Throwable t) : 3
10005 [pool-1-thread-2] INFO test.thread.pool.ExtendsPool  - beforeExecute(Thread t, Runnable r) : 5
10005 [pool-1-thread-4] INFO test.thread.pool.ExtendsPool  - beforeExecute(Thread t, Runnable r) : 6
10008 [pool-1-thread-5] INFO test.thread.pool.ExtendsPool  - afterExecute(Runnable r, Throwable t) : 4
10009 [pool-1-thread-3] INFO test.thread.pool.ExtendsPool  - afterExecute(Runnable r, Throwable t) : 2
10008 [pool-1-thread-1] INFO test.thread.pool.ExtendsPool  - afterExecute(Runnable r, Throwable t) : 0
10010 [pool-1-thread-3] INFO test.thread.pool.ExtendsPool  - beforeExecute(Thread t, Runnable r) : 8
10009 [pool-1-thread-5] INFO test.thread.pool.ExtendsPool  - beforeExecute(Thread t, Runnable r) : 7
10010 [pool-1-thread-1] INFO test.thread.pool.ExtendsPool  - beforeExecute(Thread t, Runnable r) : 9
20006 [pool-1-thread-2] INFO test.thread.pool.ExtendsPool  - afterExecute(Runnable r, Throwable t) : 5
20009 [pool-1-thread-4] INFO test.thread.pool.ExtendsPool  - afterExecute(Runnable r, Throwable t) : 6
20011 [pool-1-thread-3] INFO test.thread.pool.ExtendsPool  - afterExecute(Runnable r, Throwable t) : 8
20012 [pool-1-thread-1] INFO test.thread.pool.ExtendsPool  - afterExecute(Runnable r, Throwable t) : 9
20012 [pool-1-thread-5] INFO test.thread.pool.ExtendsPool  - afterExecute(Runnable r, Throwable t) : 7
20013 [pool-1-thread-5] INFO test.thread.pool.ExtendsPool  - terminated() !!
5-2、execute方法和submit方法的区别
上面的示例代码中,我们使用的是execute方法来提交任务;而上文有的示例代码中,我们使用的是submit方法提交任务。ThreadPoolExecutor线程池中,这两种方法提交任务都是可以的,但是他们的工作原理是不一样的:
execute方法:所有实现了Runnable接口的任务都可以使用execute方法进行提交。而实现了Runnable接口的任务,并没有提供任何“标准”的方式为我们返回任务的执行结果(这是我们还没有讲到的知识点)。线程在线程池中运行结束了,就结束了。所以,使用execute方法提交的任务,程序员并不能在任务执行完成后,获得一个“标准”的执行结果。
submit方法:submit方法提交的任务是实现了Callable接口的任务(这是我们还没有讲到的知识点)。Callable接口的特性是,在其运行完成后,会返回一个“标准”的执行结果。
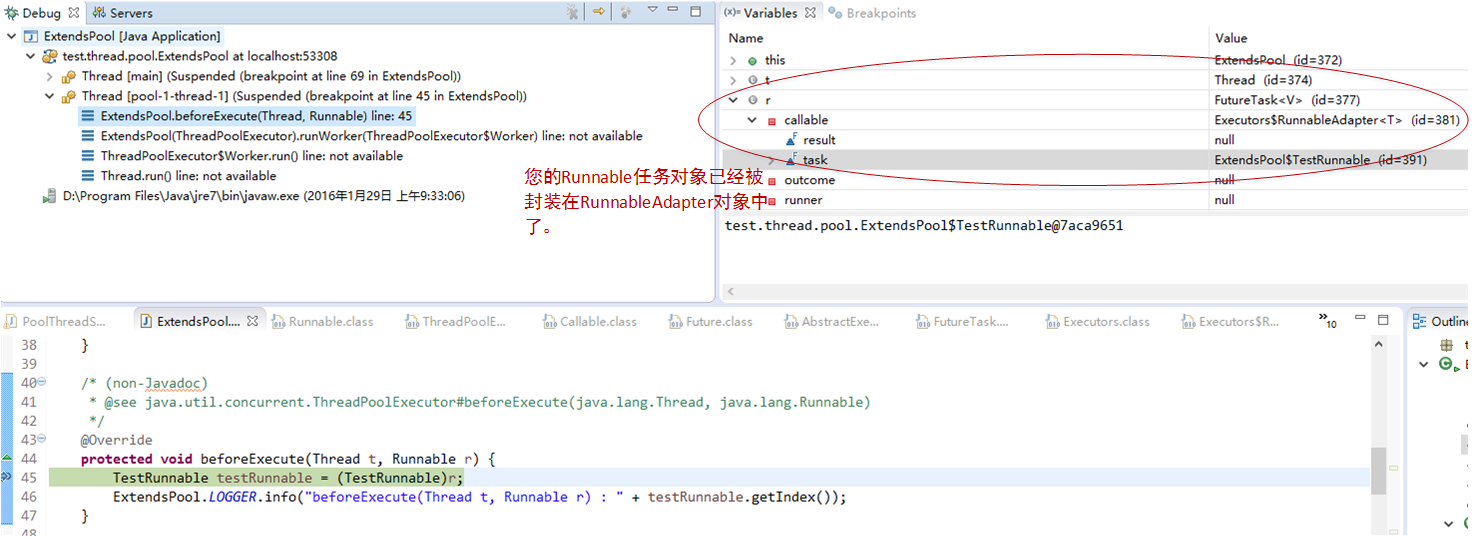
但有的读者可能会问,不是说submit方法也可以提交实现Runnable接口的任务吗?你之前也是这么使用的。是的,submit方法也可以提交实现Runnable接口的任务,但是处理方式和execute方法的处理方式完全不同:使用submit方法提交的实现了Runnable接口的任务,将会被封装到 线程池内部使用Executors工具中callable方法创建的RunnableAdapter对象中。源代码片段如下:
// JAVA提供的Executors 工具类
public class Executors {
    。。。。。。
    // 这个工具方法可以将一个Runnable任务转换为一个Callable任务
    public static <T> Callable<T> callable(Runnable task, T result) {
        if (task == null)
            throw new NullPointerException();
        return new RunnableAdapter<T>(task, result);
    }

    // 实际上您提交的任务,作为了这个类的一个属性。
    static final class RunnableAdapter<T> implements Callable<T> {
        final Runnable task;
        final T result;
        RunnableAdapter(Runnable task, T result) {
            this.task = task;
            this.result = result;
        }
        public T call() {
            task.run();
            return result;
        }
    }
    。。。。。。
}
所以为什么在5-1小结第一段示例代码中,我会说明只能使用extendsPool.execute提交任务, 而不要使用extendsPool.submit提交任务。因为如果使用extendsPool.submit提交任务,那么您使用的hook method:beforeExecute和afterExecute,虽然可以拿到一个Runnable对象,但是这个Runnable对象却不是您创建的Runnable任务本身。而是一个FutureTask对象,里面封装了一个RunnableAdapter对象,在RunnableAdapter对象里面,才是您的Runnable任务本身:
如果您非要使用submit提交任务,那么在执行到:TestRunnable testRunnable = (TestRunnable)r; 的时候,就会抛出对象类型转换错误(不过您理解了原因后,当然可以改示例代码了)。我们在后续的文章中,将专门花一定的篇幅介绍Callable接口。
6、工具类
6-1、Executors工具类
Executors是一个用于创建各种线程池特性的工具类。通常情况下,您使用这个工具类创建的线程池就可以涵盖90%以上的业务场景了。
如果您观察一下Executors类的源代码,您就可以发现Executors工具类实际上就是帮助您完成了特定线程池的创建过程。
- 创建一个固定大小的ThreadPoolExecutor线程池:
public static ExecutorService newFixedThreadPool(int nThreads) {
    return new ThreadPoolExecutor(nThreads, nThreads,
                                  0L, TimeUnit.MILLISECONDS,
                                  new LinkedBlockingQueue<Runnable>());
}
以上代码片段就是Executors工具类创建固定大小的ThreadPoolExecutor线程池的过程。实际上就是把corePoolSize 和maximumPoolSize 的值设置成一样,也就是线程池中只有“核心线程”——那些创建了就不会回收的线程。并且线程池的等待队列设置为LinkedBlockingQueue——一种没有数量限制的先进先出队列。
- 创建一个只有一个线程的ThreadPoolExecutor线程池:
public static ExecutorService newSingleThreadExecutor() {
  return new FinalizableDelegatedExecutorService
        (new ThreadPoolExecutor(1, 1,
                                0L, TimeUnit.MILLISECONDS,
                                new LinkedBlockingQueue<Runnable>()));
}
这段代码在Executors工具类中,用于创建只有一个固定线程的线程池。即corePoolSize 和maximumPoolSize的值都等于1。这根线程也不会被回收,然后将LinkedBlockingQueue这个无大小限制的先进先出队列中的每个任务,按照顺序进行处理。
显然,处理的即时性并不是这中特性的线程池关心的重点;它的重点显然是保证LinkedBlockingQueue中的等待任务能够按照既定顺序被处理。
- 创建一个“Cache”线程池:
public static ExecutorService newCachedThreadPool() {
  return new ThreadPoolExecutor(0, Integer.MAX_VALUE,
                                  60L, TimeUnit.SECONDS,
                                  new SynchronousQueue<Runnable>());
}谁说corePoolSize的大小不能为0?!,当只有maximumPoolSize参数有值的时候,代表无论什么时候,线程池中等待超时的线程都将会被回收。注意,CachedThreadPool所设置的等待队列的类型是SynchronousQueue,意味着任务将会立即被送入线程池执行(如果这时没有空闲的线程,则立即创建新的线程)。
- 将一个Runnable接口转换成Callable接口:
public static <T> Callable<T> callable(Runnable task, T result) {
    if (task == null)
        throw new NullPointerException();
    return new RunnableAdapter<T>(task, result);
}
这又是Executors提供的一个好用的工具方法,将没有执行值返回的Runnable接口的实现,转换为一个有执行返回值的Callable接口。就像上文提到的一样,ThreadPoolExecutor类中的submit(Runnable task)方法,就是使用这种方式实现了Runnable接口 到 Callable接口的转变的。
6-2、对象池:Apache中的扩展?
在百度或者Google上,您可以搜索:“common-pool2 线程池”,并且找到很多搜索结果。本来在写作之初,我想在介绍JAVA原生线程池的时候,顺便介绍Apache-common-pool2中提供的对象池的使用。但是后来想想其实这两者并没有什么直接连接,而且两者的差异实际上比较大:
线程池中运行的就是线程,如果你使用JConsole或者jvisualvm等监控工具,通过JMX协议你可以看到线程池中运行的每一个线程,并作dump操作;对象池是对一组实例对象进行管理的集合,对象池不会因为要生成、发送、回收某一个对象,就为某一次执行创建一个线程。如果硬是要将对象池和线程池做硬性的关联,那就只有一种情况:“拥有线程对象的对象池”。这样的问题是,对象池并没有提供像线程池那样针对线程管理所需要的特定方法。
例如,拥有线程对象的对象池并没有“等待队列”的特性;再例如,拥有线程对象的对象池,并没有义务启动线程、回收多余线程。也就是说它没有管理线程执行过程的义务,只负责创建线程对象、回收线程对象;所有使用对象池管理线程对象的做法是不科学的。
6-3、ThreadPoolExecutor中常用属性含义
这一小节,我们看着ThreadPoolExecutor的源代码,再来总结一下ThreadPoolExecutor线程池中我们已经介绍过和没有介绍过的属性。当然在实际工作中,您不需要随时随地的记住这些属性的含义,但是理解这些属性的意义,至少可以在同事面前炫一下,哈哈:
/**
 * 等待队列,这几篇文章我们已经花了很大的篇幅来介绍线程池的等待队列
 */
private final BlockingQueue<Runnable> workQueue;

/**
 * ReentrantLock是JDK 1.5中引入的一个锁机制,后续的文章我会专门讲解ReentrantLock锁。
 * 线程池主要在创建线程、回收线程、终止等操作的时候,使用ReentrantLock,保证线程池对象中的状态一致性
 */
private final ReentrantLock mainLock = new ReentrantLock();

/**
 * 线程池中一个任务就是一个worker,这个集合用于存储正在线程池中运行的任务
 */
private final HashSet<Worker> workers = new HashSet<Worker>();

/**
 * 这个参数记录,线程池曾经达到过的最大的“池大小”
 */
private int largestPoolSize;

/**
 * 这个属性记录线程池已经完成的任务数量
 */
private long completedTaskCount;

/*
 * All user control parameters are declared as volatiles so that
 * ongoing actions are based on freshest values, but without need
 * for locking, since no internal invariants depend on them
 * changing synchronously with respect to other actions.
 */

/**
 * 创建线程使用的线程工程
 */
private volatile ThreadFactory threadFactory;

/**
 * 指定的“拒绝处理器”,系统中还有一个默认的“拒绝处理器”:defaultHandler =new AbortPolicy();
 */
private volatile RejectedExecutionHandler handler;

/**
 * 空闲线程在等待工作时间超时。
 */
private volatile long keepAliveTime;

/**
 * 是否在超过等待时间后,就连线程池中小于corePoolSize的“核心线程”对象也进行回收。
 * 默认情况为false
 */
private volatile boolean allowCoreThreadTimeOut;

/**
 * “核心线程”的大小。小于或者等于这个数量的线程,即便超过keepAliveTime也不会被回收,
 * 除非allowCoreThreadTimeOut设置为true
 */
private volatile int corePoolSize;

/**
 * 线程池中最大的线程数量
 */
private volatile int maximumPoolSize;

/**
 * 默认的“拒绝处理器”
 */
private static final RejectedExecutionHandler defaultHandler =new AbortPolicy();
6-4、与spring结合
当然JAVA的ThreadPoolExecutor线程池还可以和Spring框架集成在一起。如果您理解Spring的容器原理,您就知道不能使用new关键字创建ThreadPoolExecutor线程池了。如果您不具备Spring的知识,请参考相关学习资料。
下面我为读者提供一段我自己在工作中使用的spring配置,将ThreadPoolExecutor线程池注入到Spring容器中。这样做的目的,是为了将某个线程中处理的任务置于Spring容器的控制下。
<bean id="smsServerThreadPoolExecutor" scope="singleton" class="java.util.concurrent.ThreadPoolExecutor">
        <constructor-arg  value="${sms.corePoolSize}" type="int"></constructor-arg>
        <constructor-arg  value="${sms.maximumPoolSize}" type="int"></constructor-arg>
        <constructor-arg  value="${sms.keepAliveTime}" type="long"></constructor-arg>
        <constructor-arg  value="MILLISECONDS"  type="java.util.concurrent.TimeUnit"></constructor-arg>
        <constructor-arg  ref="smsWaitingThreadQueue"></constructor-arg>
    </bean>

    <bean id="smsWaitingThreadQueue" class="java.util.concurrent.LinkedBlockingQueue"></bean>
7、后记
线程池的介绍到此告一段落,之前本来计划两篇文章写完,但是后面越写越多,说到某一个知识点就想在深入下去,一时停不下来,所以之后变成了三篇文章。后面我将开始线程间通讯和工作协调的讲解。感谢各位读者对我的支持,如果有任何的疑问,或者不同意我文章的观点,可以给我留言,尽情讨论。目前我写了42片文章,已经收到了两个“踩”,说明我的讲解能力和归纳能力真的还有可以进一步提高。


 733
733


 被折叠的 条评论
为什么被折叠?
被折叠的 条评论
为什么被折叠?
 到【灌水乐园】发言


