


1.动画的基本概念
- 动画的使⽤场景:iOS中的动画是指一些视图上的过渡效果,合理利用动画能提⾼用户体验,UIView动画影响的属性 frame:视图框架 center:视图位置 alpha:视图透明度 bounds:视图⼤小 transform:视图转换 backgroundColor:背景颜⾊,动画分类
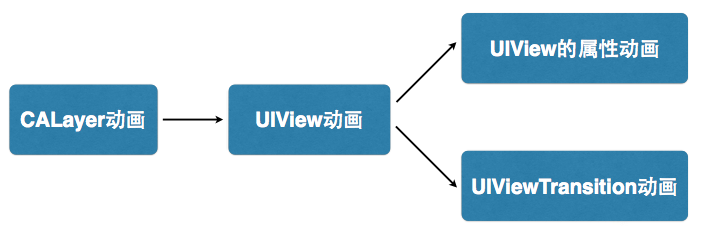
- UIView动画
1) UIView动画的设置
2) UIView动画的实现 动画块–>block
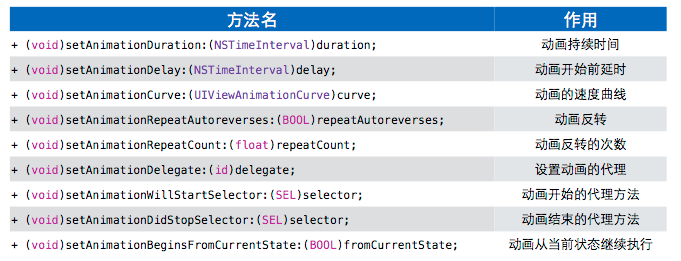
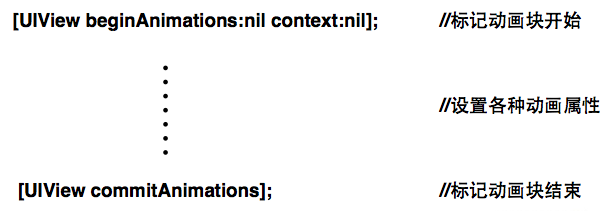
3) UIView动画块的用法
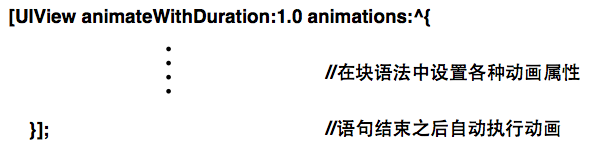
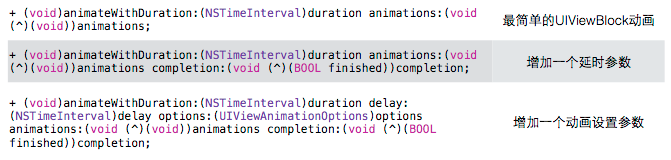
4) UIViewBlock动画的用法
5) UIViewBlock动画的API
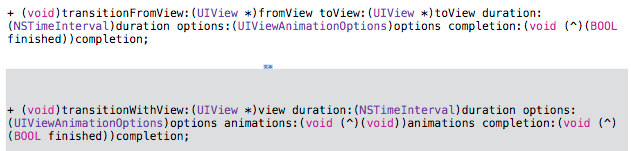
6) UIViewTransition的API
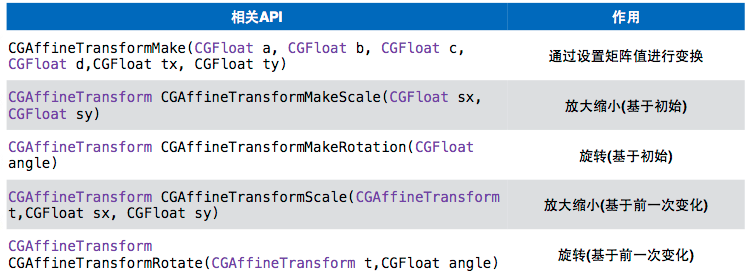
- CGAffineTransform2D仿射变换 , CGAffineTransform的使用:CGAffineTransform是结构体,表⽰一个矩阵,⽤于映射视图变换。缩放、旋转、偏移是仿射变换支持的最常用的操作,是区分“基于上一次”和“基于初始”。CGAffineTransfrom的API
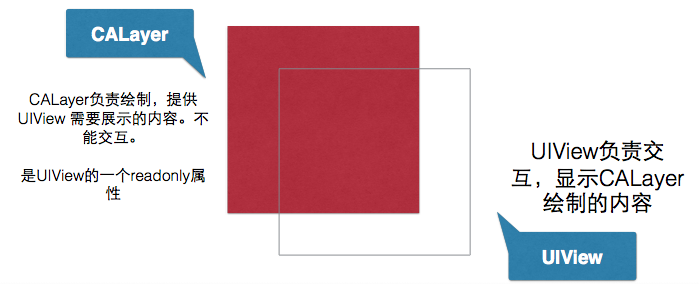
- CALayer
1) UIView和CALayer的区别和联系
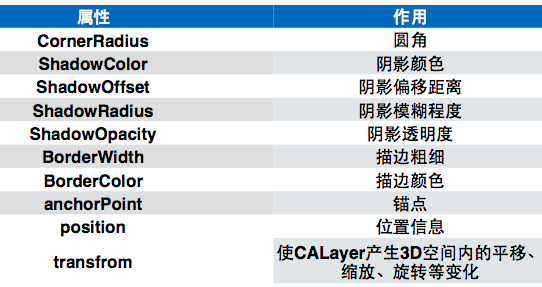
2) CALayer的常用属性
3) anchorPoint锚点(取值为[0,1]),默认为视图中心,值为(0.5,0.5),坐标上值为(1,1); position位置,是锚点基于父视图原点的位置,这两点是指同一点(重合),position,anchorPoint,frame三个中任意一个发生变化,其它两个都会发生变化
4) layer主要负责显示控件的一些设置属性,比如边框和弧度等,layer动画的种类很多,我们看见的UIView的动画也是封装了几个layer动画.动画都添加在layer层上,是动画的触发核心
5) anchorPoint和position
- CAAnimation动画
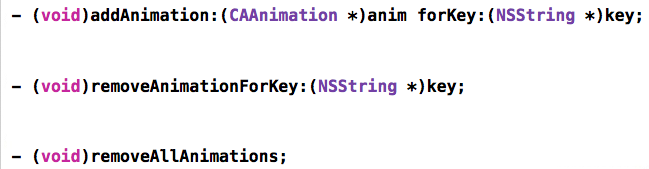
1) CAAnimation是抽象类,通常使用它的子类实现动画效果,所有CAAnimation及其子类的对象都添加在View的layer上,例如: [view.layer addAnimation:animation forKey:nil];
2) 给layer添加/移除CALayer动画
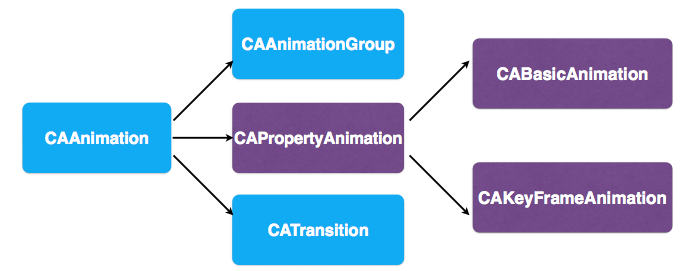
3) CAAnimation相关子类
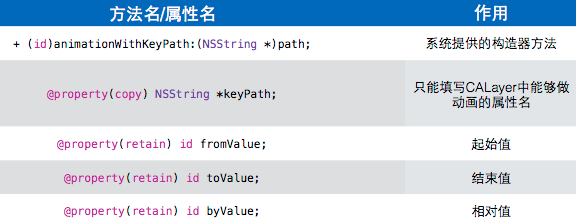
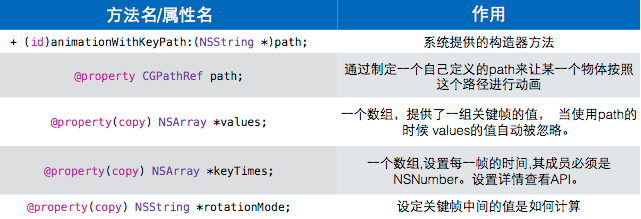
4) CAPropertyAnimation也是一个抽象类,通常我们都使用它的两个子类:CABasicAnimation和 CAKeyFrameAnimation
5) CABasicAnimation作用:基本layer动画,通过设定初始和结束值执行动画
6) CAKeyFrameAnimation作用:关键帧动画,可以让你的view的layer按照预定轨迹做动画
7) CATrasition作用:layer的过渡动画,有两个主要属性:type(设置过渡动画的效果)和subType(设置过渡动画的方向)
8) CAAnimationGroup只有一个数组属性,可以添加多个 CAAnimation,一起执行
2.简单运用
通过Main.storyboard创建3个button,然后添加成点击方法
#import "ViewController.h"
@interface ViewController ()
- (IBAction)UIViewAction:(id)sender;
- (IBAction)transformAction:(id)sender;
- (IBAction)layerAction:(id)sender;
@property(nonatomic,retain)UIImageView *imageView;
@end
@implementation ViewController
- (void)viewDidLoad {
    [super viewDidLoad];
    //创建一个imageView用来展示动画
    self.imageView = [[UIImageView alloc] initWithImage:[UIImage imageNamed:@"bg8.jpg"]];
    self.imageView.frame = CGRectMake(100, 350, 100, 100);
    [self.view addSubview:self.imageView];
}
第一种 : UIView提供的动画方法
- (IBAction)UIViewAction:(id)sender {
    //1.第一种:不重复有去不回
    [UIView animateWithDuration:3 animations:^{
        self.imageView.frame = CGRectMake(100, 100, 300, 300);
    }];
    //2.第二种:不重复有去有回
    [UIView animateWithDuration:3 animations:^{
        self.imageView.frame = CGRectMake(100, 100, 300, 300);
        self.imageView.alpha = 0;
    } completion:^(BOOL finished) {//动画结束时的动作
        [UIView animateWithDuration:3 animations:^{
            self.imageView.frame = CGRectMake(100, 350, 100, 100);
            self.imageView.alpha = 1;
        }];
    }];
    //3.第三种,只能重复动画部分的内容
    [UIView animateWithDuration:3 delay:1 options:UIViewAnimationOptionRepeat animations:^{
        self.imageView.frame = CGRectMake(100, 100, 300, 300);
        self.imageView.alpha = 0;
    } completion:^(BOOL finished) {//由于重复执行没有结束,所以下面的代码不会走
        [UIView animateWithDuration:3 animations:^{
            self.imageView.frame = CGRectMake(100, 350, 100, 100);
            self.imageView.alpha = 1;
        }];
    }];
    //4.第四种: 颤抖动画,第三个参数:越小抖动越剧烈 第四个参数:越大初速度越大
    [UIView animateWithDuration:3 delay:1 usingSpringWithDamping:0.1 initialSpringVelocity:100 options:UIViewAnimationOptionRepeat animations:^{
        self.imageView.frame = CGRectMake(100, 100, 300, 300);
        self.imageView.alpha = 0;
    } completion:^(BOOL finished) {//由于重复执行没有结束,所以下面的代码不会走
        self.imageView.frame = CGRectMake(100, 350, 100, 100);
        self.imageView.alpha = 1;
    }];
}
第二种 : CGAffineTransform 2D仿射变换,不属于动画
//CGAffineTransform  2D仿射变换,不属于动画
- (IBAction)transformAction:(id)sender {
    //对视图进行旋转的操作 第二个参数:设置旋转的弧度,每点击一次旋转M_PI_4
    self.imageView.transform = CGAffineTransformRotate(self.imageView.transform, M_PI_4);
    //对视图的缩放 后两个参数设置缩放比例,每点击一次变为点击前的0.9倍大小
    self.imageView.transform = CGAffineTransformScale(self.imageView.transform, 0.9,0.9);
    //设置视图的偏移量,每点击一次向左移10,向下移10
    self.imageView.transform = CGAffineTransformTranslate(self.imageView.transform, -10, 10);
}
第三种 : CAAnimation动画
- (IBAction)layerAction:(id)sender {
    //layer 动画第一种:CATransition  枚举动画效果
    CATransition *transition = [CATransition animation];
    //设置动画种类:首字母必须小写
    transition.type = @"rippleEffect";
    [transition setDuration:3];
    //动画重复次数,NSIntegerMax整数最大值
    [transition setRepeatCount:NSIntegerMax];
    //向imageview上添加动画效果,添加到imageView的layer上
    [self.imageView.layer addAnimation:transition forKey:@"transition"];

    typedef enum : NSUInteger {
        Fade = 1,                   //淡入淡出
        Push,                       //推挤
        Reveal,                     //揭开
        MoveIn,                     //覆盖
        Cube,                       //立方体
        SuckEffect,                 //吮吸
        OglFlip,                    //翻转
        RippleEffect,               //波纹
        PageCurl,                   //翻页
        PageUnCurl,                 //反翻页
        CameraIrisHollowOpen,       //开镜头
        CameraIrisHollowClose,      //关镜头
        CurlDown,                   //下翻页
        CurlUp,                     //上翻页
        FlipFromLeft,               //左翻转
        FlipFromRight,              //右翻转
    } AnimationType;

    //layer 动画第二种(1):CABasicAnimation 让图片进行自动放大
    CABasicAnimation *basic = [CABasicAnimation animationWithKeyPath:@"transform.scale"];
    //对动画设置很多需要kvc的方式赋值,就是需要通过给定一个key,再去设值
    //这个动画设置的是一个缩放效果,所以需要给定一个开始的初始值
    basic.fromValue = [NSNumber numberWithInt:1];
    //再设置一个结束值
    basic.toValue = [NSNumber numberWithInt:2];
    //动画时长和次数
    [basic setDuration:3];
    [basic setRepeatCount:NSIntegerMax];
    //向imageview上添加动画效果,添加到imageView的layer上
    [self.imageView.layer addAnimation:basic forKey:@"basic"];

    //layer 动画第二种(2):CABasicAnimation 让图片进行自动旋转
    CABasicAnimation *basicRot = [CABasicAnimation animationWithKeyPath:@"transform.rotation"];
    //设置角度
    basicRot.fromValue = [NSNumber numberWithFloat:0.0];
    basicRot.toValue = [NSNumber numberWithFloat:2*M_PI];
    //设置动画时长和次数
    [basicRot setDuration:3];
    [basicRot setRepeatCount:NSIntegerMax];
    [self.imageView.layer addAnimation:basicRot forKey:@"basicRot"];
    [basicRot setAutoreverses:YES];

    //layer 动画第三种:CAKeyframeAnimation 关键帧动画,通过制定的路劲让图片自己动画移动
    CAKeyframeAnimation *keyAnimation = [CAKeyframeAnimation animationWithKeyPath:@"position"];
    //给动画创建一个行走的路径,用来记录移动的关键坐标
    CGMutablePathRef path = CGPathCreateMutable();
    //指定起始的坐标位置,四个参数:1.用path来保存起始路径 2.NULL 34.要移动的控件的起始坐标
    CGPathMoveToPoint(path, NULL, self.imageView.frame.origin.x, self.imageView.frame.origin.y);
    //设置图片移动的轨迹
    CGPathAddLineToPoint(path, NULL, 100, 100);
    CGPathAddLineToPoint(path, NULL, 10, 20);
    CGPathAddLineToPoint(path, NULL, 50, 10);
    CGPathAddLineToPoint(path, NULL, 140, 200);
    //给视图设置一条曲线的路径
    CGPathAddCurveToPoint(path, NULL, 200, 200, 100, 120, 120, 40);
    CGPathAddCurveToPoint(path, NULL, 12, 24, 44, 120, 300, 100);
    CGPathAddCurveToPoint(path, NULL, 23, 53, 534, 234, 234, 322);
    CGPathAddCurveToPoint(path, NULL, 2, 345, 342, 343, 43, 453);
    //设置动画时长和次数
    [keyAnimation setDuration:5];
    [keyAnimation setRepeatCount:NSIntegerMax];
    [keyAnimation setPath:path];
    [self.imageView.layer addAnimation:keyAnimation forKey:@"keyAnimation"];
}
3.理解position与anchorPoint
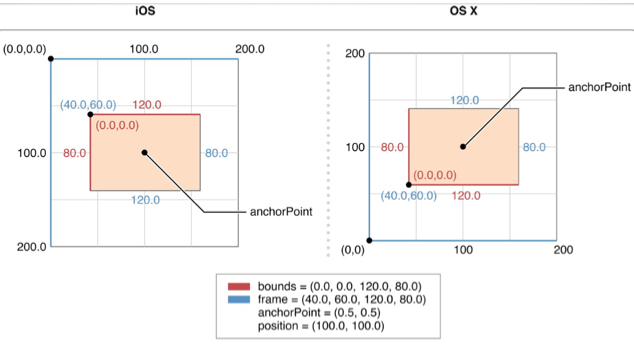
每一个UIView内部都默认关联着一个CALayer, UIView有frame、bounds和center三个属性,CALayer也有类似的属性,分别为frame、bounds、position、anchorPoint。frame和bounds比较好理解,bounds可以视为x坐标和y坐标都为0的frame
在iOS中,anchorPoint点的值是用一种相对bounds的比例值来确定的,在白纸的左上角、右下角,anchorPoint分为为(0,0), (1, 1),也就是说anchorPoint是在单元坐标空间(同时也是左手坐标系)中定义的。类似地,可以得出在白纸的中心点、左下角和右上角的anchorPoint为(0.5,0.5), (0,1), (1,0)。
像UIView有superView与subView的概念一样,CALayer也有superLayer与layer的概念,前面说到的白纸和图中的矩形可以理解为layer,书桌和图中矩形以外的坐标系可以理解成superLayer。如果各自以左上角为原点,则在图中有相对的两个坐标空间。
这时候可以大胆猜测一下,position就是anchorPoint在superLayer中的位置,更确切地说,position是layer中的anchorPoint点在superLayer中的位置坐标。因此可以说, position点是相对suerLayer的,anchorPoint点是相对layer的,两者是相对不同的坐标空间的一个重合点。
anchorPoint的默认值为(0.5,0.5),也就是anchorPoint默认在layer的中心点。默认情况下,使用addSublayer函数添加layer时,如果已知layer的frame值,根据上面的结论,那么position的值便可以用下面的公式计算:
position.x = frame.origin.x + 0.5 * bounds.size.width;
position.y = frame.origin.y + 0.5 * bounds.size.height;
里面的0.5是因为anchorPoint取默认值,更通用的公式应该是下面的:
position.x = frame.origin.x + anchorPoint.x * bounds.size.width;
position.y = frame.origin.y + anchorPoint.y * bounds.size.height;
如果单方面修改layer的position位置或anchorPoint位置两者互不影响,受影响的只会是frame.origin,也就是layer坐标原点相对superLayer会有所改变。换句话说,frame.origin由position和anchorPoint共同决定,上面的公式可以变换成下面这样的:
frame.origin.x = position.x - anchorPoint.x * bounds.size.width;
frame.origin.y = position.y - anchorPoint.y * bounds.size.height;
这就解释了为什么修改anchorPoint会移动layer,因为position不受影响,只能是frame.origin做相应的改变,因而会移动layer。
当你设置图层的frame属性的时候,position点的位置(也就是position坐标)根据锚点(anchorPoint)的值来确定,而当你设置图层的position属性的时候,bounds的位置(也就是frame的orgin坐标)会根据锚点(anchorPoint)来确定。
在实际情况中,可能还有这样一种需求,我需要修改anchorPoint,但又不想要移动layer也就是不想修改frame.origin,那么根据前面的公式,就需要position做相应地修改。简单地推导,可以得到下面的公式:
positionNew.x = positionOld.x + (anchorPointNew.x - anchorPointOld.x) * bounds.size.width
positionNew.y = positionOld.y + (anchorPointNew.y - anchorPointOld.y) * bounds.size.height
但是在实际使用没必要这么麻烦。修改anchorPoint而不想移动layer,在修改anchorPoint后再重新设置一遍frame就可以达到目的,这时position就会自动进行相应的改变。写成函数就是下面这样的:
- (void) setAnchorPoint:(CGPoint)anchorpoint forView:(UIView *)view{
CGRect oldFrame = view.frame;
view.layer.anchorPoint = anchorpoint;
view.frame = oldFrame;
}
总结
1、position是layer中的anchorPoint在superLayer中的位置坐标。
2、互不影响原则:单独修改position与anchorPoint中任何一个属性都不影响另一个属性。
3、frame、position与anchorPoint有以下关系:
frame.origin.x = position.x - anchorPoint.x * bounds.size.width;
frame.origin.y = position.y - anchorPoint.y * bounds.size.height;
第2条的互不影响原则还可以这样理解:position与anchorPoint是处于不同坐标空间中的重合点,修改重合点在一个坐标空间的位置不影响该重合点在另一个坐标空间中的位置。


 2057
2057


 被折叠的 条评论
为什么被折叠?
被折叠的 条评论
为什么被折叠?
 到【灌水乐园】发言


