


artic from:http://bigdatahandler.com/2013/11/02/installing-single-node-hadoop-2-2-0-on-ubuntu/
Please find the complete step by step process for installing Hadoop 2.2.0 stable version on Ubuntu as requested by many of this blog visitors, friends and subscribers.
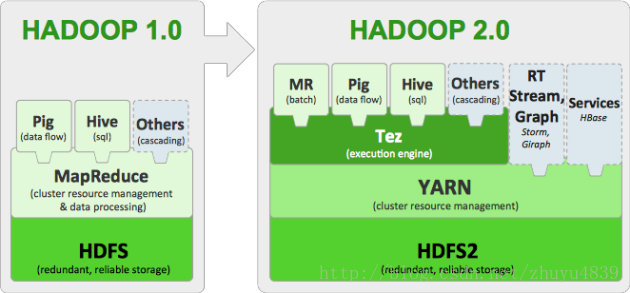
Apache Hadoop 2.2.0 release has significant changes compared to its previous stable release, which is Apache Hadoop 1.2.1(Setting up Hadoop 1.2.1 can be found here).
In short , this release has a number of changes compared to its earlier version 1.2.1:
- YARN – A general purpose resource management system for Hadoop to allow MapReduce and other data processing frameworks like Hive, Pig and Services
- High Availability for HDFS
- HDFS Federation, Snapshots
- NFSv3 access to data in HDFS
- Introduced Application Manager to manage the application life cycle
- Support for running Hadoop on Microsoft Windows
- HDFS – Symlinks feature is disabled & will be taken out in future versions
- Jobtracker has been replaced with Resource Manager and Node Manager
Before starting into setting up Apache Hadoop 2.2.0, please understand the concepts of Big Data and Hadoop from my previous blog posts:
Big Data Characteristics, Problems and Solution.
Setting up Single node Hadoop Cluster.
Setting up Multi node Hadoop Cluster.
Understanding HDFS architecture (in comic format).
Setting up the environment:
In this tutorial you will know step by step process for setting up a Hadoop Single Node cluster, so that you can play around with the framework and learn more about it.
In This tutorial we are using following Software versions, you can download same by clicking the hyperlinks:
- Ubuntu Linux 12.04.3 LTS
- Hadoop 2.2.0, released in October, 2013
If you are using putty to access your Linux box remotely, please install openssh by running this command, this also helps in configuring SSH access easily in the later part of the installation:
sudo apt-get install openssh-server
Prerequisites:
- Installing Java v1.7
- Adding dedicated Hadoop system user.
- Configuring SSH access.
- Disabling IPv6.
Before starting of installing any applications or softwares, please makes sure your list of packages from all repositories and PPA’s is up to date or if not update them by using this command:
sudo apt-get update

1. Installing Java v1.7:
For running Hadoop it requires Java v1. 7+
a. Download Latest oracle Java Linux version of the oracle website by using this command
wget https://edelivery.oracle.com/otn-pub/java/jdk/7u45-b18/jdk-7u45-linux-x64.tar.gz
If it fails to download, please check with this given command which helps to avoid passing username and password.
wget --no-cookies --no-check-certificate --header "Cookie: gpw_e24=http%3A%2F%2Fwww.oracle.com" "https://edelivery.oracle.com/otn-pub/java/jdk/7u45-b18/jdk-7u45-linux-x64.tar.gz"


b. Unpack the compressed Java binaries, in the directory:
sudo tar xvzf jdk-7u25-linux-x64.tar.gz

c. Create a Java directory using mkdir under /user/local/ and change the directory to /usr/local/Java by using this command
mkdir -R /usr/local/Java
cd /usr/local/Java

d. Copy the Oracle Java binaries into the /usr/local/Java directory.
sudo cp -r jdk-1.7.0_45 /usr/local/java

e. Edit the system PATH file /etc/profile and add the following system variables to your system path
sudo nano /etc/profile or sudo gedit /etc/profile
![]()
f. Scroll down to the end of the file using your arrow keys and add the following lines below to the end of your /etc/profile file:
JAVA_HOME=/usr/local/Java/jdk1.7.0_45
PATH=$PATH:$HOME/bin:$JAVA_HOME/bin
export JAVA_HOME
export PATH

g. Inform your Ubuntu Linux system where your Oracle Java JDK/JRE is located. This will tell the system that the new Oracle Java version is available for use.
sudo update-alternatives --install "/usr/bin/javac" "javac" "/usr/local/java/jdk1.7.0_45/bin/javac" 1
sudo update-alternatvie --set javac /usr/local/Java/jdk1.7.0_45/bin/javac

- This command notifies the system that Oracle Java JDK is available for use
h. Reload your system wide PATH /etc/profile by typing the following command:
. /etc/profile
Test to see if Oracle Java was installed correctly on your system.
Java -version

2. Adding dedicated Hadoop system user.
We will use a dedicated Hadoop user account for running Hadoop. While that’s not required but it is recommended, because it helps to separate the Hadoop installation from other software applications and user accounts running on the same machine.
a. Adding group:
sudo addgroup Hadoop
b. Creating a user and adding the user to a group:
sudo adduser –ingroup Hadoop hduser
It will ask to provide the new UNIX password and Information as shown in below image.

3. Configuring SSH access:
The need for SSH Key based authentication is required so that the master node can then login to slave nodes (and the secondary node) to start/stop them and also local machine if you want to use Hadoop with it. For our single-node setup of Hadoop, we therefore need to configure SSH access to localhost for the hduser user we created in the previous section.
Before this step you have to make sure that SSH is up and running on your machine and configured it to allow SSH public key authentication.
Generating an SSH key for the hduser user.
a. Login as hduser with sudo
b. Run this Key generation command:
ssh-keyegen -t rsa -P ""

c. It will ask to provide the file name in which to save the key, just press has entered so that it will generate the key at ‘/home/hduser/ .ssh’
d. Enable SSH access to your local machine with this newly created key.
cat $HOME/.ssh/id_rsa.pub >> $HOME/.ssh/authorized_keys
e. The final step is to test the SSH setup by connecting to your local machine with the hduser user.
ssh hduser@localhost
This will add localhost permanently to the list of known hosts

4. Disabling IPv6.
We need to disable IPv6 because Ubuntu is using 0.0.0.0 IP for different Hadoop configurations. You will need to run the following commands using a root account:
sudo gedit /etc/sysctl.conf
Add the following lines to the end of the file and reboot the machine, to update the configurations correctly.
#disable ipv6
net.ipv6.conf.all.disable_ipv6 = 1
net.ipv6.conf.default.disable_ipv6 = 1
net.ipv6.conf.lo.disable_ipv6 = 1


Hadoop Installation:
Go to Apache Downloadsand download Hadoop version 2.2.0 (prefer to download any stable versions)
i. Run this following command to download Hadoop version 2.2.0
wget http://apache.mirrors.pair.com/hadoop/common/stable2/hadoop-2.2..tar.gz
![]()
ii. Unpack the compressed hadoop file by using this command:
tar –xvzf hadoop-2.2.0.tar.gz

iii. move hadoop-2.2.0 to hadoop directory by using give command
mv hadoop-2.2.0 hadoop

iv. Move hadoop package of your choice, I picked /usr/local for my convenience
sudo mv hadoop /usr/local/
v. Make sure to change the owner of all the files to the hduser user and hadoop group by using this command:
sudo chown -R hduser:hadoop Hadoop

Configuring Hadoop:
The following are the required files we will use for the perfect configuration of the single node Hadoop cluster.
a. yarn-site.xml:
b. core-site.xml
c. mapred-site.xml
d. hdfs-site.xml
e. Update $HOME/.bashrc
We can find the list of files in Hadoop directory which is located in
cd /usr/local/hadoop/etc/hadoop


a.yarn-site.xml:
<configuration>
<!-- Site specific YARN configuration properties -->
<property>
<name>yarn.nodemanager.aux-services</name>
<value>mapreduce_shuffle</value>
</property>
<property>
<name>yarn.nodemanager.aux-services.mapreduce.shuffle.class</name>
<value>org.apache.hadoop.mapred.ShuffleHandler</value>
</property>
</configuration>

b. core-site.xml:
i. Change the user to “hduser”. Change the directory to /usr/local/hadoop/conf and edit the core-site.xml file.
vi core-site.xml
ii. Add the following entry to the file and save and quit the file:
<configuration>
<property>
<name>fs.default.name</name>
<value>hdfs://localhost:9000</value>
</property>
</configuration>

c. mapred-site.xml:
If this file does not exist, copy mapred-site.xml.template as mapred-site.xml
i. Edit the mapred-site.xml file
vi mapred-site.xml
ii. Add the following entry to the file and save and quit the file.
<configuration>
<property>
<name>mapreduce.framework.name</name>
<value>yarn</value>
</property>
</configuration>

d. hdfs-site.xml:
i. Edit the hdfs-site.xml file
vi hdfs-site.xml
ii. Create two directories to be used by namenode and datanode.
mkdir -p $HADOOP_HOME/yarn_data/hdfs/namenode
sudo mkdir -p $HADOOP_HOME/yarn_data/hdfs/namenode
mkdir -p $HADOOP_HOME/yarn_data/hdfs/datanode
iii. Add the following entry to the file and save and quit the file:
<configuration>
<property>
<name>dfs.replication</name>
<value>1</value>
</property>
<property>
<name>dfs.namenode.name.dir</name>
<value>file:/usr/local/hadoop/yarn_data/hdfs/namenode</value>
</property>
<property>
<name>dfs.datanode.data.dir</name>
<value>file:/usr/local/hadoop/yarn_data/hdfs/datanode</value>
</property>
</configuration>

e. Update $HOME/.bashrc
i. Go back to the root and edit the .bashrc file.
vi .bashrc
![]()
ii. Add the following lines to the end of the file.
Add below configurations:
# Set Hadoop-related environment variables
export HADOOP_PREFIX=/usr/local/hadoop
export HADOOP_HOME=/usr/local/hadoop
export HADOOP_MAPRED_HOME=${HADOOP_HOME}
export HADOOP_COMMON_HOME=${HADOOP_HOME}
export HADOOP_HDFS_HOME=${HADOOP_HOME}
export YARN_HOME=${HADOOP_HOME}
export HADOOP_CONF_DIR=${HADOOP_HOME}/etc/hadoop
# Native Path
export HADOOP_COMMON_LIB_NATIVE_DIR=${HADOOP_PREFIX}/lib/native
export HADOOP_OPTS="-Djava.library.path=$HADOOP_PREFIX/lib"
#Java path
export JAVA_HOME='/usr/locla/Java/jdk1.7.0_45'
# Add Hadoop bin/ directory to PATH
export PATH=$PATH:$HADOOP_HOME/bin:$JAVA_PATH/bin:$HADOOP_HOME/sbin

Formatting and Starting/Stopping the HDFS filesystem via the NameNode:
i. The first step to starting up your Hadoop installation is formatting the Hadoop filesystem which is implemented on top of the local filesystem of your cluster. You need to do this the first time you set up a Hadoop cluster. Do not format a running Hadoop filesystem as you will lose all the data currently in the cluster (in HDFS). To format the filesystem (which simply initializes the directory specified by the dfs.name.dir variable), run the
hadoop namenode -format


ii. Start Hadoop Daemons by running the following commands:
Name node:
$ hadoop-daemon.sh start namenode
Data node:
$ hadoop-daemon.sh start datanode
Resource Manager:
$ yarn-daemon.sh start resourcemanager

Node Manager:
$ yarn-daemon.sh start nodemanager
Job History Server:
$ mr-jobhistory-daemon.sh start historyserver

v. Stop Hadoop by running the following command
stop-dfs.sh
stop-yarn.sh
Hadoop Web Interfaces:
Hadoop comes with several web interfaces which are by default available at these locations:
- HDFS Namenode and check health using http://localhost:50070
- HDFS Secondary Namenode status using http://localhost:50090

By this we are done in setting up a single node hadoop cluster v2.2.0, hope this step by step guide helps you to setup same environment at your end.
Please leave a comment/suggestion in the comment section,will try to answer asap and don’t forget to subscribe for the newsletter and a facebook like ![]()


 374
374


 被折叠的 条评论
为什么被折叠?
被折叠的 条评论
为什么被折叠?
 到【灌水乐园】发言


