


参考:http://www.paulsprojects.net/opengl/cloth/cloth.html
写给我的室友:
布料仿真的常用方法就是将布料表达为三维网格,然后通过弹力+外力进行布料仿真。它在游戏中有着广泛的应用,如衣袖的摆动,旗帜的飘动;此外,也可以用于模拟试衣等。
模型初始化
在质点弹簧模型中,整个布料由网格点表达,而点与点之间的连线,我们称之为弹簧。
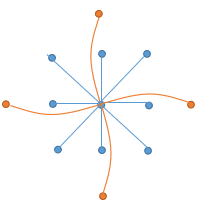
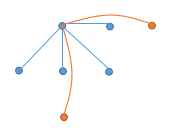
布料一个点的位置是由它周围的12个点控制的。其中8个是相邻点,另外4个是隔点的邻接点。
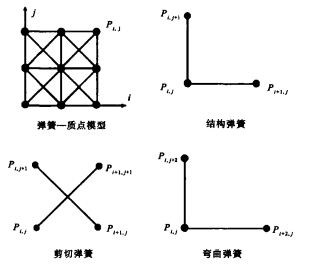
对于弹簧而言,存在三种弹簧,一种是结构弹簧,一种是剪切弹簧,还有一种是弯曲弹簧。它们分别与上图12根弹簧对应。
其中,结构弹簧模拟的是横向的力,为了阻止布料在横向产生较大的拉压变形。
剪切弹簧同理,是为了阻止布料在斜向产生较大的拉压变形。
而弯曲弹簧连接了两个相隔的点,它主要作用是在布料发生弯曲形变的时候,阻止它的过度弯曲,导致布料的角一下子坍塌。这个系数有时候也可以不考虑。
在具体的代码实现中,我们初始化点的位置、速度(初始化为0),质量(设为统一的值),以及是否固定(固定后将不受外力,即重力)。
接下来,执行六个循环,来初始化弹簧,对应于上图,可以避免重复边计算。对于弹簧,我们需要指定两个端点,弹性系数(所有的弹簧都一样),初始长度(跟位置有关,上下左右为1,斜边为根号2,红色边为2)
	//The first (gridSize-1)*gridSize springs go from one ball to the next,
	//excluding those on the right hand edge
	for(int i=0; i<gridSize; ++i)
	{
		for(int j=0; j<gridSize-1; ++j)
		{
			currentSpring->ball1=i*gridSize+j;
			currentSpring->ball2=i*gridSize+j+1;

			currentSpring->springConstant=springConstant;
			currentSpring->naturalLength=naturalLength;

			++currentSpring;
		}
	}

	//The next (gridSize-1)*gridSize springs go from one ball to the one below,
	//excluding those on the bottom edge
	for(int i=0; i<gridSize-1; ++i)
	{
		for(int j=0; j<gridSize; ++j)
		{
			currentSpring->ball1=i*gridSize+j;
			currentSpring->ball2=(i+1)*gridSize+j;

			currentSpring->springConstant=springConstant;
			currentSpring->naturalLength=naturalLength;

			++currentSpring;
		}
	}

	//The next (gridSize-1)*(gridSize-1) go from a ball to the one below and right
	//excluding those on the bottom or right
	for(int i=0; i<gridSize-1; ++i)
	{
		for(int j=0; j<gridSize-1; ++j)
		{
			currentSpring->ball1=i*gridSize+j;
			currentSpring->ball2=(i+1)*gridSize+j+1;

			currentSpring->springConstant=springConstant;
			currentSpring->naturalLength=naturalLength*sqrt(2.0f);

			++currentSpring;
		}
	}

	//The next (gridSize-1)*(gridSize-1) go from a ball to the one below and left
	//excluding those on the bottom or right
	for(int i=0; i<gridSize-1; ++i)
	{
		for(int j=1; j<gridSize; ++j)
		{
			currentSpring->ball1=i*gridSize+j;
			currentSpring->ball2=(i+1)*gridSize+j-1;

			currentSpring->springConstant=springConstant;
			currentSpring->naturalLength=naturalLength*sqrt(2.0f);

			++currentSpring;
		}
	}

	//The first (gridSize-2)*gridSize springs go from one ball to the next but one,
	//excluding those on or next to the right hand edge
	for(int i=0; i<gridSize; ++i)
	{
		for(int j=0; j<gridSize-2; ++j)
		{
			currentSpring->ball1=i*gridSize+j;
			currentSpring->ball2=i*gridSize+j+2;

			currentSpring->springConstant=springConstant;
			currentSpring->naturalLength=naturalLength*2;

			++currentSpring;
		}
	}

	//The next (gridSize-2)*gridSize springs go from one ball to the next but one below,
	//excluding those on or next to the bottom edge
	for(int i=0; i<gridSize-2; ++i)
	{
		for(int j=0; j<gridSize; ++j)
		{
			currentSpring->ball1=i*gridSize+j;
			currentSpring->ball2=(i+2)*gridSize+j;

			currentSpring->springConstant=springConstant;
			currentSpring->naturalLength=naturalLength*2;

			++currentSpring;
		}
	}
加入外力并更新位置
首先,我们计算每根弹簧形变产生的压力。
		//Calculate the tensions in the springs
		//计算弹簧压力
		for(int i=0; i<numSprings; ++i)
		{//弹簧长度 = 前一个弹簧的位置 - 下一个弹簧的位置
			float springLength=(	currentBalls[springs[i].ball1].position-
									currentBalls[springs[i].ball2].position).GetLength();
			//伸展 = 现在长度 - 原始长度
			float extension=springLength-springs[i].naturalLength;
	        //压力 = 弹性系数 * 伸展 / 自然长度
			springs[i].tension=springs[i].springConstant*extension/springs[i].naturalLength;
		}
在这里使用的公式为 F = k△x。在上面代码中,又除以了自然长度,这是因为对于物理上完全相同的弹簧而言,弹性系数与长度有关,而在这里我们设为相同的,为了抵消这种影响,需要消除这个参数。
我们需要注意k的选取:如果k太小,布料就会过于柔软,呈现凹陷的状态,而如果k太大,布料会显得过于僵硬。
如果该点不是固定的,那么需要计算外力。
对于每个弹簧,我们对它的两个端点加上这个弹簧的弹力以及外力(在这里,外力为重力)。
//Loop through springs
for (int j = 0; j<numSprings; ++j)
{
	//If this ball is "ball1" for this spring, add the tension to the force
	if (springs[j].ball1 == i)
	{
		VECTOR3D tensionDirection = currentBalls[springs[j].ball2].position -
			currentBalls[i].position;
		tensionDirection.Normalize();

		//把力加上去
		force += springs[j].tension*tensionDirection;
	}

	//Similarly if the ball is "ball2"
	if (springs[j].ball2 == i)
	{
		VECTOR3D tensionDirection = currentBalls[springs[j].ball1].position -
			currentBalls[i].position;
		tensionDirection.Normalize();

		force += springs[j].tension*tensionDirection;
	}
}
得到外力后,我们根据牛顿第二定律计算每个控制点新的位置:
//计算加速度
//Calculate the acceleration
VECTOR3D acceleration = force / currentBalls[i].mass;


//更新速度
//Update velocity
nextBalls[i].velocity = currentBalls[i].velocity + acceleration*
(float)timePassedInSeconds;
//减少速度
//Damp the velocity
nextBalls[i].velocity *= dampFactor;


//Calculate new position
//计算新的位置
nextBalls[i].position = currentBalls[i].position +
(nextBalls[i].velocity + currentBalls[i].velocity)*(float)timePassedInSeconds / 2;
之后,对球体和地板进行碰撞检测:
//Check against sphere (at origin)
//计算球体
if (nextBalls[i].position.GetSquaredLength()<sphereRadius*1.08f*sphereRadius*1.08f)
	nextBalls[i].position = nextBalls[i].position.GetNormalized()*
	sphereRadius*1.08f;

//Check against floor
if (nextBalls[i].position.y<-8.5f)
	nextBalls[i].position.y = -8.5f;
最终把下一状态转移到当前状态,并计算新的法线(根据两个矢量的叉积):
//Calculate the normals on the current balls
for (int i = 0; i<gridSize - 1; ++i)
{
	for (int j = 0; j<gridSize - 1; ++j)
	{
		VECTOR3D & p0 = currentBalls[i*gridSize + j].position;
		VECTOR3D & p1 = currentBalls[i*gridSize + j + 1].position;
		VECTOR3D & p2 = currentBalls[(i + 1)*gridSize + j].position;
		VECTOR3D & p3 = currentBalls[(i + 1)*gridSize + j + 1].position;

		VECTOR3D & n0 = currentBalls[i*gridSize + j].normal;
		VECTOR3D & n1 = currentBalls[i*gridSize + j + 1].normal;
		VECTOR3D & n2 = currentBalls[(i + 1)*gridSize + j].normal;
		VECTOR3D & n3 = currentBalls[(i + 1)*gridSize + j + 1].normal;

		//Calculate the normals for the 2 triangles and add on
		VECTOR3D normal = (p1 - p0).CrossProduct(p2 - p0);

		n0 += normal;
		n1 += normal;
		n2 += normal;

		normal = (p1 - p2).CrossProduct(p3 - p2);

		n1 += normal;
		n2 += normal;
		n3 += normal;
	}
}

//Normalize normals
for (int i = 0; i<numBalls; ++i)
	currentBalls[i].normal.Normalize();
}
拓展
以上算法提供了布料模拟的一个基本雏形,在可扩展性上,可以考虑到这些问题:
1) 没有精确的碰撞检测(包括自身的碰撞建策 和 与外物的碰撞检测)
2) 布料是纯光滑的,没有考虑到质地(摩擦因子)
3) 外力较为单一
4)把布料抽象为面片,没有考虑到厚度


 1万+
1万+


 被折叠的 条评论
为什么被折叠?
被折叠的 条评论
为什么被折叠?
 到【灌水乐园】发言


