


文章目录
概要
本篇文章简要介绍如何快速搭建SpringBoot整合Mybatis项目,适合新手快速入门。
开始时,请先创建一个名为springboot的数据库,并执行以下语句:
CREATE TABLE account(
id INT PRIMARY KEY auto_increment,
name VARCHAR(255),
money DOUBLE
);

INSERT INTO account(name,money) VALUES('李四',300.0),('王五',400.0),('赵六',300.0);
该表数据如下:

至此,准备完毕。
整体架构流程
- SpringBoot官网创建项目
- 引入相关依赖
- 配置数据源
- 搭建三层架构
1.SpringBoot官网创建项目
SpringBoot创建官网:https://start.spring.io/
进入官网后如下图配置相关内容:

点击GENERATE下载项目项目压缩包,解压到自己指定路径,打开文件夹,
删除以下文件夹及文件:
1. . mvn
2. HELP.md
3. mvnw
4. mvnw.cmd
删除后,使用idea打开文件目录下的pom.xml文件,并点击“Open as Project”选项:

2.引入相关依赖
打开项目下的pom.xml文件,更改mysql依赖为:
		<dependency>
			<groupId>mysql</groupId>
			<artifactId>mysql-connector-java</artifactId>
            <version>8.0.11</version>
		</dependency>
其中,<version>标签更换为自己mysql数据库对应版本驱动包
更改后pom.xml依赖如下:
	<dependencies>
		<dependency>
			<groupId>org.springframework.boot</groupId>
			<artifactId>spring-boot-starter-web</artifactId>
		</dependency>
		<dependency>
			<groupId>org.mybatis.spring.boot</groupId>
			<artifactId>mybatis-spring-boot-starter</artifactId>
			<version>2.3.1</version>
		</dependency>

		<dependency>
			<groupId>mysql</groupId>
			<artifactId>mysql-connector-java</artifactId>
            <version>8.0.11</version>
		</dependency>
		<dependency>
			<groupId>org.projectlombok</groupId>
			<artifactId>lombok</artifactId>
			<optional>true</optional>
		</dependency>
		<dependency>
			<groupId>org.springframework.boot</groupId>
			<artifactId>spring-boot-starter-test</artifactId>
			<scope>test</scope>
		</dependency>
		<dependency>
			<groupId>org.mybatis.spring.boot</groupId>
			<artifactId>mybatis-spring-boot-starter-test</artifactId>
			<version>2.3.1</version>
			<scope>test</scope>
		</dependency>
	</dependencies>
- spring-boot-starter-web: 为Web开发提供支持,提供了嵌入的 Servlet 容器以及 Spring MVC 的依赖,并为 Spring MVC 提供了大量自动配置。
- mysql-connector-java: 数据库驱动包
- mybatis-spring-boot-starter: 链接Spring Boot和MyBatis,构建基于Spring Boot的MyBatis应用程序
- lombok: 简化持久层构建代码
- spring-boot-starter-test & mybatis-spring-boot-starter-test: 提供单元、集成测试功能
引入Druid连接数据池依赖:
        <dependency>
            <groupId>com.alibaba</groupId>
            <artifactId>druid-spring-boot-starter</artifactId>
            <version>1.2.6</version>
        </dependency>
至此,依赖引入完毕。
3.配置数据源
在项目中的src\main\resources包下创建application.yml文件,以配置数据源

创建后,在文件内写入如下代码:
server:
  port: 8080
spring:
  datasource:
    druid:
      driver-class-name: com.mysql.cj.jdbc.Driver
      url: jdbc:mysql://localhost:3306/springboot?serverTimezone=Asia/Shanghai&Unicode=true&characterEncoding=utf-8&useSSL=false
      username: root
      password: 123456
其中,server:port 为配置访问端口号,url、username、password配置为自己数据库的对应路径、用户及密码
3.1 数据源配置测试
在src\test\java{自己的对应包}下的测试类中,编写如下内容:

    @Autowired
    private DataSource dataSource;

	@Test
	void contextLoads() throws SQLException {
	    Connection connection = dataSource.getConnection();
        System.out.println(connection);
        connection.close();
	}
其中,@Autowired注解自动将 DataSource 注入,运行方法void contextLoads()方法,测试数据源配置是否成功。
至此,数据源配置完毕。
4.搭建三层架构
在项目下src\main\java{自己的对应包}\下创建如下四个包,分别为:
- pojo: 实体层
- mapper: 持久层
- service: 业务层
- controller: 控制层

4.1 编写实体层
在 pojo 包下创建 Account 类,该类内容如下:
package com.panda.hellospringboot.pojo;

import lombok.Data;

@Data
public class Account {
    private Integer id;
    private String name;
    private Double money;
}
4.2 编写持久层
在 mapper 下创建 AccountMapper 接口,该接口内容如下:
package com.panda.hellospringboot.mapper;

import com.panda.hellospringboot.pojo.Account;
import org.apache.ibatis.annotations.Mapper;
import org.apache.ibatis.annotations.Select;

import java.util.List;
@Mapper
public interface AccountMapper {
    @Select("select * from account")
    List<Account> queryAll();
}
其中,@Mapper 注解将被SpringBoot识别为mybatis的mapper接口,并自动的为该注解的接口生成动态代理类,而 @Select 注解查询了数据库中表名为account的所有数据。
在src\test\java{自己的对应包}下的测试类中,编写如下内容:
    private AccountMapper accountMapper;

	@Test
    void  mapperTest(){
        List<Account> accounts = accountMapper.queryAll();
        accounts.forEach(account -> System.out.println(account));
    }
进行持久层测试,若成功输出以下内容,则持久层编写完毕:
Account(id=1, name=李四, money=300.0)
Account(id=2, name=王五, money=400.0)
Account(id=3, name=赵六, money=300.0)
4.3 编写业务层
在 service 包下创建 AccountService 接口,该接口内容如下:
package com.panda.hellospringboot.service;

import com.panda.hellospringboot.pojo.Account;

import java.util.List;

public interface AccountService {
    List<Account> queryAll();
}
在 service 包下创建 impl 包,创建实现类 AccountServiceImpl ,该类内容如下:
package com.panda.hellospringboot.service.impl;

import com.panda.hellospringboot.mapper.AccountMapper;
import com.panda.hellospringboot.pojo.Account;
import com.panda.hellospringboot.service.AccountService;
import org.springframework.beans.factory.annotation.Autowired;
import org.springframework.stereotype.Service;

import java.util.List;
@Service
public class AccountServiceImpl implements AccountService {
    @Autowired
    AccountMapper accountMapper;

    @Override
    public List<Account> queryAll() {
        return accountMapper.queryAll();
    }
}
其中,@Service 注解将当前类标记为一个 service 类,并将该类自动注入Spring容器中。
在src\test\java{自己的对应包}下的测试类中,编写如下内容:
    @Autowired
    private AccountService accountService;

    @Test
    void serviceTest(){
	    List<Account> accounts = accountService.queryAll();
	    accounts.forEach(account -> System.out.println(account));
    }
进行业务层测试,若成功输出以下内容,则业务层编写完毕:
Account(id=1, name=李四, money=300.0)
Account(id=2, name=王五, money=400.0)
Account(id=3, name=赵六, money=300.0)
4.4 编写控制层
在 controller 包下创建 AccountController 类,该类内容如下:
package com.panda.hellospringboot.controller;

import com.panda.hellospringboot.pojo.Account;
import com.panda.hellospringboot.service.AccountService;
import org.springframework.beans.factory.annotation.Autowired;
import org.springframework.web.bind.annotation.RequestMapping;
import org.springframework.web.bind.annotation.RestController;

import java.util.List;

@RestController
public class AccountController {
    @Autowired
    private AccountService accountService;

    @RequestMapping("/getAll")
    public List<Account> getAll(){
        return accountService.queryAll();
    }
}
其中,@RestController 注解结合了@Controller和@ResponseBody两个注解的功能,用于标记一个类或者方法,表示该类或方法用于处理HTTP请求,并将响应的结果直接返回给客户端,而不需要进行视图渲染,@RequestMapping 注解用来映射请求,即指明处理器可以处理哪些URL请求,该注解既可以用在类上,也可以用在方法上。
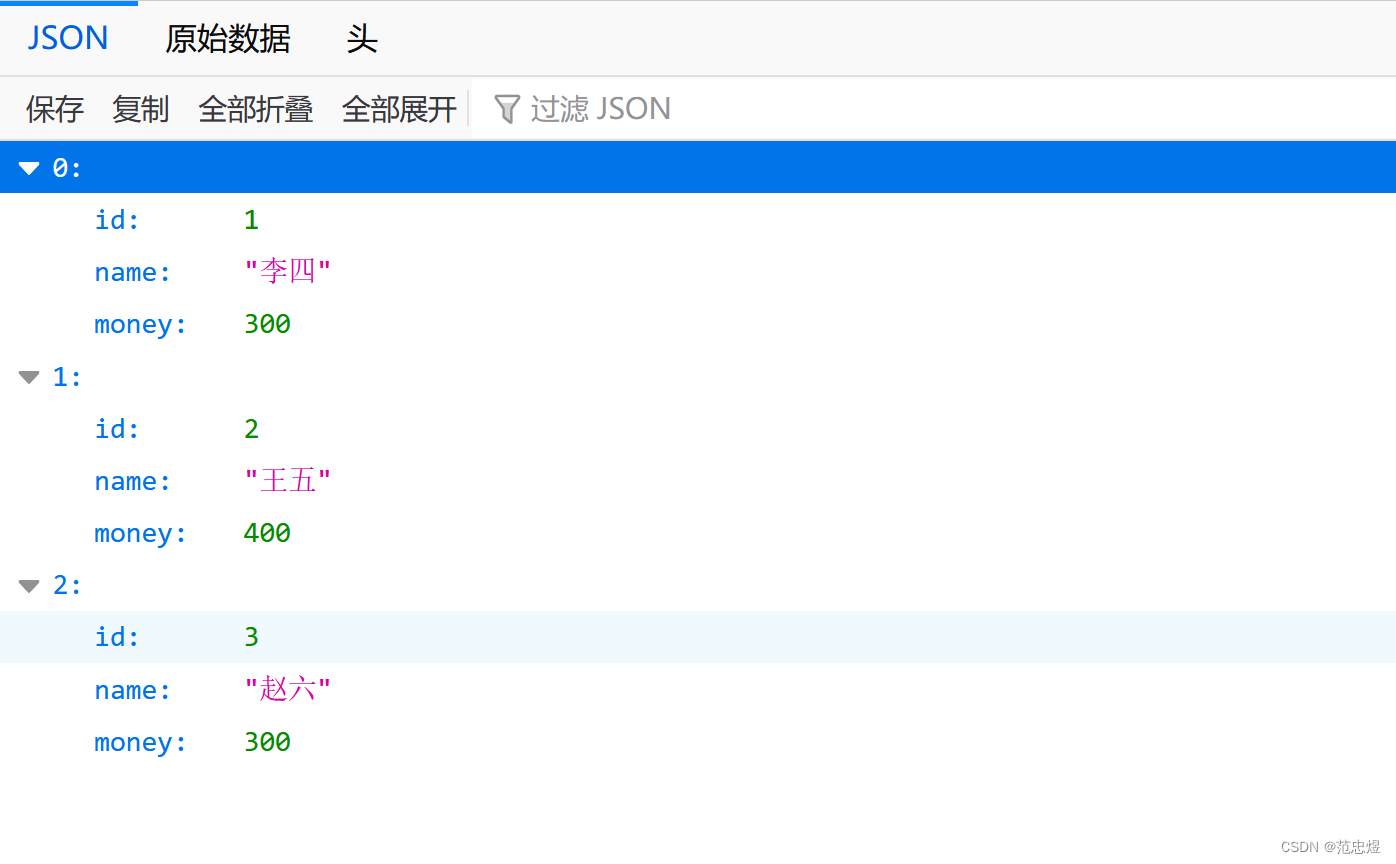
打开浏览器,访问 http://localhost:8080/getAll ,其中8080替换为自己配置的端口号。
访问后,页面出现以下内容,则SpringBoot整合Mybatis至此成功结束。
小结
本篇文章从零开始搭建,适合新手快速熟悉搭建流程及入手,以便后续深入学习。


 369
369


 被折叠的 条评论
为什么被折叠?
被折叠的 条评论
为什么被折叠?
 到【灌水乐园】发言


