


给大家的福利
零基础入门
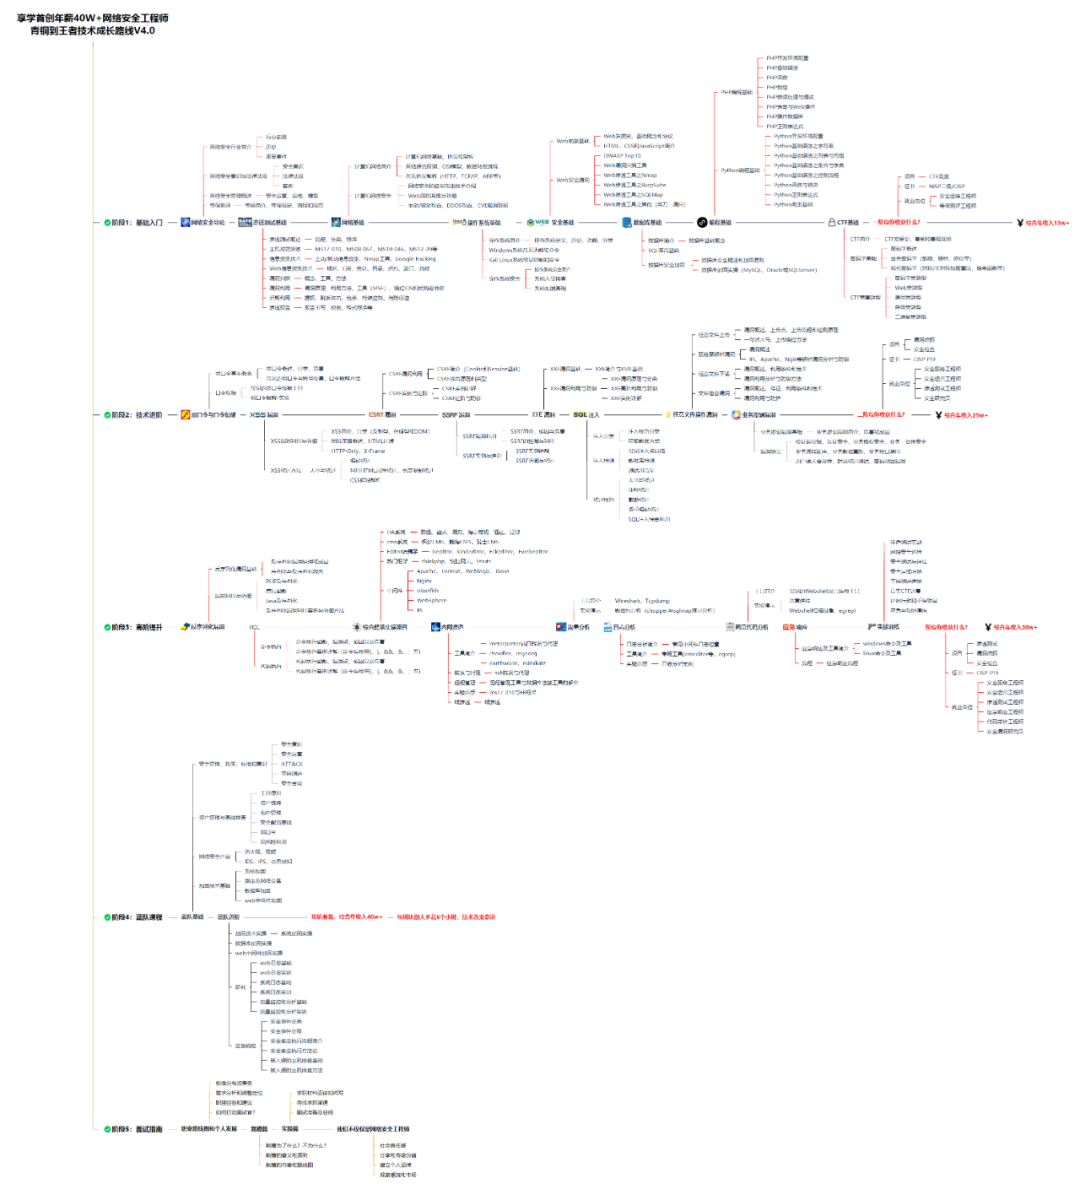
对于从来没有接触过网络安全的同学,我们帮你准备了详细的学习成长路线图。可以说是最科学最系统的学习路线,大家跟着这个大的方向学习准没问题。
同时每个成长路线对应的板块都有配套的视频提供:

因篇幅有限,仅展示部分资料
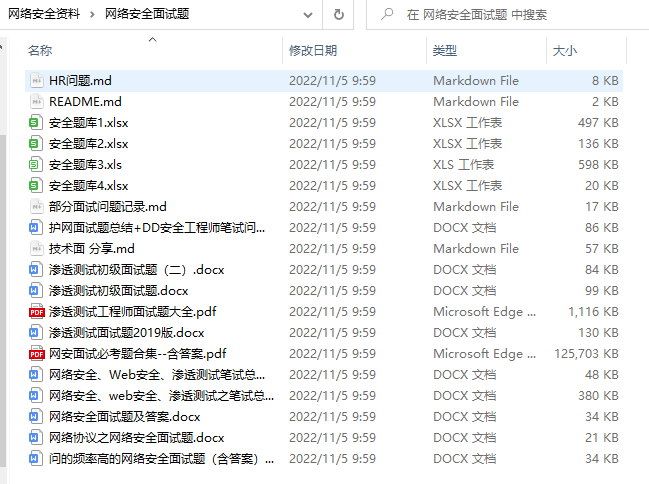
网络安全面试题
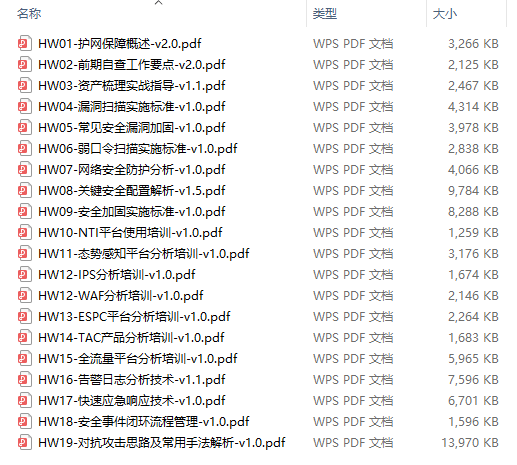
绿盟护网行动
还有大家最喜欢的黑客技术

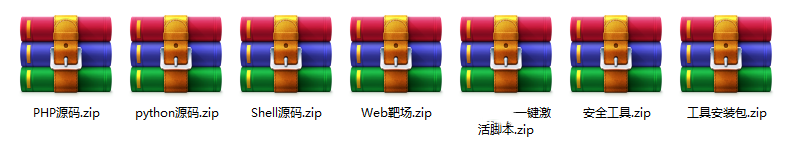
网络安全源码合集+工具包
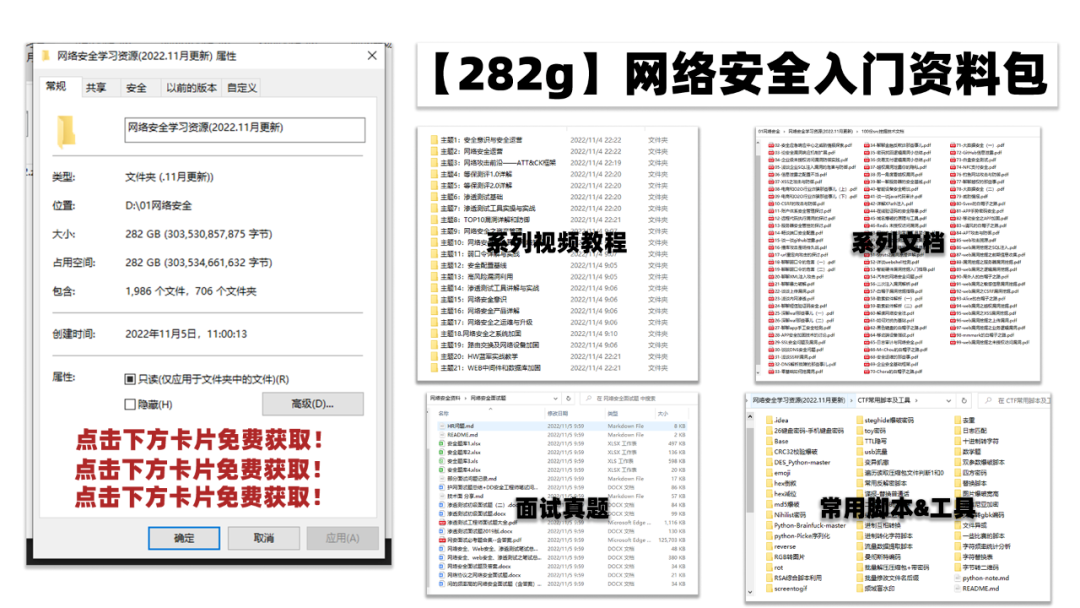
所有资料共282G,朋友们如果有需要全套《网络安全入门+黑客进阶学习资源包》,可以扫描下方二维码领取(如遇扫码问题,可以在评论区留言领取哦)~
需要体系化学习资料的朋友,可以加我V获取:vip204888 (备注网络安全)
网上学习资料一大堆,但如果学到的知识不成体系,遇到问题时只是浅尝辄止,不再深入研究,那么很难做到真正的技术提升。
一个人可以走的很快,但一群人才能走的更远!不论你是正从事IT行业的老鸟或是对IT行业感兴趣的新人,都欢迎加入我们的的圈子(技术交流、学习资源、职场吐槽、大厂内推、面试辅导),让我们一起学习成长!

针对控制器的命令
按q键退出,下同。
我翻译了一下
class RemoteController(Controller)
|控制器在Mininet的控制范围之外运行。
|
|方法解析顺序:
|远程控制器
|控制器
|节点
| 内置对象
|
|此处定义的方法:
|
| __init __(self,name,ip ='127.0.0.1',port = None,** kwargs)
|初始化。
|name:控制器名称
| ip:控制器所在的IP地址
|监听
| port:控制器监听的端口
|
| checkListening(self)
|在无法访问控制器时发出警告
|
| isListening(self,ip,port)
|检查控制器是否正在侦听特定的IP和端口
|
|start(self)
|什么也不做,可覆盖。
|
|stop(self)
|什么也不做,可覆盖。
|
| -------------------------------------------------- --------------------
|此处定义的数据和其他属性:
|
| isSetup = True
|
| -------------------------------------------------- --------------------
|从Controller继承的方法:
|
| IP(self,intf=None)
|返回控制器的IP地址
|
| __repr __(self)
|更丰富的字符串表示形式
|
| -------------------------------------------------- --------------------
|从Controller继承的类方法:
|
| __builtin __.type中的isAvailable(cls)
|控制器可用吗?
|
| -------------------------------------------------- --------------------
|从Node继承的方法:
|
| MAC(self,intf=None)
|返回节点或特定接口的MAC地址。
|
| __str __(self)
|缩写字符串表示
|
| addIntf(self,intf,port = None,moveIntfFn = <fuction moveIntf>)
|添加接口。
| intf:接口
| port:端口号(可选,通常为OpenFlow端口号)
| moveIntfFn:移动界面的功能(可选)
|
|cleanup(self)
|帮助python收集其垃圾。
|
| cmd(self,* args,** kwargs)
|发送命令,等待输出,然后返回。
| cmd:字符串
|
| cmdPrint(self,* args)
|调用cmd并打印其输出
| cmd:字符串
|
| config(self,mac = None,ip = None,defaultRoute = None,lo ='up',** _ params)
|根据(可选)参数配置节点:
| mac:默认接口的MAC地址
| ip:默认接口的IP地址
| ifconfig:任意接口配置子类应重写此方法并调用父类的config(** params)
|
| configDefault(self,** moreParams)
|使用默认参数进行配置
|
| connectionsTo(self,node)
|对于将自身连接到节点的所有接口,返回[接口1,接口2 ...]
|
| defaultIntf()
|最低端口的返回接口
|
| delIntf(self,intf)
|从节点的已知接口中删除接口
|注意:要完全删除接口,请调用intf.delete()
|
| deleteIntfs(self,checkName = True)
|删除所有接口
| checkName:仅删除包含名称的接口
|
| intf(self,intf = None)
|返回给定字符串名称的接口对象,
|如果名称为假(无,空字符串等),则默认为intf。
|或输入intf参数。
|
|使此函数返回其接口对象的参数使其使用灵活的输入参数更容易构造函数
|接口(既接受字符串名称又接受Intf对象的接口)。
|
| intfIsUp(self,intf = None)
|检查接口是否打开
|
| intfList(self)
|接口列表按端口号排序
|
| intfNames(self)
|接口名称按端口号排序
|
| linkTo(self,node,link= <class'mininet.link.Link'>)
| (不建议使用)链接到另一个节点
|替换为Link(node1,node2)
|
|monitor(self,timeoutms=None,findPid = True)
|监视并返回命令的输出。
|如果命令已完成,请将self.waiting设置为False。
| timeoutms:超时(以毫秒为单位)或填写“None”进行无限期等待
| findPid:用mnexec -p查找PID
|
| mountPrivateDirs(self)
|挂载私有目录
|
| newPort(self)
|返回下一个要分配的端口号。
|
| pexec(self,* args,** kwargs)
|使用popen执行命令
|返回:out,err,exitcode
|
| popen(self,* args,** kwargs)
|在我们的命名空间中返回一个Popen()对象
| args:Popen()args,单个列表或字符串
| kwargs:Popen()关键字args
|
|read(self,size= 1024)
|从节点缓冲读取,可能会阻塞。
| size:要返回的最大字符数
|
| readline(self)
|来自节点的缓冲读取行,可能会阻塞。
|返回:行(减去换行符)或None
|
| sendCmd(self,* args,** kwargs)
|发送命令,然后发送命令回显哨兵,
|然后返回,而无需等待命令完成。
| args:命令和参数,或字符串
| printPid:打印命令的PID?(False)
|
| sendInt(self,intr ='\ x03')
|中断运行命令。
|
| setARP(self,ip,mac)
|添加ARP条目。
| ip:IP地址作为字符串
| mac:MAC地址为字符串
|
| setDefaultRoute(self,intf = None)
|设置默认路由来通过接口。
| intf:Intf或{dev <intfname>通过<gw-ip> ...}
|
| setHostRoute(self,ip,intf)
|将路由添加到主机。
| ip:IP地址,点分十进制
| intf:字符串,接口名称
|
| setIP(self,ip,prefixLen = 8,intf = None,** kwargs)
|设置接口的IP地址。
| intf:intf或接口名称
| ip:IP地址作为字符串
| prefixLen:前缀长度,例如8个/ 8或16M加法器
| kwargs:intf.setIP的所有其他参数
|
| setMAC(self,mac,intf =None)
|设置接口的MAC地址。
| intf:intf或intf名称
| mac:MAC地址为字符串
|
| setParam(self,results,method,** param)
|内部方法:配置一个单一的参数
|results:要更新的结果字典
|method:配置方法名称
|param:arg = value(如果value = None则忽略)
|值也可以是列表或字典
|
| startShell(self,mnopts = None)
|启动Shell进程以运行命令
|
|terminate(self)
|向节点发送终止信号并对其进行清理。
|
| unmountPrivateDirs(个体)
|挂载私有目录
|
| waitOutput(self,verbose = False,findPid = True)
|等待命令完成。
|完成由前哨字符ASCII(127)表示
|出现在输出流中。等待哨兵返回输出,包括尾随换行符。
|详细:以交互方式打印输出
|
| waitReadable(self,timeoutms = None)
|等待直到节点的输出可读。
| timeoutms:超时(以毫秒为单位)或填写“None”进行无限期等待。
|返回:poll()的结果
|
|write(self,data)
|将数据写入节点。
|data:字符串
|
| -------------------------------------------------- --------------------
|从Node继承的类方法:
|
|checkSetup(cls) __builtin __.type中的
|确保设置了我们的类和超类
|
|fdToNode(cls,fd)__builtin __.type中的
|返回节点对应于给定的文件描述符。
| fd:文件描述符
|返回:节点
|
|setup(cls) __builtin __.type中的
|确保我们的类依赖项可用
|
| -------------------------------------------------- --------------------
|从Node继承的数据描述符:
|
| __dict__
|实例变量字典(如果已定义)
|
| __weakref__
|对对象的弱引用列表(如果已定义)
|
| -------------------------------------------------- --------------------
|从mininet.node.Node继承的数据和其他属性:
|
| inToNode = {7:<RemoteController c0:127.0.0.1:6633 pid = 74955>,9:<c ...
|
| outToNode = {7:<RemoteController c0:127.0.0.1:6633 pid = 74955>,9:<...
示例
从controller继承的方法
- IP

显示c0的ip
从Node继承的类方法
- __str__

显示控制器名称
- cmdPrint

运行cmdf命令ifconfig并打印结果
博主测试了其他cmd命令,也可以运行。
交换机相关
使用py help(s1)可查看交换机命令界面,使用dir()可查看命令,不包含命令的作用及参数解释,使用方法见下图。

控制器,交换机,主机命令目录
可以看出,有些函数名称是一样的,部分函数名称、作用及参数一样,不再翻译,主机的翻译也是。
class customOvs(mininet.node.OVSSwitch)
 |自定义的OVS交换机
 |
 |方法解析顺序:
 | customOvs
 | mininet.node.OVSSwitch
 | mininet.node.Switch
 | mininet.node.Node
 | __builtin__.object
 |
 |此处定义的方法:
 |
 | __init __(self,name,failMode ='secure',datapath ='kernel',** params)
 |
 | getSwitchIP()
 |返回IP地址
 |
 | setSwitchIP(self,ip)
 |设置管理IP地址
 |
 |start(self,controllers)
 |启动并设置管理IP地址
 |
 | -------------------------------------------------- --------------------
 |此处定义的数据和其他属性:
 |
 | OVSVersion ='2.9'
 |
 | isSetup = True
 |
 | -------------------------------------------------- --------------------
 |从mininet.node.OVSSwitch继承的方法:
 |
 |attach(self,intf)
 |连接数据端口
 |
 | bridgeOpts(self)
 |返回OVS桥选项
|
 |connected(self)
 |我们是否连接到至少一个控制器?
 |
 | controllerUUIDs(self,update = False)
 |返回控制器的ovsdb UUID
 |update:更新缓存的值
 |
 | detach(self,intf)
 |断开数据端口
 |
 | dpctl(self,* args)
 |运行ovs-ofctl命令
 |
 | intfOpts(self,intf)
 |返回intf的OVS接口选项
 |
 |stop(self,deleteIntfs = True)
 |终止OVS交换机
 |deleteIntfs:删除接口? (真)
 |
 |vsctl(self,* args,** kwargs)
 |运行ovs-vsctl命令(或排队等待以后执行)
 |
 | -------------------------------------------------- --------------------
 |从mininet.node.OVSSwitch继承的类方法:
 |
 |batchShutdown(cls,switches,run = <function errRun>),来自__builtin __.type
 |关闭OVS开关列表
 |
 |batchStartup(cls,switches,run = <function errRun>),来自__builtin __.type
 |批量启动OVS
 |switches:交换机启动
 | run:运行命令的函数(errRun)
 |
 | isOldOVS(cls),来自__builtin __.type
 | OVS误差是否小于1.10?
 |
 |
 | setup(cls),来自__builtin __.type
 |确保已安装Open vSwitch并正常工作
 |
 | -------------------------------------------------- --------------------
 |从mininet.node.OVSSwitch继承的静态方法:
 |
 | TCReapply(intf)
 |不幸的是,OVS和Mininet正在战斗在tc排队学科上。
 |作为快速技巧/解决方法,我们清除了OVS,然后重新应用我们自己的。
 |
 | -------------------------------------------------- --------------------
 |从mininet.node.OVSSwitch继承的数据和其他属性:
 |
 | argmax = 128000
 |
 | -------------------------------------------------- --------------------
 |从mininet.node.Switch继承的方法:
 |
 | __repr __(self)
 |更丰富的字符串表示形式
 |
 | defaultDpid(self,dpid = None)
 |从dpid或开关名称返回正确格式的dpid(s1-> 1)
 |
 | defaultIntf()
 |返回控制界面
 |
 | sendCmd(self,* cmd,** kwargs)
 |发送命令到节点
 | cmd:字符串
 |
 | -------------------------------------------------- --------------------
 |从mininet.node.Switch继承的数据和其他属性:
 |
 | dpidLen = 16
 |
 | portBase = 1
示例
从mininet.node.OVSSwitch继承的方法
- attach

交换机s2添加端口s2-eth3
- bridgeOpts

返回桥选项
- connected

是否连接控制器
True表示已连接,False表示未连接
- controllerUUIDs

返回控制器的UUID
- stop

关闭交换机
dpctl ovs-vsctl ovs-ofctl等放在后面讲解
主机相关命令
使用py help(h1)可查看主机命令界面
翻译如下
class Host(Node)
|主机只是一个节点
|
|方法解析顺序:
|Host
|Node
| __buliltin__.object
|
|此处定义的数据和其他属性:
|
| isSetup = True
|
| -------------------------------------------------- --------------------
|从Node继承的方法:
|
| IP(self,intf=None)
|返回节点或特定接口的IP地址。
|
| MAC(self,intf=None)
|返回节点或特定接口的MAC地址。
|
| __init __(self,name,inNamespace = True,** params)
| name:节点名称
| inNamespace:在网络名称空间?
| privateDirs:私有目录字符串或元组的列表
| params:节点参数(有关详细信息,请参见config())
|
| __repr __(self)
|更丰富的字符串表示形式
|
| __str __(self)
|缩写字符串表示
|
| addIntf(self,intf,port = None,moveIntfFn = <函数moveIntf>)
|添加接口
| intf:接口
| port:端口号(可选,通常为OpenFlow端口号)
| moveIntfFn:移动界面的功能(可选)
|
|cleanup(self)
|帮助python收集其垃圾。
|
| cmd(self,* args,** kwargs)
|发送命令,等待输出,然后返回
| cmd:字符串
|
| cmdPrint(self,* args)
|调用cmd并打印其输出
| cmd:字符串
|
| config(self,mac = None,ip = None,defaultRoute = None,lo ='up',** _ params)
|根据(可选)参数配置节点:
| mac:默认接口的MAC地址
| ip:默认接口的IP地址
| ifconfig:任意接口配置子类应重写此方法并调用父类的config(** params)
|
| configDefault(self,** moreParams)
|使用默认参数进行配置
|
| connectionsTo(self,节点)
|对于将自身连接到节点的所有接口,返回[接口1,接口2 ...]
|
| defaultIntf()
|最低端口的返回接口
|
| delIntf(self,intf)
|从Node的已知接口中删除接口
|注意:要完全删除接口,请调用intf.delete()
|
| deleteIntfs(self,checkName = True)
|删除所有接口
| checkName:仅删除包含我们名称的接口
|
| intf(self,intf = None)
|返回给定字符串名称的接口对象,
|如果名称为假(None,空字符串等),则默认为intf。
|或输入intf参数。
|
|使此函数返回其接口对象的参数使其使用灵活的输入参数更容易构造函数
|接口(既接受字符串名称又接受Intf对象的接口)。
|
| intfIsUp(self,intf = None)
|检查接口是否打开
|
| intfList(self)
|我们的接口列表按端口号排序
|
| intfNames(self)
|我们的接口名称按端口号排序
|
| linkTo(自身,节点,链接= <类'mininet.link.Link'>)
| (不建议使用)链接到另一个节点
|替换为Link(node1,node2)
|
|monitor(self,timeoutms=None,findPid = True)
|监视并返回命令的输出。
|如果命令已完成,请将self.waiting设置为False。
| timeoutms:超时(以毫秒为单位)或填写“None”进行无限期等待
| findPid:用mnexec -p查找PID
|
| mountPrivateDirs(self)
|挂载私有目录
|
| newPort(self)
|返回下一个要分配的端口号。
|
| pexec(self,* args,** kwargs)
|使用popen执行命令
|返回:out,err,exitcode
|
| popen(self,* args,** kwargs)
|在我们的命名空间中返回一个Popen()对象
| args:Popen()args,单个列表或字符串
| kwargs:Popen()关键字args
|
|read(self,size= 1024)
|从节点缓冲读取,可能会阻塞。
| size:要返回的最大字符数
|
| readline(self)
|来自节点的缓冲读取行,可能会阻塞。
|返回:行(减去换行符)或None
|
| sendCmd(self,* args,** kwargs)
|发送命令,然后发送命令回显哨兵,
|然后返回,而None需等待命令完成。
| args:命令和参数,或字符串
| printPid:打印命令的PID? (假)
|
| sendInt(self,intr ='\ x03')
|中断运行命令。
|
| setARP(self,ip,mac)
|添加ARP条目。
| ip:IP地址作为字符串
| mac:MAC地址为字符串
|
| setDefaultRoute(self,intf = None)
|设置默认路由以通过intf。
| intf:Intf或{dev <intfname>通过<gw-ip> ...}
|
| setHostRoute(self,ip,intf)
|将路由添加到主机。
| ip:IP地址,点分十进制
| intf:字符串,接口名称
|
| setIP(self,ip,prefixLen = 8,intf = None,** kwargs)
|设置接口的IP地址。
| intf:intf或接口名称
| ip:IP地址作为字符串
| prefixLen:前缀长度,例如8个/ 8或16M加法器
| kwargs:intf.setIP的所有其他参数
|
| setMAC(self,mac,intf =None)
|设置接口的MAC地址。
| intf:intf或intf名称
| mac:MAC地址为字符串
|
| setParam(self,results,method,** param)
|内部方法:配置一个单一的参数
|results:要更新的结果字典
|method:配置方法名称
|param:arg = value(如果value = None则忽略)
|值也可以是列表或字典
|
| startShell(self,mnopts = None)
|启动Shell进程以运行命令
|
|terminate(self)
|向节点发送终止信号并对其进行清理。
|
| unmountPrivateDirs(个体)
|挂载私有目录
|
| waitOutput(self,verbose = False,findPid = True)
|等待命令完成。
|完成由前哨字符ASCII(127)表示
## 学习路线:
这个方向初期比较容易入门一些,掌握一些基本技术,拿起各种现成的工具就可以开黑了。不过,要想从脚本小子变成黑客大神,这个方向越往后,需要学习和掌握的东西就会越来越多以下是网络渗透需要学习的内容:
**需要体系化学习资料的朋友,可以加我V获取:vip204888 (备注网络安全)**
**网上学习资料一大堆,但如果学到的知识不成体系,遇到问题时只是浅尝辄止,不再深入研究,那么很难做到真正的技术提升。**
**[需要这份系统化资料的朋友,可以点击这里获取](https://bbs.csdn.net/topics/618540462)**
**一个人可以走的很快,但一群人才能走的更远!不论你是正从事IT行业的老鸟或是对IT行业感兴趣的新人,都欢迎加入我们的的圈子(技术交流、学习资源、职场吐槽、大厂内推、面试辅导),让我们一起学习成长!**


 893
893


 被折叠的 条评论
为什么被折叠?
被折叠的 条评论
为什么被折叠?
 到【灌水乐园】发言


