


 本文详细解析了如何通过扩展FrameLayout和创建PercentLinearLayout来支持percent属性,涉及属性获取、onMeasure中的尺寸计算以及onLayout的复原过程。作者展示了PercentFrameLayout的核心代码和PercentLinearLayout的实现思路。
其实细想一下,Google只是对我们原本熟悉的RelativeLayout和FrameLayout进行的功能的扩展,使其支持了percent相关的属性。
那么,我们考虑下,如果是我们添加这种扩展,我们会怎么做:
-
通过LayoutParams获取child设置的percent相关属性的值
-
onMeasure的时候,将child的width,height的值,通过获取的自定义属性的值进行计算(eg:容器的宽 * fraction ),计算后传入给child.measure(w,h);
ok,有了上面的猜想,我们直接看PercentFrameLayout的源码。
public class PercentFrameLayout extends FrameLayout {
private final PercentLayoutHelper mHelper = new PercentLayoutHelper(this);
//省略了,两个构造方法
public PercentFrameLayout(Context context, AttributeSet attrs) {
super(context, attrs);
}
@Override
public LayoutParams generateLayoutParams(AttributeSet attrs) {
return new LayoutParams(getContext(), attrs);
}
@Override
protected void onMeasure(int widthMeasureSpec, int heightMeasureSpec) {
mHelper.adjustChildren(widthMeasureSpec, heightMeasureSpec);
super.onMeasure(widthMeasureSpec, heightMeasureSpec);
if (mHelper.handleMeasuredStateTooSmall()) {
super.onMeasure(widthMeasureSpec, heightMeasureSpec);
}
}
@Override
protected void onLayout(boolean changed, int left, int top, int right, int bottom) {
super.onLayout(changed, left, top, right, bottom);
mHelper.restoreOriginalParams();
}
public static class LayoutParams extends FrameLayout.LayoutParams
implements PercentLayoutHelper.PercentLayoutParams {
private PercentLayoutHelper.PercentLayoutInfo mPercentLayoutInfo;
public LayoutParams(Context c, AttributeSet attrs) {
super(c, attrs);
mPercentLayoutInfo = PercentLayoutHelper.getPercentLayoutInfo(c, attrs);
}
//省略了一些代码…
@Override
public PercentLayoutHelper.PercentLayoutInfo getPercentLayoutInfo() {
return mPercentLayoutInfo;
}
@Override
protected void setBaseAttributes(TypedArray a, int widthAttr, int heightAttr) {
PercentLayoutHelper.fetchWidthAndHeight(this, a, widthAttr, heightAttr);
}
}
}
代码是相当的短,可以看到PercentFrameLayout里面首先重写了generateLayoutParams方法,当然了,由于支持了一些新的layout_属性,那么肯定需要定义对应的LayoutParams。
(一)percent相关属性的获取
可以看到PercentFrameLayout.LayoutParams在原有的FrameLayout.LayoutParams基础上,实现了PercentLayoutHelper.PercentLayoutParams接口。
这个接口很简单,只有一个方法:
public interface PercentLayoutParams {
PercentLayoutInfo getPercentLayoutInfo();
}
而,这个方法的实现呢,也只有一行:return mPercentLayoutInfo;,那么这个mPercentLayoutInfo在哪完成赋值呢?
看PercentFrameLayout.LayoutParams的构造方法:
public LayoutParams(Context c, AttributeSet attrs) {
super(c, attrs);
mPercentLayoutInfo = PercentLayoutHelper.getPercentLayoutInfo(c, attrs);
}
可以看到,将attrs传入给getPercentLayoutInfo方法,那么不用说,这个方法的内部,肯定是获取自定义属性的值,然后将其封装到PercentLayoutInfo对象中,最后返回。
代码如下:
public static PercentLayoutInfo getPercentLayoutInfo(Context context,
AttributeSet attrs) {
PercentLayoutInfo info = null;
TypedArray array = context.obtainStyledAttributes(attrs, R.styleable.PercentLayout_Layout);
float value = array.getFraction(R.styleable.PercentLayout_Layout_layout_widthPercent, 1, 1,
-1f);
if (value != -1f) {
if (Log.isLoggable(TAG, Log.VERBOSE)) {
Log.v(TAG, "percent width: " + value);
}
info = info != null ? info : new PercentLayoutInfo();
info.widthPercent = value;
}
value = array.getFraction(R.styleable.PercentLayout_Layout_layout_heightPercent, 1, 1, -1f);
if (value != -1f) {
if (Log.isLoggable(TAG, Log.VERBOSE)) {
Log.v(TAG, "percent height: " + value);
}
info = info != null ? info : new PercentLayoutInfo();
info.heightPercent = value;
}
value = array.getFraction(R.styleable.PercentLayout_Layout_layout_marginPercent, 1, 1, -1f);
if (value != -1f) {
if (Log.isLoggable(TAG, Log.VERBOSE)) {
Log.v(TAG, "percent margin: " + value);
}
info = info != null ? info : new PercentLayoutInfo();
info.leftMarginPercent = value;
info.topMarginPercent = value;
info.rightMarginPercent = value;
info.bottomMarginPercent = value;
}
value = array.getFraction(R.styleable.PercentLayout_Layout_layout_marginLeftPercent, 1, 1,
-1f);
if (value != -1f) {
if (Log.isLoggable(TAG, Log.VERBOSE)) {
Log.v(TAG, "percent left margin: " + value);
}
info = info != null ? info : new PercentLayoutInfo();
info.leftMarginPercent = value;
}
value = array.getFraction(R.styleable.PercentLayout_Layout_layout_marginTopPercent, 1, 1,
-1f);
if (value != -1f) {
if (Log.isLoggable(TAG, Log.VERBOSE)) {
Log.v(TAG, "percent top margin: " + value);
}
info = info != null ? info : new PercentLayoutInfo();
info.topMarginPercent = value;
}
value = array.getFraction(R.styleable.PercentLayout_Layout_layout_marginRightPercent, 1, 1,
-1f);
if (value != -1f) {
if (Log.isLoggable(TAG, Log.VERBOSE)) {
Log.v(TAG, "percent right margin: " + value);
}
info = info != null ? info : new PercentLayoutInfo();
info.rightMarginPercent = value;
}
value = array.getFraction(R.styleable.PercentLayout_Layout_layout_marginBottomPercent, 1, 1,
-1f);
if (value != -1f) {
if (Log.isLoggable(TAG, Log.VERBOSE)) {
Log.v(TAG, "percent bottom margin: " + value);
}
info = info != null ? info : new PercentLayoutInfo();
info.bottomMarginPercent = value;
}
value = array.getFraction(R.styleable.PercentLayout_Layout_layout_marginStartPercent, 1, 1,
-1f);
if (value != -1f) {
if (Log.isLoggable(TAG, Log.VERBOSE)) {
Log.v(TAG, "percent start margin: " + value);
}
info = info != null ? info : new PercentLayoutInfo();
info.startMarginPercent = value;
}
value = array.getFraction(R.styleable.PercentLayout_Layout_layout_marginEndPercent, 1, 1,
-1f);
if (value != -1f) {
if (Log.isLoggable(TAG, Log.VERBOSE)) {
Log.v(TAG, "percent end margin: " + value);
}
info = info != null ? info : new PercentLayoutInfo();
info.endMarginPercent = value;
}
array.recycle();
if (Log.isLoggable(TAG, Log.DEBUG)) {
Log.d(TAG, "constructed: " + info);
}
return info;
}
是不是和我们平时的取值很类似,所有的值最终封装到PercentLayoutInfo对象中。
ok,到此我们的属性获取就介绍完成,有了这些属性,是不是onMeasure里面要进行使用呢?
(二) onMeasue中重新计算child的尺寸
@Override
protected void onMeasure(int widthMeasureSpec, int heightMeasureSpec) {
mHelper.adjustChildren(widthMeasureSpec, heightMeasureSpec);
super.onMeasure(widthMeasureSpec, heightMeasureSpec);
if (mHelper.handleMeasuredStateTooSmall()) {
super.onMeasure(widthMeasureSpec, heightMeasureSpec);
}
}
可以看到onMeasure中的代码页很少,看来核心的代码都被封装在mHelper的方法中,我们直接看mHelper.adjustChildren方法。
/**
-
Iterates over children and changes their width and height to one calculated from percentage
-
values.
-
@param widthMeasureSpec Width MeasureSpec of the parent ViewGroup.
-
@param heightMeasureSpec Height MeasureSpec of the parent ViewGroup.
*/
public void adjustChildren(int widthMeasureSpec, int heightMeasureSpec) {
//…
int widthHint = View.MeasureSpec.getSize(widthMeasureSpec);
int heightHint = View.MeasureSpec.getSize(heightMeasureSpec);
for (int i = 0, N = mHost.getChildCount(); i < N; i++) {
View view = mHost.getChildAt(i);
ViewGroup.LayoutParams params = view.getLayoutParams();
if (params instanceof PercentLayoutParams) {
PercentLayoutInfo info =
((PercentLayoutParams) params).getPercentLayoutInfo();
if (Log.isLoggable(TAG, Log.DEBUG)) {
Log.d(TAG, "using " + info);
}
if (info != null) {
if (params instanceof ViewGroup.MarginLayoutParams) {
info.fillMarginLayoutParams((ViewGroup.MarginLayoutParams) params,
widthHint, heightHint);
} else {
info.fillLayoutParams(params, widthHint, heightHint);
}
}
}
}
}
通过注释也能看出,此方法中遍历所有的孩子,通过百分比的属性重新设置其宽度和高度。
首先在widthHint、heightHint保存容器的宽、高,然后遍历所有的孩子,判断其LayoutParams是否是PercentLayoutParams类型,如果是,通过params.getPercentLayoutInfo拿出info对象。
是否还记得,上面的分析中,PercentLayoutInfo保存了percent相关属性的值。
如果info不为null,则判断是否需要处理margin;我们直接看fillLayoutParams方法(处理margin也是类似的)。
/**
- Fills {@code ViewGroup.LayoutParams} dimensions based on percentage values.
*/
public void fillLayoutParams(ViewGroup.LayoutParams params, int widthHint,
int heightHint) {
// Preserve the original layout params, so we can restore them after the measure step.
mPreservedParams.width = params.width;
mPreservedParams.height = params.height;
if (widthPercent >= 0) {
params.width = (int) (widthHint * widthPercent);
}
if (heightPercent >= 0) {
params.height = (int) (heightHint * heightPercent);
}
if (Log.isLoggable(TAG, Log.DEBUG)) {
Log.d(TAG, “after fillLayoutParams: (” + params.width + ", " + params.height + “)”);
}
}
首先保存原本的width和height,然后重置params的width和height为(int) (widthHint * widthPercent)和(int) (heightHint * heightPercent);。
到此,其实我们的百分比转换就结束了,理论上就已经实现了对于百分比的支持,不过Google还考虑了一些细节。
我们回到onMeasure方法:
@Override
protected void onMeasure(int widthMeasureSpec, int heightMeasureSpec) {
mHelper.adjustChildren(widthMeasureSpec, heightMeasureSpec);
super.onMeasure(widthMeasureSpec, heightMeasureSpec);
if (mHelper.handleMeasuredStateTooSmall()) {
super.onMeasure(widthMeasureSpec, heightMeasureSpec);
}
}
下面还有个mHelper.handleMeasuredStateTooSmall的判断,也就是说,如果你设置的百分比,最终计算出来的MeasuredSize过小的话,会进行一些操作。
代码如下:
public boolean handleMeasuredStateTooSmall() {
boolean needsSecondMeasure = false;
for (int i = 0, N = mHost.getChildCount(); i < N; i++) {
View view = mHost.getChildAt(i);
ViewGroup.LayoutParams params = view.getLayoutParams();
if (Log.isLoggable(TAG, Log.DEBUG)) {
Log.d(TAG, "should handle measured state too small " + view + " " + params);
}
if (params instanceof PercentLayoutParams) {
PercentLayoutInfo info =
((PercentLayoutParams) params).getPercentLayoutInfo();
if (info != null) {
if (shouldHandleMeasuredWidthTooSmall(view, info)) {
needsSecondMeasure = true;
params.width = ViewGroup.LayoutParams.WRAP_CONTENT;
}
if (shouldHandleMeasuredHeightTooSmall(view, info)) {
needsSecondMeasure = true;
params.height = ViewGroup.LayoutParams.WRAP_CONTENT;
}
}
}
}
if (Log.isLoggable(TAG, Log.DEBUG)) {
Log.d(TAG, "should trigger second measure pass: " + needsSecondMeasure);
}
return needsSecondMeasure;
}
首先遍历所有的孩子,拿出孩子的layoutparams,如果是PercentLayoutParams实例,则取出info。如果info不为null,调用shouldHandleMeasuredWidthTooSmall判断:
private static boolean shouldHandleMeasuredWidthTooSmall(View view, PercentLayoutInfo info) {
int state = ViewCompat.getMeasuredWidthAndState(view) & ViewCompat.MEASURED_STATE_MASK;
return state == ViewCompat.MEASURED_STATE_TOO_SMALL && info.widthPercent >= 0 &&
info.mPreservedParams.width == ViewGroup.LayoutParams.WRAP_CONTENT;
}
这里就是判断,如果你设置的measuredWidth或者measureHeight过小的话,并且你在布局文件中layout_w/h 设置的是WRAP_CONTENT的话,将params.width / height= ViewGroup.LayoutParams.WRAP_CONTENT,然后重新测量。
哈,onMeasure终于结束了~~~现在我觉得应该代码结束了吧,尺寸都设置好了,还需要干嘛么,but,你会发现onLayout也重写了,我们又不改变layout规则,在onLayout里面干什么毛线:
@Override
protected void onLayout(boolean changed, int left, int top, int right, int bottom) {
super.onLayout(changed, left, top, right, bottom);
mHelper.restoreOriginalParams();
}
继续看mHelper.restoreOriginalParams
/**
-
Iterates over children and restores their original dimensions that were changed for
-
percentage values. Calling this method only makes sense if you previously called
-
{@link PercentLayoutHelper#adjustChildren(int, int)}.
*/
public void restoreOriginalParams() {
for (int i = 0, N = mHost.getChildCount(); i < N; i++) {
View view = mHost.getChildAt(i);
ViewGroup.LayoutParams params = view.getLayoutParams();
if (Log.isLoggable(TAG, Log.DEBUG)) {
Log.d(TAG, "should restore " + view + " " + params);
}
if (params instanceof PercentLayoutParams) {
PercentLayoutInfo info =
((PercentLayoutParams) params).getPercentLayoutInfo();
if (Log.isLoggable(TAG, Log.DEBUG)) {
Log.d(TAG, "using " + info);
}
if (info != null) {
if (params instanceof ViewGroup.MarginLayoutParams) {
info.restoreMarginLayoutParams((ViewGroup.MarginLayoutParams) params);
} else {
info.restoreLayoutParams(params);
}
}
}
}
}
噗,原来是重新恢复原本的尺寸值,也就是说onMeasure里面的对值进行了改变,测量完成后。在这个地方,将值又恢复成如果布局文件中的值,上面写的都是0。恢复很简单:
public void restoreLayoutParams(ViewGroup.LayoutParams params) {
params.width = mPreservedParams.width;
params.height = mPreservedParams.height;
}
你应该没有忘在哪存的把~忘了的话,麻烦Ctrl+F ‘mPreservedParams.width’ 。
也就是说,你去打印上面写法,布局文件中view的v.getLayoutParams().width,这个值应该是0。
这里感觉略微不爽这个0没撒用处呀,还不如不重置~
好了,到此就分析完了,其实主要就几个步骤:
-
LayoutParams中属性的获取
-
onMeasure中,改变params.width为百分比计算结果,测量
-
如果测量值过小且设置的w/h是wrap_content,重新测量
-
onLayout中,重置params.w/h为布局文件中编写的值
可以看到,有了RelativeLayout、FrameLayout的扩展,竟然没有LinearLayout几个意思。好在,我们的核心代码都由PercentLayoutHelper封装了,自己扩展下LinearLayout也不复杂。
三、实现PercentLinearlayout
可能有人会说,有了weight呀,但是weight能做到宽、高同时百分比赋值嘛?
好了,代码很简单,如下:
(一)PercentLinearLayout
package com.juliengenoud.percentsamples;
import android.content.Context;
import android.content.res.TypedArray;
import android.support.percent.PercentLayoutHelper;
import android.util.AttributeSet;
import android.view.ViewGroup;
import android.widget.LinearLayout;
/**
- Created by zhy on 15/6/30.
*/
public class PercentLinearLayout extends LinearLayout
{
private PercentLayoutHelper mPercentLayoutHelper;
public PercentLinearLayout(Context context, AttributeSet attrs)
{
super(context, attrs);
mPercentLayoutHelper = new PercentLayoutHelper(this);
}
@Override
protected void onMeasure(int widthMeasureSpec, int heightMeasureSpec)
{
mPercentLayoutHelper.adjustChildren(widthMeasureSpec, heightMeasureSpec);
super.onMeasure(widthMeasureSpec, heightMeasureSpec);
if (mPercentLayoutHelper.handleMeasuredStateTooSmall())
{
super.onMeasure(widthMeasureSpec, heightMeasureSpec);
}
}
@Override
protected void onLayout(boolean changed, int l, int t, int r, int b)
{
super.onLayout(changed, l, t, r, b);
mPercentLayoutHelper.restoreOriginalParams();
}
@Override
public LayoutParams generateLayoutParams(AttributeSet attrs)
{
return new LayoutParams(getContext(), attrs);
自我介绍一下,小编13年上海交大毕业,曾经在小公司待过,也去过华为、OPPO等大厂,18年进入阿里一直到现在。
深知大多数初中级Android工程师,想要提升技能,往往是自己摸索成长或者是报班学习,但对于培训机构动则近万的学费,着实压力不小。自己不成体系的自学效果低效又漫长,而且极易碰到天花板技术停滞不前!
因此收集整理了一份《2024年Android移动开发全套学习资料》,初衷也很简单,就是希望能够帮助到想自学提升又不知道该从何学起的朋友,同时减轻大家的负担。
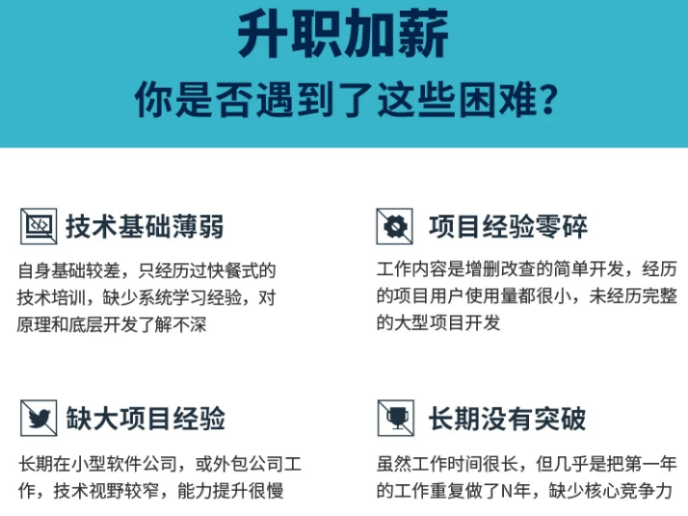

既有适合小白学习的零基础资料,也有适合3年以上经验的小伙伴深入学习提升的进阶课程,基本涵盖了95%以上Android开发知识点,真正体系化!
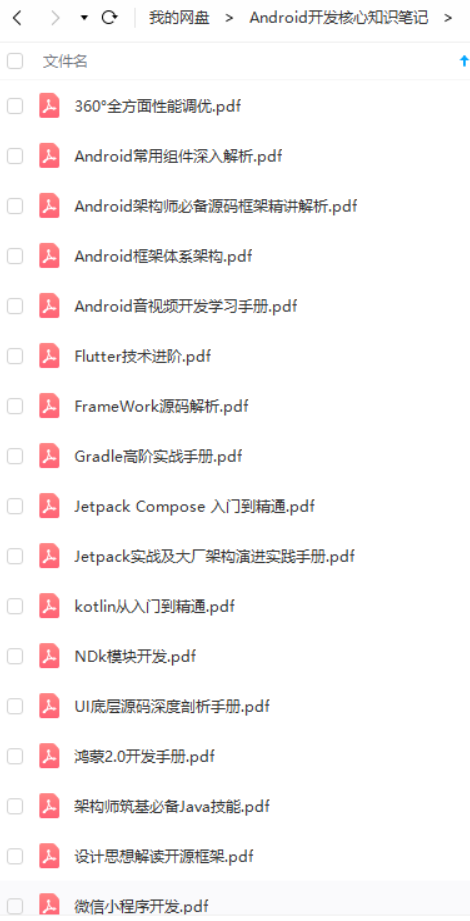
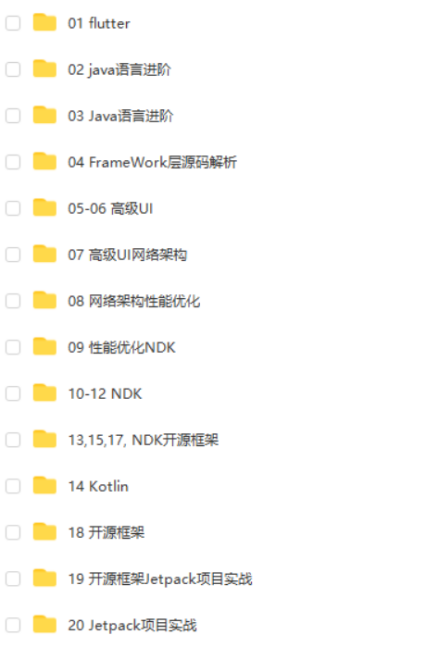
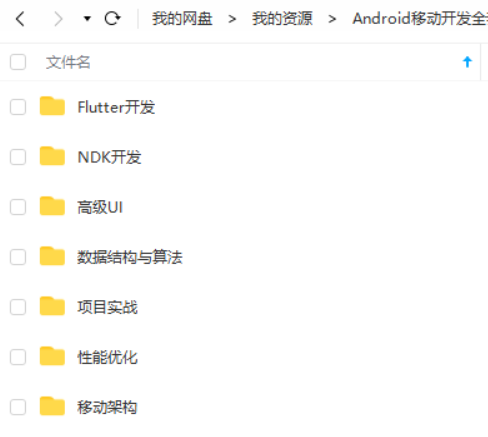
由于文件比较大,这里只是将部分目录截图出来,每个节点里面都包含大厂面经、学习笔记、源码讲义、实战项目、讲解视频,并且会持续更新!
如果你觉得这些内容对你有帮助,可以扫码获取!!(资料价值较高,非无偿)

重要知识点
下面是有几位Android行业大佬对应上方技术点整理的一些进阶资料。

高级进阶篇——高级UI,自定义View(部分展示)
UI这块知识是现今使用者最多的。当年火爆一时的Android入门培训,学会这小块知识就能随便找到不错的工作了。不过很显然现在远远不够了,拒绝无休止的CV,亲自去项目实战,读源码,研究原理吧!

- 面试题部分合集

《Android学习笔记总结+移动架构视频+大厂面试真题+项目实战源码》,点击传送门即可获取!
roid移动开发全套学习资料》,初衷也很简单,就是希望能够帮助到想自学提升又不知道该从何学起的朋友,同时减轻大家的负担。**
[外链图片转存中…(img-L2PWuHYW-1711552457007)]
[外链图片转存中…(img-JR8LVyLn-1711552457008)]
[外链图片转存中…(img-AmVZcNt6-1711552457008)]
[外链图片转存中…(img-QKx0oIAq-1711552457008)]
[外链图片转存中…(img-BXkAMGHa-1711552457009)]
既有适合小白学习的零基础资料,也有适合3年以上经验的小伙伴深入学习提升的进阶课程,基本涵盖了95%以上Android开发知识点,真正体系化!
由于文件比较大,这里只是将部分目录截图出来,每个节点里面都包含大厂面经、学习笔记、源码讲义、实战项目、讲解视频,并且会持续更新!
如果你觉得这些内容对你有帮助,可以扫码获取!!(资料价值较高,非无偿)
重要知识点
下面是有几位Android行业大佬对应上方技术点整理的一些进阶资料。
[外链图片转存中…(img-URMuv9mg-1711552457009)]
高级进阶篇——高级UI,自定义View(部分展示)
UI这块知识是现今使用者最多的。当年火爆一时的Android入门培训,学会这小块知识就能随便找到不错的工作了。不过很显然现在远远不够了,拒绝无休止的CV,亲自去项目实战,读源码,研究原理吧!
[外链图片转存中…(img-REcF8CwD-1711552457009)]
- 面试题部分合集
[外链图片转存中…(img-42296rWZ-1711552457010)]


 1769
1769

 被折叠的 条评论
为什么被折叠?
被折叠的 条评论
为什么被折叠?
 到【灌水乐园】发言


