


概述
在小程序中要进行上传附件的操作,使用u-view中自带的上传附件,如果只是上传图片的话比较好用,但是如果pdf,ppt等文件就会没那么好用了。所以我使用的uni中的上传与下载,详细信息可以去文档查看
uni.uploadFile(OBJECT) | uni-app官网官方链接:uni.uploadFile(OBJECT) | uni-app官网
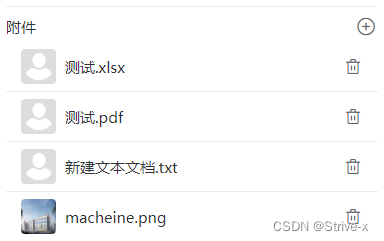
运行效果
配置步骤
1.页面样式
<u-form-item borderBottom labelPosition="top">
						<template #label>
							<view
								style="display: flex;justify-content: space-between;margin-bottom: 10rpx;font-size: 30rpx;"
								@click="chooseFile">
								<text>附件</text>
								<u-icon name="plus-circle" size="20"></u-icon>
							</view>
						</template>
						<u-cell-group :border="false">
							<u-cell v-for="(item, index) in form.file" :key="item.id">
								<u-avatar slot="icon" @click="downloadFile(item)" shape="square" size="35"
									:src="item.src" customStyle="margin: -3px 5px -3px 0"></u-avatar>
								<template #value>
									<u-icon name="trash" size="20" @click="delFile(index)"></u-icon>
								</template>
								<template #title>
									<view style="width:70vw;display:inline-block;white-space: pre-wrap; word-wrap: break-word;height: auto;margin-right: 10rpx;"> {{ item.real_name }} </view>
								</template>
							</u-cell>
						</u-cell-group>
</u-form-item>
2.在data中定义初始变量
fileList: [],//点击上传后,在 本地 保留的文件地址及其他的文件信息
				form: {
					file: []//传给 后端 后返回来的文件地址及文件信息
				},
3.选择文件上传(代码中都有注释)
chooseFile() {
				//#ifdef  H5
				uni.chooseFile({
						//#endif
						// #ifdef MP-WEIXIN
						uni.chooseMessageFile({
							//#endif
							count: 10,
							success: (res) => {
								this.fileList = res.tempFiles;//fileList需要在data中初始定义为一个数组
								this.uploadFile()
							},
							fail: (err) => {
								console.log(err);
							}
						});
					},
					// 上传文件
					uploadFile() {
						this.fileList.forEach(file => {
							// 调用uni.uploadFile方法上传文件
							uni.uploadFile({
								//#ifdef  H5
								url: '/adminapi/file/upload',//h5我进行了 代理 所以直接写接口就可以了
								//#endif
								// #ifdef MP-WEIXIN
								url: `${projectConfig.baseUrl}/adminapi/file/upload`,//这里需要引入站点名称然后与后端接口进行拼接;import projectConfig from '@/common/config.js'
								//#endif
								filePath: file.path,
								name: 'file',
								header: {
									Authorization: "Bearer " + this.vuex_token//这里需要放token
								},
								formData: {
									module: 'reimburse'//这里的‘module’值看后端需要传什么参数
								},
								success: (res) => {
									const {
										status,
										msg,
										data
									} = JSON.parse(res.data)
									if (status === 200) {
										this.$u.toast(msg);
										this.form.file.push(data)
									} else {
										this.$u.toast(msg);
										return
									}
								},
								fail: (err) => {
									console.log('失败啦', err);
								}
							})
						})
					},
4.进行下载预览文件(代码中都有注释)
// 下载
					downloadFile(item) {
						// #ifdef H5
						const downloadLink = item.src;
						window.open(downloadLink, '_blank');//h5直接进行跳转页面打开就可以了
						// #endif
						// #ifdef MP-WEIXIN
						uni.downloadFile({//调用uni中的下载方法
							url: item.src,//后端返回的完整路径
							success: (res) => {
								if (res.statusCode === 200) {
									const tempFilePath = res.tempFilePath;
									// 显示文件
									uni.openDocument({
										filePath: tempFilePath,
										success: (res) => {
											console.log('打开文件成功');
										},
										fail: (err) => {
											this.$u.toast('小程序不支持此类文件')
											uni.setClipboardData({//如果小程序对于一些不支持打开的文件,复制链接然后让用户去网页进行打开
												data: tempFilePath,
												success: function() {
													uni.$u.toast('已复制链接')
												}
											})
											console.log('打开文件失败', err, tempFilePath);
										}
									});
								}
							},
							fail: (err) => {
								console.log('下载文件失败', err);
							}
						});
						// #endif
					},
5.删除文件
// 删除
					delFile(index) {
						this.form.file.splice(index, 1)
					},
总结
基本按照这个步骤便可以实现上传与下载文件,目前我测试png,pdf,doc,xlsx,ppt,txt都是没有问题的。


 8440
8440


 被折叠的 条评论
为什么被折叠?
被折叠的 条评论
为什么被折叠?
 到【灌水乐园】发言


