


hiai引擎框架-主体分割
介绍
本示例展示了使用hiai引擎框架提供的主体分割能力。
本示例模拟了在应用里,选择一张图片,识别其图片中的显著性主体并展示出来主体的边界框的数据。
需要使用hiai引擎框架通用文字识别接口@hms.ai.vision.subjectSegmentation.d.ts。
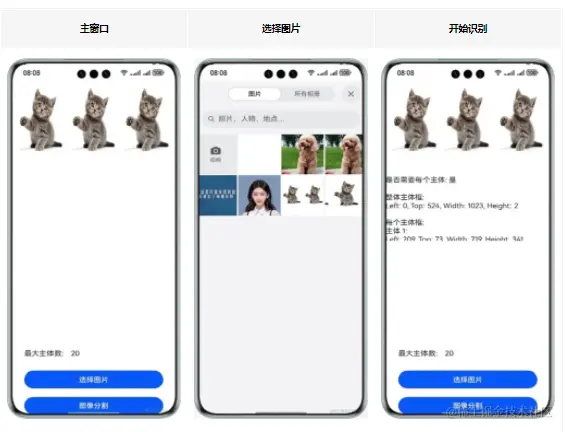
效果预览
使用说明:
- 在手机的主屏幕,点击”imageSegmentationDemo“,启动应用。
- 点击“选择图片”按钮,默认自带一张图片,用户可以在图库中选择图片,或者通过相机拍照(请先在图库中确定已开启图库权限)。
- 点击“主体分割”按钮,识别图片中的显著性主体,结果通过主体边界框的坐标显示。
具体实现
本示例展示的控件在@hms.ai.vision.subjectSegmentation.d.ts定义了主体分割API:
- function doSegmentation(visionInfo: VisionInfo, config?: SegmentationConfig): Promise;
业务使用时,需要先进行import导入subjectSegmentation 调用通用主体分割接口,并传入想要识别的图片,接收处理返回的结果(文字信息)。参考:
import image from '@ohos.multimedia.image'
import hilog from '@ohos.hilog'
import subjectSegmentation from '@hms.ai.vision.subjectSegmentation';
import { mContext } from '../entryability/EntryAbility';
import picker from '@ohos.file.picker'
import fs from '@ohos.file.fs';
import { BusinessError } from '@ohos.base'

const TAG: string = "ImageSegmentationSample";

class PictureUtil {
  private constructor() {
  }
  /**
   * class to string.
   *
   * @param data the class to be converted
   * @return the result string
   */
  public static async getPixelMap(picPath: Resource): Promise<image.PixelMap> {
    let resourceM = mContext.resourceManager;
    const value = await resourceM.getMediaContent(picPath);
    const imageSourceApi = image.createImageSource(value.buffer);
    return imageSourceApi.createPixelMap();
  }
}

@Entry
@Component
struct Index {
  @State chooseImage: PixelMap | undefined = undefined
  @State dataValues: string = ''
  @State segmentedImage: PixelMap | undefined = undefined
  @State maxNum: string = '20'

  aboutToAppear() {
    PictureUtil.getPixelMap($r("app.media.3cat")).then(data => {
      this.chooseImage = data
    })
  }

  build() {
    Column() {
      Image(this.chooseImage)
        .objectFit(ImageFit.Fill)
        .height('30%')
        .accessibilityDescription("待分割图片")

      Scroll() {
        Text(this.dataValues)
          .copyOption(CopyOptions.LocalDevice)
          .margin(10)
          .width('100%')
      }
      .height('20%')  // 设置Scroll组件的高度

      Image(this.segmentedImage)
        .objectFit(ImageFit.Fill)
        .height('30%')
        .accessibilityDescription("分割后的主体图像")

      Row() {
        Text('最大主体数:')
          .fontSize(16)
        TextInput({ placeholder: '请输入最大主体数', text: this.maxNum })
          .type(InputType.Number)
          .placeholderColor(Color.Gray)
          .fontSize(16)
          .backgroundColor(Color.White)
          .onChange((value: string) => {
            this.maxNum = value
          })
      }
      .width('80%')
      .margin(10)

      Button('选择图片')
        .type(ButtonType.Capsule)
        .fontColor(Color.White)
        .alignSelf(ItemAlign.Center)
        .width('80%')
        .margin(10)
        .onClick(() => {
          // 拉起图库
          this.selectImage()
        })

      Button('图像分割')
        .type(ButtonType.Capsule)
        .fontColor(Color.White)
        .alignSelf(ItemAlign.Center)
        .width('80%')
        .margin(10)
        .onClick(async () => {
          if (!this.chooseImage) {
            hilog.error(0x0000, 'testTag', "imageSegmentation not have chooseImage");
            return
          }
          // 调用图像分割接口
          let visionInfo: subjectSegmentation.VisionInfo = {
            pixelMap: this.chooseImage,
          };
          let config: subjectSegmentation.SegmentationConfig = {
            maxCount: parseInt(this.maxNum),
            enableSubjectDetails: true,
            enableSubjectForegroundImage: true,
          };
          let data: subjectSegmentation.SegmentationResult = await subjectSegmentation.doSegmentation(visionInfo, config);
          let outputString = `主体数量: ${data.subjectCount}\n`;
          outputString += `最大主体数: ${config.maxCount}\n`;
          outputString += `是否需要每个主体: ${config.enableSubjectDetails ? '是' : '否'}\n\n`;
          let segBox : subjectSegmentation.Rectangle = data.fullSubject.subjectRectangle;
          let segBoxString = `整体主体框:\nLeft: ${segBox.left}, Top: ${segBox.top}, Width: ${segBox.width}, Height: ${segBox.height}\n\n`;
          outputString += segBoxString;

          if (config.enableSubjectDetails) {
            outputString += '每个主体框:\n';
            if (data.subjectDetails) {
              for (let i = 0; i < data.subjectDetails.length; i++) {
                let detailSegBox: subjectSegmentation.Rectangle = data.subjectDetails[i].subjectRectangle;
                outputString += `主体 ${i + 1}:\nLeft: ${detailSegBox.left}, Top: ${detailSegBox.top}, Width: ${detailSegBox.width}, Height: ${detailSegBox.height}\n\n`;
              }
            }
          }

          hilog.info(0x0000, 'testTag', "Segmentation result: " + outputString);
          this.dataValues = outputString;
        })
    }
    .width('100%')
    .height('100%')
    .justifyContent(FlexAlign.Center)
  }

  private async selectImage() {
    let uri = await this.openPhoto()
    if (uri === undefined) {
      hilog.error(0x0000, 'imageSegmentation', "uri is undefined");
    }
    this.loadImage(uri);
  }

  private openPhoto(): Promise<Array<string>> {
    return new Promise<Array<string>>((resolve, reject) => {
      let PhotoSelectOptions = new picker.PhotoSelectOptions();
      PhotoSelectOptions.MIMEType = picker.PhotoViewMIMETypes.IMAGE_TYPE;
      PhotoSelectOptions.maxSelectNumber = 1;
      let photoPicker = new picker.PhotoViewPicker();
      console.error(TAG, 'PhotoViewPicker.select successfully, PhotoSelectResult uri: ');
      photoPicker.select(PhotoSelectOptions).then((PhotoSelectResult) => {
        console.error(TAG, 'PhotoViewPicker.select successfully, PhotoSelectResult uri: ' + JSON.stringify(PhotoSelectResult));
        resolve(PhotoSelectResult.photoUris)
      }).catch((err: BusinessError) => {
        console.error(TAG, 'PhotoViewPicker.select failed with err: ' + err);
        reject();
      });
    })
  }

  private loadImage(names: string[]) {
    setTimeout(async () => {
      let imageSource: image.ImageSource | undefined = undefined
      let f = await fs.open(names[0], fs.OpenMode.READ_ONLY)
      imageSource = image.createImageSource(f.fd)
      this.chooseImage = await imageSource.createPixelMap()
      hilog.info(0x0000, 'imageSegmentation', `this.chooseImage===${JSON.stringify(this.chooseImage)}`);
    }, 100
    )
  }
}
以上就是本篇文章所带来的鸿蒙开发中一小部分技术讲解;想要学习完整的鸿蒙全栈技术。可以在结尾找我可全部拿到!
下面是鸿蒙的完整学习路线,展示如下:

除此之外,根据这个学习鸿蒙全栈学习路线,也附带一整套完整的学习【文档+视频】,内容包含如下:
内容包含了:(ArkTS、ArkUI、Stage模型、多端部署、分布式应用开发、音频、视频、WebGL、OpenHarmony多媒体技术、Napi组件、OpenHarmony内核、鸿蒙南向开发、鸿蒙项目实战)等技术知识点。帮助大家在学习鸿蒙路上快速成长!
鸿蒙【北向应用开发+南向系统层开发】文档
鸿蒙【基础+实战项目】视频
鸿蒙面经

为了避免大家在学习过程中产生更多的时间成本,对比我把以上内容全部放在了↓↓↓想要的可以自拿喔!谢谢大家观看!


 213
213

 被折叠的 条评论
为什么被折叠?
被折叠的 条评论
为什么被折叠?
 到【灌水乐园】发言


