Spring Security 自定义用户信息端点与多种登录方式共存_oauth2 自定义端点(1)

先自我介绍一下,小编浙江大学毕业,去过华为、字节跳动等大厂,目前阿里P7

深知大多数程序员,想要提升技能,往往是自己摸索成长,但自己不成体系的自学效果低效又漫长,而且极易碰到天花板技术停滞不前!

因此收集整理了一份《2024年最新大数据全套学习资料》,初衷也很简单,就是希望能够帮助到想自学提升又不知道该从何学起的朋友。
img
img
img
img
img

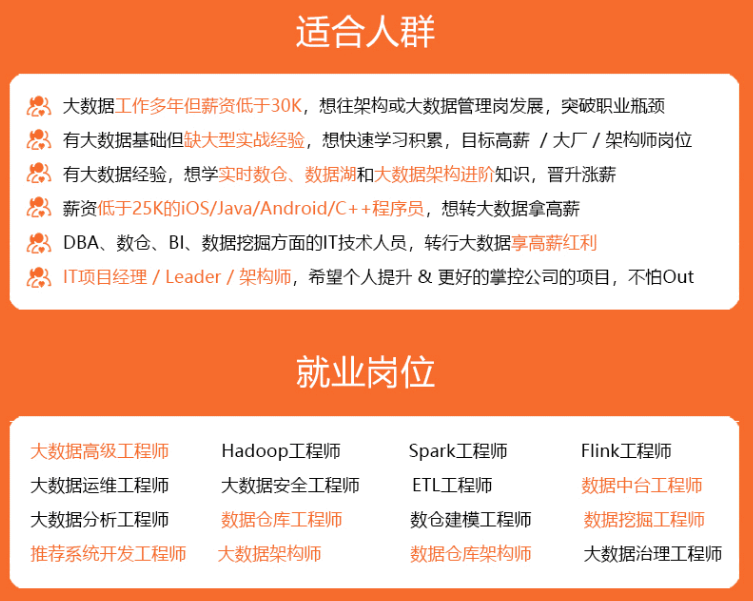
既有适合小白学习的零基础资料,也有适合3年以上经验的小伙伴深入学习提升的进阶课程,涵盖了95%以上大数据知识点,真正体系化!

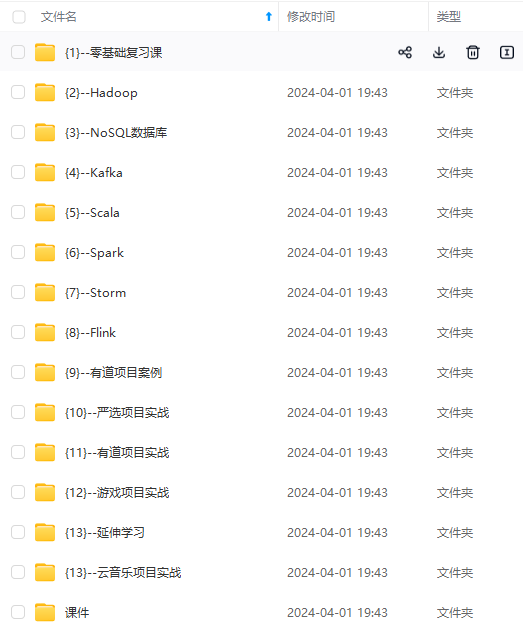
由于文件比较多,这里只是将部分目录截图出来,全套包含大厂面经、学习笔记、源码讲义、实战项目、大纲路线、讲解视频,并且后续会持续更新

如果你需要这些资料,可以添加V获取:vip204888 (备注大数据)
img

正文

public class CustomOAuth2UserService implements OAuth2UserService {
    private static final String MISSING\_USER\_INFO\_URI\_ERROR\_CODE = "missing\_user\_info\_uri";

    private static final String MISSING\_USER\_NAME\_ATTRIBUTE\_ERROR\_CODE = "missing\_user\_name\_attribute";

    private static final String INVALID\_USER\_INFO\_RESPONSE\_ERROR\_CODE = "invalid\_user\_info\_response";

    private static final ParameterizedTypeReference<Map<String, Object>> PARAMETERIZED\_RESPONSE\_TYPE = new ParameterizedTypeReference<Map<String, Object>>() {
    };

    private Converter<OAuth2UserRequest, RequestEntity<?>> requestEntityConverter = new OAuth2UserRequestEntityConverter();

    private RestOperations restOperations;

    public CustomOAuth2UserService() {
        RestTemplate restTemplate = new RestTemplate();
        restTemplate.setErrorHandler(new OAuth2ErrorResponseErrorHandler());
        this.restOperations = restTemplate;
    }

    @Override
    public OAuth2User loadUser(OAuth2UserRequest userRequest) throws OAuth2AuthenticationException {
        Assert.notNull(userRequest, "userRequest cannot be null");
        if (!StringUtils
                .hasText(userRequest.getClientRegistration().getProviderDetails().getUserInfoEndpoint().getUri())) {
            OAuth2Error oauth2Error = new OAuth2Error(MISSING\_USER\_INFO\_URI\_ERROR\_CODE,
                    "Missing required UserInfo Uri in UserInfoEndpoint for Client Registration: "
                            + userRequest.getClientRegistration().getRegistrationId(),
                    null);
            throw new OAuth2AuthenticationException(oauth2Error, oauth2Error.toString());
        }
        String userNameAttributeName = userRequest.getClientRegistration().getProviderDetails().getUserInfoEndpoint()
                .getUserNameAttributeName();
        if (!StringUtils.hasText(userNameAttributeName)) {
            OAuth2Error oauth2Error = new OAuth2Error(MISSING\_USER\_NAME\_ATTRIBUTE\_ERROR\_CODE,
                    "Missing required \"user name\" attribute name in UserInfoEndpoint for Client Registration: "
                            + userRequest.getClientRegistration().getRegistrationId(),
                    null);
            throw new OAuth2AuthenticationException(oauth2Error, oauth2Error.toString());
        }
        RequestEntity<?> request = this.requestEntityConverter.convert(userRequest);
        ResponseEntity<Map<String, Object>> response = getResponse(userRequest, request);
        Map<String, Object> userAttributes = response.getBody();
        Set<GrantedAuthority> authorities = new LinkedHashSet<>();
        authorities.add(new OAuth2UserAuthority(userAttributes));
        OAuth2AccessToken token = userRequest.getAccessToken();
        for (String authority : token.getScopes()) {
            authorities.add(new SimpleGrantedAuthority("SCOPE\_" + authority));
        }
        //更换为自定义的OAuth2User实现
        return new CustomOAuth2User(authorities, userAttributes, userNameAttributeName);
    }

    private ResponseEntity<Map<String, Object>> getResponse(OAuth2UserRequest userRequest, RequestEntity<?> request) {
        try {
            return this.restOperations.exchange(request, PARAMETERIZED\_RESPONSE\_TYPE);
        }
        catch (OAuth2AuthorizationException ex) {
            OAuth2Error oauth2Error = ex.getError();
            StringBuilder errorDetails = new StringBuilder();
            errorDetails.append("Error details: [");
            errorDetails.append("UserInfo Uri: ")
                    .append(userRequest.getClientRegistration().getProviderDetails().getUserInfoEndpoint().getUri());
            errorDetails.append(", Error Code: ").append(oauth2Error.getErrorCode());
            if (oauth2Error.getDescription() != null) {
                errorDetails.append(", Error Description: ").append(oauth2Error.getDescription());
            }
            errorDetails.append("]");
            oauth2Error = new OAuth2Error(INVALID\_USER\_INFO\_RESPONSE\_ERROR\_CODE,
                    "An error occurred while attempting to retrieve the UserInfo Resource: " + errorDetails.toString(),
                    null);
            throw new OAuth2AuthenticationException(oauth2Error, oauth2Error.toString(), ex);
        }
        catch (UnknownContentTypeException ex) {
            String errorMessage = "An error occurred while attempting to retrieve the UserInfo Resource from '"
                    + userRequest.getClientRegistration().getProviderDetails().getUserInfoEndpoint().getUri()
                    + "': response contains invalid content type '" + ex.getContentType().toString() + "'. "
                    + "The UserInfo Response should return a JSON object (content type 'application/json') "
                    + "that contains a collection of name and value pairs of the claims about the authenticated End-User. "
                    + "Please ensure the UserInfo Uri in UserInfoEndpoint for Client Registration '"
                    + userRequest.getClientRegistration().getRegistrationId() + "' conforms to the UserInfo Endpoint, "
                    + "as defined in OpenID Connect 1.0: 'https://openid.net/specs/openid-connect-core-1\_0.html#UserInfo'";
            OAuth2Error oauth2Error = new OAuth2Error(INVALID\_USER\_INFO\_RESPONSE\_ERROR\_CODE, errorMessage, null);
            throw new OAuth2AuthenticationException(oauth2Error, oauth2Error.toString(), ex);
        }
        catch (RestClientException ex) {
            OAuth2Error oauth2Error = new OAuth2Error(INVALID\_USER\_INFO\_RESPONSE\_ERROR\_CODE,
                    "An error occurred while attempting to retrieve the UserInfo Resource: " + ex.getMessage(), null);
            throw new OAuth2AuthenticationException(oauth2Error, oauth2Error.toString(), ex);
        }
    }

    /\*\*
 \* Sets the {@link Converter} used for converting the {@link OAuth2UserRequest} to a
 \* {@link RequestEntity} representation of the UserInfo Request.
 \* @param requestEntityConverter the {@link Converter} used for converting to a
 \* {@link RequestEntity} representation of the UserInfo Request
 \* @since 5.1
 \*/
    public final void setRequestEntityConverter(Converter<OAuth2UserRequest, RequestEntity<?>> requestEntityConverter) {
        Assert.notNull(requestEntityConverter, "requestEntityConverter cannot be null");
        this.requestEntityConverter = requestEntityConverter;
    }

    /\*\*
 \* Sets the {@link RestOperations} used when requesting the UserInfo resource.
 \*
 \* <p>
 \* <b>NOTE:</b> At a minimum, the supplied {@code restOperations} must be configured
 \* with the following:
 \* <ol>
 \* <li>{@link ResponseErrorHandler} - {@link OAuth2ErrorResponseErrorHandler}</li>
 \* </ol>
 \* @param restOperations the {@link RestOperations} used when requesting the UserInfo
 \* resource
 \* @since 5.1
 \*/
    public final void setRestOperations(RestOperations restOperations) {
        Assert.notNull(restOperations, "restOperations cannot be null");
        this.restOperations = restOperations;
    }
}

3、配置自定义OAuth2UserService实现

创建一个@Configuration注解的类,用来生成SecurityFilterChain Bean

    @Bean
    SecurityFilterChain oauth2SecurityFilterChain(HttpSecurity http) throws Exception {
        http.authorizeRequests((requests) -> requests.anyRequest().authenticated());
        //自定义用户信息获取实现
        http.oauth2Login(oauth2 -> oauth2.userInfoEndpoint(userInfo -> userInfo.userService(new CustomOAuth2UserService())));
        http.oauth2Client();
        return http.build();
    }

测试一下,当我们点击Customize,正常跳转,并显示了Hello,阿提说说,说明成功了。
image.png

💡当再使用Gitee、GitHub登录的时候,不能登录了,这是怎么回事?
原因是上面这种配置方式,把其他的OAuth2登录都给覆盖了,所有获取用户信息的逻辑都会使用 CustomOAuth2UserService,但这几个第三方登录的接口返回格式又不一样了,因此这种配置方式违背了我们的初衷。

4、多方登录共存

创建一个用于保存多个登录实现的类CompositeOAuth2UserService,同样实现OAuth2UserService接口。

@Configuration
public class OAuth2LoginConfig {
    //无法共存
// @Bean
// SecurityFilterChain oauth2SecurityFilterChain(HttpSecurity http) throws Exception {
// http.authorizeRequests((requests) -> requests.anyRequest().authenticated());
// //自定义用户信息获取实现
// http.oauth2Login(oauth2 -> oauth2.userInfoEndpoint(userInfo -> userInfo.userService(new CustomOAuth2UserService())));
// http.oauth2Client();
// return http.build();
// }


    //多方登录共存的方式
    @Bean
    SecurityFilterChain oauth2SecurityFilterChain(HttpSecurity http) throws Exception {
        http.authorizeRequests((requests) -> requests.anyRequest().authenticated());
        http.oauth2Login(oauth2 -> oauth2.userInfoEndpoint(userInfo -> userInfo.userService(CustomUserService())));
        http.oauth2Client();
        return http.build();
    }

    private OAuth2UserService<OAuth2UserRequest, OAuth2User> CustomUserService() {
        //自定义的OAuth2客户端id
        final String CUSTOM = "customize";
        final CompositeOAuth2UserService compositeOAuth2UserService = new CompositeOAuth2UserService();
        //这里可以把所有自定义的实现都初始化进去
        compositeOAuth2UserService.getUserServiceMap().put(CUSTOM, new CustomOAuth2UserService());
        return compositeOAuth2UserService;
    }
}

多个三方登录共存主要实现类

/\*\*
 \* 多个三方登录共存
 \*/
public class CompositeOAuth2UserService implements OAuth2UserService<OAuth2UserRequest, OAuth2User> {

    //重点,registrationId -> OAuth2UserService实现
    private Map<String, OAuth2UserService> userServiceMap = new ConcurrentHashMap<>();

    //默认OAuth2UserService实现
    private static final String DEFAULT\_KEY = "default\_key";

    public CompositeOAuth2UserService() {
        //初始化一个默认值
        userServiceMap.put(DEFAULT\_KEY, new DefaultOAuth2UserService());
    }

    @Override
    public OAuth2User loadUser(OAuth2UserRequest userRequest) throws OAuth2AuthenticationException {
        ClientRegistration clientRegistration = userRequest.getClientRegistration();
        //根据注册客户端id获取对于的OAuth2UserService实现
        OAuth2UserService service = userServiceMap.get(clientRegistration.getRegistrationId());
        //没有获取到自定义的,使用默认实现
        if (service == null) {
            service = userServiceMap.get(DEFAULT\_KEY);
        }
        //调用loadUser
        return service.loadUser(userRequest);
    }

    public Map<String, OAuth2UserService> getUserServiceMap() {
        return this.userServiceMap;
    }
}


**网上学习资料一大堆,但如果学到的知识不成体系,遇到问题时只是浅尝辄止,不再深入研究,那么很难做到真正的技术提升。**

**需要这份系统化的资料的朋友,可以添加V获取:vip204888 (备注大数据)**
![img](https://img-blog.csdnimg.cn/img_convert/bb7f552c7fb691a18fbc467431c36169.png)

**一个人可以走的很快,但一群人才能走的更远!不论你是正从事IT行业的老鸟或是对IT行业感兴趣的新人,都欢迎加入我们的的圈子(技术交流、学习资源、职场吐槽、大厂内推、面试辅导),让我们一起学习成长!**

 }
}


**网上学习资料一大堆,但如果学到的知识不成体系,遇到问题时只是浅尝辄止,不再深入研究,那么很难做到真正的技术提升。**

**需要这份系统化的资料的朋友,可以添加V获取:vip204888 (备注大数据)**
[外链图片转存中...(img-JpL4ciaX-1713325138187)]

**一个人可以走的很快,但一群人才能走的更远!不论你是正从事IT行业的老鸟或是对IT行业感兴趣的新人,都欢迎加入我们的的圈子(技术交流、学习资源、职场吐槽、大厂内推、面试辅导),让我们一起学习成长!**

  • 3
    点赞
  • 5
    收藏
    觉得还不错? 一键收藏
  • 0
    评论
### 回答1: Spring Security提供了多种登录方式的支持,可以使用表单登录、Basic认证、OAuth2等方式进行身份验证。如果需要自定义多种登录方式,可以按照以下步骤进行: 1. 实现自定义的AuthenticationProvider AuthenticationProvider是Spring Security的一个核心接口,用于实现身份验证逻辑。通过实现自定义的AuthenticationProvider,可以实现多种不同的身份验证方式。 例如,可以实现一个LDAPAuthenticationProvider,用于基于LDAP的身份验证,或者实现一个SmsCodeAuthenticationProvider,用于基于短信验证码的身份验证。 2. 配置多个AuthenticationProvider 在Spring Security的配置文件中,可以通过配置多个AuthenticationProvider来支持多种登录方式。例如,可以同时配置一个基于表单登录的AuthenticationProvider和一个基于OAuth2的AuthenticationProvider。 3. 实现自定义的AuthenticationFilter AuthenticationFilter是Spring Security用于处理身份验证请求的过滤器。通过实现自定义的AuthenticationFilter,可以实现多种不同的身份验证方式。 例如,可以实现一个基于短信验证码的AuthenticationFilter,用于处理短信验证码登录请求。 4. 配置多个AuthenticationFilter 在Spring Security的配置文件中,可以通过配置多个AuthenticationFilter来支持多种登录方式。例如,可以同时配置一个基于表单登录的AuthenticationFilter和一个基于短信验证码的AuthenticationFilter。 总的来说,实现多种登录方式的关键在于实现自定义的AuthenticationProvider和AuthenticationFilter,并在Spring Security的配置文件中进行配置。 ### 回答2: Spring Security 提供了多种自定义登录方式的选项。以下是一些常见的方法: 1. 自定义用户名密码登录:可以使用 Spring Security 的表单登录功能,通过配置用户名和密码的输入框,实现用户名密码登录功能。 例如,可以通过配置 `formLogin()` 方法来实现: ```java protected void configure(HttpSecurity http) throws Exception { http .formLogin() .loginPage("/login") .usernameParameter("username") .passwordParameter("password") .defaultSuccessUrl("/home") .permitAll(); } ``` 2. 自定义第三方登录:可以使用 Spring Security OAuth2 来实现第三方登录,例如使用 Facebook、Google 或 Github 等社交媒体的账号进行登录Spring Security OAuth2 提供了很多集成第三方认证的实例代码,可以根据具体的需求进行自定义。 3. 自定义手机号码登录:可以通过继承 Spring Security 的 `AbstractAuthenticationProcessingFilter` 类来实现自定义手机号码登录。 可以在自定义的过滤器中验证手机号码,并进行认证逻辑。 4. 自定义单点登录(SSO):可以通过集成 Spring Security 的 `AuthenticationProvider` 接口来实现自定义的单点登录认证。 可以通过实现该接口的 `authenticate()` 方法来处理单点登录的逻辑。 这些只是一些常见的自定义登录方式的示例,根据具体的需求,可以结合 Spring Security 提供的各种功能和扩展点,灵活地进行自定义实现。

“相关推荐”对你有帮助么?

  • 非常没帮助
  • 没帮助
  • 一般
  • 有帮助
  • 非常有帮助
提交
评论
添加红包

请填写红包祝福语或标题

红包个数最小为10个

红包金额最低5元

当前余额3.43前往充值 >
需支付:10.00
成就一亿技术人!
领取后你会自动成为博主和红包主的粉丝 规则
hope_wisdom
发出的红包
实付
使用余额支付
点击重新获取
扫码支付
钱包余额 0

抵扣说明:

1.余额是钱包充值的虚拟货币,按照1:1的比例进行支付金额的抵扣。
2.余额无法直接购买下载,可以购买VIP、付费专栏及课程。

余额充值