


一、AOP概念引入
编写入门案例
创建maven的项目,引入开发的坐标
<dependencies>
        <!--spring的核心依赖jar包-->
        <dependency>
            <groupId>org.springframework</groupId>
            <artifactId>spring-context</artifactId>
            <version>5.0.2.RELEASE</version>
        </dependency>
        <!--日志相关-->
        <dependency>
            <groupId>commons-logging</groupId>
            <artifactId>commons-logging</artifactId>
            <version>1.2</version>
        </dependency>
        <dependency>
            <groupId>log4j</groupId>
            <artifactId>log4j</artifactId>
            <version>1.2.12</version>
        </dependency>
        <!--有单元测试的环境,Spring5版本,Junit4.12版本-->
        <dependency>
            <groupId>junit</groupId>
            <artifactId>junit</artifactId>
            <version>4.12</version>
            <scope>test</scope>
        </dependency>
        <!--连接池  阿里巴巴  第三方-->
        <dependency>
            <groupId>com.alibaba</groupId>
            <artifactId>druid</artifactId>
            <version>1.1.10</version>
        </dependency>
        <!--mysql驱动包-->
        <dependency>
            <groupId>mysql</groupId>
            <artifactId>mysql-connector-java</artifactId>
            <version>8.0.27</version>
        </dependency>
         <!--Spring整合Junit测试的jar包-->
        <dependency>
            <groupId>org.springframework</groupId>
            <artifactId>spring-test</artifactId>
            <version>5.0.2.RELEASE</version>
            <scope>test</scope>
        </dependency>
    </dependencies>
传统方式
1、service业务层实现(包含事务管理)
package com.qcby.service;

import com.qcby.model.Account;

/**
 * AOP概念引入需要的业务层接口
 * 模拟转账业务
 */
public interface AccountService {
    //转账逻辑方法   account1 扣款   account2 增款
    public void saveAll(Account account1,Account account2);

}


@Service("accountService")
public class AccountServiceImpl implements AccountService {
    private AccountDao accountDao;

    public void setAccountDao(AccountDao accountDao) {
        this.accountDao = accountDao;
    }

    @Override
    public void saveAll(Account account1, Account account2) {
        try {
            // 开启事务
            TxUtils.startTransaction();

            // 保存1账号
            accountDao.save(account1);

            // 模拟异常
            // int a = 1/0;

            // 保存2账号
            accountDao.save(account2);

            // 提交事务
            TxUtils.commit();
        } catch (Exception e) {
            // 打印异常信息
            e.printStackTrace();
            // 回滚事务
            TxUtils.rollback();
        } finally {
            // 关闭资源
            TxUtils.close();
        }
    }
}
2、Dao持久层实现
package com.qcby.dao;

import com.qcby.model.Account;

//持久层  account转账业务
//转账逻辑操作数据库
public interface AccountDao {
    public void save(Account account);

}


public class AccountDaoImpl implements AccountDao {
    @Override
    public void save(Account account) throws SQLException {
        Connection conn = TxUtils.getConnection();
        String sql = "insert into account values(null,?,?)";
        PreparedStatement stmt = conn.prepareStatement(sql);
        stmt.setString(1, account.getName());
        stmt.setDouble(2, account.getMoney());
        stmt.executeUpdate();
        stmt.close();
    }
}
问题分析
-
代码重复:每个Service方法都需要写相同的事务管理代码
-
耦合度高:业务逻辑和事务管理代码混合在一起
-
维护困难:修改事务逻辑需要修改所有相关方法
使用动态代理的AOP方式
service实现(无事务代码)
package com.qcby.service.impl;

import com.qcby.dao.AccountDao;
import com.qcby.model.Account;
import com.qcby.service.AccountService;
import org.springframework.beans.factory.annotation.Autowired;
import org.springframework.beans.factory.annotation.Qualifier;
import org.springframework.stereotype.Service;

/**
 * AOP概念引入需要的业务层实现类
 * 模拟转账业务
 */
@Service("accountService")
public class AccountServiceImpl implements AccountService {

    @Autowired
    @Qualifier("accountDao")
    private AccountDao accountDao;

    //转账逻辑方法   account1 扣款   account2 增款  实现
    public void saveAll(Account account1, Account account2) {
        try {
            //开启事务
//            TxUtils.startTransaction();
            //保存账号1
            accountDao.save(account1);
            //模拟异常
            //int a=1/0;
            //保存账号二
            accountDao.save(account2);
            //提交事务/回滚事务
//            TxUtils.commit();
        }catch (Exception e){
            //打印异常信息
            System.out.println("回滚");
            e.printStackTrace();
//            TxUtils.rollback();
        }finally {
            //关闭资源
            System.out.println("结束");
//            TxUtils.close();
        }

    }
}
JDK动态代理实现
package com.qcby.JDKUtils;

import com.qcby.service.AccountService;
import com.qcby.utils.TxUtils;

import java.lang.reflect.InvocationHandler;
import java.lang.reflect.Method;
import java.lang.reflect.Proxy;

//JDK代理对象
public class JdkProxy {

    public static Object getPoxy(final AccountService accountService){

        /**
         *使用Jdk的动态代理生成代理对象
         */
         Object proxy=Proxy.newProxyInstance(JdkProxy.class.getClassLoader(), accountService.getClass().getInterfaces(), new InvocationHandler() {

             /**
              *调用代理对象的方法,invoke方法就会去执行
              *@paramproxy
              *@parammethod
              *@paramargs
              *@return
              *@throwsThrowable
              * 用到反射
              */
           public Object invoke(Object proxy, Method method, Object[] args) throws Throwable {
               Object result= null;
               try {
                   //开启事务
                   TxUtils.startTransaction();
                   //对象目标对象的方法进行增强
                   result =method.invoke(accountService,args);
                   //提交事务
                   TxUtils.commit();
               }catch (Exception e){
                   e.printStackTrace();
                   TxUtils.rollback();
               }finally {
                   TxUtils.close();
               }
              return result;
           }
       });
         return proxy;
    }

}
测试代码
package com.qcby.test;

import com.qcby.JDKUtils.JdkProxy;
import com.qcby.model.Account;
import com.qcby.service.AccountService;
import org.junit.Test;
import org.junit.runner.RunWith;
import org.springframework.beans.factory.annotation.Autowired;
import org.springframework.beans.factory.annotation.Qualifier;
import org.springframework.test.context.ContextConfiguration;
import org.springframework.test.context.junit4.SpringJUnit4ClassRunner;

//整合junit文件
@RunWith(SpringJUnit4ClassRunner.class) // 使用Spring的测试运行器
@ContextConfiguration(locations = "classpath:applicationContext.xml") // 加载Spring配置文件
public class AccountTest {
    @Autowired
    @Qualifier("accountService")
    private AccountService accountService;

    @Test
    public void testSaveAll(){

//        ApplicationContext ac =new ClassPathXmlApplicationContext("applicationContext.xml");
//        AccountService accountService=(AccountService) ac.getBean("accountService");
        // 模拟两个账户
        Account account1 = new Account();
        account1.setName("abc");
        account1.setMoney(1000.0);

        Account account2 = new Account();
        account2.setName("qqq");
        account2.setMoney(2000.0);

        //生成代理对象
        Object proxyobj = JdkProxy.getPoxy(accountService);
        //强转
        AccountService proxy =(AccountService)proxyobj;
        //调用代理对象的方法
        proxy.saveAll(account1,account2);
        // 调用转账方法
//        accountService.saveAll(account1, account2);

        System.out.println("转账成功!");
    }

}
AOP方式的优势
-
业务解耦:业务代码不再包含事务管理逻辑
-
代码复用:事务管理逻辑集中处理
-
维护方便:修改事务逻辑只需修改代理类
-
灵活性强:可以动态为不同方法添加不同增强
二、Spring的AOP相关概念
AOP的概述
通俗理解:AOP(面向切面编程)就像给程序"打补丁",可以在不修改原有代码的情况下,给程序添加新功能。
生活比喻:
-
就像给手机贴膜:不需要改变手机本身,就能增加防刮功能
-
类似快递包装:在原有商品外增加保护层,不影响商品本身
解决了什么问题:
-
传统OOP(面向对象)中,像日志记录、权限检查这些通用功能需要在每个方法里重复写
-
AOP把这些"横切关注点"抽离出来,实现"一次编写,多处使用"
核心特点:
-
横向抽取:不同于继承的纵向扩展
-
非侵入式:不改动原有代码
-
动态增强:运行时给方法添加功能
AOP的优势
三大好处:
-
消灭重复代码
-
把日志、事务等通用功能集中管理
-
示例:不用在每个支付方法里写日志代码
-
-
提升开发效率
-
专注业务逻辑开发
-
通用功能通过配置实现
-
-
维护更方便
-
修改日志格式只需改一处
-
不影响业务代码
-
AOP底层原理
两种代理方式:
-
JDK动态代理(适合接口)
-
过程:创建接口的代理类 → 加载到JVM → 调用代理方法
-
特点:要求目标类必须实现接口
-
-
CGLIB代理(适合类)
-
过程:生成目标类的子类作为代理
-
特点:通过继承实现,无需接口
-
工作流程:原始方法 → [代理拦截] → 添加增强功能 → 执行原始方法 → [代理拦截] → 返回结果
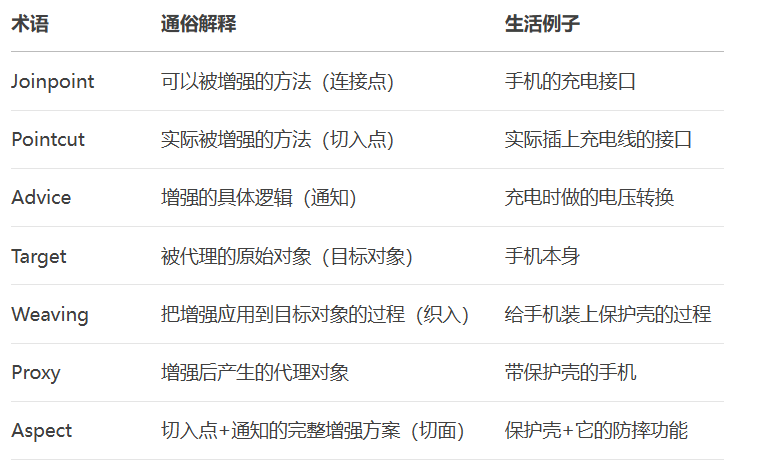
AOP相关的术语
Joinpoint(连接点) 所谓连接点是指那些被拦截到的点。在spring中,这些点指的 是方法,因为spring只支持方法类型的连接点
Pointcut(切入点)-- 所谓切入点是指我们要对哪些Joinpoint进行拦截的定义
Advice(通知/增强)-- 所谓通知是指拦截到Joinpoint之后所要做的事情就是通知. 通知分为前置通知,后置通知,异常通知,最终通知,环绕通知(切面要完成的功能)
Target(目标对象)-- 代理的目标对象
Weaving(织入)-- 是指把增强应用到目标对象来创建新的代理对象的过程
Proxy(代理)--一个类被AOP织入增强后,就产生一个结果代理类
Aspect(切面)--是切入点和通知的结合,以后咱们自己来编写和配置的
三、Spring的AOP技术--配置文件方式
AOP配置文件方式入门程序
基本实现步骤:
1、创建Maven工程并导入坐标依赖
    <dependencies>
        <dependency>
            <groupId>org.springframework</groupId>
            <artifactId>spring-context</artifactId>
            <version>5.0.2.RELEASE</version>
        </dependency>
        <dependency>
            <groupId>commons-logging</groupId>
            <artifactId>commons-logging</artifactId>
            <version>1.2</version>
        </dependency>
        <dependency>
            <groupId>log4j</groupId>
            <artifactId>log4j</artifactId>
            <version>1.2.12</version>
        </dependency>
        <dependency>
            <groupId>org.springframework</groupId>
            <artifactId>spring-test</artifactId>
            <version>5.0.2.RELEASE</version>
        </dependency>
        <dependency>
            <groupId>junit</groupId>
            <artifactId>junit</artifactId>
            <version>4.12</version>
        </dependency>
        <!--AOP联盟-->
        <dependency>
            <groupId>aopalliance</groupId>
            <artifactId>aopalliance</artifactId>
            <version>1.0</version>
        </dependency>
        <!--SpringAspects-->
        <dependency>
            <groupId>org.springframework</groupId>
            <artifactId>spring-aspects</artifactId>
            <version>5.0.2.RELEASE</version>
        </dependency>
        <!--aspectj-->
        <dependency>
            <groupId>org.aspectj</groupId>
            <artifactId>aspectjweaver</artifactId>
            <version>1.8.3</version>
        </dependency>
    </dependencies>
2、创建Spring配置文件
<?xml version="1.0" encoding="UTF-8"?>
<beans xmlns="http://www.springframework.org/schema/beans"
       xmlns:xsi="http://www.w3.org/2001/XMLSchema-instance"
       xmlns:aop="http://www.springframework.org/schema/aop"
       xsi:schemaLocation="
        http://www.springframework.org/schema/beans
        http://www.springframework.org/schema/beans/spring-beans.xsd
        http://www.springframework.org/schema/aop
        http://www.springframework.org/schema/aop/spring-aop.xsd">
</beans>
3、定义目标类
public class UserServiceImpl implements UserService {
    @Override
    public void save() {
        System.out.println("业务层:保存用户...");
    }
}
4、配置目标类
<bean id="userService" class="com.qcbyjy.demo2.UserServiceImpl"/>5、定义切面类
public class MyXmlAspect {
    public void log() {
        System.out.println("增强的方法执行了...");
    }
}
6、配置AOP
<aop:config>
    <aop:aspect ref="myXmlAspect">
        <aop:before method="log"
                    pointcut="execution(public void com.qcbyjy.demo2.UserServiceImpl.save())"/>
    </aop:aspect>
</aop:config>
7、编写测试类
@RunWith(SpringJUnit4ClassRunner.class)
@ContextConfiguration("classpath:applicationContext_demo2.xml")
public class Demo2 {
    @Autowired
    private UserService userService;

    @Test
    public void run1() {
        userService.save();
    }
}
切入点表达式
表达式语法:基本格式:execution([修饰符] 返回值类型 包名.类名.方法名(参数))
- 修饰符可以省略不写,不是必须要出现的。
- 返回值类型是不能省略不写的,根据你的方法来编写返回值。可以使用*代替。
- 包名例如:com.tx.demo3.BookDaoImpl
- 首先com是不能省略不写的,但是可以使用*代替
- 中间的包名可以使用*号代替
- 如果想省略中间的包名可以使用
- 类名也可以使用*号代替,也有类似的写法:*DaoImpl
- 方法也可以使用*号代替 参数如果是一个参数可以使用*号代替,如果想代表任意参数使用
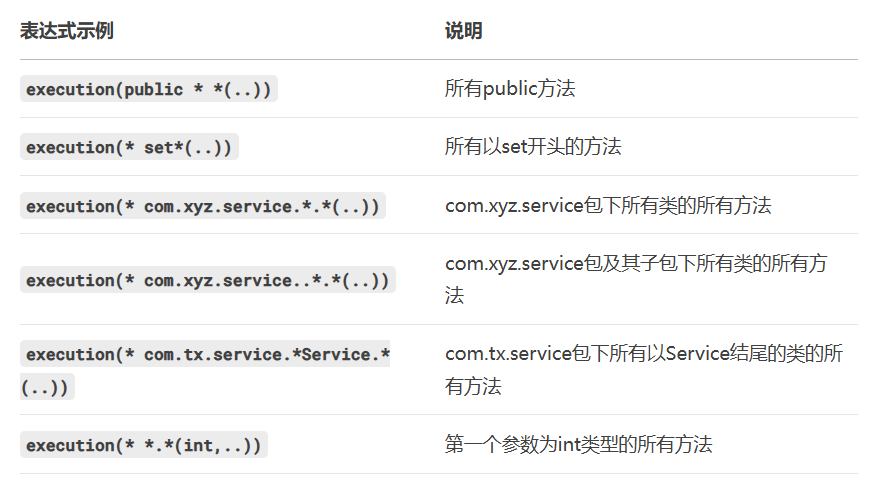 通用表达式:
<aop:before method="log"
            pointcut="execution(* com.qcbyjy.*.*ServiceImpl.save*(..))"/>
AOP通知类型
五种通知类型配置
<aop:config>
    <aop:aspect ref="myXmlAspect">
        <!-- 1. 前置通知 -->
        <aop:before method="beforeAdvice"
                    pointcut="execution(* com.qcbyjy..*.*(..))"/>

        <!-- 2. 最终通知 -->
        <aop:after method="afterAdvice"
                  pointcut="execution(* com.qcbyjy..*.*(..))"/>

        <!-- 3. 后置通知 -->
        <aop:after-returning method="afterReturningAdvice"
                            pointcut="execution(* com.qcbyjy..*.*(..))"/>

        <!-- 4. 异常通知 -->
        <aop:after-throwing method="afterThrowingAdvice"
                           pointcut="execution(* com.qcbyjy..*.*(..))"/>

        <!-- 5. 环绕通知 -->
        <aop:around method="aroundAdvice"
                   pointcut="execution(* com.qcbyjy..*.*(..))"/>
    </aop:aspect>
</aop:config>
切面类实现
public class MyXmlAspect {
    // 前置通知
    public void beforeAdvice() {
        System.out.println("前置通知:方法执行前调用");
    }

    // 最终通知
    public void afterAdvice() {
        System.out.println("最终通知:无论是否异常都会执行");
    }

    // 后置通知
    public void afterReturningAdvice(Object result) {
        System.out.println("后置通知:方法正常返回,返回值: " + result);
    }

    // 异常通知
    public void afterThrowingAdvice(Exception ex) {
        System.out.println("异常通知:方法抛出异常: " + ex.getMessage());
    }

    // 环绕通知
    public Object aroundAdvice(ProceedingJoinPoint pjp) throws Throwable {
        System.out.println("环绕通知-前");
        Object result = pjp.proceed();  // 必须手动调用目标方法
        System.out.println("环绕通知-后");
        return result;
    }
}
关键点总结
-
执行顺序:
-
环绕通知前 → 前置通知 → 目标方法 → 环绕通知后 → 后置通知/异常通知 → 最终通知
-
-
XML配置要点:
-
必须引入AOP命名空间
-
使用
<aop:config>作为根标签 -
每个切面使用
<aop:aspect>配置 -
通知类型通过不同子标签配置
-
-
通知选择:
-
需要获取返回值 → 后置通知
-
需要处理异常 → 异常通知
-
需要方法前后都处理 → 环绕通知
-
无论成功失败都要执行 → 最终通知
-
四、Spring的AOP技术--注解方式
AOP注解方式入门程序
基本实现步骤:
1、创建Maven工程并导入坐标
<dependencies>
        <dependency>
            <groupId>org.springframework</groupId>
            <artifactId>spring-context</artifactId>
            <version>5.0.2.RELEASE</version>
        </dependency>
        <dependency>
            <groupId>commons-logging</groupId>
            <artifactId>commons-logging</artifactId>
            <version>1.2</version>
        </dependency>
        <dependency>
            <groupId>log4j</groupId>
            <artifactId>log4j</artifactId>
            <version>1.2.12</version>
        </dependency>
        <dependency>
            <groupId>org.springframework</groupId>
            <artifactId>spring-test</artifactId>
            <version>5.0.2.RELEASE</version>
        </dependency>
        <dependency>
            <groupId>junit</groupId>
            <artifactId>junit</artifactId>
            <version>4.12</version>
        </dependency>
        <!--AOP联盟-->
        <dependency>
            <groupId>aopalliance</groupId>
            <artifactId>aopalliance</artifactId>
            <version>1.0</version>
        </dependency>
        <!--SpringAspects-->
        <dependency>
            <groupId>org.springframework</groupId>
            <artifactId>spring-aspects</artifactId>
            <version>5.0.2.RELEASE</version>
        </dependency>
        <!--aspectj-->
        <dependency>
            <groupId>org.aspectj</groupId>
            <artifactId>aspectjweaver</artifactId>
            <version>1.8.3</version>
        </dependency>
    </dependencies>
2、编写接口和实现类
public interface OrderService {
    void save();
}

@Service
public class OrderServiceImpl implements OrderService {
    @Override
    public void save() {
        System.out.println("订单保存操作...");
    }
}
3、编写切面类
package com.qcbyjy.demo3;

import org.aspectj.lang.annotation.Aspect;
import org.aspectj.lang.annotation.Before;
import org.springframework.stereotype.Component;

@Component  // 把该类交给IOC管理
@Aspect     // 声明是切面类
public class MyAnnoAspect {

    // 前置通知
    @Before("execution(public * com.qcbyjy.demo3.OrderServiceImpl.save(..))")
    public void log() {
        System.out.println("增强了...");
    }
}
4、配置自动代理(XML)
<!-- applicationContext2.xml -->
<context:component-scan base-package="com.qcbyjy.demo3"/>
<aop:aspectj-autoproxy/>
5、编写测试类
@RunWith(SpringJUnit4ClassRunner.class)
@ContextConfiguration("classpath:applicationContext2.xml")
public class Demo3 {

    @Autowired
    private OrderService orderService;

    @Test
    public void run1() {
        orderService.save();
    }
}
通知类型的注解
五种通知类型
1、@Before - 前置通知
@Before("execution(* com.qcbyjy.demo3.*.*(..))")
public void beforeAdvice() {
    System.out.println("前置通知:方法执行前调用");
}2、@AfterReturning - 后置通知
@AfterReturning(pointcut="execution(* com.qcbyjy.demo3.*.*(..))",
                returning="result")
public void afterReturningAdvice(Object result) {
    System.out.println("后置通知:方法正常返回,返回值: " + result);
}3、@Around - 环绕通知
@Around("execution(* com.qcbyjy.demo3.*.*(..))")
public Object aroundAdvice(ProceedingJoinPoint pjp) throws Throwable {
    System.out.println("环绕通知-前");
    Object result = pjp.proceed();  // 必须手动调用目标方法
    System.out.println("环绕通知-后");
    return result;
}4、@After - 最终通知
@After("execution(* com.qcbyjy.demo3.*.*(..))")
public void afterAdvice() {
    System.out.println("最终通知:无论是否异常都会执行");
}5、@AfterThrowing - 异常抛出通知
@AfterThrowing(pointcut="execution(* com.qcbyjy.demo3.*.*(..))",
               throwing="ex")
public void afterThrowingAdvice(Exception ex) {
    System.out.println("异常通知:方法抛出异常: " + ex.getMessage());
}
纯注解的方式
完全使用Java配置替代XML,使用配置类
package com.qcbyjy.demo3;

import org.springframework.context.annotation.ComponentScan;
import org.springframework.context.annotation.Configuration;
import org.springframework.context.annotation.EnableAspectJAutoProxy;

@Configuration  // 声明为配置类
@ComponentScan("com.qcbyjy.demo3")  // 组件扫描
@EnableAspectJAutoProxy  // 等价于XML中的<aop:aspectj-autoproxy/>
public class SpringConfig {
}
测试类调整
@RunWith(SpringJUnit4ClassRunner.class)
@ContextConfiguration(classes = SpringConfig.class)  // 使用配置类
public class Demo3 {

    @Autowired
    private OrderService orderService;

    @Test
    public void run1() {
        orderService.save();
    }
}
关键点总结
-
切面类必须使用
@Aspect和@Component注解标记 -
通知注解需要指定切入点表达式
-
纯注解配置核心是
@EnableAspectJAutoProxy注解 -
执行顺序:Around前→Before→目标方法→Around后→AfterReturning/AfterThrowing→After
-
XML与注解对比:
-
XML配置更集中,适合大型项目
-
注解更简洁,适合中小型项目
-


 被折叠的 条评论
为什么被折叠?
被折叠的 条评论
为什么被折叠?
 到【灌水乐园】发言


