


一、背景样式
1. 简写属性
.con{
width: 923px;
height: 1069px;
/* background-color: red;
background-image: url(img/微信图片_20240617093916.jpg);
background-repeat: no-repeat;
background-position: center;
*/
/* 背景简写 */
background: red url(img/微信图片_20240617093916.jpg) no-repeat center;
}
2. 背景尺寸 background-size
| 属性值 | 描述 |
| 长度值 | 用长度值指定间隔。 |
| contain | 自动调整比例,保证图片始终完整,可能会有留白 |
| cover | 自动调整比例,保证图片始终完整,溢出部分会被隐藏,平时用cover居多 |
.con{width: 200px;
height: 300px;
background-color: red;
background-image: url(img/微信图片_20240617093916.jpg);
background-repeat: no-repeat;
background-position: center;
border: 1px solid red;
/* 背景尺寸的属性*/
/* 1.使用像素 */
background-size:200px 300px;
/* 2.使用contain 自动调整比例,保证图片始终完整,可能会有留白*/
background-size: contain;
/* 3.cover 自动调整比例,保证图片始终完整,溢出部分会被隐藏,平时用cover居多*/
background-size: cover;
}
注意:background-size属性一定要写在background属性后面。
| 属性 | 作用 | 值 |
|---|---|---|
| background-color | 背景颜色 | 预定义的颜色值/十六进制/RGB代码 |
| background-image | 背景图片 | url(图片路径) |
| background-repeat | 是否平铺 | repeat/no-repeat/repeat-x/repeat-y |
| background-position | 背景位置 | length/position 分别是x 和 y坐标, 切记 如果有 精确数值单位,则必须按照先X 后Y 的写法 |
| 背景简写 | 更简单 | 背景颜色 背景图片地址 背景平铺 背景滚动 背景位置; 他们没有顺序 |
| 背景透明 | 让盒子半透明 | background: rgba(0,0,0,0.3); 后面必须是 4个值 |
| 背景缩放 | 背景图片的尺寸 | 长度单位、cover、contain |
二、字体图标的使用
1.font-class 引用
1.在<head>引入css文件
<link rel="stylesheet" href="fonts/iconfont.css">
2.<body>中设置标签和class名 iconfont一定不能少 .icon-sharpicons_Eagle引入字体图像名
<span class="iconfont icon-sharpicons_Eagle"></span>
注意:href=""内内容要及时修改相适应的自己的路径
<span>里图标的名字实时修改
<span class="iconfont icon-xxx"></span>2. unicode 引用
1.在<style>里拷贝font-face
@font-face {
font-family: 'iconfont';
src: url('fonts/iconfont.ttf') format('truetype');
}
2.同样在在<style>里定义使用iconfont的样式s
.iconfont {
font-family: "iconfont" !important;
font-size: 16px;
font-style: normal;
-webkit-font-smoothing: antialiased;
-moz-osx-font-smoothing: grayscale;
}
3.<body>中拷贝span的标签并把unicode特殊字符作为文本设置到span的内容的当中
<span class="iconfont"></span>
注意:
@font-face里的url('')路径对应修改
<span>标签里特殊字符实时更新
三、CSS的list-style属性
1.list-style 简写属性
list-style 简写属性在一个声明中设置所有的列表属性。
可以按顺序设置如下属性:
-
list-style-type
-
list-style-position
-
list-style-image
ul
{
list-style:square inside url(media/arrow.gif);
}
2. list-style-type
| 值 | 描述 |
|---|---|
| none | 无标记。 |
| disc | 默认。标记是实心圆。 |
| circle | 标记是空心圆。 |
| square | 标记是实心方块 |
3. list-style-position
| 值 | 描述 |
|---|---|
| inside | 列表项目标记放置在文本以内,且环绕文本根据标记对齐。 |
| outside | 默认值。保持标记位于文本的左侧,列表项目标记放置在文本以外,且环绕文本不根据标记对齐。 |
4. list-style-image
| 值 | 描述 |
|---|---|
| URL | 图像的路径。 |
/* ul的小圆点 */
.nav{
/* 1.去掉小圆点 */
list-style-type: none;
/* 2.disc 默认实心圆 */
/* 3.空心圆 circle */
list-style-type: circle;
/* 4.方型 */
list-style-type: square;
/* outside时默认值 */
list-style-position: inside;
/* 列表前面的图标显示 */
list-style-image: url(img/btn.png);
}
四、CSS三大属性
1.层叠性
当同一个元素被两个选择器选中时,CSS会根据选择器的权重决定使用哪一个选择器。
2. CSS继承性
继承:字体大小 字体 颜色 行高可以, 除a标签,a标签的颜色不继承
不能被继承:边框 外边距 内边距 背景 定位 元素高属性
3. CSS优先级
浏览器默认样式<继承样式<通配符样式<标签选择器样式<类选择器<id选择器<行内样式<!important
| 继承或者* 的贡献值 | 0,0,0,0 |
|---|---|
| 每个元素(标签)贡献值为 | 0,0,0,1 |
| 每个类,伪类贡献值为 | 0,0,1,0 |
| 每个ID贡献值为 | 0,1,0,0 |
| 每个行内样式贡献值 | 1,0,0,0 |
| 每个!important贡献值 | ∞ 无穷大 |
注意:
-
权重相同时,CSS遵循就近原则。也就是说靠近元素的样式具有最大的优先级,或者说排在最后的样式优先级最大。
-
CSS定义了一个!important命令,该命令被赋予最大的优先级。也就是说不管权重如何以及样式位置的远近,!important都具有最大优先级。
-
权重是可以叠加的
/* 0,0,1,3 */
.nav li a span{
color: red;
}
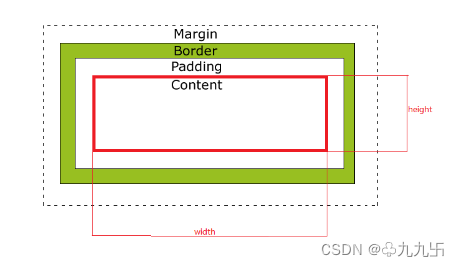
五、盒子模型
1.盒子模型
所谓盒子模型:
-
就是把HTML页面中的布局元素看作是一个矩形的盒子,也就是一个盛装内容的容器。
-
CSS盒模型本质上是一个盒子,封装周围的HTML元素,它包括:
-
外边距(margin)、
-
边框(border)、
-
内边距(padding)、
-
实际内容(content)四个属性。
2. 盒子边框
border : border-width | border-style | border-color
| 属性 | 作用 |
|---|---|
| border-width | 定义边框粗细,单位是px |
| border-style | 边框的样式 |
| border-color | 边框颜色 |
边框样式(border-style),常用属性值如下:
.con{
width: 200px;
height:100px;
/* 粗细 边框样式 边框颜色 */
/* 实线 */
border: 10px solid red;
}
.con1,.con2,.con3{
width: 200px;
height: 100px;
margin: 20px;
}
.con1{
/* 虚线 */
border: 10px dashed red;
}
.con2{
/* 点线 */
border: 10px dotted blue;
}
.con3{
/* 双实线 */
border: 10px double yellow;
}
我们在开发中,经常把表单原本的边框去掉,然后添加任意的样式。(border: 0)
3.圆角边框(CSS3)
border-radius: 左上角 右上角 右下角 左下角;
/* border-radius: 10px 10px 10px 10px; */
.con2{
width: 200px;
height: 200px;
margin: 20px;
/* 圆的写法 */
/* border-radius: 100px; */
border-radius: 50%;
}
4.内边距
padding属性用于设置内边距。 是指边框与内容之间的距离。
| padding-top | 上内边距 |
| padding-right | 右内边距 |
| padding-bottom | 下内边距 |
| padding-left | 左内边距 |
.con{
width: 200px;
height: 100px;
background-color: pink;
/* 1个值 上下左右都一样 */
padding: 20px;
/* 2个值 上下 左右 */
padding: 10px 20px;
/* 3个值 上 左右 下 */
padding: 10px 20px 30px;
/* 4个值 上 右 下 左*/
padding: 10px 20px 30px 40px;
}
5.外边距
margin属性用于设置外边距。 设置外边距会在元素之间创建“空白”, 这段空白通常不能放置其他内容。
| margin-top | 上外边距 |
| margin-right | 右外边距 |
| margin-bottom | 下外边距 |
| margin-left | 上外边距 |
| margin | 上外边距 右外边距 下外边距 左外边 |
外边距塌陷:
.father{
width: 300px;
height: 300px;
background-color: pink;
/* 1.给父元素设置上边框 */
border-top: 1px solid red;
/* 2.给父元素设置上内边距*/
padding-top: 1px;
}
.son{
width: 100px;
height: 100px;
background-color: blue;
/* 外边距塌陷 */
margin-top: 30px;
}


 3557
3557

 被折叠的 条评论
为什么被折叠?
被折叠的 条评论
为什么被折叠?
 到【灌水乐园】发言


