


手动实现 Spring 底层机制【初始化 IOC容器+依赖注入+BeanPostProcessor 机制+AOP】 【任务阶段5】
任务阶段1-4链接
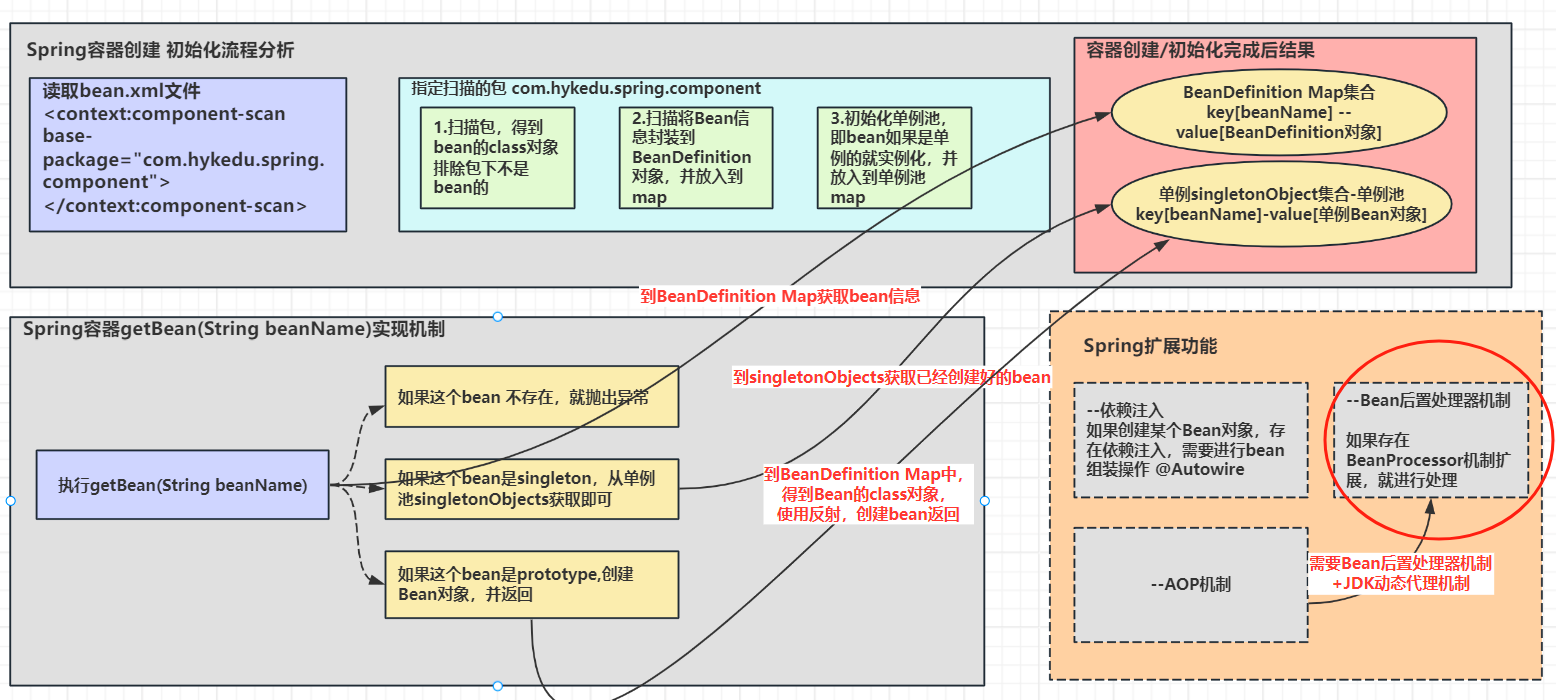
一、实现任务阶段 1- 编写自己 Spring 容器,实现扫描包, 得到 bean 的 class 对象
二、实现任务阶段 2- 扫描将 bean 信息封装到 BeanDefinition 对象, 并放入到 Map
三、实现任务阶段 3- 初始化 bean 单例池,并完成 getBean 方法 , createBean 方法
四、实现任务阶段 4- 完成依赖注入
五、实现任务阶段 5- bean 后置处理器实现
1.在processor包定义InitializingBean接口
实现该接口的 Bean , 需要实现 Bean 初始化方法, 可以参考 原生 Spring 规范来定义这个接口
package com.hykedu.spring.processor;

/**
 * @author 程序员蛇皮
 * @version 1.0
 * 1.我们根据原生Spring 定义了一个InitializingBean
 * 2.该 InitializingBean接口有一个void afterPropertiesSet() throws Exception;
 * 3.afterPropertiesSet() 在bean的setter后执行,即等价于Spring原来的初始化方法init()
 * 4.当一个Bean实现这个接口后,就实现afterPropertiesSet(),这个方法就是初始化方法
 */
public interface InitializingBean {
    void afterPropertiesSet() throws Exception;
}
2.编辑CodeSnakeSpringApplicationContext类的createBean(BeanDefinition beanDefinition)方法,在创建好 Bean 实例后,判断是否需要进行初始化 【 容器中常用的一个方法是,根据该类是否实现了某个接口,来判断是否要执行某个业务逻辑, 这里其实就是 java 基础的接口编程实际运用】
//完成createBean(BeanDefinition beanDefinition)方法
private Object createBean(BeanDefinition beanDefinition, String beanName) {
    //得到Bean的clazz对象
    Class clazz = beanDefinition.getClazz();
    try {
        //使用反射得到对象实例
        Object instance = clazz.getDeclaredConstructor().newInstance();
        //依赖注入
        //1.遍历当前要创建的对象的所有字段
        for (Field declaredField : clazz.getDeclaredFields()) {
            //2.判断这个字段是否有@Autowired
            if (declaredField.isAnnotationPresent(Autowired.class)) {
                //3.得到这个字段的名字
                String name = declaredField.getName();
                System.out.println("字段名:" + name);
                //4.通过getBean()获取要组装的对象
                Object bean = getBean(name);
                //5.进行组装
                //私有属性需要进行反射暴破
                declaredField.setAccessible(true);
                declaredField.set(instance, bean);
            }
        }
        System.out.println("------------------------------------------------------------------------------------------------------------------------------------------------");
        System.out.println("=====创建好实例=====" + instance);
        //这里要判断是否要执行Bean的初始化方法
        //1.判断当前创建的Bean对象是否实现了InitializingBean
        //2.实现了InitializingBean就调用初始化方法
        if (instance instanceof InitializingBean) {
            try {
                ((InitializingBean) instance).afterPropertiesSet();
            } catch (Exception e) {
                throw new RuntimeException(e);
            }
        }
        if (instance != null) {
            return instance;
        }
    } catch (Exception e) {
        throw new RuntimeException(e);
    }
    return null;
}
3.测试:在StudentService类中实现InitializingBean接口并重新初始化方法
package com.hykedu.spring.component;

import com.hykedu.spring.annotation.Autowired;
import com.hykedu.spring.annotation.Component;
import com.hykedu.spring.annotation.Scope;
import com.hykedu.spring.processor.InitializingBean;

/**
 * @author 程序员蛇皮
 * @version 1.0
 */
@Scope(value = "prototype")
@Component
public class StudentService implements InitializingBean {
    //这里我们使用自己的 @Autowired 来修饰属性
    //表示该属性,是通过容器完成依赖注入
    //我们这里实现按照名字进行组装
    @Autowired
    private StudentDao studentDao;
    public void m1(){
        studentDao.hi();
    }

    @Override
    public void afterPropertiesSet() throws Exception {
        System.out.println("StudentService初始化方法");
    }
}
测试方法AppMain
package com.hykedu.spring;

import com.hykedu.spring.component.StudentDao;
import com.hykedu.spring.component.StudentService;
import com.hykedu.spring.ioc.CodeSnakeSpringApplicationContext;
import com.hykedu.spring.ioc.CodeSnakeSpringConfig;

/**
 * @author 程序员蛇皮
 * @version 1.0
 */
public class AppMain {
    public static void main(String[] args) {
        CodeSnakeSpringApplicationContext codeSnakeSpringApplicationContext = new CodeSnakeSpringApplicationContext(CodeSnakeSpringConfig.class);
        StudentDao studentDao1 = (StudentDao) codeSnakeSpringApplicationContext.getBean("studentDao");
        StudentDao studentDao = (StudentDao) codeSnakeSpringApplicationContext.getBean("studentDao");
        StudentService studentService1 = (StudentService) codeSnakeSpringApplicationContext.getBean("studentService");
        StudentService studentService2 = (StudentService) codeSnakeSpringApplicationContext.getBean("studentService");
        System.out.println("ok");
    }
}
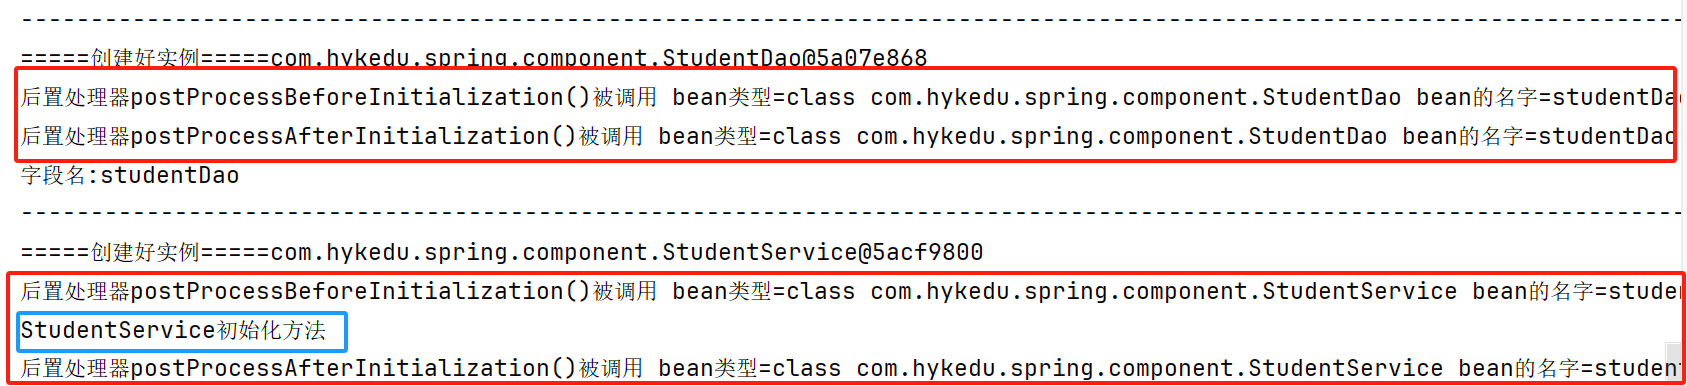
测试结果:实现了InitializingBean接口的对象都在创建好实例后执行了初始化方法

4.在processor包定义后置处理器BeanPostProcessor接口
package com.hykedu.spring.processor;

/**
 * @author 程序员蛇皮
 * @version 1.0
 * 1.参考原生Spring容器,定义一个BeanPostProcessor接口
 * 2.该接口有两个方法 postProcessBeforeInitialization(Object bean, String beanName)、postProcessAfterInitialization(Object bean, String beanName)
 * 3.这两个方法会对Spring容器的所有Bean生效
 */
public interface BeanPostProcessor {
    /**
     * 1.postProcessBeforeInitialization在Bean的初始化前调用
     * @param bean
     * @param beanName
     * @return
     */
    default Object postProcessBeforeInitialization(Object bean, String beanName) {
        return bean;
    }

    /**
     * 1.postProcessAfterInitializatio在Bean的初始化后调用
     * @param bean
     * @param beanName
     * @return
     */
    default Object postProcessAfterInitialization(Object bean, String beanName) {
        return bean;
    }
}
5.在component包中定义MyProcessor类,该类实现了BeanPostProcessor接口,重写其中的方法
package com.hykedu.spring.component;

import com.hykedu.spring.annotation.Component;
import com.hykedu.spring.processor.BeanPostProcessor;

import java.lang.reflect.InvocationHandler;
import java.lang.reflect.Method;
import java.lang.reflect.Proxy;

/**
 * @author 程序员蛇皮
 * @version 1.0
 * 1.这是我们自己的一个后置处理器
 * 2.实现了BeanPostProcessor
 * 3.我们可以重新before和after
 * 4.在Spring容器中,仍然把MyBeanPostProcessor当作一个Bean对象,注入到容器中
 * 5.@Component
 */
@Component
public class MyBeanPostProcessor implements BeanPostProcessor {
    @Override
    public Object postProcessBeforeInitialization(Object bean, String beanName) {
        System.out.println("后置处理器postProcessBeforeInitialization()被调用 bean类型=" + bean.getClass() + " bean的名字=" + beanName);
        return bean;
    }

    @Override
    public Object postProcessAfterInitialization(Object bean, String beanName) {
        System.out.println("后置处理器postProcessAfterInitialization()被调用 bean类型=" + bean.getClass() + " bean的名字=" + beanName);
        return bean;
    }
}
6.编辑CodeSnakeSpringApplicationContext类的scanBeanDefinition(Class configClass)和createBean(BeanDefinition beanDefinition)方法,在我们Bean的初始化方法前,调用后置处理器的before方法,在我们Bean的初始化方法后,调用后置处理器的after方法
package com.hykedu.spring.ioc;

import com.hykedu.spring.annotation.Autowired;
import com.hykedu.spring.annotation.Component;
import com.hykedu.spring.annotation.ComponentScan;
import com.hykedu.spring.annotation.Scope;
import com.hykedu.spring.processor.BeanPostProcessor;
import com.hykedu.spring.processor.InitializingBean;
import org.apache.commons.lang.StringUtils;

import java.io.File;
import java.lang.reflect.Field;
import java.net.URL;
import java.util.ArrayList;
import java.util.List;
import java.util.concurrent.ConcurrentHashMap;

/**
 * @author 程序员蛇皮
 * @version 1.0
 * SpringApplicationContext 类的作用类似Spring原生ioc容器
 */
@SuppressWarnings("all")
public class CodeSnakeSpringApplicationContext {
    private Class configClass;
    //定义beanDefinitionMap,存放BeanDefinition对象
    private final ConcurrentHashMap<String, BeanDefinition> beanDefinitionMap = new ConcurrentHashMap<>();
    //定义singletonObjects,存放单例对象
    private final ConcurrentHashMap<String, Object> singletonObjects = new ConcurrentHashMap<>();
    //定义beanPostProcessors=>存放后置处理器
    private final List<BeanPostProcessor> beanPostProcessors = new ArrayList<>();

    public CodeSnakeSpringApplicationContext(Class configClass) {
        scanBeanDefinition(configClass);
        scanSingletonObjects();
    }

    //初始化单例池方法
    private void scanSingletonObjects() {
        //通过 beanDefinitionMap,初始化 singletonObjects 单例池
        ConcurrentHashMap.KeySetView<String, BeanDefinition> keys = beanDefinitionMap.keySet();
        for (String key : keys) {
            BeanDefinition beanDefinition = beanDefinitionMap.get(key);
            //判断该bean是singleton还是prototype
            if ("singleton".equalsIgnoreCase(beanDefinition.getScope())) {
                Object bean = createBean(beanDefinition, key);
                singletonObjects.put(key, bean);
            }
        }
    }

    //该方法完成的对指定包的扫描,并将Bean信息封装到BeanDefinition对象,再放入map
    private void scanBeanDefinition(Class configClass) {
        this.configClass = configClass;
        System.out.println(configClass);
        //获取要扫描的包
        //1.先得到SpringConfig配置的@ComponentScan(value = "com.hykedu.spring.component")
        ComponentScan componentScan = (ComponentScan) this.configClass.getDeclaredAnnotation(ComponentScan.class);
        //2.componentScan的value就是我们要扫描的包
        String path = componentScan.value();
        System.out.println("要扫描的包:" + path);
        //得到要扫描的包下所有的资源(类.class)
        //1.得到类的加载器
        ClassLoader classLoader = CodeSnakeSpringApplicationContext.class.getClassLoader();
        //2.通过类加载器获取到要扫描包的url
        path = path.replace(".", "/");//把 . 替换成路径间隔符 /
        URL resource = classLoader.getResource(path);
        System.out.println("要扫描包的url:" + resource);
        //3.将要加载的资源(.class) 路径下的文件进行遍历=>io
        File file = new File(resource.getFile());
        if (file.isDirectory()) {//pand
            File[] files = file.listFiles();
            for (File f : files) {
                String absolutePath = f.getAbsolutePath();
                System.out.println("文件的绝对路径:" + absolutePath);
                //这里我们只处理.class文件
                if (absolutePath.endsWith(".class")) {
                    //1.获取到类名
                    String className = absolutePath.substring
                            (absolutePath.lastIndexOf("\\") + 1, absolutePath.lastIndexOf(".class"));
                    System.out.println("类名:" + className);
                    //2.获取类的完整路径(全类名)
                    String classFullName = path.replace("/", ".") + "." + className;
                    System.out.println("全类名:" + classFullName);
                    //3.判断该类是否需要注入容器,判断该类是不是有@Component/@Controller/@Repository/@Service注解
                    try {
                        Class<?> clazz = classLoader.loadClass(classFullName);
                        if (clazz.isAnnotationPresent(Component.class)) {
                            //如果在注解指定了value,将其赋值给className
                            System.out.println("这是一个Spring bean" + clazz);
                            //1.这里为了方便,将后置处理器放入到ArrayList集合中
                            //2.如果发现是一个后置处理器,放入到beanPostProcessors
                            //3.在原生的Spring中,对后置处理器还是走的getBean,createBean,但是我们需要在singletonObjects加入相应的业务逻辑
                            //4.这里我们简化,用的ArrayList

                            //判断这个clazz有没有实现BeanPostProcessor
                            //说明:这里我们不能使用 instanceof 来判断clazz是否实现了BeanPostProcessor
                            //原因:clazz不是一个实例对象,而是一个类对象/clazz
                            if (BeanPostProcessor.class.isAssignableFrom(clazz)) {
                                BeanPostProcessor beanPostProcessor = (BeanPostProcessor) clazz.newInstance();
                                beanPostProcessors.add(beanPostProcessor);
                                continue;
                            }
                            Component componentAnnotation = clazz.getDeclaredAnnotation(Component.class);
                            String beanName = componentAnnotation.value();
                            if (beanName.equals("")) {
                                //将类名首字母小写作为beanName
                                beanName = StringUtils.uncapitalize(className);
                            }
                            BeanDefinition beanDefinition = new BeanDefinition();
                            beanDefinition.setClazz(clazz);
                            if (clazz.isAnnotationPresent(Scope.class)) {
                                //如果配置了Scope,获取他配置的值
                                Scope scopeAnnotation = clazz.getDeclaredAnnotation(Scope.class);
                                beanDefinition.setScope(scopeAnnotation.value());
                            } else {
                                //如果没有配置值,就默认Singleton
                                beanDefinition.setScope("singleton");
                            }
                            //将beanDefinition放入beanDefinitionMap
                            beanDefinitionMap.put(beanName, beanDefinition);
                        } else {
                            System.out.println("这不是一个Spring bean" + clazz);
                        }
                    } catch (Exception e) {
                        throw new RuntimeException(e);
                    }
                }
            }
        }
    }

    //完成createBean(BeanDefinition beanDefinition)方法
    private Object createBean(BeanDefinition beanDefinition, String beanName) {
        //得到Bean的clazz对象
        Class clazz = beanDefinition.getClazz();
        try {
            //使用反射得到对象实例
            Object instance = clazz.getDeclaredConstructor().newInstance();
            //依赖注入
            //1.遍历当前要创建的对象的所有字段
            for (Field declaredField : clazz.getDeclaredFields()) {
                //2.判断这个字段是否有@Autowired
                if (declaredField.isAnnotationPresent(Autowired.class)) {
                    //3.得到这个字段的名字
                    String name = declaredField.getName();
                    System.out.println("字段名:" + name);
                    //4.通过getBean()获取要组装的对象
                    Object bean = getBean(name);
                    //5.进行组装
                    //私有属性需要进行反射暴破
                    declaredField.setAccessible(true);
                    declaredField.set(instance, bean);
                }
            }
            System.out.println("------------------------------------------------------------------------------------------------------------------------------------------------");
            System.out.println("=====创建好实例=====" + instance);
            //在我们Bean的初始化方法前,调用后置处理器的before方法
            for (BeanPostProcessor beanPostProcessor : beanPostProcessors) {
                Object current = beanPostProcessor.postProcessBeforeInitialization(instance, beanName);
                if (current != null) {
                    instance = current;
                }
            }
            //这里要判断是否要执行Bean的初始化方法
            //1.判断当前创建的Bean对象是否实现了InitializingBean
            //2.实现了InitializingBean就调用初始化方法
            if (instance instanceof InitializingBean) {
                try {
                    ((InitializingBean) instance).afterPropertiesSet();
                } catch (Exception e) {
                    throw new RuntimeException(e);
                }
            }
            //在我们Bean的初始化方法后,调用后置处理器的after方法
            for (BeanPostProcessor beanPostProcessor : beanPostProcessors) {
                Object current = beanPostProcessor.postProcessAfterInitialization(instance, beanName);
                if (current != null) {
                    instance = current;
                }
            }
            if (instance != null) {
                return instance;
            }
        } catch (Exception e) {
            throw new RuntimeException(e);
        }
        return null;
    }

    //编写方法,返回容器的对象
    public Object getBean(String name) {
        if (beanDefinitionMap.containsKey(name)) {
            BeanDefinition beanDefinition = beanDefinitionMap.get(name);
            if ("singleton".equalsIgnoreCase(beanDefinition.getScope())) {
                //说明是单例配置
                return singletonObjects.get(name);
            } else {//如果不是单例的,就反射一个新的对象
                return createBean(beanDefinition, name);
            }
        }
        throw new NullPointerException("没有该bean");
    }
}
7.在AppMain中进行测试
测试结果:成功在初始化方法前后调用后置处理器方法


 284
284

 被折叠的 条评论
为什么被折叠?
被折叠的 条评论
为什么被折叠?
 到【灌水乐园】发言


