


1.什么是I2C?
即“集成电路总线”,一种串行通讯总线,使用多主从架构。有两根通讯线,SCL(时钟线)和SDA(串行数据线)用于连接低速外围设备。
2.特点
- 同步时钟,半双工通讯;
- 带数据应答,最快速度5Mbit/s;
- 支持一主多从,多主多从(同一时刻只能有一台主设备);
- 两根通讯线需要外挂上拉电阻(4.7千欧);
- SCL和SDA均配置成开漏输出模式;
- 利用不同设备的地址进行访问通讯;
3.通讯协议
主节点:产生时钟并发起与从节点的通信;
从节点:接受时钟并响应主节点的寻址;
发送:START + data(7bit addr + 1bit 0W) + data(8bit data) + ... + STOP
1bit ACK 1bit ACK
接收:START + data(7bit addr + 1bit 1R) + data(8bit data) + ... + STOP
1bit ACK 1bit ACK
| s | 7bit设备地址 | R/W | ACK | 8bit寄存器地址 | ACK | 要写入的数据8bit | ACK | p |
s:起始位:时钟线为高,数据线由高到低;
设备地址(7位):用于识别从设备,并进行通信控制;
读写位(1位):通过设备地址的最低位表示读写方向,例如写操作;
应答信号(1位):从设备接收到地址后,发送应答信号以确认接受;
寄存器地址(8位):用于标识具体的寄存器,并通过该指定的寄存器进行的写数据;
应答信号(1位):确认数据已被正确接收;
要写入的数据(8位):发送8bit的数据;
应答信号(1位):确认数据已被正确接收;
停止位(1位):如果不需要进行通信,则发出停止标志:SCL为高,SDA由低电平到高电平
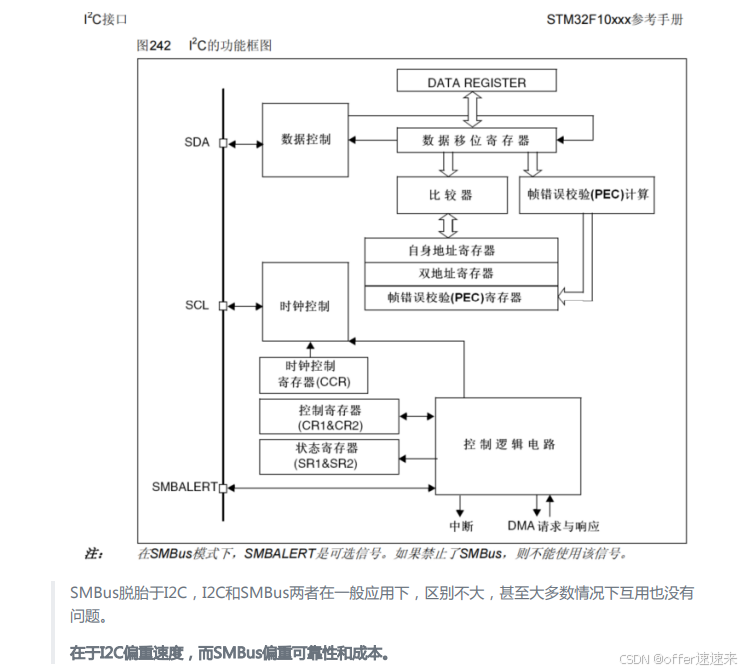
I2C的功能
iic.c
/*
	IIC1 SCL PB8 SDA PB9
	      (#) Enable peripheral clock using RCC_APB1PeriphClockCmd(RCC_APB1Periph_I2Cx, ENABLE)
          function for I2C1, I2C2 or I2C3.

      (#) Enable SDA, SCL  and SMBA (when used) GPIO clocks using
          RCC_AHBPeriphClockCmd() function.

      (#) Peripherals alternate function:
        (++) Connect the pin to the desired peripherals' Alternate
             Function (AF) using GPIO_PinAFConfig() function
        (++) Configure the desired pin in alternate function by:
             GPIO_InitStruct->GPIO_Mode = GPIO_Mode_AF
        (++) Select the type, pull-up/pull-down and output speed via
             GPIO_PuPd, GPIO_OType and GPIO_Speed members
        (++) Call GPIO_Init() function
             Recommended configuration is Push-Pull, Pull-up, Open-Drain.
             Add an external pull up if necessary (typically 4.7 KOhm).

      (#) Program the Mode, duty cycle , Own address, Ack, Speed and Acknowledged
          Address using the I2C_Init() function.

      (#) Optionally you can enable/configure the following parameters without
          re-initialization (i.e there is no need to call again I2C_Init() function):
        (++) Enable the acknowledge feature using I2C_AcknowledgeConfig() function

      (#) Enable the NVIC and the corresponding interrupt using the function
          I2C_ITConfig() if you need to use interrupt mode.


      (#) Enable the I2C using the I2C_Cmd() function.
*/


#include "iic.h"
#include "systick"

void iic_Init()
{
	// 1. 使能adc1时钟
	RCC_APB1PeriphClockCmd(RCC_APB1Periph_I2C1, ENABLE);

	// 2. 配置GPIO
	RCC_AHB1PeriphClockCmd(RCC_AHB1Periph_GPIOB, ENABLE);

	// 将PB8/9复用为IIC引脚
	GPIO_PinAFConfig(GPIOB, GPIO_PinSource8, GPIO_AF_I2C1);
	GPIO_PinAFConfig(GPIOB, GPIO_PinSource9, GPIO_AF_I2C1);

	// 配置GPIO模式 输出类型 ...
	GPIO_InitTypeDef gpio;
	// 设置配置的引脚
	gpio.GPIO_Pin = GPIO_Pin_8 | GPIO_Pin_9;
	// 设置为复用模式
	gpio.GPIO_Mode = GPIO_Mode_AF;
	// 设置为开漏输出
	gpio.GPIO_OType = GPIO_OType_OD;
	// 设置上下拉
	gpio.GPIO_PuPd = GPIO_PuPd_NOPULL;
	// 设置gpio输出速率
	gpio.GPIO_Speed = GPIO_Low_Speed;
	GPIO_Init(GPIOB, &gpio);

	// 3. 配置IIC
	I2C_InitTypeDef i2c1;
	// 设置I2C时钟速率 不超过400Khz -- AT24C02 工作在400Khz频率下
	i2c1.I2C_ClockSpeed = 100000;
	i2c1.I2C_ClockSpeed = 400000;
	// 设置IIC模式 为IIC模式
	i2c1.I2C_Mode = I2C_Mode_I2C;
	// 设置快速模式下的时钟的占空比
	i2c1.I2C_DutyCycle = I2C_DutyCycle_16_9;
	// 设置IIC设备地址 主模式下用处不大
	i2c1.I2C_OwnAddress1 = 0x14;
	// 设置ACK自动应答 禁止
	i2c1.I2C_Ack = I2C_Ack_Disable;
	// 设置地址长度的应答  即指定自身地址长度
	i2c1.I2C_AcknowledgedAddress = I2C_AcknowledgedAddress_7bit;
	I2C_Init(I2C1, &i2c1);

	// 4. 使能IIC
	I2C_Cmd(I2C1, ENABLE);
}

uint8_t EEPROM_Random_ReadByte(uint8_t ByteAddr)
{
	// 总线是否空闲
	while( I2C_GetFlagStatus( I2C1, I2C_FLAG_BUSY ) == SET );
	//EEPROM是否在写周期内
	if ( EEPROM_Twr() == 0 )
	{
		/*
			1. 起始信号
				wait EV5事件发生
			2. 器件地址 + W
				wait EV6事件发生  DR寄存器可以写入
			3. 字地址
				wait EV8_2事件的结束
			4. SR 起始信号
				wait EV5
			5. 器件地址 + R
				wait EV6

				wait EV7  RxNE 接收寄存器不为空
			6. EEPROM -data-》IIC ---> I2C1 ---> DR

			7. 停止信号
		*/
		I2C_GenerateSTART(I2C1, ENABLE);
			// 1.1 等待事件5的发生
		while ( I2C_CheckEvent(I2C1, I2C_EVENT_MASTER_MODE_SELECT) == ERROR );

		// 2. 发送器件地址 + 操作命令
		I2C_Send7bitAddress(I2C1, 0xA0, I2C_Direction_Transmitter);
			// 2.1 等待事件6的发生
		while ( I2C_CheckEvent(I2C1, I2C_EVENT_MASTER_TRANSMITTER_MODE_SELECTED) == RESET );

		// 3. 发送字节地址
		I2C_SendData(I2C1, ByteAddr);
			// 3.1 等待事件8_2的发生
		while ( I2C_CheckEvent(I2C1, I2C_EVENT_MASTER_BYTE_TRANSMITTED) == RESET );

		// 重复起始信号
		I2C_GenerateSTART(I2C1, ENABLE);

		while ( I2C_CheckEvent(I2C1, I2C_EVENT_MASTER_MODE_SELECT) == RESET );

		// 2. 发送器件地址 + 操作命令
		I2C_Send7bitAddress(I2C1, 0xA0, I2C_Direction_Receiver);
		while ( I2C_CheckEvent(I2C1, I2C_EVENT_MASTER_RECEIVER_MODE_SELECTED) == RESET );

		// 等待有数据可读
		while ( I2C_CheckEvent(I2C1, I2C_EVENT_MASTER_BYTE_RECEIVED) == RESET );

		uint8_t temp = I2C_ReceiveData(I2C1);

		I2C_GenerateSTOP(I2C1, ENABLE);

		return temp;
	}

	return -1;

}

// 随机向EEPROM 写入一个字节的数据
uint8_t EEPROM_Random_WriteByte(uint8_t ByteAddr, uint8_t data)
{
	// 0. 前提 是 总线空闲  && EEPROM 不是 写周期时间内
	// 等待总线空闲
	while( I2C_GetFlagStatus( I2C1, I2C_FLAG_BUSY ) == SET );

	// 判断是否在写周期内
	if ( EEPROM_Twr() == 0 )
	{
		// 1. 发送起始信号
		I2C_GenerateSTART(I2C1, ENABLE);
			// 1.1 等待事件5的发生
		while ( I2C_CheckEvent(I2C1, I2C_EVENT_MASTER_MODE_SELECT) == RESET );

		// 2. 发送器件地址 + 操作命令
		I2C_Send7bitAddress(I2C1, 0xA0, I2C_Direction_Transmitter);
			// 2.1 等待事件6的发生 ADDR == 1 地址已发送 --- 事件8  TxE == 1  发送数据寄存器为空
		while ( I2C_CheckEvent(I2C1, I2C_EVENT_MASTER_TRANSMITTER_MODE_SELECTED) == RESET );

		// 3. 发送字节地址
		I2C_SendData(I2C1, ByteAddr);
			// 3.1 等待事件8的发生
		while ( I2C_CheckEvent(I2C1, I2C_EVENT_MASTER_BYTE_TRANSMITTING) == RESET );

		// 4. 发送要写的数据
		I2C_SendData(I2C1, data);
			// 4.1 等待事件8_2的发生
		while ( I2C_CheckEvent(I2C1, I2C_EVENT_MASTER_BYTE_TRANSMITTED) == RESET );

		// 5. 发送结束信号
		I2C_GenerateSTOP(I2C1, ENABLE);
	}

}

//  测试 EEPROM 是否在内部写周期
uint8_t EEPROM_Twr()
{
	/* 测试EEPROM 是否不再写周期内:
	测试方式为应答查询:向EEPROM发送 Start + addr+r/w 看他是否有应答
		有应答则为空闲
		无应答则说明在写周期内
	*/
	// 只发送20次查询
	uint32_t times = 500;
	uint32_t delay = 1000;
	while ( times )
	{
		delay = 1000;
		// 1. 发送起始位
		I2C_GenerateSTART(I2C1, ENABLE);
			// 1.1 等待EV5发生
		while ( I2C_CheckEvent(I2C1, I2C_EVENT_MASTER_MODE_SELECT) == RESET );
		// 2. 发送地址 + R/W
		// 发送设备地址 0xA0 并且指定读/写
		I2C_Send7bitAddress(I2C1, 0xA0, I2C_Direction_Transmitter);
		// 2.0 保证地址数据已经发送到总线 --- EV6/EV8
		while ( I2C_CheckEvent(I2C1, I2C_EVENT_MASTER_TRANSMITTER_MODE_SELECTED) != SET && --delay )
//		//if ( I2C_CheckEvent(I2C1, I2C_EVENT_MASTER_TRANSMITTER_MODE_SELECTED) == SET )
		{
			delayUs(1);
		}

		I2C_GenerateSTOP(I2C1, ENABLE);

		if ( delay )
			return 0;
		else
			times--;
	}

	// == 0 还在写周期内
	return -1;
}

void EEPROM_WritePage(uint8_t ByteAddr, char data[], uint8_t dataLen)
{
	// 0. 前提 是 总线空闲  && EEPROM 不是 写周期时间内
	// 等待总线空闲
	while( I2C_GetFlagStatus( I2C1, I2C_FLAG_BUSY ) == SET );

	// 判断是否在写周期内
	if ( EEPROM_Twr() == 0 )
	{
		// 1. 发送起始信号
		I2C_GenerateSTART(I2C1, ENABLE);
			// 1.1 等待事件5的发生
		while ( I2C_CheckEvent(I2C1, I2C_EVENT_MASTER_MODE_SELECT) == RESET );

		// 2. 发送器件地址 + 操作命令
		I2C_Send7bitAddress(I2C1, 0xA0, I2C_Direction_Transmitter);
			// 2.1 等待事件6的发生 ADDR == 1 地址已发送 --- 事件8  TxE == 1  发送数据寄存器为空
		while ( I2C_CheckEvent(I2C1, I2C_EVENT_MASTER_TRANSMITTER_MODE_SELECTED) == RESET );

		// 3. 发送字节地址
		I2C_SendData(I2C1, ByteAddr);
			// 3.1 等待事件8的发生
		while ( I2C_CheckEvent(I2C1, I2C_EVENT_MASTER_BYTE_TRANSMITTING) == RESET ) ;

		// 4. 发送要写的数据

			int i = 0;
			for(i=0;i<dataLen;i++)
			{
				I2C_SendData(I2C1, data[i]);
				// 4.1 等待事件8的发生
				while ( I2C_CheckEvent(I2C1, I2C_EVENT_MASTER_BYTE_TRANSMITTING) == RESET );
			}
			//事件8_2发生就停止发送
			while ( I2C_CheckEvent(I2C1, I2C_EVENT_MASTER_BYTE_TRANSMITTED) == RESET );

		// 5. 发送结束信号
		I2C_GenerateSTOP(I2C1, ENABLE);
	}
}

/*
	实现向EEPROM写任意的字节数,并且可以写到任意的位置
*/
void EEPROM_WriteBytes(uint8_t ByteAddr, char data[], uint8_t dataLen)
{
	// 记录页地址
	uint8_t PageAddr = ByteAddr & 0xF8;
	// 记录页内地址偏移
	uint8_t PageByteAddr = ByteAddr & 0x07;
	// 表示当前待写入的字节数
	uint8_t WriteCnt = 0;

	// 等待总线空闲
	while( I2C_GetFlagStatus( I2C1, I2C_FLAG_BUSY ) == SET );

	// 判断是否在写周期内
	if ( EEPROM_Twr() == 0 )
	{
		// 判断这个地址是当页的第多少个字节 --- 这一页还可以写多少个字节
		WriteCnt = (8-PageByteAddr) > dataLen ? dataLen : (8-PageByteAddr) ;
		dataLen -= WriteCnt;
		EEPROM_WritePage(ByteAddr , data,  WriteCnt);
		data += WriteCnt;

		// 判断剩余的待写入的字节数 >= 8 === 》 页写
		while ( dataLen >= 8 )
		{
			// +8 即为下一页
			PageAddr += 8;
			EEPROM_WritePage( PageAddr , data, 8);
			// 数据长度 -8
			dataLen -= 8;
			// 数组偏移 +8
			data += 8;
		}

		// 直接在最后一页写入剩余字节数
		EEPROM_WritePage( PageAddr+8 , data,  dataLen);
	}
}
iic.h
#ifndef IIC_H
#define IIC_H

#include "stm32f4xx.h"

#define PAGEBITS     (3)
#define EEPROM_PAGE0 (0<<PAGEBITS)
#define EEPROM_PAGE1 (1<<PAGEBITS)
#define EEPROM_PAGE2 (2<<PAGEBITS)
#define EEPROM_PAGE3 (3<<PAGEBITS)
#define EEPROM_PAGE4 (4<<PAGEBITS)

void iic_Init();

uint8_t EEPROM_Random_ReadByte(uint8_t ByteAddr);

uint8_t EEPROM_Random_WriteByte(uint8_t ByteAddr, uint8_t data);

void EEPROM_WritePage(uint8_t ByteAddr, char data[], uint8_t dataLen);

void EEPROM_WriteBytes(uint8_t ByteAddr, char data[], uint8_t dataLen);

uint8_t EEPROM_Twr();

#endif /* iic.h */


 7151
7151

 被折叠的 条评论
为什么被折叠?
被折叠的 条评论
为什么被折叠?
 到【灌水乐园】发言


