GitHub,Gitee 想来大家都用过,我们的代码就是托管在这些平台上的。因此,你可能好奇为什么我们不自己搭建一个 git 呢服务器?下面,就开始教大家如何一步步搭建自己的 git 服务器(试验成功的那一刻还是很让人激动的)。
我自己的虚拟机是 centOS7 的,首先肯定要安装 git 和 git-daemon,可以使用自带的 yum 进行安装。
yum install -y git
yum install -y git-daemon
复制
[root@master ~]# git --version
git version 2.28.0

[root@master ~]# yum install -y git-daemon
Loaded plugins: fastestmirror
Determining fastest mirrors
 * base: mirrors.aliyun.com
 * extras: mirrors.aliyun.com
 * updates: mirrors.aliyun.com
Running transaction
  Installing : perl-Git-1.8.3.1-23.el7_8.noarch

  ...

Installed:
  git-daemon.x86_64 0:1.8.3.1-23.el7_8

Dependency Installed:
  git.x86_64 0:1.8.3.1-23.el7_8                          perl-Git.noarch 0:1.8.3.1-23.el7_8

Complete!
复制
虚拟机服务端
创建 git 目录
[root@master ~]# mkdir git
[root@master ~]# cd git
[root@master git]# pwd
/root/git
复制
创建 git 仓库文件夹
[root@master git]# mkdir test-repo.git
[root@master git]# cd test-repo.git/
[root@master test-repo.git]#
复制
初始化空目录仓库
[root@master test-repo.git]# git --bare init
Initialized empty Git repository in /root/git/test-repo.git/
[root@master test-repo.git]# ls -l
total 16
drwxr-xr-x. 2 root root    6 Sep 15 22:56 branches
-rw-r--r--. 1 root root   66 Sep 15 22:56 config
-rw-r--r--. 1 root root   73 Sep 15 22:56 description
-rw-r--r--. 1 root root   23 Sep 15 22:56 HEAD
drwxr-xr-x. 2 root root 4096 Sep 15 22:56 hooks
drwxr-xr-x. 2 root root   21 Sep 15 22:56 info
drwxr-xr-x. 4 root root   30 Sep 15 22:56 objects
drwxr-xr-x. 4 root root   31 Sep 15 22:56 refs
复制
修改仓库的 mod 权限
[root@master test-repo.git]# cd ..
[root@master git]# chmod 770 test-repo.git/ -R
[root@master git]# chmod 775 test-repo.git/ -R
复制
设置默认新建的文件和文件夹同属于其父目录的用户组
[root@master git]# chmod g+s test-repo.git -R
[root@master git]# set -m g:root:rwx test-repo.git
[root@master git]#
复制
开启 git daemon 服务
[root@master git]# git daemon --verbose --export-all --base-path=/root/git/test-repo.git/
[3680] Ready to rumble
复制
本地机客户端
创建目录并初始化成仓库
Administrator@PC-20200713AJJH MINGW64 /d/MyProject
$ mkdir test-repo
Administrator@PC-20200713AJJH MINGW64 /d/MyProject
$ cd test-repo
Administrator@PC-20200713AJJH MINGW64 /d/MyProject/test-repo
$ git init
Initialized empty Git repository in D:/MyProject/test-repo/.git/

Administrator@PC-20200713AJJH MINGW64 /d/MyProject/test-repo (master)
$
复制
查看 config 文件
文件在仓库的 .git 目录下。
Administrator@PC-20200713AJJH MINGW64 /d/MyProject/test-repo (master)
$ cd .git/

Administrator@PC-20200713AJJH MINGW64 /d/MyProject/test-repo/.git (GIT_DIR!)
$ vim config
[core]
        repositoryformatversion = 0
        filemode = false
        bare = false
        logallrefupdates = true
        symlinks = false
        ignorecase = true
复制
关联远程仓库
Administrator@PC-20200713AJJH MINGW64 /d/MyProject/test-repo/.git (GIT_DIR!)
$ git remote add origin ssh://192.168.128.139/root/git/test-repo.git
复制
修改 config 文件
我用的 root 账号登录的,所以 url 也改成 root@192.168.128.139 的形式:
[core]
        repositoryformatversion = 0
        filemode = false
        bare = false
        logallrefupdates = true
        symlinks = false
        ignorecase = true
[remote "origin"]
        url = ssh://root@192.168.128.139/root/git/test-repo.git
        fetch = +refs/heads/*:refs/remotes/origin/*
复制
git commit 一些东西
Administrator@PC-20200713AJJH MINGW64 /d/MyProject/test-repo/.git (GIT_DIR!)
$ cd ..

Administrator@PC-20200713AJJH MINGW64 /d/MyProject/test-repo (master)
$ touch test.txt

Administrator@PC-20200713AJJH MINGW64 /d/MyProject/test-repo (master)
$ vim test.txt
hello world

Administrator@PC-20200713AJJH MINGW64 /d/MyProject/test-repo (master)
$ git add test.txt
warning: LF will be replaced by CRLF in test.txt.
The file will have its original line endings in your working directory.

Administrator@PC-20200713AJJH MINGW64 /d/MyProject/test-repo (master)
$ git commit -m "first commit :)"
[master (root-commit) a1e4f83] first commit :)
 1 file changed, 1 insertion(+)
 create mode 100644 test.txt
复制
关联分支并推送
Administrator@PC-20200713AJJH MINGW64 ~/Desktop/test-repo (master)
$ git remote -v
origin  ssh://root@192.168.128.139/root/git/test-repo.git (fetch)
origin  ssh://root@192.168.128.139/root/git/test-repo.git (push)

Administrator@PC-20200713AJJH MINGW64 /d/MyProject/test-repo (master)
$ git push -u origin master
root@192.168.128.139's password:
Enumerating objects: 3, done.
Counting objects: 100% (3/3), done.
Writing objects: 100% (3/3), 217 bytes | 217.00 KiB/s, done.
Total 3 (delta 0), reused 0 (delta 0)
To ssh://192.168.128.139/root/git/test-repo.git
 * [new branch]      master -> master
Branch 'master' set up to track remote branch 'master' from 'origin'.
复制
虚拟机服务端
新建一个终端查看 push 记录
因为刚才那个终端还跑着 git-daemon 服务,所以先不要关掉(后来发现好像关掉了也不影响,不知道是为什么)。
[root@master git]# cd test-repo.git/
[root@master test-repo.git]# pwd
/root/git/test-repo.git
[root@master test-repo.git]# git log
commit a1e4f83292ac8d9128c94a402ce2ada752fb14aa (HEAD -> master)
Author: 2392863668 <2392863668@qq.com>
Date:   Tue Sep 15 23:16:34 2020 +0800

    first commit :)
复制
可以看到,服务端已经成功接收到了。
当然,客户端可以多推送一些上来,服务端都是可以接收到的。
本地机客户端
再次推送
Administrator@PC-20200713AJJH MINGW64 /d/MyProject/test-repo (master)
$ vim test.txt

Administrator@PC-20200713AJJH MINGW64 /d/MyProject/test-repo (master)
$ git add test.txt
warning: LF will be replaced by CRLF in test.txt.
The file will have its original line endings in your working directory.

Administrator@PC-20200713AJJH MINGW64 /d/MyProject/test-repo (master)
$ git commit -m "second commit"
[master ec56e9e] second commit
 1 file changed, 1 insertion(+)

Administrator@PC-20200713AJJH MINGW64 /d/MyProject/test-repo (master)
$ git push
root@192.168.128.139's password:
Enumerating objects: 5, done.
Counting objects: 100% (5/5), done.
Writing objects: 100% (3/3), 261 bytes | 261.00 KiB/s, done.
Total 3 (delta 0), reused 0 (delta 0)
To ssh://192.168.128.139/root/git/test-repo.git
   a1e4f83..ec56e9e  master -> master
复制
虚拟机服务端
[root@master test-repo.git]# git log
commit ec56e9ee09edd5b4ab9ea5fe46927e91d4e09fd5 (HEAD -> master)
Author: 2392863668 <2392863668@qq.com>
Date:   Tue Sep 15 23:21:26 2020 +0800

    second commit

commit a1e4f83292ac8d9128c94a402ce2ada752fb14aa
Author: 2392863668 <2392863668@qq.com>
Date:   Tue Sep 15 23:16:34 2020 +0800

    first commit :)
复制
从服务端克隆仓库
我们甚至还可以从服务端克隆仓库下来:
Administrator@PC-20200713AJJH MINGW64 ~/Desktop
$ git clone ssh://root@192.168.128.139/root/git/test-repo.git
Cloning into 'test-repo'...
root@192.168.128.139's password:
remote: Counting objects: 6, done.
remote: Compressing objects: 100% (2/2), done.
remote: Total 6 (delta 0), reused 0 (delta 0)
Receiving objects: 100% (6/6), done.

Administrator@PC-20200713AJJH MINGW64 ~/Desktop
$ cd test-repo/

Administrator@PC-20200713AJJH MINGW64 ~/Desktop/test-repo (master)
$ git log
commit ec56e9ee09edd5b4ab9ea5fe46927e91d4e09fd5 (HEAD -> master, origin/master, origin/HEAD)
Author: 2392863668 <2392863668@qq.com>
Date:   Tue Sep 15 23:21:26 2020 +0800

    second commit

commit a1e4f83292ac8d9128c94a402ce2ada752fb14aa
Author: 2392863668 <2392863668@qq.com>
Date:   Tue Sep 15 23:16:34 2020 +0800

    first commit :)

Administrator@PC-20200713AJJH MINGW64 ~/Desktop/test-repo (master)
$
复制
SSH 免密登录
如果你不想每次远程操作都输入密码的话,就略微看一下这一节吧!免密登录已经不是什么稀奇事儿了,我们稍微过一下!
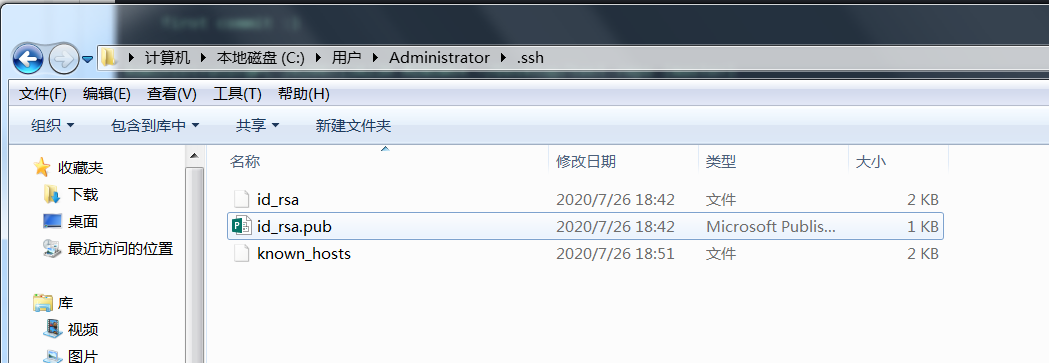
先用 ssh-keygen -t rsa 命令在本地机客户端生成密钥:

把 id_rsa.pub 上传到虚拟机,并将 id_rsa.pub 内容追加(这儿的 >> 表示追加的意思,不然很可能就把文件里边原有的东西给覆盖掉了)到 authorized_keys 里边去:
[root@master ~]# pwd
/root
[root@master ~]# cat id_rsa.pub >> .ssh/authorized_keys
复制
然后?然后就没了!这个时候你在本地机客户端再次克隆的时候,就不需要输入虚拟机服务端的密码了。(这个操作使用 ssh-copy-id 来弄也行的)
Administrator@PC-20200713AJJH MINGW64 ~/Desktop
$ git clone ssh://root@192.168.128.139/root/git/test-repo.git
Cloning into 'test-repo'...
remote: Counting objects: 6, done.
remote: Compressing objects: 100% (2/2), done.
remote: Total 6 (delta 0), reused 0 (delta 0)
Receiving objects: 100% (6/6), done.
复制
后记
细心的你可能会发现,服务端目录结构一直是这样的:
[root@master test-repo.git]# ll
total 16
drwxrwsr-x.  2 root root    6 Sep 15 22:56 branches
-rwxrwsr-x.  1 root root   66 Sep 15 22:56 config
-rwxrwsr-x.  1 root root   73 Sep 15 22:56 description
-rwxrwsr-x.  1 root root   23 Sep 15 22:56 HEAD
drwxrwsr-x.  2 root root 4096 Sep 15 22:56 hooks
drwxrwsr-x.  2 root root   21 Sep 15 22:56 info
drwxrwsr-x. 10 root root   90 Sep 15 23:21 objects
drwxrwsr-x.  4 root root   31 Sep 15 22:56 refs


 本文详细介绍了在CentOS7系统中,如何一步步搭建git服务器,包括安装git和git-daemon,创建git仓库,配置权限,启动git-daemon服务。同时,文章也展示了如何在本地客户端关联远程仓库,进行提交和推送,以及设置SSH免密登录,简化操作流程。


 2613
2613


 被折叠的 条评论
为什么被折叠?


