


自定义监控进程
以httpd服务为例,在agent1中安装httpd,监控httpd的进程
[root@agent1 ~]# yum -y install httpd

[root@agent1 ~]# systemctl restart httpd
[root@agent1 ~]# systemtctl enable httpd

[root@agent1 ~]# ps -ef | grep httpd

root        5064       1  0 09:54 ?        00:00:00 /usr/sbin/httpd -DFOREGROUND

apache      5065    5064  0 09:54 ?        00:00:00 /usr/sbin/httpd -DFOREGROUND

apache      5066    5064  0 09:54 ?        00:00:00 /usr/sbin/httpd -DFOREGROUND

apache      5067    5064  0 09:54 ?        00:00:00 /usr/sbin/httpd -DFOREGROUND

apache      5068    5064  0 09:54 ?        00:00:00 /usr/sbin/httpd -DFOREGROUND

root        5308    1775  0 09:54 pts/0    00:00:00 grep --color=auto httpd

[root@agent1 ~]# ps -ef | grep httpd | grep -v grep | wc -l
5

[root@agent1 script]# ps -ef | grep -v grep | grep -c httpd
5

[root@agent1 script]#
1、新建脚本存放目录
[root@agent1 ~]# mkdir /etc/zabbix/script
[root@agent1 ~]# cd /etc/zabbix/script/

[root@agent1 script]# vim check_httpd.sh
#!/bin/bash
count=$(ps -ef | grep -Ev "grep|$0" | grep -c httpd)
if [ $count -eq 0 ];then
        echo '1'
else
        echo '0'
fi

[root@agent1 script]# chmod +x check_httpd.sh
[root@agent1 script]# chown -R zabbix.zabbix /etc/zabbix/script/
2、测试脚本
0是httpd服务开启,1为关闭
[root@agent1 script]# ./check_httpd.sh
0

[root@agent1 script]# systemctl stop httpd
[root@agent1 script]# ./check_httpd.sh
1

[root@agent1 script]#
# 关闭后记得启动httpd服务
3、修改zabbix_agentd.conf文件
vim /etc/zabbix/zabbix_agentd.conf
添加:
UserParameter=loginusers,who | wc -l
UserParameter=check_httpd,/bin/bash /etc/zabbix/script/check_httpd.sh
重启服务:
systemctl restart zabbix-agent.service
4、zabbix server端测试脚本
[root@server ~]# zabbix_get -s 192.168.100.20 -k check_httpd
0

[root@server ~]#
# 0代表httpd服务已启动
5、zabbix web平台配置
新建监控项
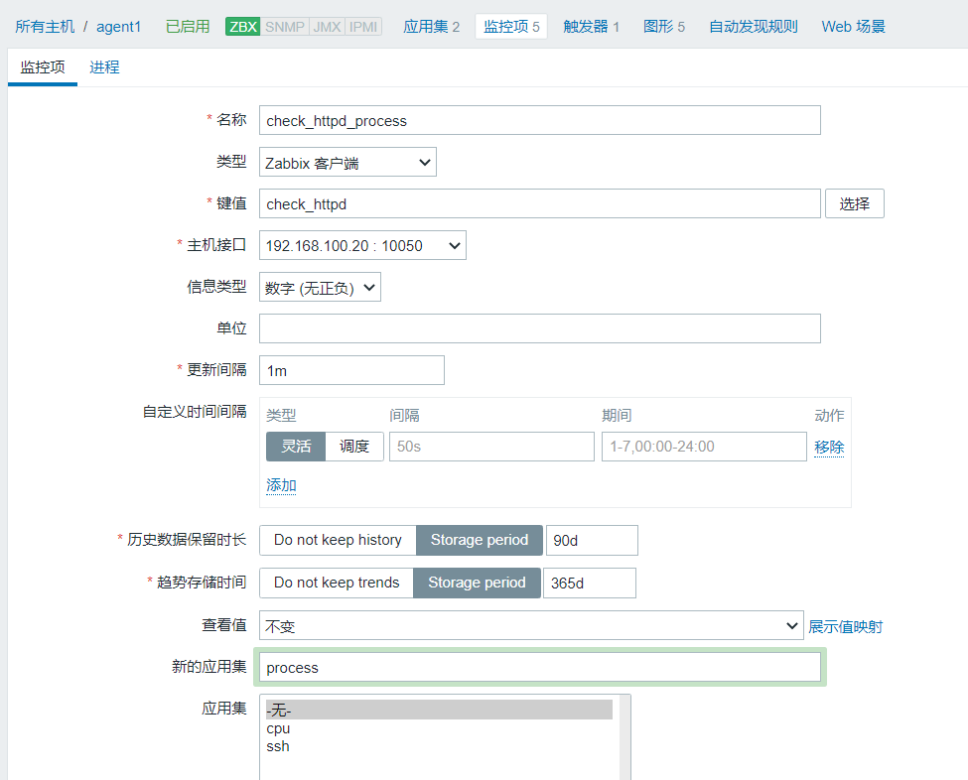
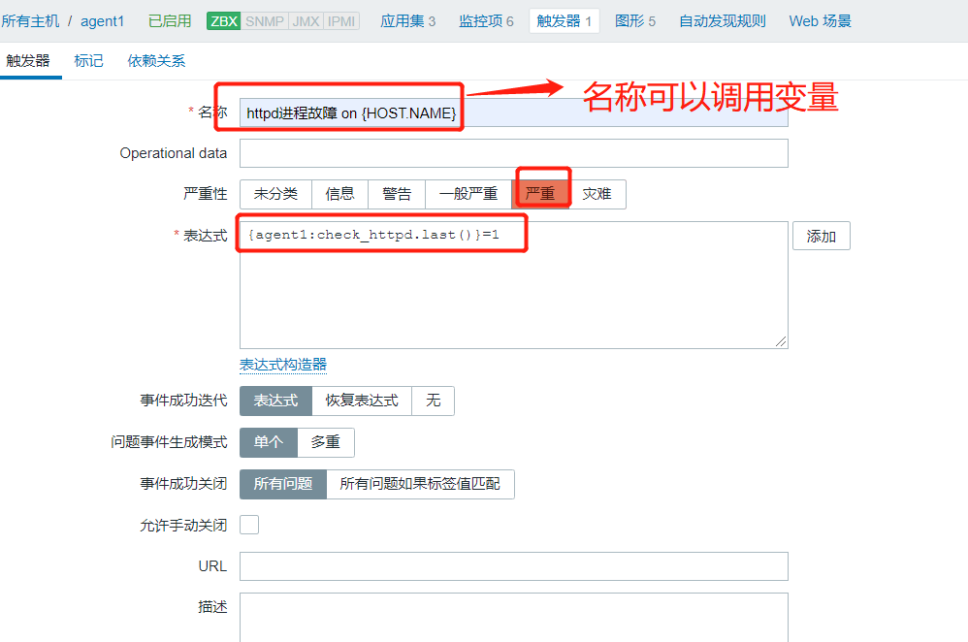
配置触发器
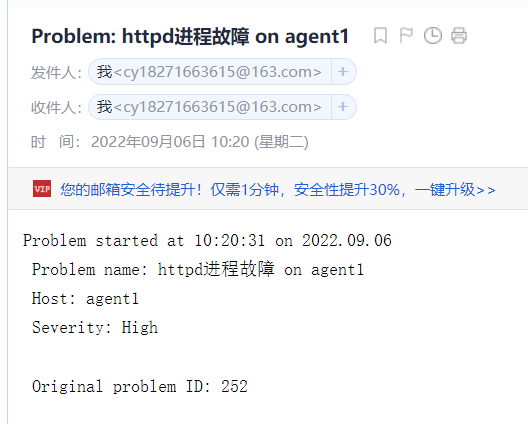
测试——关闭httpd服务,测试告警信息
[root@agent1 script]# systemctl stop httpd

自定义监控日志
1、下载log.py来协助我们进行测试,以httpd服务为例
将log.py上传到/etc/zabbix/script/目录下,然后给执行权限,修改所有者和所属组为zabbix
# log.py
    try:
        seekfile = sys.argv[2]
    except IndexError:
        seekfile = '/tmp/logseek'
    return seekfile

def getKey():
    try:
        tagKey = str(sys.argv[3])
    except IndexError:
        tagKey = 'Error'
    return tagKey

def getResult(filename,seekfile,tagkey):
    destPos = prePos(seekfile)
    curPos = lastPos(filename)

    if curPos < destPos:
        curpos = 0

    try:
        f = open(filename)
    except IOError:
        print('Could not open file: %s' % filename)
    except FileNotFoundError:
        print('Could not open file: %s' % filename)
#!/usr/bin/env python3
import sys
import re

def prePos(seekfile):
    global curpos
    try:
        cf = open(seekfile)
    except IOError:
        curpos = 0
        return curpos
    except FileNotFoundError:
        curpos = 0
        return curpos
    else:
        try:
            curpos = int(cf.readline().strip())
        except ValueError:
            curpos = 0
            cf.close()
            return curpos
        cf.close()
    return curpos

def lastPos(filename):
    with open(filename) as lfile:
        if lfile.readline():
            lfile.seek(0,2)
        else:
            return 0
        lastPos = lfile.tell()
    return lastPos

def getSeekFile():
    try:
        seekfile = sys.argv[2]
    except IndexError:
        seekfile = '/tmp/logseek'
    return seekfile

def getKey():
    try:
        tagKey = str(sys.argv[3])
    except IndexError:
        tagKey = 'Error'
    return tagKey

def getResult(filename,seekfile,tagkey):
    destPos = prePos(seekfile)
    curPos = lastPos(filename)

    if curPos < destPos:
        curpos = 0

    try:
        f = open(filename)
    except IOError:
        print('Could not open file: %s' % filename)
    except FileNotFoundError:
        print('Could not open file: %s' % filename)
    else:
        f.seek(destPos)

        while curPos != 0 and f.tell() < curPos:
            rresult = f.readline().strip()
            global result
            if re.search(tagkey, rresult):
                result = 1
                break
            else:
                result = 0

        with open(seekfile,'w') as sf:
            sf.write(str(curPos))
    finally:
        f.close()
    return result

if __name__ == "__main__":
    result = 0
    curpos = 0
    tagkey = getKey()
    seekfile = getSeekFile()
    result = getResult(sys.argv[1],seekfile,tagkey)
print(result)作用:检查日志文件中是否有指定的关键字
第一个参数为日志文件名(必须有,相对路径、绝对路径均可)
第二个参数为seek position文件的路径(可选项,若不设置则默认为/tmp/logseek文件。相对路径、绝对路径均可)
第三个参数为搜索关键字,默认为 Error
2、设置属主和权限
[root@agent1 script]# chmod +x log.py

[root@agent1 script]# chown zabbix.zabbix log.pyhttpd服务的日志文件在/var/log/httpd/目录下,首先我们需要给这个目录设置一个ACL权限,让zabbix用户有权限去访问该目录
[root@agent1 httpd]# setfacl -m u:zabbix:r-x /var/log/httpd/3、下载python3来执行log.py脚本
[root@agent1 ~]# yum -y install python34、修改zabbix_agentd.conf文件,并重启服务
[root@agent1 ~]# vim /etc/zabbix/zabbix_agentd.conf
 UserParameter=loginusers,who | wc -l
 UserParameter=check_httpd,/bin/bash /etc/zabbix/script/check_httpd.sh
 UserParameter=check_logs[*],/usr/bin/python3 /etc/zabbix/script/log.py $1 $2 $3

[root@agent1 ~]# systemctl restart zabbix-agent.service
5、测试脚本
[root@agent1 script]# python3 log.py /var/log/httpd/error_log
0

[root@agent1 script]# echo 'Error' >> /var/log/httpd/error_log
[root@agent1 script]# python3 log.py /var/log/httpd/error_log
1

# 0为没有Error日志信息,1为有Error日志信息
测试完成后将写入的Error内容删除,而且因文件/tmp/logseek属于root账户,在web端写入写不进去,所以删除。
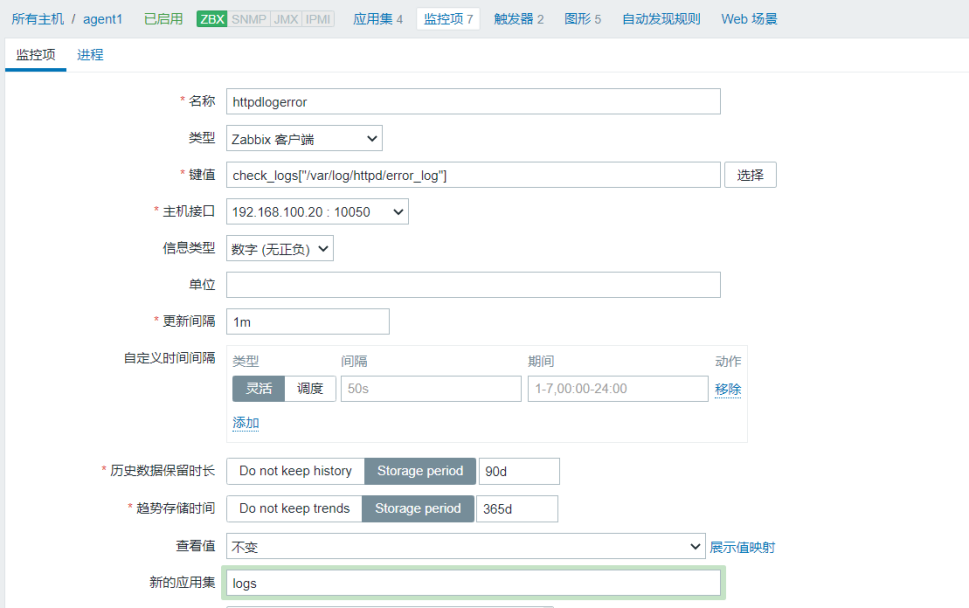
[root@agent1 script]# rm -rf /tmp/logseek6、zabbix web平台配置
配置监控项
创建触发器
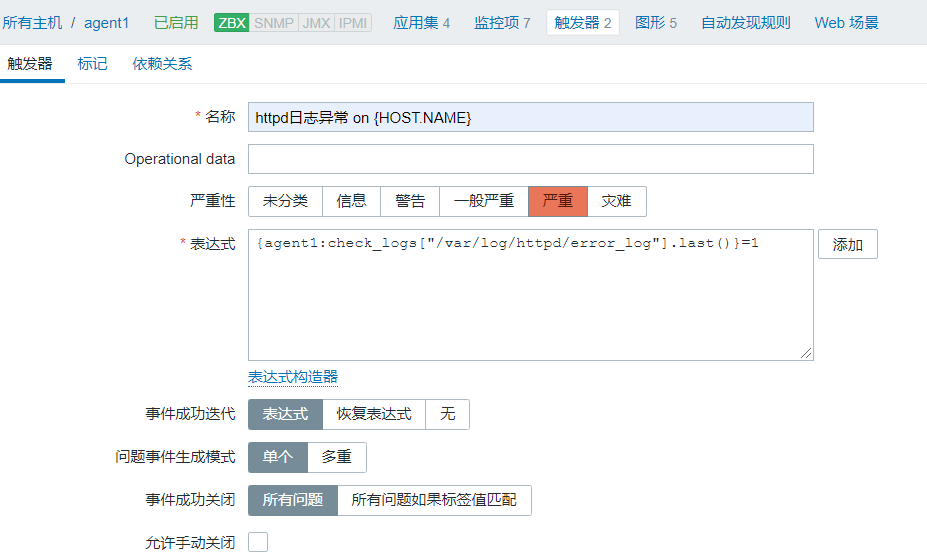
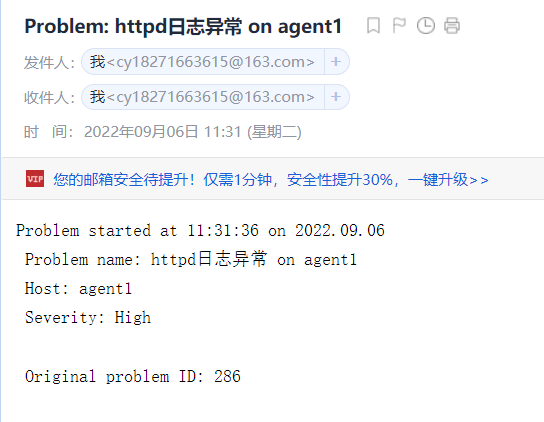
测试,echo Error >> /var/log/httpd/error_log

zabbix监控MySQL主从
1、部署mysql主从,使用mariadb进行操作
1、部署mysql主从,使用mariadb进行操作
192.168.100.10  master.example.com  master
192.168.100.20  slave.example.com  slave

2、将server、agent1、master、slave主机的/etc/hosts文件全部设置为
192.168.100.40  server.example.com server
192.168.100.30  agent1.example.com agent1
192.168.100.10  master.example.com master
192.168.100.20  slave.example.com  slave

3、然后两台主机都安装mariadb  mariadb-server
yum install -y mariadb mariadb-server
systemctl restart mariadb;systemctl enable mariadb

4、两台主机都初始化mysql数据库
mysql_secure_installation

[root@master ~]# mysql_secure_installation

NOTE: RUNNING ALL PARTS OF THIS SCRIPT IS RECOMMENDED FOR ALL MariaDB
      SERVERS IN PRODUCTION USE!  PLEASE READ EACH STEP CAREFULLY!

In order to log into MariaDB to secure it, we'll need the current
password for the root user. If you've just installed MariaDB, and
haven't set the root password yet, you should just press enter here.
Enter current password for root (enter for none):
OK, successfully used password, moving on...
Setting the root password or using the unix_socket ensures that nobody
can log into the MariaDB root user without the proper authorisation.
You already have your root account protected, so you can safely answer 'n'.
Switch to unix_socket authentication [Y/n] y
Enabled successfully!
Reloading privilege tables..
 ... Success!
You already have your root account protected, so you can safely answer 'n'.
Change the root password? [Y/n] y
New password:
Re-enter new password:
Password updated successfully!
Reloading privilege tables..
 ... Success!
By default, a MariaDB installation has an anonymous user, allowing anyone
to log into MariaDB without having to have a user account created for
them.  This is intended only for testing, and to make the installation
go a bit smoother.  You should remove them before moving into a
production environment.
Remove anonymous users? [Y/n] y
 ... Success!
Normally, root should only be allowed to connect from 'localhost'.  This
ensures that someone cannot guess at the root password from the network.
Disallow root login remotely? [Y/n] n
 ... skipping.
By default, MariaDB comes with a database named 'test' that anyone can
access.  This is also intended only for testing, and should be removed
before moving into a production environment.
Remove test database and access to it? [Y/n] y
 - Dropping test database...
 ... Success!
 - Removing privileges on test database...
 ... Success!
Reloading the privilege tables will ensure that all changes made so far
will take effect immediately.
Reload privilege tables now? [Y/n] y
 ... Success!
Cleaning up...
All done!  If you've completed all of the above steps, your MariaDB
installation should now be secure.

Thanks for using MariaDB!

5、修改数据库配置文件,然后两台主机都重启mariadb服务
Master:
vim /etc/my.cnf
[mysqld]
#添加两行数据
log_bin=mysql-bin
server_id=20

systemctl restart mariadb

Slave:
vim /etc/my.cnf
[mysqld]
#添加两行数据
log_bin=mysql-bin
server_id=30
systemctl restart mariadb

6、进入数据库配置主从
Master:
mysql -u root -p   #密码为redhat
grant all privileges  on *.* to root@'%' identified by "redhat";
grant replication slave on *.* to 'user'@'slave' identified by 'redhat';

Slave:
grant all privileges  on *.* to root@'%' identified by "redhat";
change master to master_host='master',master_user='user',master_password='redhat';
start slave;
show slave status\G

Slave_IO_Running: Connecting
Slave_SQL_Running: Yes
2、在slave主机中安装zabbix-agent软件包,将slave添加到zabbix web监控平台中
将server主机的zabbix.repo复制过来,然后将yum源中的8改成7,接着安装zabbix-agent
[root@slave ~]# vim /etc/yum.repos.d/zabbix.repo

[aliyun]

name=aliyun

baseurl=https://mirrors.aliyun.com/zabbix/zabbix/4.4/rhel/7/x86_64/

enable=1

gpgcheck=0

[qinghua]

name=Zabbix Official Repository - $basearch

#baseurl=http://repo.zabbix.com/zabbix/3.4/rhel/7/$basearch/

baseurl=https://mirrors.tuna.tsinghua.edu.cn/zabbix/zabbix/4.4/rhel/7/$basearch/

enabled=1

gpgcheck=0

gpgkey=file:///etc/pki/rpm-gpg/RPM-GPG-KEY-ZABBIX-A14FE591


[root@slave ~]# yum -y install zabbix-agent

# 修改 /etc/zabbix/zabbix_agentd.conf,重启服务

[root@slave ~]# vim /etc/zabbix/zabbix_agentd.conf

Server=192.168.100.10

ServerActive=192.168.100.10

Hostname=slave


[root@slave ~]# systemctl restart zabbix-agent.service

[root@slave ~]# systemctl enable zabbix-agent.service
3、进入zabbix web监控平台,添加主机
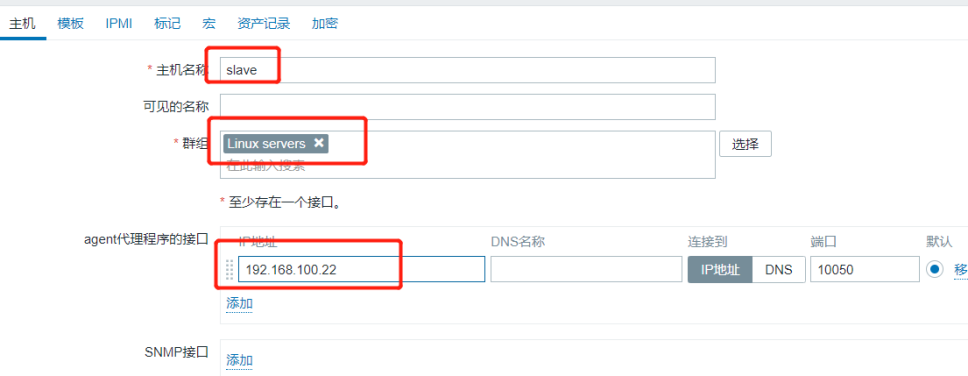
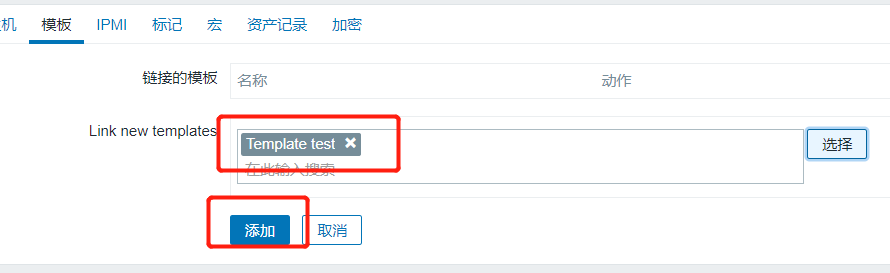

4、在slave主机上配置脚本
[root@slave ~]# cd /etc/zabbix/
[root@slave zabbix]# mkdir script
[root@slave zabbix]# cd script/
[root@slave script]# cat mysql_slave_status.sh
#!/bin/bash
USER="root"
PASSWD="redhat"
NAME=$1

function IO {
    Slave_IO_Running=`mysql -u $USER -p$PASSWD -e "show slave status\G;" 2> /dev/null |grep Slave_IO_Running |awk '{print $2}'`
    if [ $Slave_IO_Running == "Connecting" ];then
        echo 0
    else
        echo 1
    fi
}

function SQL {
    Slave_SQL_Running=`mysql -u $USER -p$PASSWD -e "show slave status\G;" 2> /dev/null |grep Slave_SQL_Running: |awk '{print $2}'`
if [ $Slave_SQL_Running == "Yes" ];then
echo 0
    else
        echo 1
    fi

}

case $NAME in
   io)
       IO
   ;;
   sql)
       SQL
   ;;
   *)
        echo -e "Usage: $0 [io | sql]"
esac

[root@slave script]# chmod +x mysql_slave_status.sh
[root@slave script]# chown -R zabbix.zabbix /etc/zabbix/script/
5、 验证脚本是否正确
[root@slave script]# ./mysql_slave_status.sh io
0
[root@slave script]# ./mysql_slave_status.sh sql
0
[root@slave script]#
6、编写一个自配置文件,里面指定上面编写的脚本的路径,然后重启服务
[root@slave ~]# cd /etc/zabbix/zabbix_agentd.d/
[root@slave zabbix_agentd.d]# vim userparameter_mysql_slave.conf

UserParameter=mysql.slave[*],/etc/zabbix/script/mysql_slave_status.sh $1

[root@slave zabbix_agentd.d]# chown -R zabbix.zabbix /etc/zabbix/zabbix_agentd.d/userparameter_mysql_slave.conf
[root@slave zabbix_agentd.d]# systemctl restart zabbix-agent.service
7、去zabbix server验证状态
使用zabbix_get命令验证,需要先下载zabbix-get软件包
[root@zabbix-server ~]# yum -y install zabbix-get
[root@zabbix-server ~]# zabbix_get -s 192.168.100.20 -k mysql.slave[io]
0
[root@zabbix-server ~]# zabbix_get -s 192.168.100.20 -k mysql.slave[sql]
0
[root@zabbix-server ~]#
# 验证的结果如果是0,为正常,如果为1,则异常
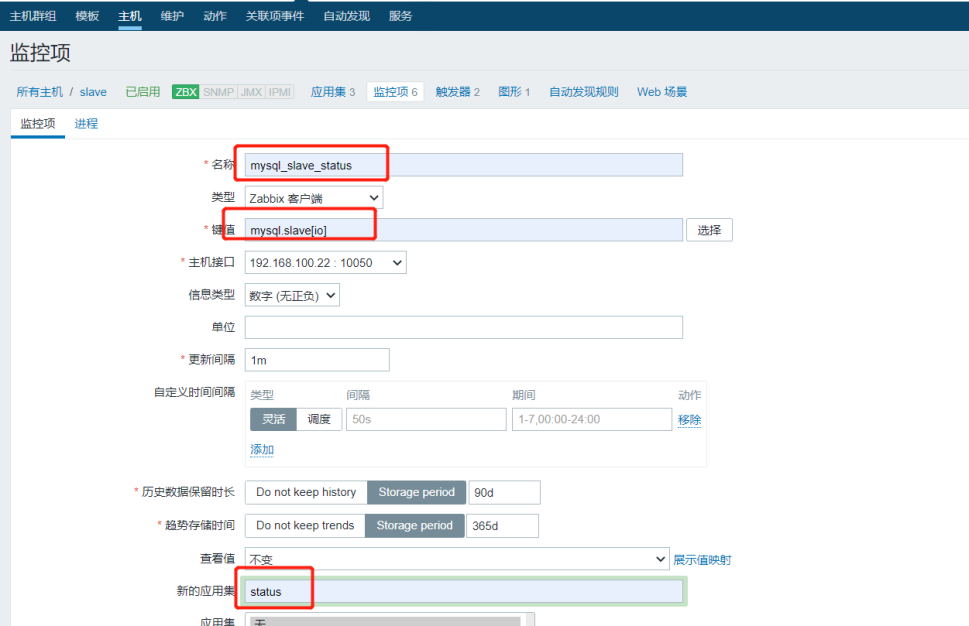
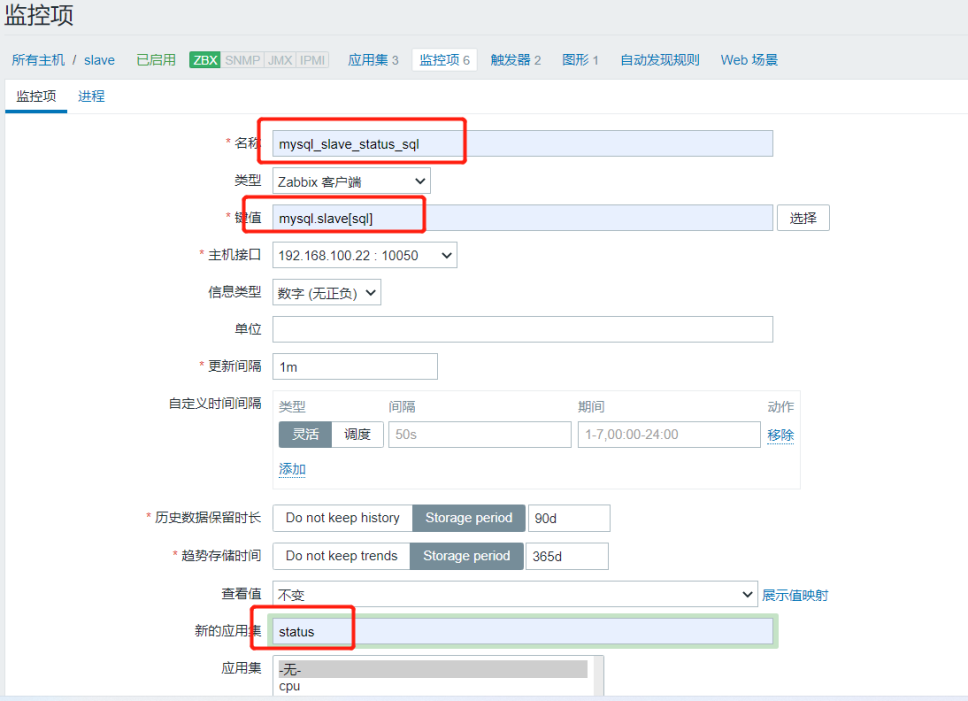
8、在zabbix web平台配置
新建监控项
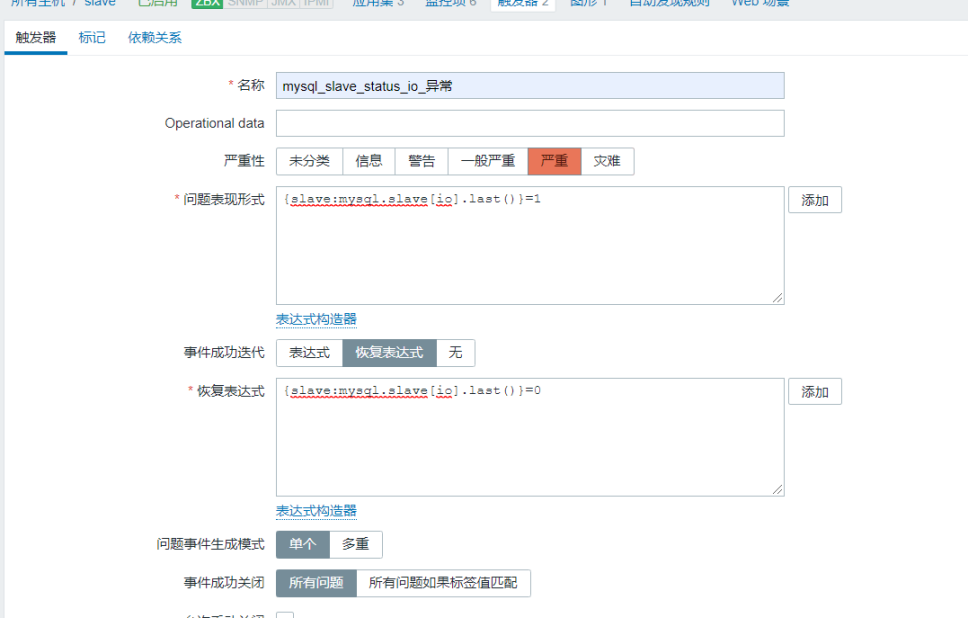
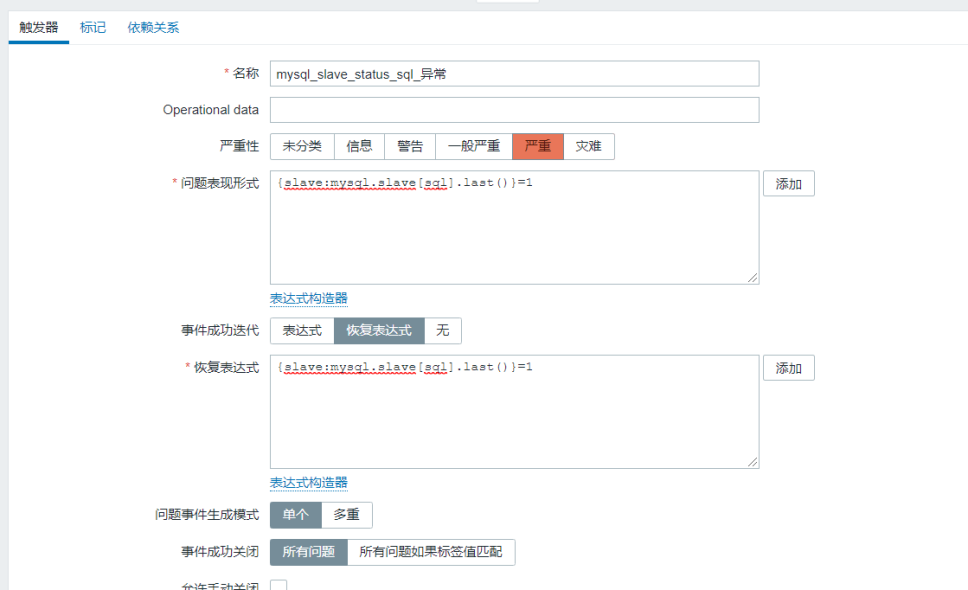
新建触发器
创建图形
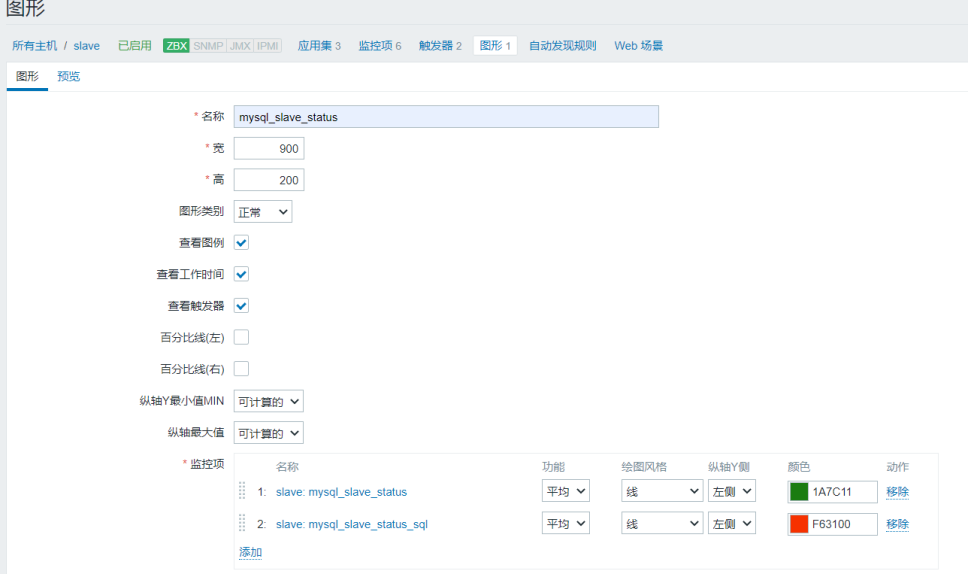
9、测试验证
将mysql主从关闭,查看zabbix告警信息,验证邮箱是否能接收到邮件
mysql -u root -predhat -e "stop slave;"
zabbix监控主从延迟
1、配置库脚本
cd /etc/zabbix/script
#Behind:落后主库多少秒,存在秒数则出现主库复制之间的延迟
#只要当延迟数据为NULL,以及0-200是正常的,否则其他数字输入1表示错误
vim mysql_delay.sh

#!/bin/bash
delay=$(mysql -uroot -predhat -e 'show slave status\G' 2> /dev/null | grep 'Seconds_Behind_Master' | awk '{print $2}')
if [ $delay == "NULL" ];then
echo 0
elif [ $delay -ge 0 ] && [ $delay -le 200 ];then
echo 0
else
echo $delay
fi
2、 配置agentd文件,并重启服务
chown -R zabbix.zabbix mysql_delay.sh
chmod +x mysql_delay.sh
3、配置agentd文件,并重启服务
vim /etc/zabbix/zabbix_agentd.d/userparameter_mysql_slave.conf
UserParameter=mysql.slave[*],/etc/zabbix/script/mysql_slave_status.sh $1
UserParameter=check_mysql_delay,/bin/bash /etc/zabbix/script/mysql_delay.sh
systemctl restart zabbix-agent.service
4、测试mysql_delay.sh脚本
cd /etc/zabbix/script/
./mysql_delay.sh
5、zabbix server主机进行脚本测试
[root@server ~]# zabbix_get -s 192.168.100.22 -k check_mysql_delay
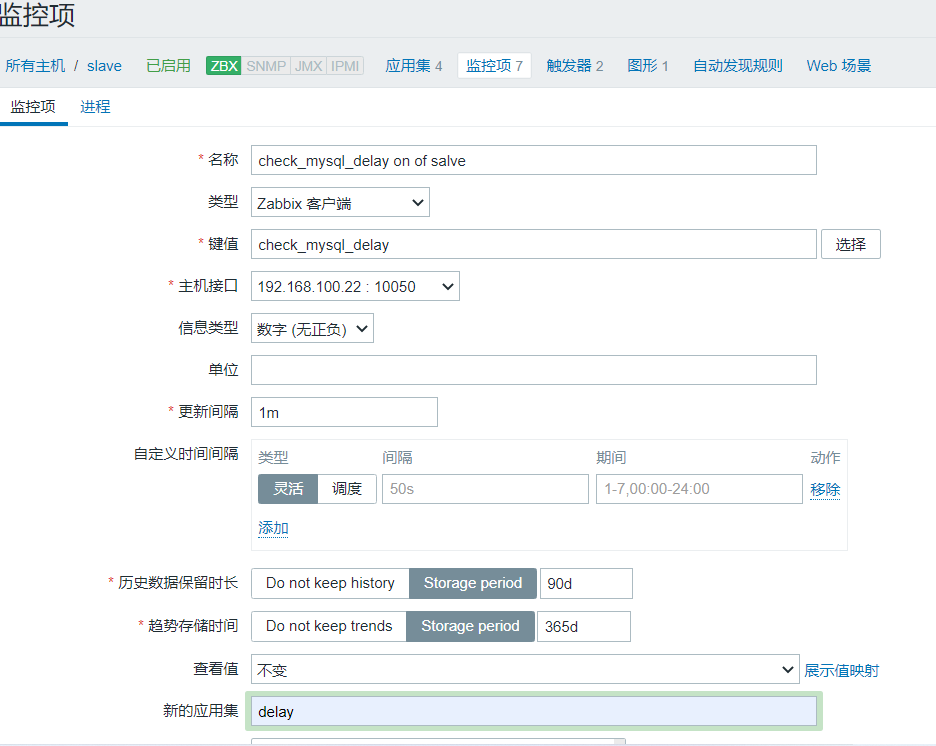
06、在zabbix web平台操作
添加监控项
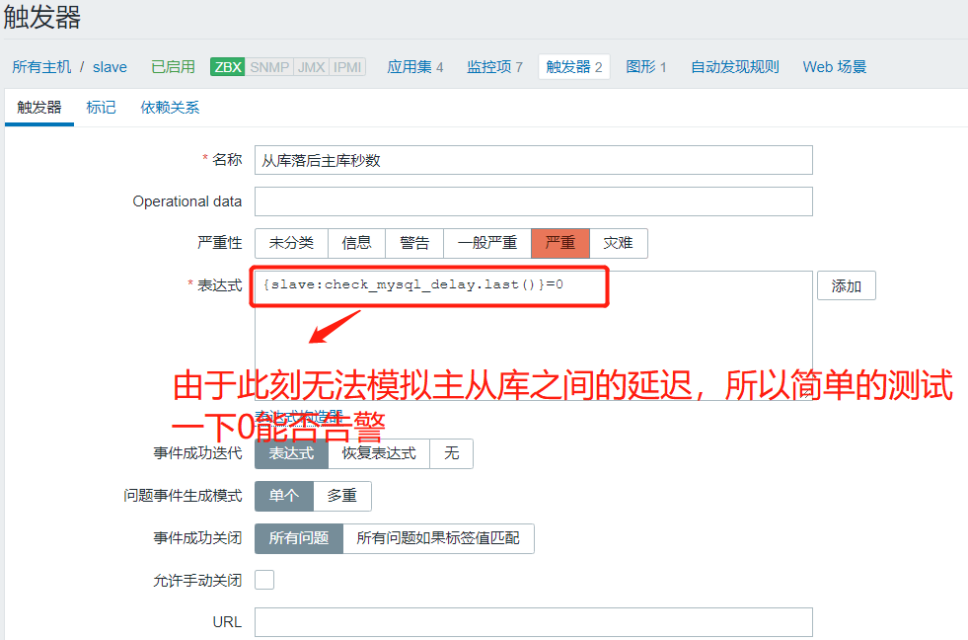
创建触发器
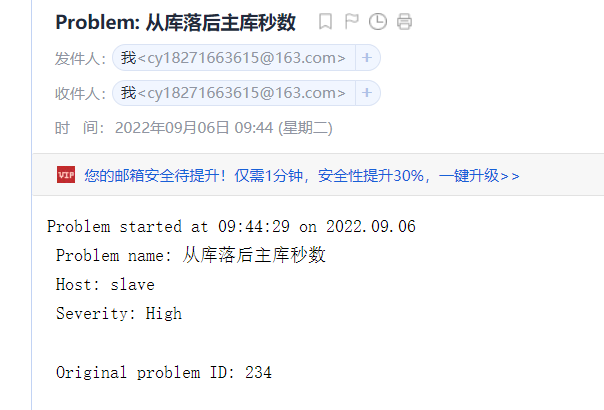
查看告警信息

查看邮箱
完成!
思维导图


 1003
1003

 被折叠的 条评论
为什么被折叠?
被折叠的 条评论
为什么被折叠?
 到【灌水乐园】发言


