


原文转载自
https://blog.csdn.net/luzhouyue1024/article/details/129317402
首先需要搭建Kafka broker集群(本次实验搭建3台,伪集群单机部署3台),然后在Spring容器中启动生产者、消费者,与borker集群交互。
搭建zookeeper集群
首先,启动Kafka需要安装Zookeeper.
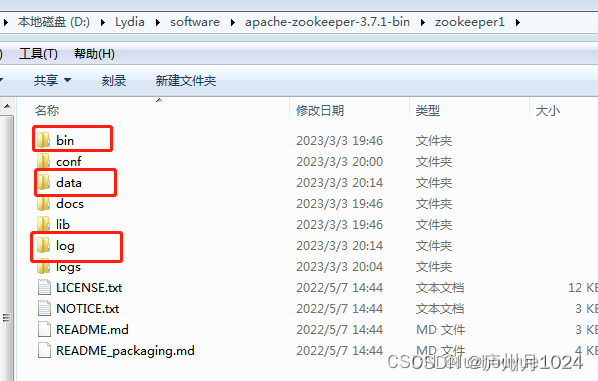
在官网下载Kafka对应的zookeeper版本,本Demo采用Zookeeper 3.7.1和kafka 2.13,解压缩后找到bin/目录,返回上层目录,将父目录改名为zookeeper1,并创建两个子目录data和log
在conf/创建一个文件zoo.cfg,内容如下
tickTime=2000
initLimit=10
syncLimit=5
clientPort=2181
dataDir=D:/Lydia/software/apache-zookeeper-3.7.1-bin/zookeeper1/data
dataLogDir=D:/Lydia/software/apache-zookeeper-3.7.1-bin/zookeeper1/log
server.1=localhost:2888:3888
server.2=localhost:2889:3889
在data/目录创建文件myid,文件内容为1, 代表当前zookeeper节点的id值。
复制一份上面zookeeper1文件,修改文件夹名为zookeeper2,重复以上操作,并且修改clientPort=2182,并将data/myid设置为2
在两个zookeeper文件夹bin目录下修改zkServer.cmd
添加set ZOOCFG=..\conf\zoo.cfg,最终如下所示

依次启动zookeeper1和zookeeper2目录下的bin/zkServer.cmd,看到启动成功。
搭建Kafka
1.下载Kafka 2.13
2.解压到本地文件夹,同理,模拟两个kafka的broker,分别创建子目录kafka_2.13_1和kafka_2.13_2
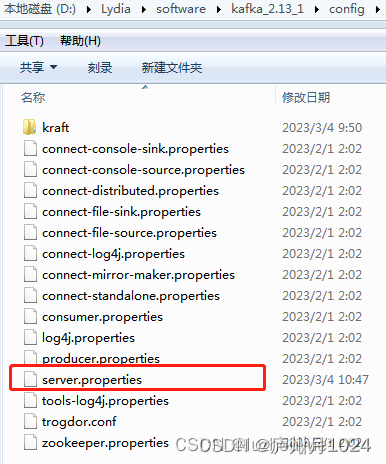
3.修改kafka_2.13_1文件夹config下的server.properties文件
主要是borker.id=1
port=9092
listners=PLAINTEXT://:9092
zookeeper.connect=localhost:2181,localhost:2182(Zookeeper刚刚用到的clientPort端口号)
broker.id=1
port=9092
listeners=PLAINTEXT://:9092

num.network.threads=3


num.io.threads=8

socket.send.buffer.bytes=102400

socket.receive.buffer.bytes=102400

socket.request.max.bytes=104857600

log.dirs=/tmp/kafka-logs

num.partitions=1

num.recovery.threads.per.data.dir=1

offsets.topic.replication.factor=1
transaction.state.log.replication.factor=1
transaction.state.log.min.isr=1

log.retention.hours=168

log.retention.check.interval.ms=300000

zookeeper.connect=localhost:2181,localhost:2182

zookeeper.connection.timeout.ms=18000

group.initial.rebalance.delay.ms=0
同理,修改kafka_2.13_2文件夹config下的server.properties文件
主要修改项是
borker.id=2
port=9093
listners=PLAINTEXT://:9093
zookeeper.connect=localhost:2181,localhost:2182
4.启动kafka1和kafka2文件夹下的bin/windows/kafka-server-start.bat,分别在两个cmd窗口启动两个broker,本Demo认为有两个borker组成集群。
SpringBoot整合Kakfa
感谢开源社区已经有了spring-kafka项目,可以方便地在Spring容器中启动和使用Kafka生产者和消费者线程。
引入依赖
打开IntelliJ, 创建一个maven工程,并引入该开源项目的maven依赖包,如下
<dependency>
  <groupId>org.springframework.kafka</groupId>
  <artifactId>spring-kafka</artifactId>
</dependency>
创建单-生产者,双消费者Demo
生产者使用RestController建立web映射,并把收到的请求内容,通过KafkaTemplate发送给Kafka brokers.
消费者利用@KafkaListener(id = "consumer-group-id", topics = "topic-id")申明自己,代表在哪个消费者Group中,对什么topic感兴趣,如下:
@SpringBootApplication
@RestController
@Slf4j
public class KafkaDemoApplication {

    public static void main(String[] args) {
        SpringApplication.run(KafkaDemoApplication.class, args);
    }

    @Autowired
    private KafkaTemplate<Object, Object> kafkaTemplate;

    @GetMapping("/send/{input}")
    public void receiveAndSendToKafka(@PathVariable String input) {
        //生产者,把收到的消息用KafkaTemplate发出去
        //
        this.kafkaTemplate.send("topic_hello", input);
    }

    @KafkaListener(id = "rest1", topics = "topic_hello")
    public void listen1(String input) {
        log.info("Kafka Consumer1 gets value: {}", input);
    }

    @KafkaListener(id = "rest2", topics = "topic_hello")
    public void listen2(String input) {
        log.info("Kafka Consumer2 gets value: {}", input);
    }
}
启动SpringBoot,然后在浏览器输入测试地址 http://localhost:8090/send/hululu,然后在控制台看到消费者收到消息:
INFO 25184 --- [    rest2-0-C-1] com.lydia.KafkaDemoApplication           : Kafka Consumer2 gets value: hululu
INFO 25184 --- [    rest1-0-C-1] com.lydia.KafkaDemoApplication           : Kafka Consumer1 gets value: hululu
创建Topic的Demo
Kafka为了实现高可用性,对每个topic都有一个副本数量,如果某一个单点挂了,可以立刻使用其他的副本作为Leader来收发消息。
同时,每一个topic还可以分区,比如一个topic分了5个区,那么可以有5个消费者来分别监听5个区,每个消费者只会收到其中一个区的消息,那么100条消息,分到了5个区,平均只有20条消息由每个消费者接收,提高了并行度。
使用 KafkaClient 自带的 AdminClient创建消息
@SpringBootApplication
@RestController
@Slf4j
public class CreateTopicDemo {
    @Autowired
    private KafkaProperties properties;

    @Autowired
    private KafkaTemplate<Object, Object> kafkaTemplate;

    public static void main(String[] args) {
        SpringApplication.run(CreateTopicDemo.class, args);
    }

    @GetMapping("/create/{topic}/{numPartitions}")
    public void createTopic(@PathVariable String topic, @PathVariable int numPartitions) {
        AdminClient client = AdminClient.create(properties.buildAdminProperties());
        if(client !=null){
            try {
                Collection<NewTopic> topics = new LinkedList<>();
                short replications = 2;
                log.info("Receives topic value={}, numPartition={}", topic, numPartitions);
                //创建topic,含有topic名称,分区数,副本数
                topics.add(new NewTopic(topic ,numPartitions,replications));
                client.createTopics(topics);
            }catch (Throwable e){
                e.printStackTrace();
                log.error("Create topic occurs with error {}", e.getCause());
            }finally {
                client.close();
            }
        }
    }
}
测试创建消息: 浏览器输入http://localhost:8090/create/hello10/2, 代表想创建topic=hello10,分区数为2的主题。在Kafka服务器日志上看到类似日志,代表创建成功:

两种生产者获取Callback的方式
方法一
重写callback
测试地址http://localhost:8090/send/callback1/test1
/**
     * 生产者Callback1
     */
    @GetMapping("/send/callback1/{input}")
    public void sendWithCallbackOne(@PathVariable String input) {
        //生产者,把收到的消息用KafkaTemplate发出去
        log.info("从Rest服务接收到内容:{}, 将发往topic_hello...", input);
        //发到topic_hello上
        this.kafkaTemplate.send("topic_hello", input).addCallback(new ListenableFutureCallback<SendResult<Object, Object>>() {
            @Override
            public void onFailure(Throwable throwable) {
				log.error("发送失败,{}", throwable);
                log.error("发送失败,cause={}", throwable.getCause());
            }

            @Override
            public void onSuccess(SendResult<Object, Object> objectObjectSendResult) {
				log.info("Callback1发送成功:{}", objectObjectSendResult.toString());
            }
        });
    }
方法二
获取future
测试地址http://localhost:8090/send/callback2/test2
将获取如下结果:[nio-8090-exec-1] c.l.callback.KafkaProducerCallbackDemo : Callback2发送成功:SendResult [producerRecord=ProducerRecord(topic=topic_hello, partition=null, headers=RecordHeaders(headers = [], isReadOnly = true), key=null, value=test, timestamp=null), recordMetadata=topic_hello-0@13]
/**
     * 生产者Callback2
     */
    @GetMapping("/send/callback2/{input}")
    public void sendWithCallbackTwo(@PathVariable String input) {
        //生产者,把收到的消息用KafkaTemplate发出去
        log.info("从Rest服务接收到内容:{}, 将发往topic_hello...", input);
        //发到topic_hello上
        this.kafkaTemplate.send("topic_hello", input);
        ListenableFuture<SendResult<Object,Object>> future = this.kafkaTemplate.send("topic_hello", input);
        try {
            SendResult<Object,Object> result = future.get();
            log.info("Callback2发送成功:{}", result.toString());
        }catch (Throwable throwable){
            log.error("发送失败,{}", throwable);
            log.error("发送失败,cause={}", throwable.getCause());
        }
    }
ReplyingKafkaTemplate
ReplyingKafkaTemplate extends KafkaTemplate,方法 sendAndReceive实现了消息回复语义,也就是说,生产者发送消息后获得一个Future, future.get能得到消费者返回的消息
JavaConfig类:
@Configuration
public class ReplayingConfig {

    @Bean
    public ConcurrentMessageListenerContainer<String, String> repliesContainer(ConcurrentKafkaListenerContainerFactory<String, String> containerFactory) {
        ConcurrentMessageListenerContainer<String, String> repliesContainer = containerFactory.createContainer("replies");
        repliesContainer.getContainerProperties().setGroupId("repliesGroup");
        repliesContainer.setAutoStartup(false);
        return repliesContainer;
    }

    @Bean
    public ReplyingKafkaTemplate<String, String, String> replyingTemplate(ProducerFactory<String, String> pf, ConcurrentMessageListenerContainer<String, String> repliesContainer) {
        return new ReplyingKafkaTemplate(pf, repliesContainer);
    }

    @Bean
    public KafkaTemplate kafkaTemplate(ProducerFactory<String, String> pf) {
        return new KafkaTemplate(pf);
    }
}
启动类:
@SpringBootApplication
@RestController
@Slf4j
public class ReplyingKafkaTemplateDemo {

    public static void main(String[] args) {
        SpringApplication.run(ReplyingKafkaTemplateDemo.class, args);
    }


    @Autowired
    private ReplyingKafkaTemplate replyingTemplate;

    @GetMapping("/send/{input}")
    @Transactional(rollbackFor = RuntimeException.class)
    public void sendWithReplayFuture(@PathVariable String input) throws Exception {
        ProducerRecord<String, String> record = new ProducerRecord<>("topic-testReplayTemplate", input);
        RequestReplyFuture<String, String, String> replyFuture = replyingTemplate.sendAndReceive(record);
        ConsumerRecord<String, String> consumerRecord = replyFuture.get();
        log.info("获取消费者反馈: " + consumerRecord.value());
    }

    @KafkaListener(id = "webGroup", topics = "topic-testReplayTemplate")
    @SendTo
    public String consumer(String input) {
        log.info("消费者收到消息: {}", input);
        return "successful";
    }
}测试输入http://localhost:8090/send/hello,可以看到Console打印了消费者反馈的“successful”消息
[ webGroup-0-C-1] c.l.replaying.ReplyingKafkaTemplateDemo  : 消费者收到消息: hello
[ad | producer-1] org.apache.kafka.clients.Metadata        : [Producer clientId=producer-1] Resetting the last seen epoch of partition replies-0 to 0 since the associated topicId changed from null to jt5w2qjBSlmBtpk9n3VDvw
[nio-8090-exec-4] c.l.replaying.ReplyingKafkaTemplateDemo  : 获取消费者反馈: successful
消费者确认Ack-消费成功Acknowledgment
有两个地方会用到ack确认机制,producer生产者, consumer消费者。这里演示消费者ack功能。
1.producer发送消息到指定topic的ack确认(确认kafka成功收到消息)
2.consumer从topic中消费消息,并提交ack确认。默认情况是自动ack,因此手动Ack功能需要关闭自动提交,然后设置消费者的ack模式=manual,设置属性文件加入spring.kafka.listener.ack-mode=manual
#Tomcat rest
server.port=8090
#Kafka brokers
spring.kafka.producer.bootstrap-servers=127.0.0.1:9092,127.0.0.1:9093
spring.kafka.bootstrap-servers=127.0.0.1:9092,127.0.0.1:9093
spring.kafka.consumer.enable-auto-commit=false
spring.kafka.listener.ack-mode=manual
在消费Consumer端,对 @KafkaListener 的入参列表加入 Acknowledgment 即可,程序里面写 ack.acknowledge () ,运行到这行,代表向Kafka集群提交了偏移量,也就是消息被“消费”掉了.
使用Ack 手动提交偏移量时,假如 consumer 挂了重启,那它将从 committed offset 位置开始重新消费,而不是 consume offset 位置。
    /**
     * 消费者,当收到hulu这个消息时发送ack确认消费成功
     */
    @KafkaListener(id = "ack_group", topics = "topic_ack_test")
    public String ackConsumer(String input, Acknowledgment ack) {
        log.info("消费者收到消息: {}", input);
        if ("hulu".equals(input)) {
            ack.acknowledge();
            return "successful";
        }
        return "fail";
    }
Kafka死信队列
识别和处理错误对于任何可靠的数据流管道都是必不可少的。Kafka使用死信队列代表了错误流的存放位置和后续处理点。
死信队列的 Topic 的规则是,业务 Topic 名字 +“.DLT”。
如果业务命名为 “topic-hulu”,那么对应的死信队列的 Topic 就是 “topic-hulu.DLT”
可以设置消费者,为某个特定topic监听它的死信队列,也就是错误队列。
Git Repo
本Demo有Git地址,欢迎一览 https://github.com/LuzhouyueLee/Kafka_SpringBoot_Demo


 2646
2646


 被折叠的 条评论
为什么被折叠?
被折叠的 条评论
为什么被折叠?
 到【灌水乐园】发言


