


说明:当前kafka的版本为2.8.11,Spring Boot的版本为2.7.6。
第一步:在pom.xml中引入下述依赖
<dependency>
	<groupId>org.springframework.kafka</groupId>
	<artifactId>spring-kafka</artifactId>
	<version>2.8.11</version>
</dependency>
第二步:在yml配置文件进行如下配置
spring:
  kafka:
    # kafka服务的地址
    bootstrap-servers: 127.0.0.1:9092
    producer:
      # key-value序列化
      key-serializer: org.apache.kafka.common.serialization.StringSerializer
      value-serializer: org.apache.kafka.common.serialization.StringSerializer
    consumer:
      # 设置默认的消费者所属组id
      group-id: 0
      # key-value反序列化
      key-deserializer: org.apache.kafka.common.serialization.StringDeserializer
      value-deserializer: org.apache.kafka.common.serialization.StringDeserializer
第三步:创建生产者
package com.example.demo.kafka;

import lombok.extern.slf4j.Slf4j;
import org.springframework.beans.factory.annotation.Autowired;
import org.springframework.kafka.core.KafkaTemplate;
import org.springframework.kafka.support.SendResult;
import org.springframework.util.concurrent.ListenableFuture;
import org.springframework.util.concurrent.ListenableFutureCallback;
import org.springframework.web.bind.annotation.RequestMapping;
import org.springframework.web.bind.annotation.RequestParam;
import org.springframework.web.bind.annotation.RestController;

@Slf4j
@RestController
@RequestMapping("kafka")
public class KafkaProducer {

    // 自定义topic
    public static final String TOPIC_NAME="topic.one";

    @Autowired
    private KafkaTemplate<String, String> kafkaTemplate;

    @RequestMapping("send")
    public String send(@RequestParam("msg")String msg) {
        log.info("准备发送消息为:{}",msg);
        // 1.发送消息
        ListenableFuture<SendResult<String,String>> future=kafkaTemplate.send(TOPIC_NAME,msg);
        future.addCallback(new ListenableFutureCallback<SendResult<String, String>>() {
            @Override
            public void onFailure(Throwable throwable) {
                // 2.发送失败的处理
                log.error("生产者 发送消息失败:"+throwable.getMessage());
            }
            @Override
            public void onSuccess(SendResult<String, String> stringObjectSendResult) {
                // 3.发送成功的处理
                log.info("生产者 发送消息成功:"+stringObjectSendResult.toString());
            }
        });
        return "接口调用成功";
    }
}注意:当kafka中没有名为topic.one的主题时程序会自动创建,其实这里的主题就相当于rabbitmq中的队列。
第四步:创建消费者
package com.example.demo.kafka;

import java.util.Optional;

import lombok.extern.slf4j.Slf4j;
import org.apache.kafka.clients.consumer.ConsumerRecord;
import org.springframework.kafka.annotation.KafkaListener;
import org.springframework.kafka.support.KafkaHeaders;
import org.springframework.messaging.handler.annotation.Header;
import org.springframework.stereotype.Component;

@Slf4j
@Component
public class KafkaConsumer {

    // 自定义topic
    public static final String TOPIC_NAME="topic.one";

    @KafkaListener(topics = TOPIC_NAME, groupId = "ONE")
    public void topic_one(ConsumerRecord<?, ?> record, @Header(KafkaHeaders.RECEIVED_TOPIC) String topic) {
        Optional message = Optional.ofNullable(record.value());
        if (message.isPresent()) {
            Object msg = message.get();
            log.info("消费者One消费了: +++++++++++++++ Topic:" + topic + ",Record:" + record + ",Message:" + msg);
        }
    }

    @KafkaListener(topics = TOPIC_NAME, groupId = "TWO")
    public void topic_two(ConsumerRecord<?, ?> record, @Header(KafkaHeaders.RECEIVED_TOPIC) String topic) {
        Optional message = Optional.ofNullable(record.value());
        if (message.isPresent()) {
            Object msg = message.get();
            log.info("消费者TwO消费了: +++++++++++++++ Topic:" + topic + ",Record:" + record + ",Message:" + msg);
        }
    }
}
第五步:启动项目,在postman中访问请求下述接口
http://127.0.0.1:8080/kafka/send?msg=测试数据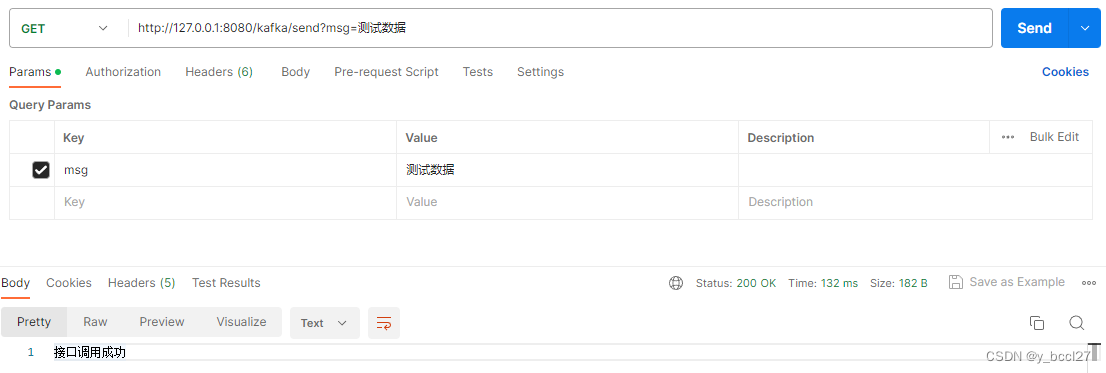
项目启动后首次调用该接口控制台会输出如下日志:
2023-05-31 22:09:50.935  INFO 20036 --- [nio-8080-exec-1] o.a.c.c.C.[Tomcat].[localhost].[/]       : Initializing Spring DispatcherServlet 'dispatcherServlet'
2023-05-31 22:09:50.935  INFO 20036 --- [nio-8080-exec-1] o.s.web.servlet.DispatcherServlet        : Initializing Servlet 'dispatcherServlet'
2023-05-31 22:09:50.936  INFO 20036 --- [nio-8080-exec-1] o.s.web.servlet.DispatcherServlet        : Completed initialization in 1 ms
2023-05-31 22:09:50.963  INFO 20036 --- [nio-8080-exec-1] com.example.demo.kafka.KafkaProducer     : 准备发送消息为:测试数据
2023-05-31 22:09:50.966  INFO 20036 --- [nio-8080-exec-1] o.a.k.clients.producer.ProducerConfig    : ProducerConfig values:
	acks = -1
	batch.size = 16384
	bootstrap.servers = [127.0.0.1:9092]
	buffer.memory = 33554432
	client.dns.lookup = use_all_dns_ips
	client.id = producer-1
	compression.type = none
	connections.max.idle.ms = 540000
	delivery.timeout.ms = 120000
	enable.idempotence = true
	interceptor.classes = []
	key.serializer = class org.apache.kafka.common.serialization.StringSerializer
	linger.ms = 0
	max.block.ms = 60000
	max.in.flight.requests.per.connection = 5
	max.request.size = 1048576
	metadata.max.age.ms = 300000
	metadata.max.idle.ms = 300000
	metric.reporters = []
	metrics.num.samples = 2
	metrics.recording.level = INFO
	metrics.sample.window.ms = 30000
	partitioner.class = class org.apache.kafka.clients.producer.internals.DefaultPartitioner
	receive.buffer.bytes = 32768
	reconnect.backoff.max.ms = 1000
	reconnect.backoff.ms = 50
	request.timeout.ms = 30000
	retries = 2147483647
	retry.backoff.ms = 100
	sasl.client.callback.handler.class = null
	sasl.jaas.config = null
	sasl.kerberos.kinit.cmd = /usr/bin/kinit
	sasl.kerberos.min.time.before.relogin = 60000
	sasl.kerberos.service.name = null
	sasl.kerberos.ticket.renew.jitter = 0.05
	sasl.kerberos.ticket.renew.window.factor = 0.8
	sasl.login.callback.handler.class = null
	sasl.login.class = null
	sasl.login.connect.timeout.ms = null
	sasl.login.read.timeout.ms = null
	sasl.login.refresh.buffer.seconds = 300
	sasl.login.refresh.min.period.seconds = 60
	sasl.login.refresh.window.factor = 0.8
	sasl.login.refresh.window.jitter = 0.05
	sasl.login.retry.backoff.max.ms = 10000
	sasl.login.retry.backoff.ms = 100
	sasl.mechanism = GSSAPI
	sasl.oauthbearer.clock.skew.seconds = 30
	sasl.oauthbearer.expected.audience = null
	sasl.oauthbearer.expected.issuer = null
	sasl.oauthbearer.jwks.endpoint.refresh.ms = 3600000
	sasl.oauthbearer.jwks.endpoint.retry.backoff.max.ms = 10000
	sasl.oauthbearer.jwks.endpoint.retry.backoff.ms = 100
	sasl.oauthbearer.jwks.endpoint.url = null
	sasl.oauthbearer.scope.claim.name = scope
	sasl.oauthbearer.sub.claim.name = sub
	sasl.oauthbearer.token.endpoint.url = null
	security.protocol = PLAINTEXT
	security.providers = null
	send.buffer.bytes = 131072
	socket.connection.setup.timeout.max.ms = 30000
	socket.connection.setup.timeout.ms = 10000
	ssl.cipher.suites = null
	ssl.enabled.protocols = [TLSv1.2]
	ssl.endpoint.identification.algorithm = https
	ssl.engine.factory.class = null
	ssl.key.password = null
	ssl.keymanager.algorithm = SunX509
	ssl.keystore.certificate.chain = null
	ssl.keystore.key = null
	ssl.keystore.location = null
	ssl.keystore.password = null
	ssl.keystore.type = JKS
	ssl.protocol = TLSv1.2
	ssl.provider = null
	ssl.secure.random.implementation = null
	ssl.trustmanager.algorithm = PKIX
	ssl.truststore.certificates = null
	ssl.truststore.location = null
	ssl.truststore.password = null
	ssl.truststore.type = JKS
	transaction.timeout.ms = 60000
	transactional.id = null
	value.serializer = class org.apache.kafka.common.serialization.StringSerializer

2023-05-31 22:09:50.973  INFO 20036 --- [nio-8080-exec-1] o.a.k.clients.producer.KafkaProducer     : [Producer clientId=producer-1] Instantiated an idempotent producer.
2023-05-31 22:09:50.982  INFO 20036 --- [nio-8080-exec-1] o.a.kafka.common.utils.AppInfoParser     : Kafka version: 3.1.2
2023-05-31 22:09:50.982  INFO 20036 --- [nio-8080-exec-1] o.a.kafka.common.utils.AppInfoParser     : Kafka commitId: f8c67dc3ae0a3265
2023-05-31 22:09:50.982  INFO 20036 --- [nio-8080-exec-1] o.a.kafka.common.utils.AppInfoParser     : Kafka startTimeMs: 1685542190982
2023-05-31 22:09:50.991  INFO 20036 --- [ad | producer-1] org.apache.kafka.clients.Metadata        : [Producer clientId=producer-1] Resetting the last seen epoch of partition topic.one-0 to 0 since the associated topicId changed from null to A8Lfh0GZQ3GR6fUo-OvcAQ
2023-05-31 22:09:50.991  INFO 20036 --- [ad | producer-1] org.apache.kafka.clients.Metadata        : [Producer clientId=producer-1] Cluster ID: 0YMM4442QOyhnWsg0zfjig
2023-05-31 22:09:50.992  INFO 20036 --- [ad | producer-1] o.a.k.c.p.internals.TransactionManager   : [Producer clientId=producer-1] ProducerId set to 4 with epoch 0
2023-05-31 22:09:51.020  INFO 20036 --- [ad | producer-1] com.example.demo.kafka.KafkaProducer     : 生产者 发送消息成功:SendResult [producerRecord=ProducerRecord(topic=topic.one, partition=null, headers=RecordHeaders(headers = [], isReadOnly = true), key=null, value=测试数据, timestamp=null), recordMetadata=topic.one-0@7]
2023-05-31 22:09:51.025  INFO 20036 --- [ntainer#1-0-C-1] com.example.demo.kafka.KafkaConsumer     : 消费者TwO消费了: +++++++++++++++ Topic:topic.one,Record:ConsumerRecord(topic = topic.one, partition = 0, leaderEpoch = 0, offset = 7, CreateTime = 1685542190992, serialized key size = -1, serialized value size = 12, headers = RecordHeaders(headers = [], isReadOnly = false), key = null, value = 测试数据),Message:测试数据
2023-05-31 22:09:51.025  INFO 20036 --- [ntainer#0-0-C-1] com.example.demo.kafka.KafkaConsumer     : 消费者One消费了: +++++++++++++++ Topic:topic.one,Record:ConsumerRecord(topic = topic.one, partition = 0, leaderEpoch = 0, offset = 7, CreateTime = 1685542190992, serialized key size = -1, serialized value size = 12, headers = RecordHeaders(headers = [], isReadOnly = false), key = null, value = 测试数据),Message:测试数据
第二次调用该接口,其输出日志则比较简洁:
2023-05-31 22:11:13.130  INFO 20036 --- [nio-8080-exec-3] com.example.demo.kafka.KafkaProducer     : 准备发送消息为:测试数据
2023-05-31 22:11:13.135  INFO 20036 --- [ad | producer-1] com.example.demo.kafka.KafkaProducer     : 生产者 发送消息成功:SendResult [producerRecord=ProducerRecord(topic=topic.one, partition=null, headers=RecordHeaders(headers = [], isReadOnly = true), key=null, value=测试数据, timestamp=null), recordMetadata=topic.one-0@8]
2023-05-31 22:11:13.144  INFO 20036 --- [ntainer#0-0-C-1] com.example.demo.kafka.KafkaConsumer     : 消费者One消费了: +++++++++++++++ Topic:topic.one,Record:ConsumerRecord(topic = topic.one, partition = 0, leaderEpoch = 0, offset = 8, CreateTime = 1685542273130, serialized key size = -1, serialized value size = 12, headers = RecordHeaders(headers = [], isReadOnly = false), key = null, value = 测试数据),Message:测试数据
2023-05-31 22:11:13.144  INFO 20036 --- [ntainer#1-0-C-1] com.example.demo.kafka.KafkaConsumer     : 消费者TwO消费了: +++++++++++++++ Topic:topic.one,Record:ConsumerRecord(topic = topic.one, partition = 0, leaderEpoch = 0, offset = 8, CreateTime = 1685542273130, serialized key size = -1, serialized value size = 12, headers = RecordHeaders(headers = [], isReadOnly = false), key = null, value = 测试数据),Message:测试数据
如上面代码所示,程序创建了两个消息消费者,每个消费者都监听来自主题topic_one的消息,唯一不同的是两个消费者分别属于不同的组别,即groupId设置不同。由此可见一条消息分别被两个不同的消费者消费,由此达到了广播的效果。
如果不需要每个消费者都读取到重复的消息该如何配置?
答案:采用相同消费组唯一消费模式
package com.example.demo.kafka;

import java.util.Optional;

import lombok.extern.slf4j.Slf4j;
import org.apache.kafka.clients.consumer.ConsumerRecord;
import org.springframework.kafka.annotation.KafkaListener;
import org.springframework.kafka.support.KafkaHeaders;
import org.springframework.messaging.handler.annotation.Header;
import org.springframework.stereotype.Component;

@Slf4j
@Component
public class KafkaConsumer {

    // 自定义topic
    public static final String TOPIC_NAME="topic.one";

    @KafkaListener(topics = TOPIC_NAME, groupId = "ONE")
    public void topic_one(ConsumerRecord<?, ?> record, @Header(KafkaHeaders.RECEIVED_TOPIC) String topic) {
        Optional message = Optional.ofNullable(record.value());
        if (message.isPresent()) {
            Object msg = message.get();
            log.info("消费者One消费了: +++++++++++++++ Topic:" + topic + ",Record:" + record + ",Message:" + msg);
        }
    }

    @KafkaListener(topics = TOPIC_NAME, groupId = "ONE")
    public void topic_two(ConsumerRecord<?, ?> record, @Header(KafkaHeaders.RECEIVED_TOPIC) String topic) {
        Optional message = Optional.ofNullable(record.value());
        if (message.isPresent()) {
            Object msg = message.get();
            log.info("消费者TwO消费了: +++++++++++++++ Topic:" + topic + ",Record:" + record + ",Message:" + msg);
        }
    }
}
上述代码与前段代码唯一的区别在于,两个消费者的组别设置成了一样的。再次调用上述接口,查看程序日志如下:
2023-05-31 22:19:31.953  INFO 17084 --- [nio-8080-exec-5] com.example.demo.kafka.KafkaProducer     : 准备发送消息为:测试数据
2023-05-31 22:19:31.956  INFO 17084 --- [ad | producer-1] com.example.demo.kafka.KafkaProducer     : 生产者 发送消息成功:SendResult [producerRecord=ProducerRecord(topic=topic.one, partition=null, headers=RecordHeaders(headers = [], isReadOnly = true), key=null, value=测试数据, timestamp=null), recordMetadata=topic.one-0@11]
2023-05-31 22:19:31.957  INFO 17084 --- [ntainer#0-0-C-1] com.example.demo.kafka.KafkaConsumer     : 消费者One消费了: +++++++++++++++ Topic:topic.one,Record:ConsumerRecord(topic = topic.one, partition = 0, leaderEpoch = 0, offset = 11, CreateTime = 1685542771953, serialized key size = -1, serialized value size = 12, headers = RecordHeaders(headers = [], isReadOnly = false), key = null, value = 测试数据),Message:测试数据
从日志可以看出无论访问多少次,只会有一个消费者消费了消息,因此达到了不重复消费的目的。


 2618
2618


 被折叠的 条评论
为什么被折叠?
被折叠的 条评论
为什么被折叠?
 到【灌水乐园】发言


