


一、Android开发涉及的编程语言
- App开发主要有两大技术路线,分别是原生开发和混合开发
- 官方编程语言Java和Kotlin
提前学好Java更有利于开发。
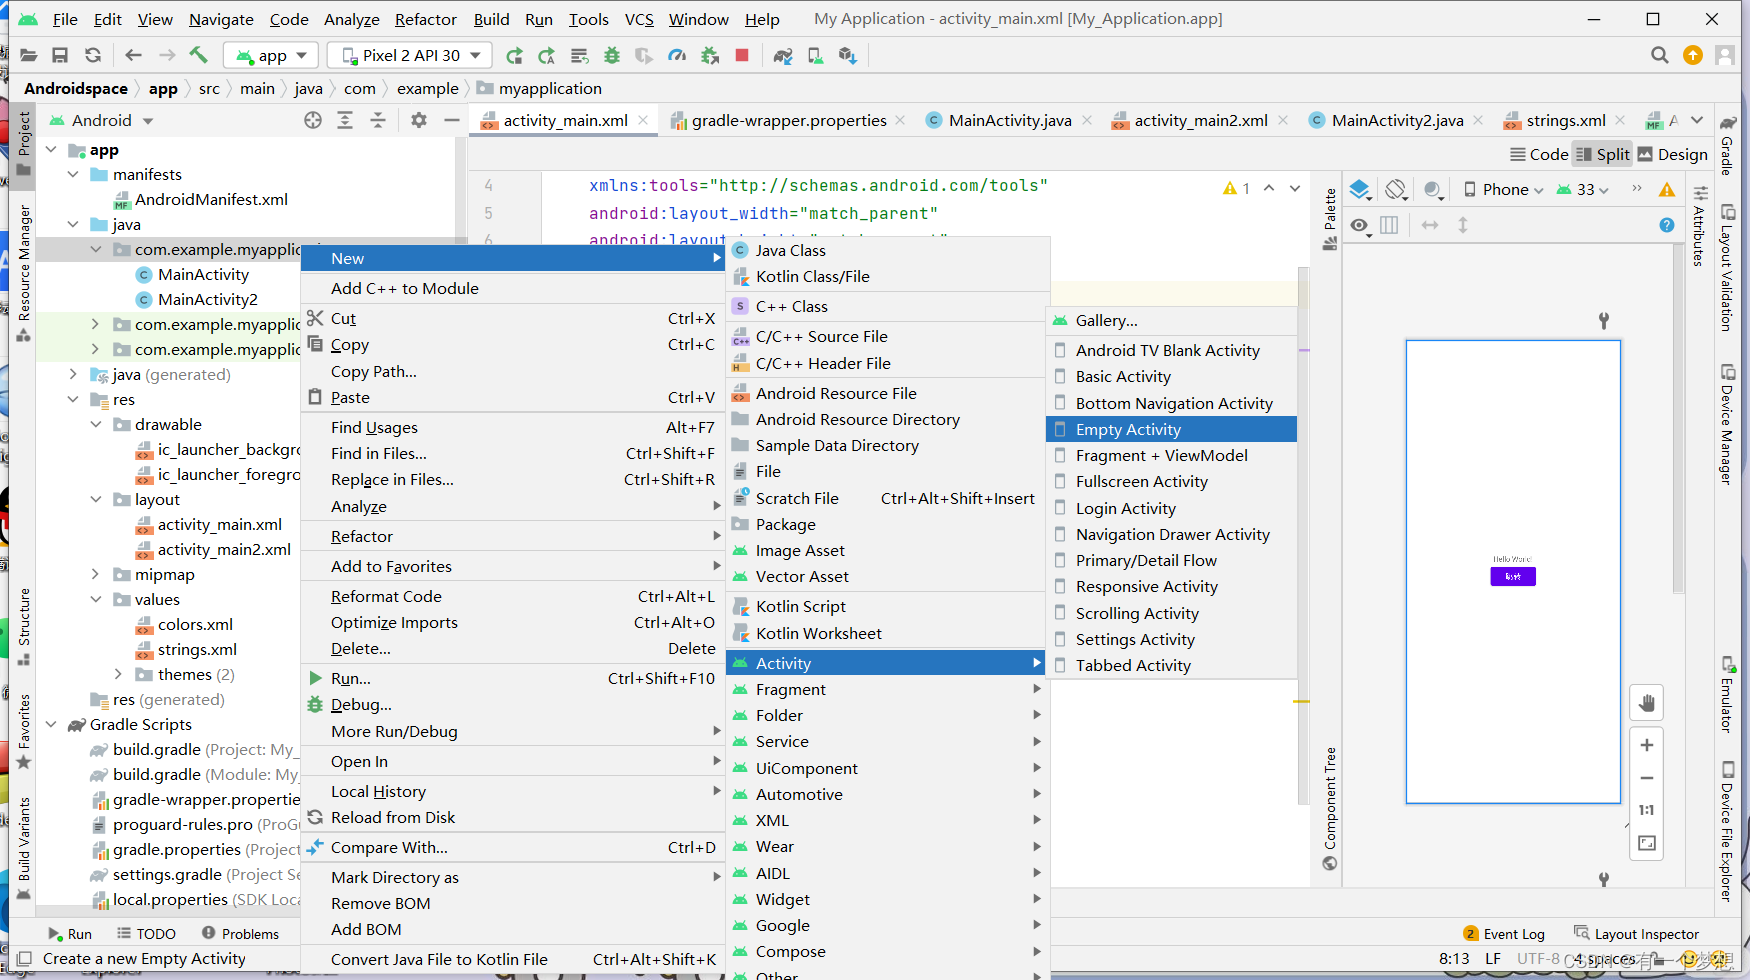
二、创建App页面
完整的页面创建过程包括三个步骤:
- 在Layout目录下创建XML文件
- 创建与XML文件对应的Java代码
- 在AndroidMainfest.XML中注册页面配置
三、简单控件
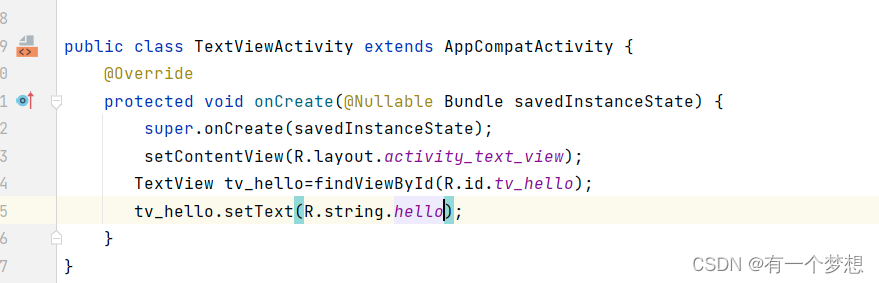
(一)文本显示
1.设置文本内容有两种方式 - 在XML文件中通过属性android:text设置文本
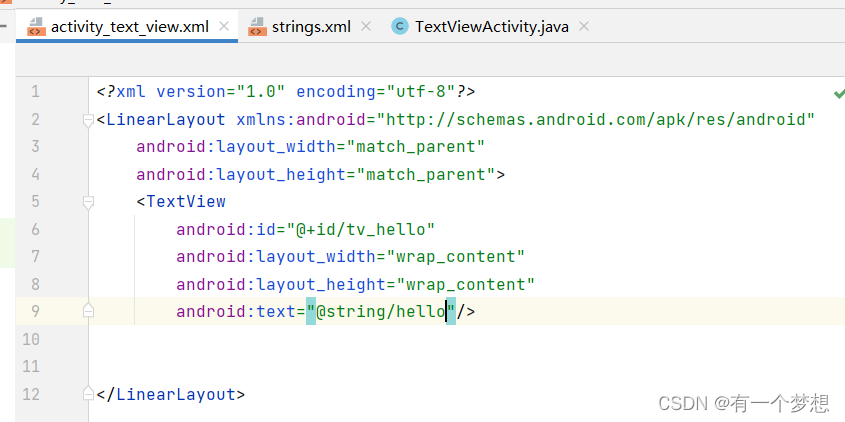
- 在Java代码中调用文本视图对象的setText方法设置文本
2.设置文本大小 - 在Java代码中调用setTextSize方法,即可指定文本大小。
- 在XML文件中通过android:textSize指定文本大小,此时需要指定字号单位。
px:它是手机屏幕的最小显示单位,与设备的显示屏有关。
dp:它是与设备无关的显示单位,只与屏幕尺寸有关。
sp:它专门用来设置字体大小,在系统设置中可以调整字体大小。
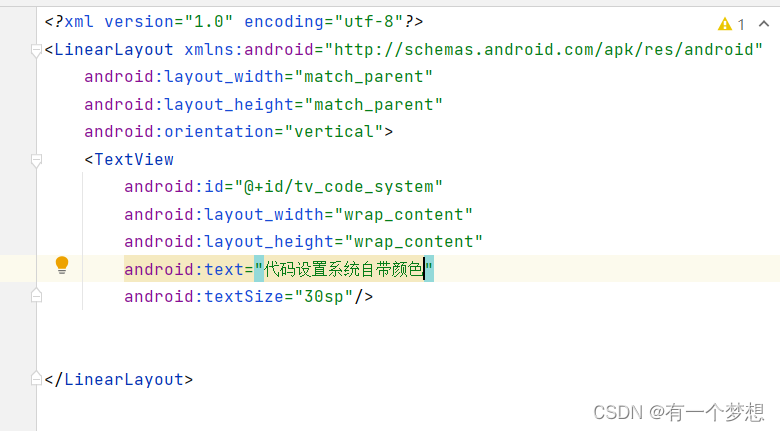
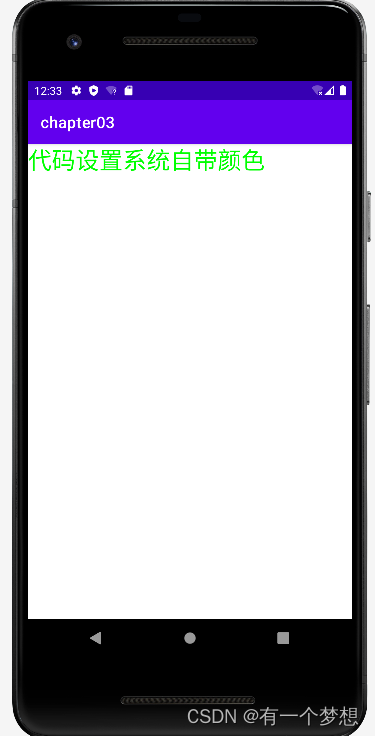
3.设置文本颜色 - 在Java代码中调用setTextColor方法即可设置文本颜色,具体色值可从Color类取。
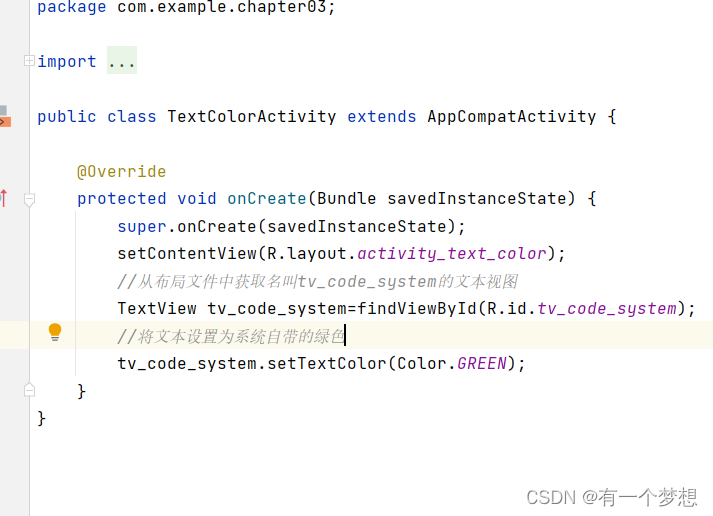
效果如下:
- 直接在XML中设置
android:textColor="#00ff00"
设置背景颜色为绿色:
android:background="#00ff00"
(二)视图基础
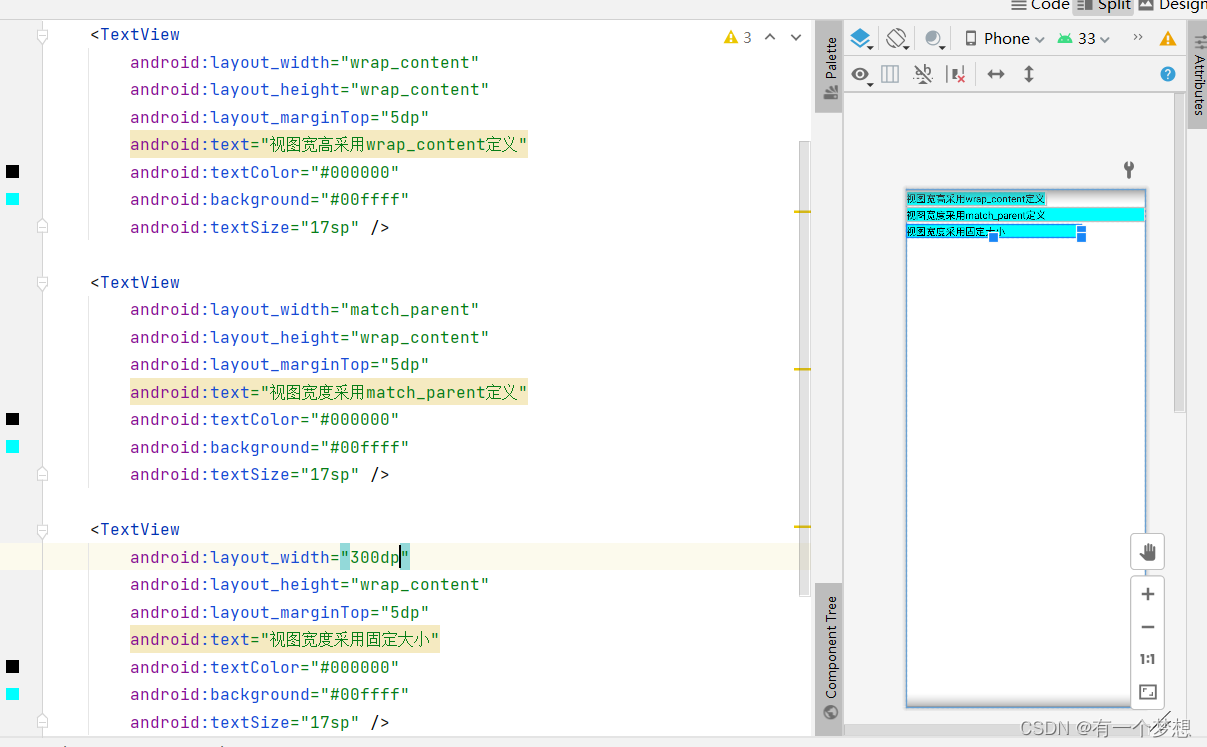
1.设置视图的宽高
视图宽度通过属性android:layout_width表达,视图高度通过属性android:layout_height表达,宽高取值主要有下列三种:
- match_parent:表示与上一级视图保持一致。
- wrap_content:表示与内容自适应。
- 以dp为单位的具体尺寸
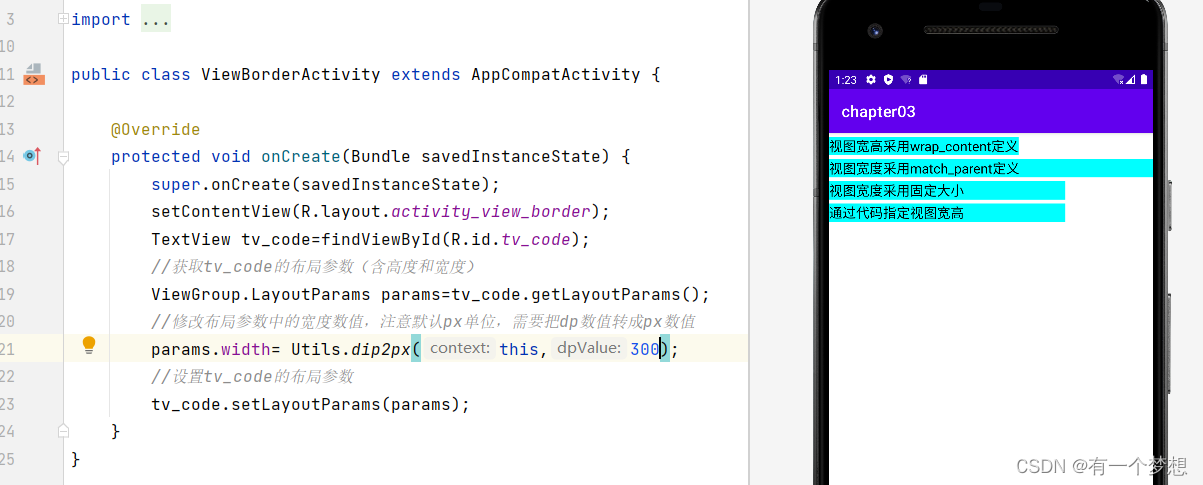
在代码中设置视图宽高:首先确保XML中宽高属性值为wrap_content,接着打开该页面对应的Java代码,依序执行以下三个步骤: - 调用控件对象的getLayoutParams方法,获取该控件的布局参数。
- 布局参数的width属性表示宽度,height表示高度,修改这两个属性。
- 调用控件对象的setLayoutParams方法,填入修改后的布局参数使之生效。
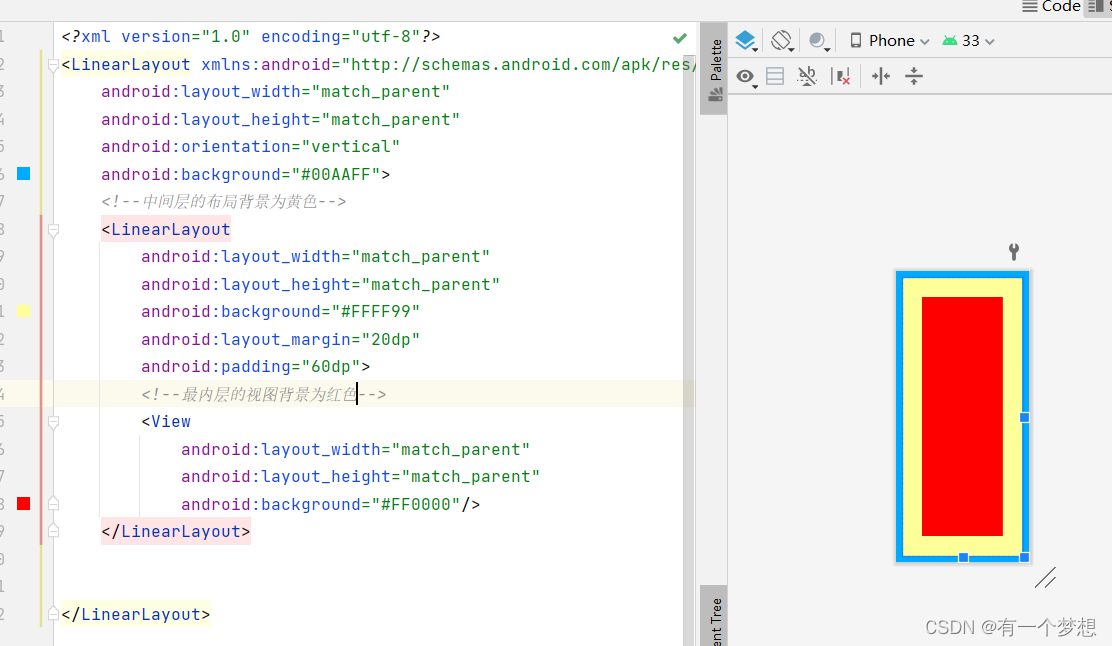
2.设置视图间距 - 采用layout_margin属性,它指定当前视图与周围平级视图之间的距离。包括:layout_margin、layout_marginLeft、layout_marginRight、layout_marginTop、layout_marginBottom
- 采用padding属性,它指定了当前视图与内部下级视图之间的距离。包括:padding、paddingLeft、paddingRight、paddingTom、paddingBottom
3.设置视图的对齐方式 - layout_gravity:指定当前视图相对于上级视图的对齐方式
- gravity:指定了下级视图相对于当前视图的对齐方式。
layout_gravity与gravity的取值包括:left、right、top、bottom,还可以用竖线连接各取值,例如"left|top"表示及靠左又靠上
例子:
<?xml version="1.0" encoding="utf-8"?>
<LinearLayout xmlns:android="http://schemas.android.com/apk/res/android"
    android:layout_width="match_parent"
    android:layout_height="300dp"
    android:background="#ffff99"
    android:orientation="horizontal"
    >
    <!--第一个子布局背景为红色,它在上级视图中朝下对齐,它的下级视图则靠左对齐-->
    <LinearLayout
        android:layout_width="0dp"
        android:layout_height="200dp"
        android:layout_weight="1"
        android:layout_margin="10dp"
        android:background="#ff0000"
        android:padding="20dp"
        android:layout_gravity="bottom"
        android:gravity="left">

        <View
            android:layout_width="100dp"
            android:layout_height="100dp"
            android:background="#00ffff"/>

    </LinearLayout>

    <!--第二个子布局背景为红色,它在上级视图中朝上对齐,它的下级视图则靠右对齐-->
    <LinearLayout
        android:layout_width="0dp"
        android:layout_height="200dp"
        android:layout_weight="1"
        android:layout_margin="10dp"
        android:background="#ff0000"
        android:layout_gravity="top"
        android:gravity="right">

        <View
            android:layout_width="100dp"
            android:layout_height="100dp"
            android:background="#00ffff"/>

    </LinearLayout>

</LinearLayout>
(三)常用布局
1.线性布局LinearLayout
线性布局内部各视图有两种排列方式:
- orientation属性值为horizantal时,内部视图在水平方向从左往右排列。
- orientation属性值为vertical时,内部视图在垂直方向从上往下排列。
- 默认为水平方向排列。
<?xml version="1.0" encoding="utf-8"?>
<LinearLayout xmlns:android="http://schemas.android.com/apk/res/android"
    xmlns:tools="http://schemas.android.com/tools"
    android:layout_width="match_parent"
    android:layout_height="match_parent"
    android:orientation="vertical">
    <LinearLayout
        android:layout_width="match_parent"
        android:layout_height="wrap_content"
        android:orientation="horizontal">

        <TextView
            android:layout_width="wrap_content"
            android:layout_height="wrap_content"
            android:text="横排第一个"
            android:textSize="17sp"
            android:textColor="#000000"/>

        <TextView
            android:layout_width="wrap_content"
            android:layout_height="wrap_content"
            android:text="横排第二个"
            android:textSize="17sp"
            android:textColor="#000000"/>
    </LinearLayout>

    <LinearLayout
        android:layout_width="match_parent"
        android:layout_height="wrap_content"
        android:orientation="vertical">

        <TextView
            android:layout_width="wrap_content"
            android:layout_height="wrap_content"
            android:text="竖排第一个"
            android:textSize="17sp"
            android:textColor="#000000"/>

        <TextView
            android:layout_width="wrap_content"
            android:layout_height="wrap_content"
            android:text="竖排第二个"
            android:textSize="17sp"
            android:textColor="#000000"/>
    </LinearLayout>

</LinearLayout>
线性布局的权重:线性布局的下级视图各自拥有多大比例的宽高。
权重属性名:layout_weight,直接在线性布局的下级视图设置,表示该下级视图占据的宽高比例。
- layout_width填0dp时,layout_weight表示水平方向宽高比例。
- layout_height填0dp时,layout_weight表示垂直方向宽高比例。
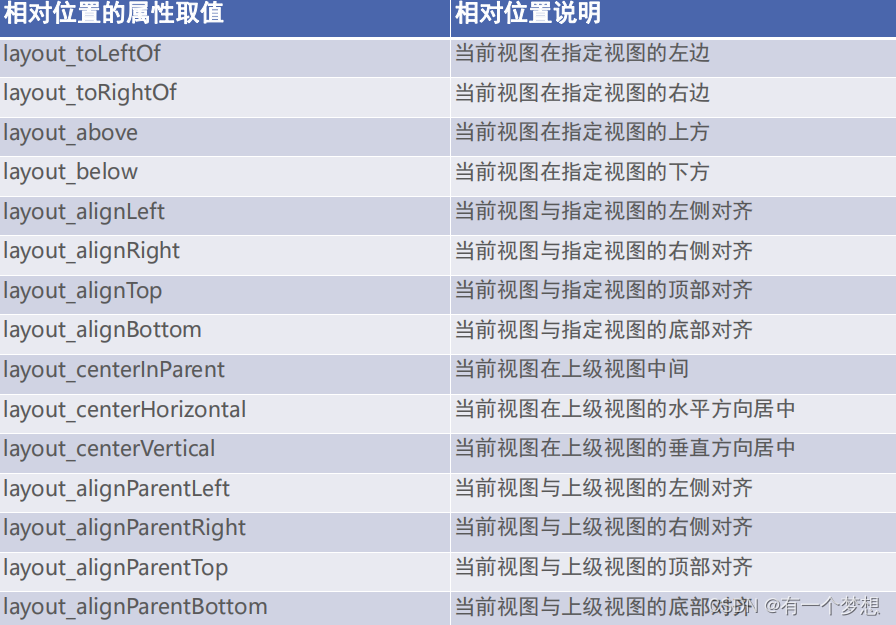
2.RelativeLayout布局
例子:
<?xml version="1.0" encoding="utf-8"?>
<RelativeLayout xmlns:android="http://schemas.android.com/apk/res/android"
    android:layout_width="match_parent"
    android:layout_height="150dp"
    >

    <TextView
        android:id="@+id/tv_center"
        android:layout_width="wrap_content"
        android:layout_height="wrap_content"
        android:layout_centerInParent="true"
        android:backgroung="#ffffff"
        android:text="我在中间"
        android:textColor="#000000"
        android:textSize="11sp"/>

    <TextView
        android:id="@+id/tv_center_horizontal"
        android:layout_width="wrap_content"
        android:layout_height="wrap_content"
        android:layout_centerHorizontal="true"
        android:backgroung="#ffffff"
        android:text="我在水平中间"
        android:textColor="#000000"
        android:textSize="11sp"/>

    <TextView
        android:id="@+id/tv_center_vertical"
        android:layout_width="wrap_content"
        android:layout_height="wrap_content"
        android:layout_centerVertical="true"
        android:backgroung="#ffffff"
        android:text="我在垂直中间"
        android:textColor="#000000"
        android:textSize="11sp"/>

    <TextView
        android:id="@+id/tv_parent_left"
        android:layout_width="wrap_content"
        android:layout_height="wrap_content"
        android:layout_alignParentLeft="true"
        android:backgroung="#ffffff"
        android:text="我和上级的左边对齐"
        android:textColor="#000000"
        android:textSize="11sp"/>

    <TextView
        android:id="@+id/tv_parent_Right"
        android:layout_width="wrap_content"
        android:layout_height="wrap_content"
        android:layout_alignParentRight="true"
        android:backgroung="#ffffff"
        android:text="我和上级的右边对齐"
        android:textColor="#000000"
        android:textSize="11sp"/>

    <TextView
        android:id="@+id/tv_parent_top"
        android:layout_width="wrap_content"
        android:layout_height="wrap_content"
        android:layout_alignParentTop="true"
        android:backgroung="#ffffff"
        android:text="我和上级的顶部对齐"
        android:textColor="#000000"
        android:textSize="11sp"/>

    <TextView
        android:id="@+id/tv_parent_bottom"
        android:layout_width="wrap_content"
        android:layout_height="wrap_content"
        android:layout_alignParentBottom="true"
        android:backgroung="#ffffff"
        android:text="我和上级的底部对齐"
        android:textColor="#000000"
        android:textSize="11sp"/>

    <TextView
        android:layout_width="wrap_content"
        android:layout_height="wrap_content"
        android:layout_toLeftOf="@+id/tv_center"
        android:layout_alignTop="@+id/tv_center"
        android:backgroung="#ffffff"
        android:text="我在中间的左边"
        android:textColor="#000000"
        android:textSize="11sp"/>

    <TextView
        android:layout_width="wrap_content"
        android:layout_height="wrap_content"
        android:layout_toRightOf="@+id/tv_center"
        android:layout_alignBottom="@+id/tv_center"
        android:backgroung="#ffffff"
        android:text="我在中间的右边"
        android:textColor="#000000"
        android:textSize="11sp"/>

    <TextView
        android:layout_width="wrap_content"
        android:layout_height="wrap_content"
        android:layout_above="@+id/tv_center"
        android:layout_alignLeft="@+id/tv_center"
        android:backgroung="#ffffff"
        android:text="我在中间的上边"
        android:textColor="#000000"
        android:textSize="11sp"/>

    <TextView
        android:layout_width="wrap_content"
        android:layout_height="wrap_content"
        android:layout_below="@+id/tv_center"
        android:layout_alignRight="@+id/tv_center"
        android:backgroung="#ffffff"
        android:text="我在中间的下边"
        android:textColor="#000000"
        android:textSize="11sp"/>

</RelativeLayout>
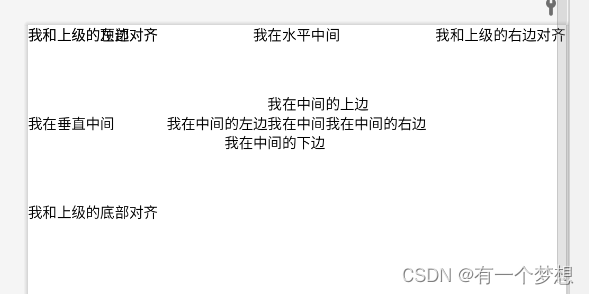
效果:
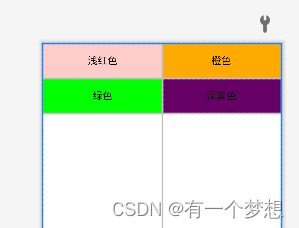
3.网格布局:GridLayout
网格布局支持多行多列的表格排列。
网格布局默认从左往右、从上到下排列,它新增了两个属性:
- columnCount:指定网格的列数,即每行能放多少个视图;
- rowCount:指定了网格的行数,即每行能放多少个视图;
例子:
<?xml version="1.0" encoding="utf-8"?>
<GridLayout xmlns:android="http://schemas.android.com/apk/res/android"
    android:layout_width="match_parent"
    android:layout_height="match_parent"
    android:columnCount="2"
    android:rowCount="2"
    >

    <TextView
        android:layout_width="0dp"
        android:layout_columnWeight="1"
        android:layout_height="60dp"
        android:gravity="center"
        android:background="#ffcccc"
        android:text="浅红色"
        android:textColor="#000000"
        android:textSize="17sp"/>

    <TextView
        android:layout_width="0dp"
        android:layout_height="60dp"
        android:layout_columnWeight="1"
        android:gravity="center"
        android:background="#ffaa00"
        android:text="橙色"
        android:textColor="#000000"
        android:textSize="17sp"/>

    <TextView
        android:layout_width="0dp"
        android:layout_height="60dp"
        android:layout_columnWeight="1"
        android:gravity="center"
        android:background="#00ff00"
        android:text="绿色"
        android:textColor="#000000"
        android:textSize="17sp"/>

    <TextView
        android:layout_width="0dp"
        android:layout_height="60dp"
        android:layout_columnWeight="1"
        android:gravity="center"
        android:background="#660066"
        android:text="深紫色"
        android:textColor="#000000"
        android:textSize="17sp"/>

</GridLayout>
效果:
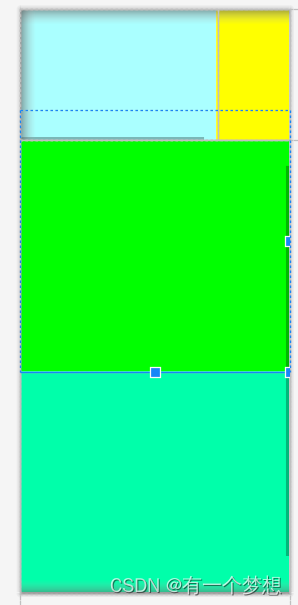
4.滚动视图ScrollView
- ScrollView,垂直方向的滚动视图;垂直方向滚动时,layout_width属性值设置为match_parent,layout_height属性值设置为wrap_content。
- HorizontalView,水平方向的滚动视图;水平方向滚动时,layout_width属性值设置为wrap_content,layout_height属性值设置为match_parent。
例子:
<?xml version="1.0" encoding="utf-8"?>
<LinearLayout xmlns:android="http://schemas.android.com/apk/res/android"
    android:layout_width="match_parent"
    android:layout_height="match_parent"
    android:orientation="vertical">

    <HorizontalScrollView
        android:layout_width="wrap_content"
        android:layout_height="200dp">

        <LinearLayout
            android:layout_width="wrap_content"
            android:layout_height="match_parent"
            android:orientation="horizontal">

            <View
                android:layout_width="300dp"
                android:layout_height="match_parent"
                android:background="#aaffff" />

            <View
                android:layout_width="300dp"
                android:layout_height="match_parent"
                android:background="#ffff00" />

        </LinearLayout>

    </HorizontalScrollView>

    <ScrollView
        android:layout_width="match_parent"
        android:layout_height="wrap_content">

        <LinearLayout
            android:layout_width="wrap_content"
            android:layout_height="match_parent"
            android:orientation="vertical">

            <View
                android:layout_width="match_parent"
                android:layout_height="400dp"
                android:background="#00ff00" />

            <View
                android:layout_width="match_parent"
                android:layout_height="400dp"
                android:background="#00ffaa" />

        </LinearLayout>

    </ScrollView>

</LinearLayout>
效果:
(四)按钮触控
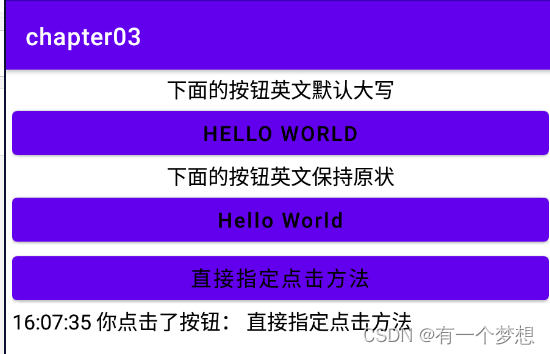
1.按钮控件Button
- Button拥有默认的按钮背景,而TextView默认无背景;
- Button的内部文本默认居中对齐,而TextView的内部文本默认靠左对齐;
- Button会默认将英文字母转为大写,而TextView不会;
- Button增加了两个属性:(1)textAllCaps:指定了是否将英文转成大写,true大写,false不转换。
(2)OnClick:接管用户的点击动作,指定了点击按钮要触发那个方法;
例子:
<?xml version="1.0" encoding="utf-8"?>
<LinearLayout xmlns:android="http://schemas.android.com/apk/res/android"
    android:layout_width="match_parent"
    android:layout_height="match_parent"
    android:orientation="vertical"
    android:padding="5dp">
    <TextView
        android:layout_width="match_parent"
        android:layout_height="wrap_content"
        android:text="下面的按钮英文默认大写"
        android:gravity="center"
        android:textColor="@color/black"
        android:textSize="17sp"
       />

    <Button
        android:layout_width="match_parent"
        android:layout_height="wrap_content"
        android:text="Hello World"
        android:textColor="@color/black"
        android:textSize="17sp"/>

    <TextView
        android:layout_width="match_parent"
        android:layout_height="wrap_content"
        android:text="下面的按钮英文保持原状"
        android:gravity="center"
        android:textColor="@color/black"
        android:textSize="17sp"
        />
    <Button
        android:layout_width="match_parent"
        android:layout_height="wrap_content"
        android:text="Hello World"
        android:textAllCaps="false"
        android:textColor="@color/black"
        android:textSize="17sp" />
    <Button
        android:layout_width="match_parent"
        android:layout_height="wrap_content"
        android:text="直接指定点击方法"
        android:textAllCaps="false"
        android:textColor="@color/black"
        android:textSize="17sp"
        android:onClick="doClick"/>

    <TextView
        android:id="@+id/tv_result"
        android:layout_width="match_parent"
        android:layout_height="wrap_content"
        android:text="这里查看按钮的点击效果"
        android:textColor="@color/black"
        android:textSize="17sp"
        />

</LinearLayout>
Java代码:
package com.example.chapter03.util;

import java.text.SimpleDateFormat;
import java.util.Date;

public class DataUtil {

    public static String getNowTime(){
        SimpleDateFormat sdf=new SimpleDateFormat("HH:mm:ss");
        return sdf.format(new Date());
    }
}
ButtonStyleActivity代码:
public class ButtonStyleActivity extends AppCompatActivity {

    private TextView tv_result;

    @Override
    protected void onCreate(Bundle savedInstanceState) {
        super.onCreate(savedInstanceState);
        setContentView(R.layout.activity_button_style);
        tv_result = findViewById(R.id.tv_result);
    }

    public void doClick(View view){
        String desc=String.format("%s 你点击了按钮: %s", DataUtil.getNowTime(),((Button)view).getText());
        tv_result.setText(desc);

    }
}
效果:
2.点击事件和长按点击事件
监听器:专门监听控件的动作和行为。只有控件发生了指定动作,监听器才会被触发开关去执行对应的代码逻辑。
按钮控件通常有两种监听器:
- 点击监听器,通过setOnClickLister方法设置。按钮被按住少于500毫秒时,会触发点击事件。
- 长按监听器,通过setOnLongClickListener方法设置。按钮被按超过500毫秒时,会触发长按点击事件。
点击事件例子:
<?xml version="1.0" encoding="utf-8"?>
<LinearLayout xmlns:android="http://schemas.android.com/apk/res/android"

    android:layout_width="match_parent"
    android:layout_height="match_parent"
    android:orientation="vertical"
    >

    <Button
        android:id="@+id/btn_click_single"
        android:layout_width="match_parent"
        android:layout_height="wrap_content"
        android:text="指定单独的点击监听器"
        android:textColor="#000000"
        android:textSize="15sp"/>

    <Button
        android:id="@+id/btn_click_public"
        android:layout_width="match_parent"
        android:layout_height="wrap_content"
        android:text="指定公共的点击监听器"
        android:textColor="#000000"
        android:textSize="15sp"/>

    <TextView
        android:id="@+id/tv_result"
        android:layout_width="match_parent"
        android:layout_height="wrap_content"
        android:padding="5dp"
        android:gravity="center"
        android:textColor="#000000"
        android:textSize="15sp"
        android:text="这里查看点击结果"/>


</LinearLayout>
public class ButtonClickActivity extends AppCompatActivity implements View.OnClickListener{

    private TextView tv_result;

    @Override
    protected void onCreate(Bundle savedInstanceState) {
        super.onCreate(savedInstanceState);
        setContentView(R.layout.activity_button_click);
        tv_result = findViewById(R.id.tv_result);
        Button btn_click_single=findViewById(R.id.btn_click_single);
        btn_click_single.setOnClickListener(new MyOnClickListener(tv_result));
        Button btn_click_public=findViewById(R.id.btn_click_public);
        btn_click_public.setOnClickListener(this);
    }

    @Override
    public void onClick(View v) {
        if (v.getId()==R.id.btn_click_public){
            String desc=String.format("%s 你点击了按钮: %s", DataUtil.getNowTime(),((Button) v).getText());
            tv_result.setText(desc);
        }
    }

    //静态内部类,不写static可能造成内存泄露
    static  class MyOnClickListener implements View.OnClickListener{
        private final TextView tv_result;

        public MyOnClickListener(TextView tv_result) {
            this.tv_result=tv_result;
        }

        @Override
        public void onClick(View v) {
            String desc=String.format("%s 你点击了按钮: %s", DataUtil.getNowTime(),((Button) v).getText());
            tv_result.setText(desc);
        }
    }
}
长按点击事件例子:
<Button
        android:id="@+id/btn_long_click_single"
        android:layout_width="match_parent"
        android:layout_height="wrap_content"
        android:text="指定长按的点击监听器"
        android:textColor="#000000"
        android:textSize="15sp"/>


    <TextView
        android:id="@+id/tv_result"
        android:layout_width="match_parent"
        android:layout_height="wrap_content"
        android:padding="5dp"
        android:gravity="center"
        android:textColor="#000000"
        android:textSize="15sp"
        android:text="这里查看点击结果"/>
public class ButtonLongClickActivity extends AppCompatActivity {

    @Override
    protected void onCreate(Bundle savedInstanceState) {
        super.onCreate(savedInstanceState);
        setContentView(R.layout.activity_button_long_click);
        TextView tv_result = findViewById(R.id.tv_result);
        Button btn_long_click_single=findViewById(R.id.btn_long_click_single);
        btn_long_click_single.setOnLongClickListener(v -> {
            String desc=String.format("%s 你点击了按钮: %s", DataUtil.getNowTime(),((Button) v).getText());
            tv_result.setText(desc);
            return true;
        });
    }
}
3.禁用与恢复按钮
是否允许点击由enable属性控制,true代表可以,false代表不可以。
<?xml version="1.0" encoding="utf-8"?>
<LinearLayout xmlns:android="http://schemas.android.com/apk/res/android"
    android:layout_width="match_parent"
    android:layout_height="match_parent"
    android:orientation="vertical">
    <LinearLayout
        android:layout_width="match_parent"
        android:layout_height="wrap_content"
        android:orientation="horizontal"
        >
        <Button
            android:id="@+id/btn_enable"
            android:layout_width="0dp"
            android:layout_weight="1"
            android:layout_height="wrap_content"
            android:text="启用测试按钮"
            android:textColor="#000000"
            android:textSize="17sp"/>

        <Button
            android:id="@+id/btn_disable"
            android:layout_width="0dp"
            android:layout_weight="1"
            android:layout_height="wrap_content"
            android:text="禁用测试按钮"
            android:textColor="#000000"
            android:textSize="17sp"/>

    </LinearLayout>

    <Button
        android:id="@+id/btn_test"
        android:layout_width="match_parent"
        android:layout_height="wrap_content"
        android:enabled="false"
        android:text="测试按钮"
        android:textColor="#888888"
        android:textSize="17sp"/>

    <TextView
        android:id="@+id/tv_result"
        android:layout_width="match_parent"
        android:layout_height="wrap_content"
        android:text="这里查看测试按钮的点击结果"
        android:textColor="#000000"
        android:textSize="17sp"/>

</LinearLayout>
public class ButtonEnableActivity extends AppCompatActivity implements View.OnClickListener {

    private Button btn_test;
    private TextView tv_result;

    @Override
    protected void onCreate(Bundle savedInstanceState) {
        super.onCreate(savedInstanceState);
        setContentView(R.layout.activity_button_enable);
        Button btn_enable=findViewById(R.id.btn_enable);
        Button btn_disable=findViewById(R.id.btn_disable);
        btn_test = findViewById(R.id.btn_test);
        tv_result = findViewById(R.id.tv_result);

        btn_enable.setOnClickListener(this);
        btn_disable.setOnClickListener(this);
        btn_test.setOnClickListener(this);
    }

    @Override
    public void onClick(View v) {
        switch (v.getId()){
            case R.id.btn_enable:
                //启用当前控件
                btn_test.setEnabled(true);
                //设置按钮文字颜色
                btn_test.setTextColor(Color.BLACK);
                break;
            case R.id.btn_disable:
                //启用当前控件
                btn_test.setEnabled(false);
                //设置按钮文字颜色
                btn_test.setTextColor(Color.GRAY);
                break;
            case R.id.btn_test:
                String desc=String.format("%s 你点击了按钮: %s", DataUtil.getNowTime(),((Button) v).getText());
                tv_result.setText(desc);
                break;
        }
    }
}
(五)图像显示
1.图像视图ImageView
图像视图展示的图片通常在res/Drawable***目录,设置图像视图的显示图片有两种方式:
- 在XML文件中,通过属性android:src设置图片资源,属性格式值形如@draw/不含扩展名的图片名称;
- 在Java代码中,调用setImageResource方法设置图片资源,方法参数格式形如“R.drawble.不含扩展名的图片名称"。
2.图像按钮ImageButton
ImaButton是显示图片的图像按钮,但它继承自ImageView,而非Button。
ImageButton和Button的区别有:
- Button即可以显示文本,也可以显示图片,ImageButton只能显示图片,不能显示文本。
- Button只能靠背景显示一张图片,而ImageButton可以分别在前景foreground和背景background显示图片,从而实现两张图片叠加的效果。
同时显示文本与图片:
(1)利用LineaLayout对ImageView和TextView组合布局。
(2)通过按钮控件Button的drawable***属性设置文本周围的图标。
- drawableTop:指文字上方的图片。
- drawableButton:指文字下方的图片。
- drawableLeft:指文字左边的图片。
- drawableRight:指文字右边的图片。
- drawablePadding:指文字图片与文字的间距。
<Button
        android:layout_width="wrap_content"
        android:layout_height="wrap_content"
        android:text="图标在左边"
        android:drawableLeft="@drawable/tbzz"
        android:background="#ffffff"
        android:drawablePadding="5dp"/>


 1821
1821

 被折叠的 条评论
为什么被折叠?
被折叠的 条评论
为什么被折叠?
 到【灌水乐园】发言


