


文章目录
Spring是一个轻量级的框架
三层架构
表现层 Web层
业务层 Service层
持久层 dao层
优良特性(非侵入式、控制反转IOC、依赖注入DI、面向切面编程Aop)
三大内置对象
控制反转ioc Inversion of Control
即“控制反转”,不是什么技术,而是一种设计思想。在Java开发中,Ioc意味着将你设计好的对象交给容器控制,而不是传统的在你的对象内部直接控制。有了IoC容器后,把创建和查找依赖对象的控制权交给了容器,由容器进行注入组合对象,所以对象与对象之间是松散耦合,这样也方便测试,利于功能复用,更重要的是使得程序的整个体系结构变得非常灵活
di依赖注入
DI—Dependency Injection,即“依赖注入”:组件之间依赖关系由容器在运行期决定,形象的说,即由容器动态的将某个依赖关系注入到组件之中。依赖注入的目的并非为软件系统带来更多功能,而是为了提升组件重用的频率,并为系统搭建一个灵活、可扩展的平台。
Aop 面向切面编程
准备阶段搭建环境
pom.xml中导入的依赖
  <properties>
    <project.build.sourceEncoding>UTF-8</project.build.sourceEncoding>
    <maven.compiler.source>1.7</maven.compiler.source>
    <maven.compiler.target>1.7</maven.compiler.target>
    <aaa>4.3.8.RELEASE</aaa>
  </properties>
  <dependencies>
    <dependency>
      <groupId>com.auth0</groupId>
      <artifactId>java-jwt</artifactId>
      <version>3.19.2</version>
    </dependency>

    <dependency>
      <groupId>org.dom4j</groupId>
      <artifactId>dom4j</artifactId>
      <version>2.0.0</version>
      <type>pom</type><!--依赖的类型,声明引入的依赖的类型,值一般有jar、war、pom-->
    </dependency>
    <dependency>
      <groupId>junit</groupId>
      <artifactId>junit</artifactId>
      <version>4.11</version>
      <scope>test</scope>
    </dependency>
    <!-- spring的webmvc的依赖 -->
    <dependency>
      <groupId>org.springframework</groupId>
      <artifactId>spring-webmvc</artifactId>
      <version>${aaa}</version>
    </dependency>

    <dependency>
      <groupId>org.springframework</groupId>
      <artifactId>spring-web</artifactId>
      <version>${aaa}</version>
    </dependency>
    <dependency>
      <groupId>org.springframework</groupId>
      <artifactId>spring-tx</artifactId>
      <version>${aaa}</version>
    </dependency>
    <dependency>
      <groupId>org.springframework</groupId>
      <artifactId>spring-core</artifactId>
      <version>4.3.8.RELEASE</version>
    </dependency>
    <dependency>
      <groupId>org.springframework</groupId>
      <artifactId>spring-beans</artifactId>
      <version>4.3.8.RELEASE</version>
    </dependency>


    <!-- Mysql的依赖 -->
    <dependency>
      <groupId>mysql</groupId>
      <artifactId>mysql-connector-java</artifactId>
      <version>8.0.27</version>
    </dependency>
    <!-- mybatis的依赖 -->
    <dependency>
      <groupId>org.mybatis</groupId>
      <artifactId>mybatis</artifactId>
      <version>3.5.1</version>
    </dependency>

    <!--数据库连接池的依赖 -->
    <dependency>
      <groupId>commons-dbcp</groupId>
      <artifactId>commons-dbcp</artifactId>
      <version>1.4</version>
    </dependency>

    <!-- spring-mybatis的依赖 -->
    <dependency>
      <groupId>org.mybatis</groupId>
      <artifactId>mybatis-spring</artifactId>
      <version>1.3.2</version>
    </dependency>
    <!-- springjdbc的依赖 -->
    <dependency>
      <groupId>org.springframework</groupId>
      <artifactId>spring-jdbc</artifactId>
      <version>4.3.8.RELEASE</version>
    </dependency>
    <!-- aspectj的依赖 -->
    <dependency>
      <groupId>org.aspectj</groupId>
      <artifactId>aspectjweaver</artifactId>
      <version>1.9.4</version>
    </dependency>
    <!-- 添加日志log4j的依赖 -->
    <dependency>
      <groupId>log4j</groupId>
      <artifactId>log4j</artifactId>
      <version>1.2.17</version>
    </dependency>
    <!-- jackson的依赖 -->
    <!--    <dependency>-->
    <!--      <groupId>com.fasterxml.jackson.core</groupId>-->
    <!--      <artifactId>jackson-databind</artifactId>-->
    <!--      <version>2.9.7</version>-->
    <!--    </dependency>-->

    <!-- 依赖 -->
    <dependency>
      <groupId>aopalliance</groupId>
      <artifactId>aopalliance</artifactId>
      <version>1.0</version>
    </dependency>
    <dependency>
      <groupId>org.apache.tomcat</groupId>
      <artifactId>tomcat-servlet-api</artifactId>
      <version>8.0.28</version>
      <scope>provided</scope><!-- 生命周期:test  -->
    </dependency>

    <dependency>
      <groupId>javax.servlet</groupId>
      <artifactId>javax.servlet-api</artifactId>
      <version>3.0.1</version>
      <scope>provided</scope>
    </dependency>

    <dependency>
      <groupId>javax.servlet.jsp</groupId>
      <artifactId>jsp-api</artifactId>
      <version>2.1</version>
      <scope>provided</scope>
    </dependency>
    <!--json依赖 -->
    <dependency>
      <groupId>com.alibaba</groupId>
      <artifactId>fastjson</artifactId>
      <version>1.2.71</version>
    </dependency>
    <!--导入lombok依赖 -->
    <dependency>
      <groupId>org.projectlombok</groupId>
      <artifactId>lombok</artifactId>
      <version>1.18.8</version>
    </dependency>
    <dependency>
      <groupId>javax.servlet</groupId>
      <artifactId>jstl</artifactId>
      <version>1.2</version>
    </dependency>
    <dependency>
      <groupId>taglibs</groupId>
      <artifactId>standard</artifactId>
      <version>1.1.2</version>
    </dependency>
    <dependency>
      <groupId>org.apache.commons</groupId>
      <artifactId>commons-lang3</artifactId>
      <version>3.3.2</version>
    </dependency>
    <dependency>
      <groupId>org.apache.httpcomponents</groupId>
      <artifactId>httpclient</artifactId>
      <version>4.5.5</version>
    </dependency>

    <!-- https://mvnrepository.com/artifact/com.mchange/c3p0 -->
    <dependency>
      <groupId>com.mchange</groupId>
      <artifactId>c3p0</artifactId>
      <version>0.9.5.2</version>
    </dependency>
    <!-- https://mvnrepository.com/artifact/com.google.code.gson/gson -->
    <dependency>
      <groupId>com.google.code.gson</groupId>
      <artifactId>gson</artifactId>
      <version>2.8.5</version>
    </dependency>
    <!-- https://mvnrepository.com/artifact/org.jdom/jdom2 -->
    <dependency>
      <groupId>org.jdom</groupId>
      <artifactId>jdom2</artifactId>
      <version>2.0.6</version>
    </dependency>
    <!-- https://mvnrepository.com/artifact/com.alibaba/fastjson -->
    <dependency>
      <groupId>com.alibaba</groupId>
      <artifactId>fastjson</artifactId>
      <version>1.2.71</version>
    </dependency>

    <dependency>
      <groupId>com.alibaba</groupId>
      <artifactId>fastjson</artifactId>
      <version>1.2.71</version>
    </dependency>

    <dependency>
      <groupId>org.testng</groupId>
      <artifactId>testng</artifactId>
      <version>RELEASE</version>
      <scope>compile</scope>
    </dependency>

    <dependency>
      <groupId>commons-fileupload</groupId>
      <artifactId>commons-fileupload</artifactId>
      <version>1.4</version>
    </dependency>


    <!-- redis客户端jar -->
    <dependency>
      <groupId>redis.clients</groupId>
      <artifactId>jedis</artifactId>
      <version>2.7.3</version>
    </dependency>

    <!-- spring-redis实现 -->
    <dependency>
      <groupId>org.springframework.data</groupId>
      <artifactId>spring-data-redis</artifactId>
      <version>1.7.2.RELEASE</version>
    </dependency>
  </dependencies>
2.创建配置文件
 <?xml version="1.0" encoding="UTF-8"?>
<beans xmlns="http://www.springframework.org/schema/beans" <!-- 默认bean命名空间 -->
xmlns:xsi="http://www.w3.org/2001/XMLSchema-instance" <!-- xml约束命名空间定义 -->
xmlns:aop="http://www.springframework.org/schema/aop"<!-- AOP命名空间的scheme约束 -->
xmlns:context="http://www.springframework.org/schema/context" <!-- context命名空间的scheme约束 -->

xsi:schemaLocation=" <!-- 上面各个scheme的location信息(网络地址) -->
     http://www.springframework.org/schema/beans
        http://www.springframework.org/schema/beans/spring-beans-4.0.xsd
        http://www.springframework.org/schema/aop
        http://www.springframework.org/schema/aop/spring-aop-4.0.xsd
        http://www.springframework.org/schema/context
        http://www.springframework.org/schema/context/spring-context-4.0.xsd ">

</beans>
创建ioc容器
ClassPathXmlApplicationContext context = new ClassPathXmlApplicationContext("spring.xml ");
从容器中拿取数据 获取bean对象
方式1.(根据id获取value)
context.getBean("emp"); 这个emp字符串就是bean标签里面的id
方式2(同过类名.clss)
context.getBean(Emp.class);
方式3 (通过接口.class获取实现类)
context3.getBean(EmpDaoImpl.class);
标签介绍

spring实现ioc的方式
1.通过配置文件
2.注解实现
IOC容器
bean的定义
bean的属性配置
单例多例
默认是单例怎么修改成多例呢 ?
 scop对象设置成prototype
饿汉模式与懒汉模式
饿汉模式(单例模式):创建ioc容器时创建对象
懒汉模式:获取bean时创建对象
饿汉模式变懒汉模式
通过懒加载
设置bean对象属性

注解(spring实现ioc的第二种方式)
类上打注解
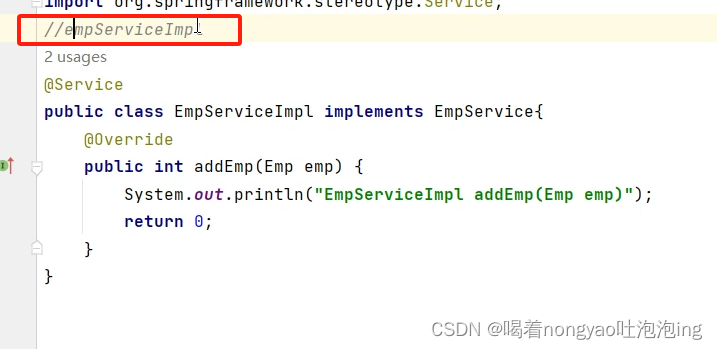
1.@Repository @Component @Service
2.打上注解该bean的名字默认就是类名首字母小写、可以使用注解重命名@Service(“aaa”)
注解
service层 ---->@Service
do层打注解 ---->@Repository
不知道那个层直接打一个 —> @Component
将类变成像.xml文件一样的 —>@Configuration(实现一个配置类)
实现扫描 -----> @ComponentScan (配置一个路径) 也可以用@ComponentScans(可以配置多个路径)
实现import标签 ----->@Import
@Import(value = Aconf.class)
标签
import标签实现把另一个配置文件引入进去
<import resource="a.xml"/>

将类变成像.xml文件一样的 —>@Configuration(SpringBoot一般都用这种方式)
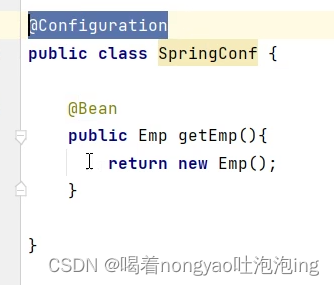
1.@Configuration怎么创建对象
(指定配置类—打@Configuration注解的)
AnnotationConfigApplicationContext context3 = new AnnotationConfigApplicationContext(SpringConf.class);
2.应用
        Emp bean = context3.getBean(Emp.class);
       Object emp = context3.getBean("getEmp");
       EmpServiceImpl bean1 = context3.getBean(EmpServiceImpl.class);
       EmpDaoImpl bean2 = context3.getBean(EmpDaoImpl.class);
3.怎么实现.XML文件中 <context:component-scan base-package=“com.li.Service”/>的功能
用@ComponentScan标签需要指定路径
@ComponentScan(value={"com.li.Service","com.li.dao"})
配置文件开启扫描
component-scan标签会自动扫描你自定的这个包(“”配置里的路径)下面所有的类 看谁打了!]@Service这个注解,会自动把它放到ioc容器中
相当于直接在spring.xml中直接配置个bean
<context:component-scan base-package="com.li.Service"/>
例子:getbean获取时候
@service默认有个value属性 不设置value时默认的是方法名首字母小写
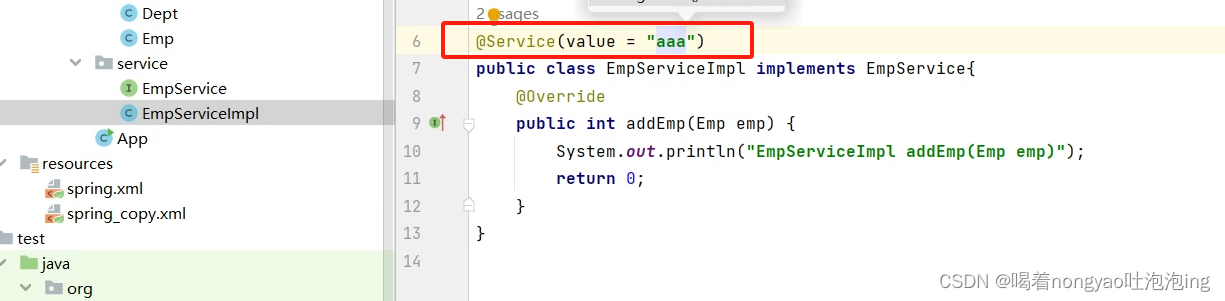

默认不设置value‘情况下
自动装配(@Autowired、@Qualifie、@Resours、@Resours和@Autowired的区别)
@Autowired 现根据类型在根据名称
在不使用xml配置文件时,@Autowired是我们使用最多的注解之一,关于该注解的原理如下:
@Autowired原理:在启动springIoC时,容器自动装载了一个AutowiredAnnotationBeanPostProcessor后置处理器,当容器扫描到@Autowied、@Resource或@Inject时,就会在IoC容器自动查找需要的bean,并装配给该对象的属性。
在使用@Autowired时,首先在容器中查询对应类型的bean
如果查询结果刚好为一个,就将该bean装配给@Autowired指定的数据(byType)
如果查询的结果不止一个,那么@Autowired会根据名(byName)称来查找。
如果查询的结果为空,那么会抛出异常。解决方法时,使用@Autowired(required=false)
@Qualifier 可以通过value指定要注入的bean的名字(一般结合@autowired—>当@Autowired匹配到多个时)
  @Autowired//自动装配
     @Qualifier( value = "empDaoImpl2")
@Resours 也可以实现注入 现根据名称(就是下面代码中的empDao)再根据类型
   @Resource
    EmpDao empDao;
—>当有多个是需要指定注入
1.component("aaa")
2.@Resource(name="aaa")

@Resours和@Autowired的区别

spring注入
构造方法注入
通过标签
五个属性
1.ref 要注入的bean的id 用于注入自定义的对象
2.value 要注入的基本类型的值 用于注入基本类型
3.index 形参列表的位置从0开始
4.name 执行参数名
5.type 要注入的参数类型
举例:(给empno属性注入1001值)

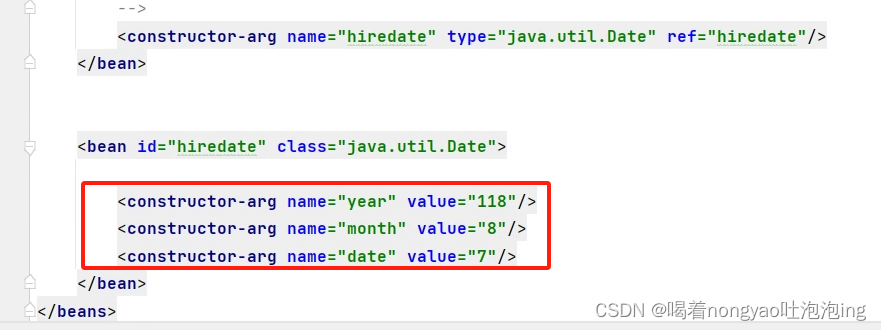
注入date时需要通过ref --从新设置一个bean --注入bean id
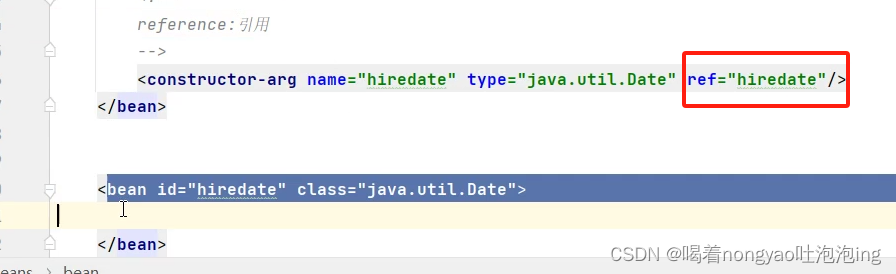 注入指定时间(2018-9-7)
setter()注入
通过标签
name:自定义的变量 这个变量要跟setter()的方法的名的首字母大写前面加上set 例如:aaa -> setAaa()
ref :要注入的bean的id 用于注入自定义对象
value: 要注入的基本类型的值 用于注入基本类型

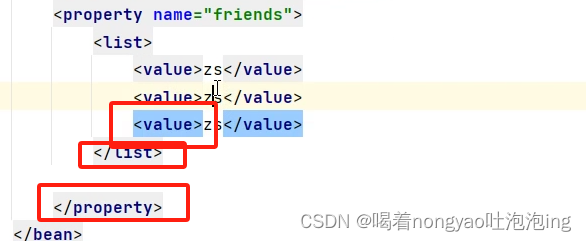
注入集合
1.set 注入list集合
标签内写标签 在里面写
2.注入map结合(下面展示的是set注入,构造注入方法相同)
<util:map id="carMapBean">
        <entry key="AA" value-ref="car"/>
        <entry key="BB" value-ref="car2"/>
        <entry key="CC" value-ref="car3"/>
    </util:map>

在map标签中就可以直接使用ref进行bean的引用配置```

<bean id="personMap" class="edu.Spring.di.PersonMap">
        <!--set方法注入-->
        <property name="name" value="老王"/>
        <!--使用集合bean来注入(引入)-->
        <property name="cars" ref="carMapBean"/>
    </bean>
Spring注解注入
(比如service层注入dao层)
@Autowired 也叫自动装配
     @Autowired//自动装配
    EmpDao empDao;
aop(面向切面编程)—>连接点、切点、通知、切面
切面编程,就需要先理解什么是切面。用刀把一个西瓜分成两瓣,切开的切口就是切面;炒菜,锅与炉子共同来完成炒菜,锅与炉子就是切面。web层级设计中,web层->网关层->服务层->数据层,每一层之间也是一个切面。编程中,对象与对象之间,方法与方法之间,模块与模块之间都是一个个切面。
- 连接点 (方法之间,代码之间都是连接点)
2.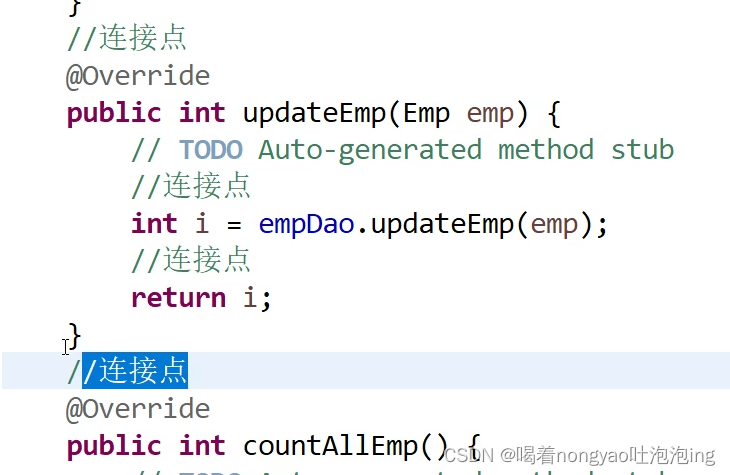
2.切点就是连接点
3.通知:你要干什么事情—>数据库事务
根据切入的时机不同分了五类
4.切点与通知形成一份切面
实现
xml方式
1.在spring.xml中配置
1.1 定义bean指定切面类
 aop配置
    <aop:config>
        配置切面
        <aop:aspect>
            切点    expresssion里面写对谁进行 切入   *解读  返回值类型   任意包   任意类  方法名  (参数)
            <aop:pointcut id="pointcount1" expression="execution(* *.*.*(..))"/>
            <aop:pointcut id="pointcount2" expression="execution(int org.service.EmpserviceImpl.addEmp (..))"/>
            通知
            1.前置通知
<aop:before method=""/>
            2.后置通知
            <aop:after method=""/>
            3.环绕通知
            <aop:around method=""/>
            4.正常返回
            <aop:after-returning method=""/>
            5.错误返回
            <aop:after-throwing method=""/>
        </aop:aspect>
   </aop:config>
1.2 配置aop:config aop:aspect
1.3 通知有五种(method=‘’'里面的是aop:before标签所在的aop:aspect通过ref引入的这个bean里面的一个方法)
.前置通知
<aop:before method=“”/>
2.后置通知-
<aop:after method=“”/>
3.环绕通知
<aop:around method=“”/>
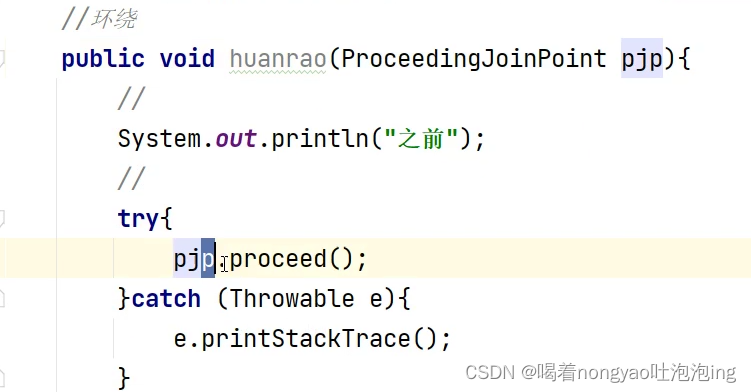
环绕通知定义如下(需要接受一个ProceedingJoinPoint参数)然后需要调pjp.proceed()
4.正常返回
<aop:after-returning method=“”/>
5.错误返回
<aop:after-throwing method=“”/>
自定义切面类---->环绕通知
@Aspect方式
应用扩展
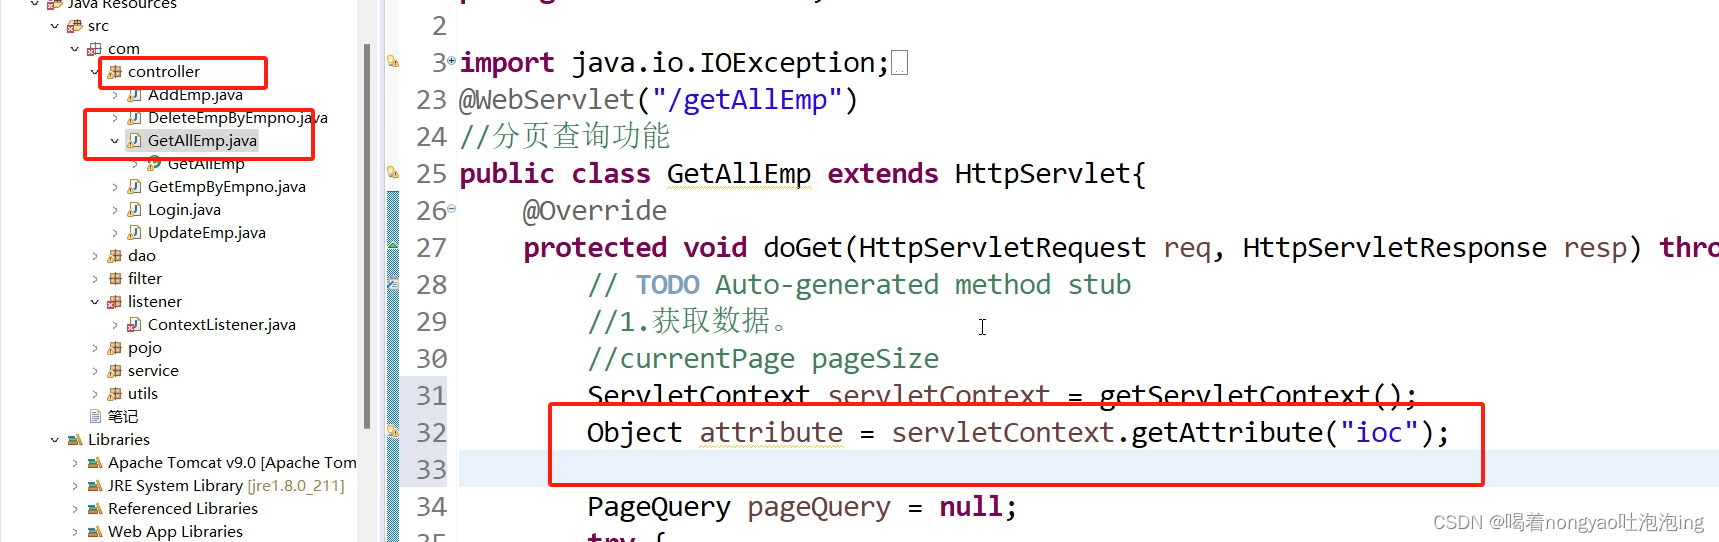
实现controlller层不需要每次创建ioc容器
创建监听实现ServletContextListener

从写里面的两个方法如图片所示
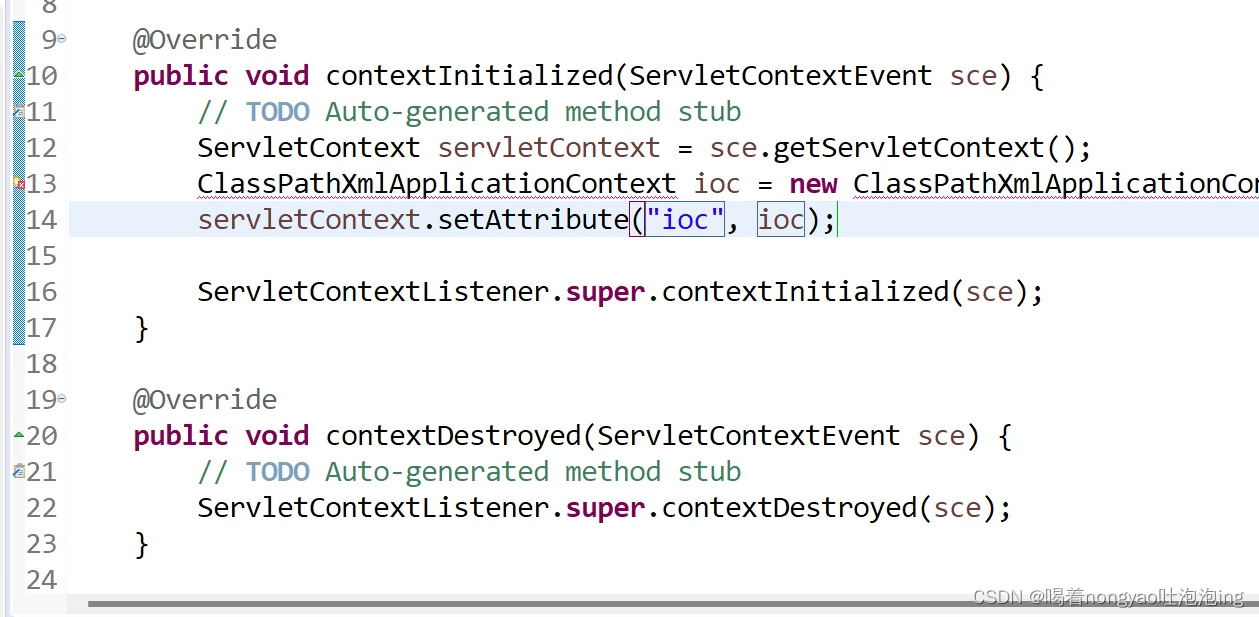
contextInitialized初始化
在里面创建ioc容器
然后再controller层就可以直接 调用ioc容器
先获取ioc容器
 *
*


 56万+
56万+


 被折叠的 条评论
为什么被折叠?
被折叠的 条评论
为什么被折叠?
 到【灌水乐园】发言


