


1、实验环境
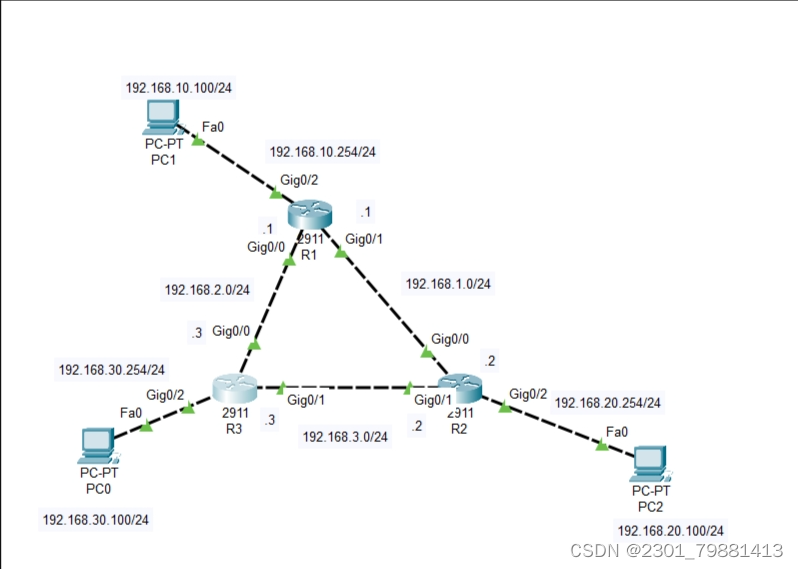
如图8.10所示,三台路由器R1.R2,R3两两互连,每台路由器上都配置了Loopback地址模拟网络环境。
2、需求描述
需要在三台路由器上配置静态路由,以实现各网段之间的互通。
若要实现全网互通,必须明确如下两个问题。
数据包被路由器转发或丢弃.取决于是否能够在路由表中找到数据包的目标地址所对应的条目。
路由器可以自动生成所有直连网段的路由条目,对于那些非直连网段就需要通过静态路由指定了
因此,要想实现全网互通,就必须为每台路由器指定所有非直连网段的路由条目。
3、推荐步骤
步骤1、在R1、R2、R3上分别配置静态路由。
在R1上分别配置192.168.20.0/24、192.168.30.0/24、192.168.3.0/24的静态路由。
在R2上分别配置192.168.10.0/24、192.168.30.0/24、192.168.2.0/24的静态路由。
在R3上分别配置192.168.20.0/24、192.168.10.0/24、192.168.1.0/24的静态路由。
步骤2、通过ping命令测试网络连通性
4、实验步骤
(1)路由器R1的基础配置
1.Router>enable
2.Router#conf t
3.Router(config)#hostname R1
4.R1(config)#interface gigabitEthernet 0/2
5.R1(config-if)#ip address 192.168.10.254 255.255.255.0
6.R1(config-if)#no shutdown
7.R1(config-if)#exit
8.R1(config)#interface gigabitEthernet 0/1
9.R1(config-if)#ip address 192.168.1.1 255.255.255.0
10.R1(config-if)#no shutdown
11.R1(config-if)#exit
R1(config)#interface gigabitEthernet 0/0
R1(config-if)#ip address 192.168.2.1 255.255.255.0
R1(config-if)#no shutdown
R1(config-if)#exit
R1(config)#
2)路由器R2的基础配置
- Router>enable
Router#conf t
Router(config)#hostname R2
R2(config)#interface gigabitEthernet 0/2
R2(config-if)#ip address 192.168.20.254 255.255.255.0
R2(config-if)#no shutdown
R2(config-if)#exit
R2(config)#interface gigabitEthernet 0/0
R2(config-if)#ip address 192.168.1.2 255.255.255.0
R2(config-if)#no shutdown
R2(config-if)#exit
R2(config)#interface gigabitEthernet 0/1
R2(config-if)#ip address 192.168.3.2 255.255.255.0
R2(config-if)#no shutdown
R2(config-if)#exit
R2(config)# -
(3)路由器R3的基础配置
(2)在PC上使用ping测试连通性

- Router>enable
Router#conf t
Router(config)#hostname R3
R3(config)#interface gigabitEthernet 0/2
R3(config-if)#ip address 192.168.30.254 255.255.255.0
R3(config-if)#no shutdown
R3(config-if)#exit
R3(config)#interface gigabitEthernet 0/1
R3(config-if)#ip address 192.168.3.3 255.255.255.0
R3(config-if)#no shutdown
R3(config-if)#exit
R3(config)#interface gigabitEthernet 0/0
R3(config-if)#ip address 192.168.2.3 255.255.255.0
R3(config-if)#no shutdown
R3(config-if)#exit
R3(config)# -
(4)各路由器配置静态路由
R1上的配置
-
R1(config)#ip route 192.168.20.0 255.255.255.0 192.168.1.2
//配置去往192.168.20.0网段的路由指定下一跳地址为192.168.1.2
R1(config)#ip route 192.168.30.0 255.255.255.0 192.168.2.3
//配置去往192.168.30.0网段的路由指定下一跳地址为192.168.2.3 -
R2上的配置
R2(config)#ip route 192.168.10.0 255.255.255.0 192.168.1.1
//配置去往192.168.10.0网段的路由指定下一跳地址为192.168.1.1
R2(config)#ip route 192.168.30.0 255.255.255.0 192.168.3.3
//配置去往192.168.30.0网段的路由指定下一跳地址为192.168.3.3
-
R3上的配置
R3(config)#ip route 192.168.10.0 255.255.255.0 192.168.2.1
//配置去往192.168.10.0网段的路由指定下一跳地址为192.168.2.1
R3(config)#ip route 192.168.20.0 255.255.255.0 192.168.3.2
//配置去往192.168.20.0网段的路由指定下一跳地址为192.168.3.2
-
5、实验调试
(1)查看路由表信息
5.1、查看R1、R2、R3上的路由表信息
- R1#show ip route static //查看路由表中的静态路由条目
S 192.168.20.0/24 [1/0] via 192.168.1.2
S 192.168.30.0/24 [1/0] via 192.168.2.3
R2#show ip route static
S 192.168.10.0/24 [1/0] via 192.168.1.1
S 192.168.30.0/24 [1/0] via 192.168.3.3
R3#show ip route static
S 192.168.10.0/24 [1/0] via 192.168.2.1
S 192.168.20.0/24 [1/0] via 192.168.3.2 -
路由信息解析
- s:表示该路由类型为静态路由
- 192.168.20.0/24:表示目的网段以及目的网段的掩码
- [1/0]:1表示为路由的AD值(管理距离),0表示为该路由的开销
- 192.168.1.2:表示为下一跳地址


 1215
1215


 被折叠的 条评论
为什么被折叠?
被折叠的 条评论
为什么被折叠?
 到【灌水乐园】发言


