


文件
什么是文件
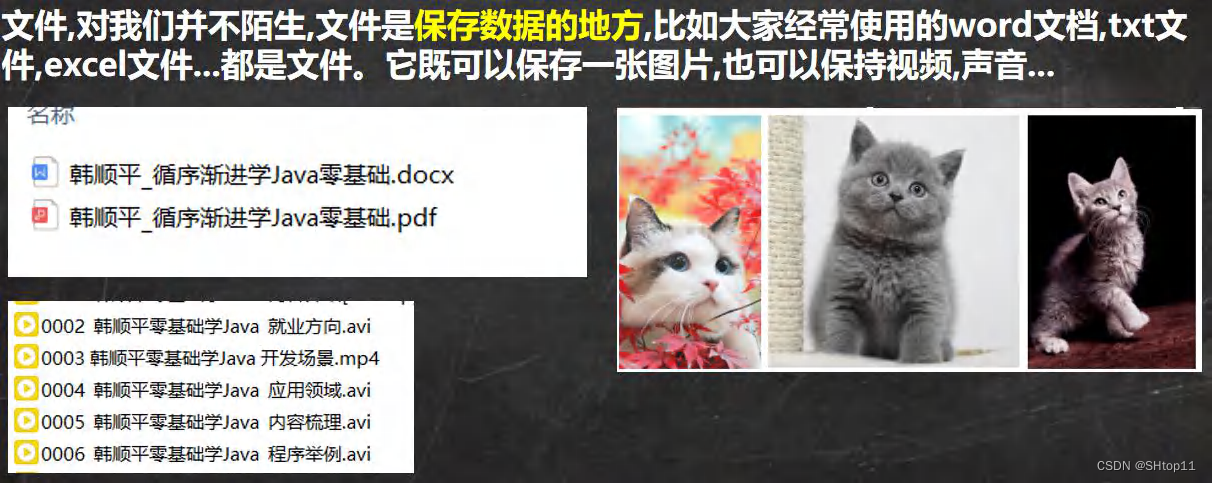
文件流

常用的文件操作
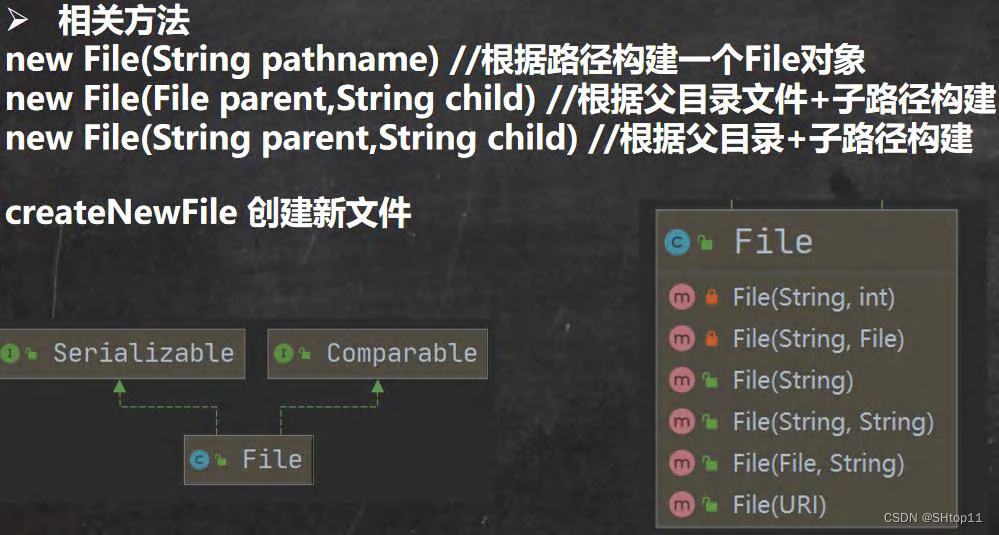
创建文件对象相关构造器和方法

public class FileCreate {
    public static void main(String[] args) {

    }

    //方式 1 new File(String pathname)//根据路径构建一个File对象
    @Test
    public void create01() {
        String filePath = "e:\\news1.txt";
        File file = new File(filePath);

        try {
            file.createNewFile();
            System.out.println("文件1创建成功");
        } catch (IOException e) {
            e.printStackTrace();
        }
    }

    //方式 2 new File(File parent,String child) //根据父目录文件+子路径构建
    //d:\\news2.txt
    @Test
    public void create02() {
        File parentFile = new File("e:\\");
        String fileName = "news2.txt";
        //这里的 file 对象,在 java 程序中,只是一个对象
        //只有执行了 createNewFile 方法,才会真正的,在磁盘创建该文件
        File file = new File(parentFile, fileName);

        try {
            file.createNewFile();
            System.out.println("文件2创建成功");
        } catch (IOException e) {
            e.printStackTrace();
        }
    }

    //方式 3 new File(String parent,String child) //根据父目录+子路径构建
    @Test
    public void create03() {
        String parentPath = "e:\\";
        String filePath = "news3.txt";
        File file = new File(parentPath,filePath);

        try {
            file.createNewFile();
            System.out.println("文件3创建成功");
        } catch (IOException e) {
            e.printStackTrace();
        }
    }

    @Test
    public void create04() {
        String parentPath = "e:/";
        String filePath = "news4.txt";
        File file = new File(parentPath,filePath);

        try {
            file.createNewFile();
            System.out.println("文件4创建成功");
        } catch (IOException e) {
            e.printStackTrace();
        }
    }

	//下面四个都是抽象类
	//InputStream
	//OutputStream
	//Reader //字符输入流
	//Writer //字符输出流

}
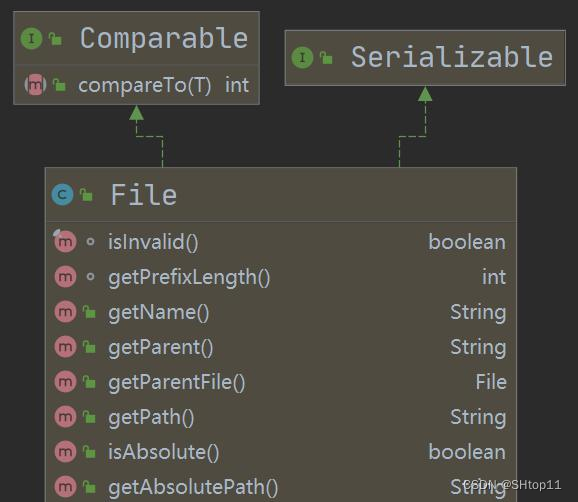
获取文件的相关信息

应用案例演示

public class FileInformation {
    public static void main(String[] args) {

    }

    @Test
    //获取文件的信息
    public void info() {
        //先创建文件对象
        File file = new File("d:\\news1.txt");
        //调用相应的方法,得到对应信息
        System.out.println("文件名字 = " + file.getName());//news1.txt
        //getName、getAbsolutePath、getParent、length、exists、isFile、isDirectory
        System.out.println("文件绝对路径 = " + file.getAbsolutePath());//d:\news1.txt
        System.out.println("文件父级目录 = " +  file.getParent());//d:\
        //news1 内容:hello啦啦啦
        System.out.println("文件大小 = " + file.length());//14
        System.out.println("文件是否存在 = " + file.exists());//true
        System.out.println("是不是一个文件 = " + file.isFile());//true
        System.out.println("是不是一个目录 = " + file.isDirectory()); //false
    }
}
目录的操作和文件删除

应用案例演示

public class Directory_ {
    public static void main(String[] args) {

    }

    //判断 d:\\news1.txt 是否存在,如果存在就删除
    @Test
    public void m1() {
        String filePath = "d:\\news2.txt";
        File file = new File(filePath);
        if (file.exists()) {
            if (file.delete()){
                System.out.println(filePath + " 删除成功");
            }else {
                System.out.println(filePath + " 删除失败");
            }
        }else {
            System.out.println("该文件不存在...");
        }
    }

    //判断 D:\\demo02 是否存在,存在就删除,否则提示不存在
    //这里我们需要体会到,在java编程中,目录也被当做文件
    @Test
    public void m2() {
        String filePath = "D:\\demo02";
        File file = new File(filePath);
        if (file.exists()) {
            if (file.delete()){
                System.out.println(filePath + " 删除成功");
            }else {
                System.out.println(filePath + " 删除失败");
            }
        }else {
            System.out.println("该目录不存在...");
        }
    }

    //file.mkdirs() 创建多级目录
    //判断 D:\\demo\\a\\b\\c 目录是否存在,如果存在就提示已经存在,否则就创建
    @Test
    public void m3() {
        String directoryPath = "D:\\demo\\a\\b\\c";
        File file = new File(directoryPath);
        if (file.exists()) {
                System.out.println(directoryPath + " 存在...");
        }else {
            if (file.mkdirs()) { //创建多级目录
                System.out.println(directoryPath + " 创建成功...");
            }else {
                System.out.println(directoryPath + " 创建失败...");
            }
        }
    }

    //file.mkdir() 创建一级目录
    //判断 D:\\demo 目录是否存在,如果存在就提示已经存在,否则就创建
    @Test
    public void m03() {
        String directoryPath = "D:\\demo03";
        File file = new File(directoryPath);
        if (file.exists()) {
            System.out.println(directoryPath + " 存在...");
        }else {
            if (file.mkdirs()) { //创建一级目录
                System.out.println(directoryPath + " 创建成功...");
            }else {
                System.out.println(directoryPath + " 创建失败...");
            }
        }
    }
}
根据目录显示文件
编写一个程序,在输入文件目录后显示所有文件(包括子目录中的文件)
public class ListFilesRecursive {

    public static void main(String[] args) {
        Scanner scanner = new Scanner(System.in);

        // 提示用户输入要列出文件的目录路径
        System.out.print("请输入要列出文件的目录路径: ");
        String directoryPath = scanner.nextLine();

        scanner.close();

        File directory = new File(directoryPath);

        // 检查目录是否存在
        if (!directory.exists()) {
            System.out.println("目录不存在: " + directoryPath);
            return;// 如果目录不存在,直接退出程序
        }

        // 调用递归方法列出所有文件
        listFiles(directory);
    }

    public static void listFiles(File directory) {
        // 获取目录下所有文件和子目录
        File[] files = directory.listFiles();

        if (files != null) {
            for (File file : files) {
                if (file.isDirectory()) {
                    // 递归调用自身,处理子目录
                    listFiles(file);
                } else {
                    // 输出文件路径
                    System.out.println("文件: " + file.getAbsolutePath());
                }
            }
        }
    }
}
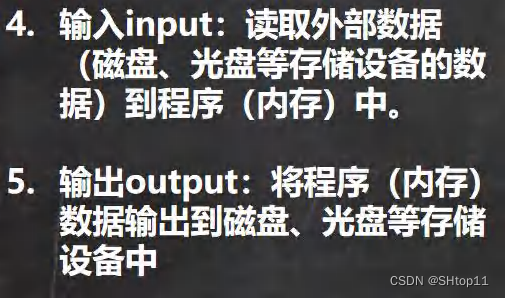
IO 流原理及流的分类
Java IO 流原理

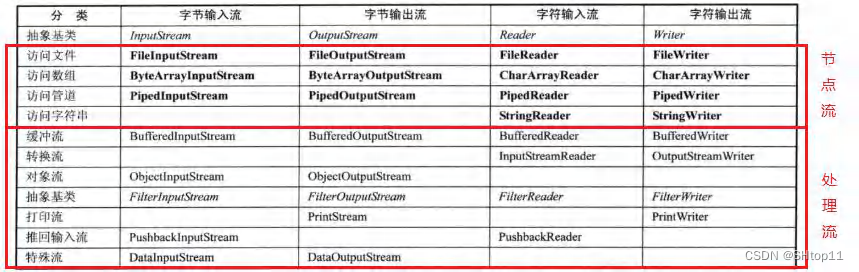
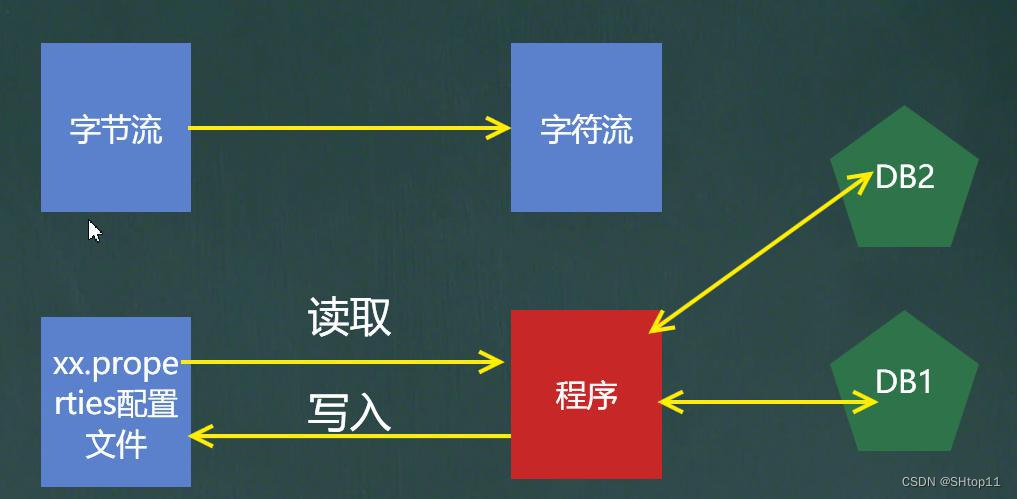
流的分类
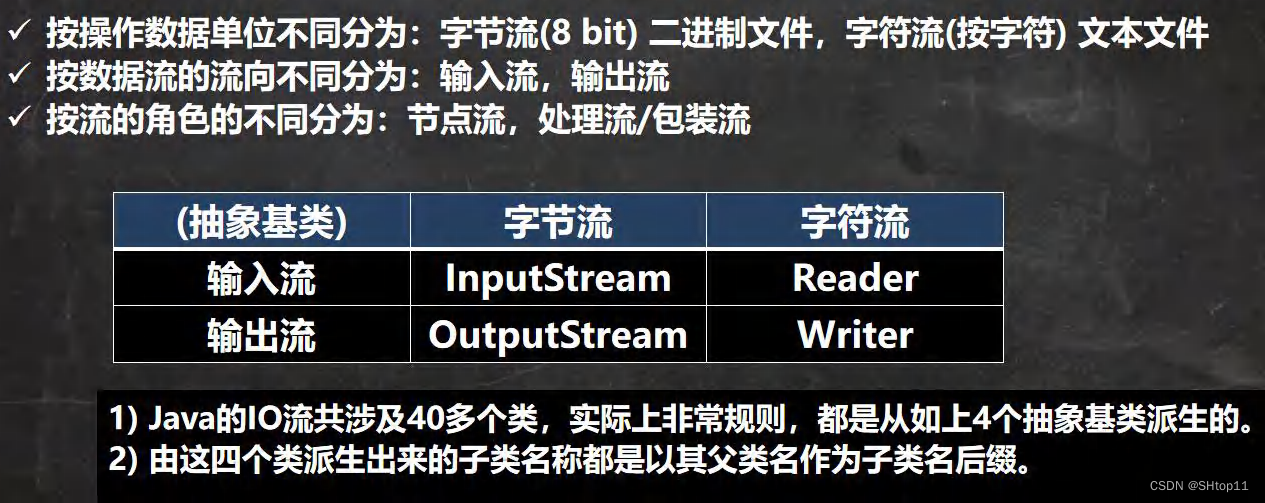
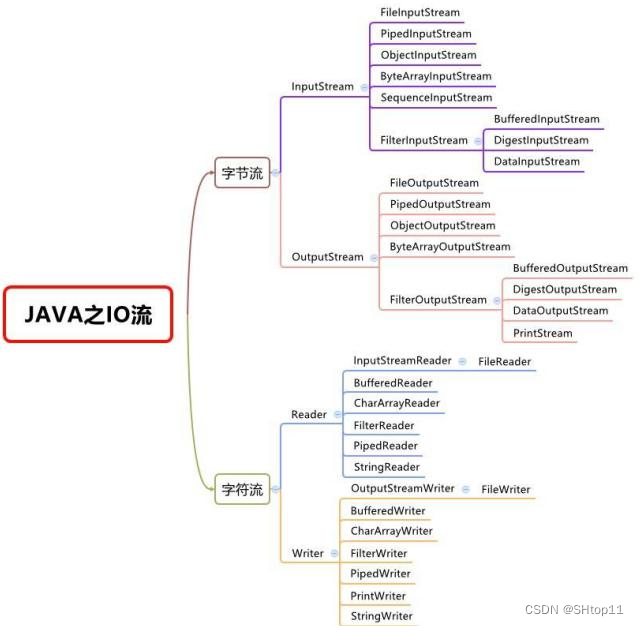
IO 流体系图-常用的类
IO 流体系图
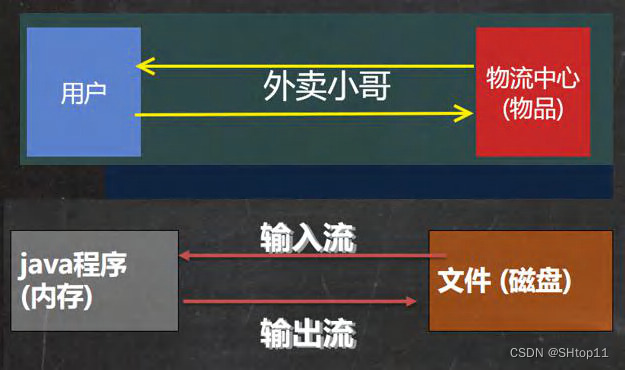
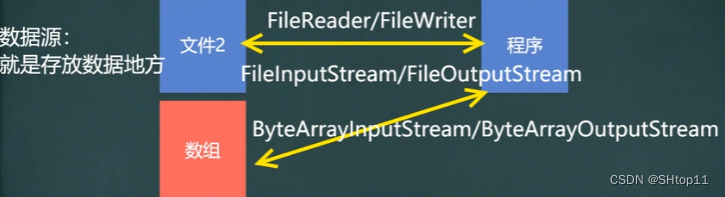
文件 VS 流
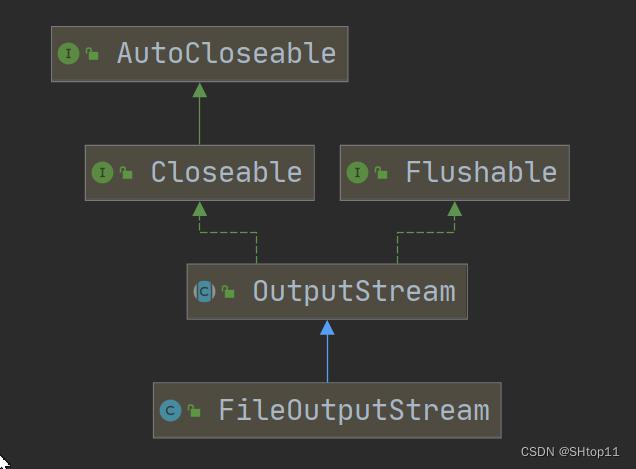
FileInputStream 介绍
FileInputStream 应用实例
/**
 * 演示 FileInputStream 的使用(字节输入流 文件--> 程序)
 */

public class FileInputStream_ {
    public static void main(String[] args) {

    }

    /**
     * 演示读取文件...
     * 单个字节的读取,效率比较低
     */
    @Test
    public void readFile01() {
        String filePath = "d:\\hello.txt";
        int readData = 0;
        FileInputStream fileInputStream = null;//定义在外边,扩大作用域
        try {
            //创建 FileInputStream 对象,用于读取文件
            fileInputStream = new FileInputStream(filePath);
            //从该输入流读取一个字节的数据。 如果没有输入可用,此方法将阻止。
            //如果返回-1 , 表示读取完毕
            while ((readData = fileInputStream.read()) != -1) {
                System.out.print((char) readData);//转成 char 显示
            }

        } catch (IOException e) {
            e.printStackTrace();
        }finally {
            //关闭文件流,释放资源
            try {
                fileInputStream.close();
            } catch (IOException e) {
                e.printStackTrace();
            }
        }
    }

    /**
     * -> 使用 read(byte[] b) 读取文件,提高效率
     */
    @Test
    public void readFile02() {
        String filePath = "d:\\hello.txt";
        int readLen = 0;
        //定义一个字节数组
        byte[] buf = new byte[8]; //一次读取 8 个字节
        FileInputStream fileInputStream = null;//定义在外边,扩大作用域
        try {
            //创建 FileInputStream 对象,用于读取文件
            fileInputStream = new FileInputStream(filePath);
            //从该输入流读取最多 b.length 字节的数据到字节数组。 此方法将阻塞,直到某些输入可用
            //如果返回-1 , 表示读取完毕
            //如果读取正常, 返回实际读取的字节数
            while ((readLen = fileInputStream.read(buf)) != -1) {
                System.out.print(new String(buf,0,readLen));//转成 char 显示
            }

        } catch (IOException e) {
            e.printStackTrace();
        }finally {
            //关闭文件流,释放资源
            try {
                fileInputStream.close();
            } catch (IOException e) {
                e.printStackTrace();
            }
        }
    }
}
FileOutputStream 介绍
FileOutputStream 应用实例
要求: 请使用 FileOutputStream 在 a.txt 文件,中写入 “hello,world”, 如果文件不存在,会创建文件(注意:前提是目录已经存在)
public class FileOutputStream01 {
    public static void main(String[] args) {

    }

    /**
     * 演示使用 FileOutputStream 将数据写到文件中,
     * 如果该文件不存在,则创建该文件
     */
    @Test
    public void writeFile() {

        //创建 FileOutputStream 对象
        String filePath = "d:\\a.txt";
        FileOutputStream fileOutputStream = null;

        try {
            //得到 FileOutputStream 对象
            //1. new FileOutputStream(filePath) 创建方式,当写入内容是,会覆盖原来的内容
            //2. new FileOutputStream(filePath, true) 创建方式,当写入内容是,是追加到文件后面
            fileOutputStream = new FileOutputStream(filePath);
            //写入一个字节
            //fileOutputStream.write('H');

            //写入字符串
            String str = "hello,world!";
            //str.getBytes() 可以把 字符串 -> 字节数组
            //fileOutputStream.write(str.getBytes());

            /*
            write(byte[] b, int off, int len) 将 len 字节从位于偏移量 off 的指定字节数组写入此文件输出流
            */
            fileOutputStream.write(str.getBytes(), 0, 3);

        } catch (IOException e) {
            e.printStackTrace();
        } finally {
            try {
                fileOutputStream.close();
            } catch (IOException e) {
                e.printStackTrace();
            }
        }
    }
}
FileOutputStream 应用实例 2
要求: 编程完成图片/音乐 的拷贝
public class FileCopy {
    public static void main(String[] args) {

        //完成 文件拷贝,将 d:\\22.jpg 拷贝 d:\\220.jpg
        //思路分析
        //1. 创建文件的输入流 , 将文件读入到程序
        //2. 创建文件的输出流, 将读取到的文件数据,写入到指定的文件
        String filePath = "d:\\22.jpg";
        String destPath = "d:\\220.jpg";
        FileInputStream fileInputStream = null;
        FileOutputStream fileOutputStream = null;

        try {
            fileInputStream = new FileInputStream(filePath);
            fileOutputStream = new FileOutputStream(destPath);
            //定义一个字节数组,提高读取效果
            byte[] buf = new byte[1024];
            int readLen = 0;
            while ((readLen = fileInputStream.read(buf)) != -1) {
                //读取到后,就写入到文件 通过 fileOutputStream
                //即,是一边读,一边写
                fileOutputStream.write(buf,0,readLen);//一定要使用这个方法
            }
            System.out.println("拷贝ok~");
        } catch (IOException e) {
            e.printStackTrace();
        } finally {
            try {
                //关闭输入流和输出流,释放资源
                if (fileInputStream != null) {
                    fileInputStream.close();
                }
                if (fileOutputStream != null) {
                    fileOutputStream.close();
                }
            } catch (IOException e) {
                e.printStackTrace();
            }
        }
    }
}
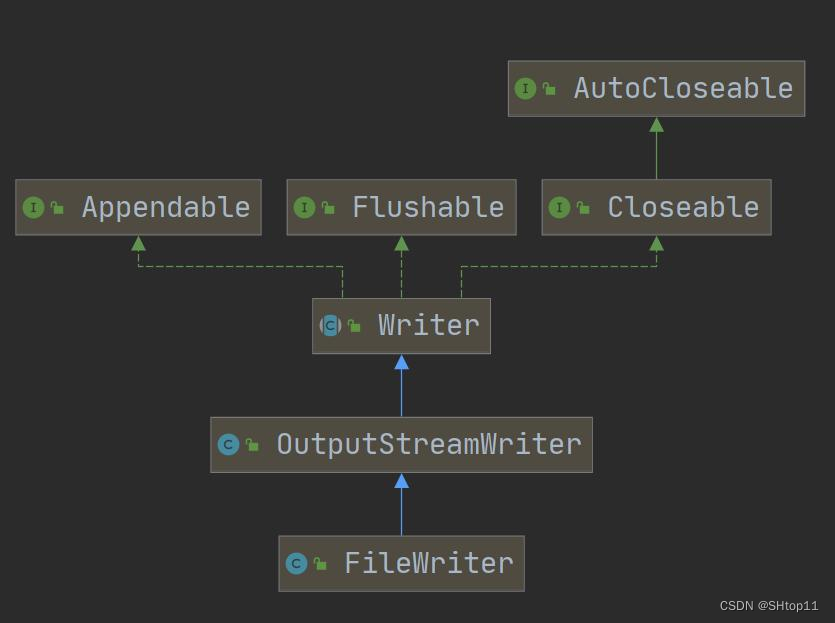
FileReader 和 FileWriter 介绍
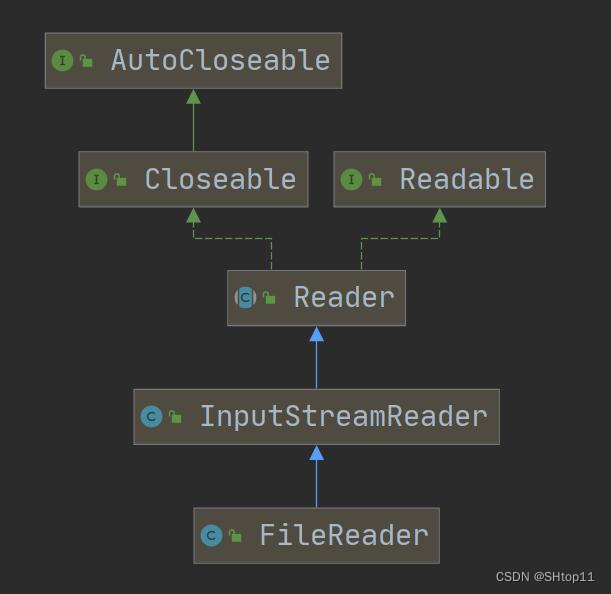
FileReader 相关方法

FileReader 应用案例
要求:使用 FileReader 从 story.txt 读取内容,并显示
public class FileReader_ {
    public static void main(String[] args) {

    }

    /**
     * 单个字符读取文件
     */
    @Test
    public void readFile01() {
        System.out.println("~~~readFile01 ~~~");
        String filePath = "d:\\story.txt";
        FileReader fileReader = null;
        int data = 0;
        //1.创建FileReader对象
        try {
            fileReader = new FileReader(filePath);
            //循环读取 使用read,单个字符读取
            while ((data = fileReader.read()) != -1) {
                System.out.print((char) data);
            }
        } catch (IOException e) {
            e.printStackTrace();
        } finally {
            if (fileReader != null) {
                try {
                    fileReader.close();
                } catch (IOException e) {
                    e.printStackTrace();
                }
            }
        }
    }

    /**
     * 字符数组读取文件
     */
    @Test
    public void readFile02() {
        System.out.println("~~~readFile02 ~~~");
        String filePath = "d:\\story.txt";
        FileReader fileReader = null;

        int readLen = 0;
        char[] buf = new char[8];
        //1.创建FileReader对象
        try {
            fileReader = new FileReader(filePath);
            //循环读取 使用 read(buf), 返回的是实际读取到的字符数
            //如果返回-1, 说明到文件结束
            while ((readLen = fileReader.read(buf)) != -1) {
                System.out.print(new String(buf,0,readLen));
            }
        } catch (IOException e) {
            e.printStackTrace();
        } finally {
            if (fileReader != null) {
                try {
                    fileReader.close();
                } catch (IOException e) {
                    e.printStackTrace();
                }
            }
        }
    }
}
FileWriter 常用方法
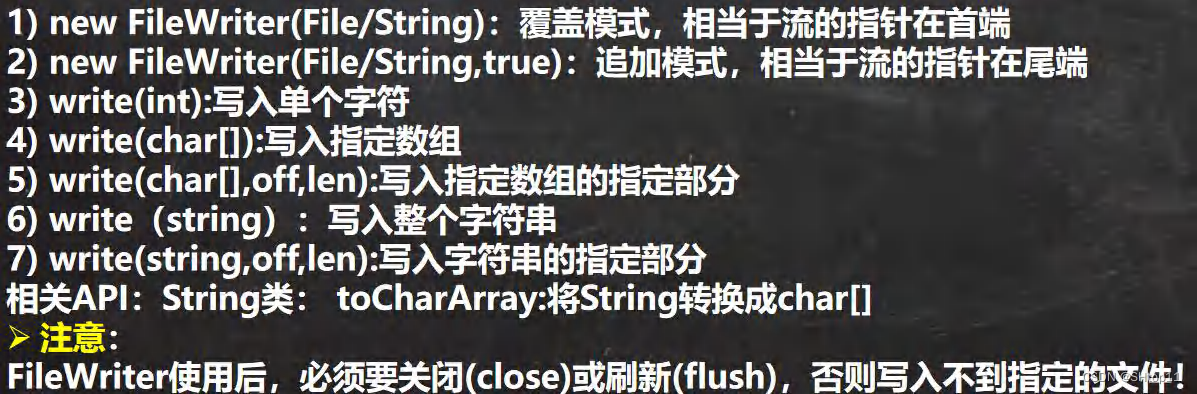
FileWriter 应用案例
要求:使用 FileWriter 将 “风雨之后,定见彩虹” 写入到 note.txt 文件中, 注意细节
public class FileWriter_ {
    public static void main(String[] args) {

        String filePath = "d:\\note.txt";
        //创建FileWriter对象
        FileWriter fileWriter = null;
        char[] chars = {'a','b','c'};
        try {
            fileWriter = new FileWriter(filePath);//默认是覆盖写入
            //write(int):写入单个字符
            fileWriter.write('H');
            //write(char[]):写入指定数组
            fileWriter.write(chars);
            //write(char[],off,len):写入指定数组的指定部分
            fileWriter.write("明天吃什么".toCharArray(), 0, 3);
            //write(string):写入整个字符串
            fileWriter.write(" 你好西安~");
            fileWriter.write("风雨之后,定见彩虹");
            //write(string,off,len):写入字符串的指定部分
            fileWriter.write("上海天津", 0, 2);
            //在数据量大的情况下,可以使用循环操作
        } catch (IOException e) {
            e.printStackTrace();
        } finally {

            //对应 FileWriter , 一定要关闭流,或者 flush 才能真正的把数据写入到文件
            //看源码就知道原因

            /*
            看看源码

            private void writeBytes() throws IOException {
                this.bb.flip();
                int var1 = this.bb.limit();
                int var2 = this.bb.position();
                assert var2 <= var1;
                int var3 = var2 <= var1 ? var1 - var2 : 0;
                if (var3 > 0) {
                    if (this.ch != null) {
                        assert this.ch.write(this.bb) == var3 : var3;
                    } else {
                        this.out.write(this.bb.array(), this.bb.arrayOffset() + var2, var3);
                    }
                }
                this.bb.clear();
            }
            */
            try {
                //fileWriter.flush();
                //关闭文件流,等价 flush() + 关闭
                fileWriter.close();
            } catch (IOException e) {
                e.printStackTrace();
            }

        }

        System.out.println("程序结束。。");
    }
}
节点流和处理流
基本介绍
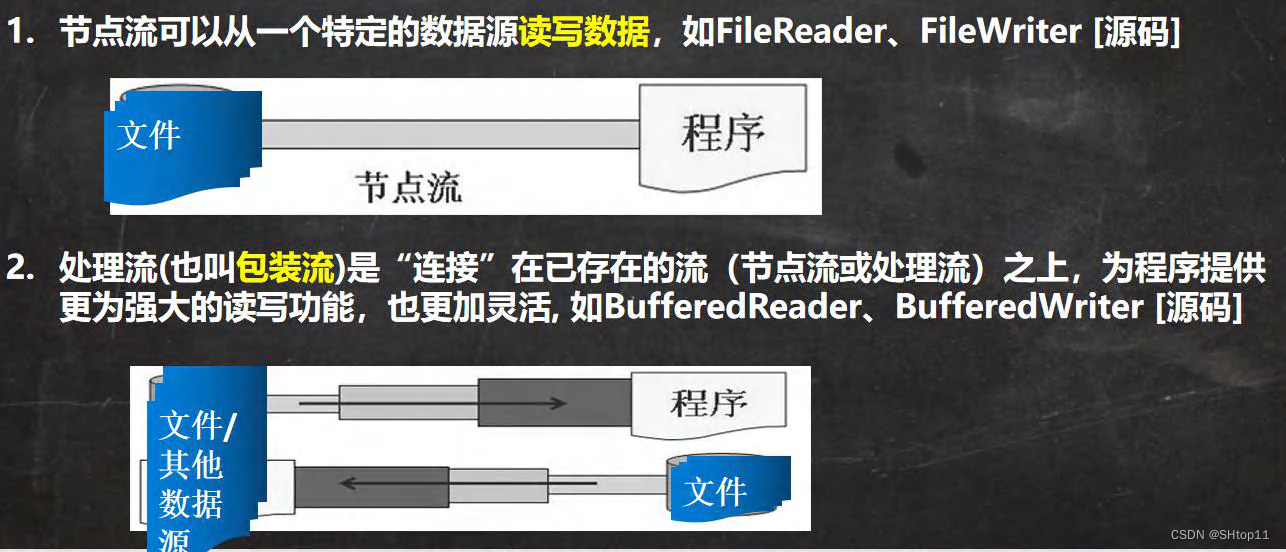
节点流和处理流一览图
节点流和处理流的区别和联系

处理流的功能主要体现在以下两个方面:

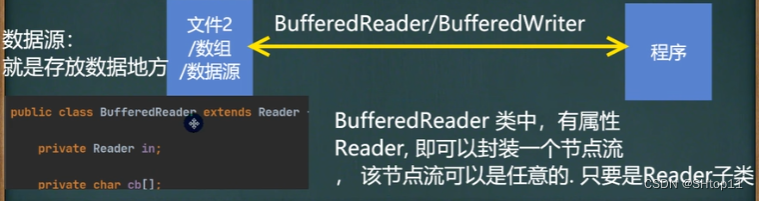
处理流-BufferedReader 和 BufferedWriter


public class BufferedReader_ {
    public static void main(String[] args) throws Exception {
        String filePath = "d:\\story.txt";
        //创建BufferedReader
        BufferedReader bufferedReader = new BufferedReader(new FileReader(filePath));
        //读取
        String line;//按行读取,效率高
        //说明
        // 1.bufferedReader.readLine()是按行读取文件
        // 2.当返回null 时,表示文件读取完毕
        while ((line = bufferedReader.readLine()) != null) {
            System.out.println(line);
        }

        //关闭流,这里注意,只需要关闭 BufferedReader,
        //因为底层会自动的去关闭节点流 FileReader
        /*
            public void close() throws IOException {
                synchronized (lock) {
                    if (in == null)
                        return;
                    try {
                        in.close();//in 就是我们传入的 new FileReader(filePath), 关闭了.
                    } finally {
                        in = null;
                        cb = null;
                    }
                }
            }
         */
        bufferedReader.close();
    }
}

public class BufferWriter_ {
    public static void main(String[] args) throws IOException {
        String filePath = "d:\\ok.txt";
        //创建BufferedWriter
        //说明:
        // 1. new FileWriter(filePath, true) 表示以追加的方式写入
        // 2. new FileWriter(filePath) , 表示以覆盖的方式写入
        BufferedWriter bufferedWriter = new BufferedWriter(new FileWriter(filePath,true));
        bufferedWriter.write("hello11");
        bufferedWriter.newLine();//插入一个和系统相关的换行
        bufferedWriter.write("hello22");
        bufferedWriter.newLine();
        bufferedWriter.write("hello33");
        bufferedWriter.newLine();


        //说明:关闭外层流即可,传入的newFileWriter(filePath),会在底层关闭
        bufferedWriter.close();
    }
}

public class BufferCopy_ {
    public static void main(String[] args) {

        //1. BufferedReader 和 BufferedWriter 是安装字符操作
        //2. 不要去操作 二进制文件[声音,视频,doc, pdf ], 可能造成文件损坏

        String srcFilePath = "d:\\ok.txt";
        String destFilePath = "d:\\ok2.txt";
        BufferedReader br = null;
        BufferedWriter bw = null;
        String line;
        try {
            br = new BufferedReader(new FileReader(srcFilePath));
            bw = new BufferedWriter(new FileWriter(destFilePath));

            //说明: readLine 读取一行内容,但是没有换行
            while ((line = br.readLine()) != null) {
                //每读取一行,就写入
                bw.write(line);
                //插入一个换行
                bw.newLine();
            }
            System.out.println("拷贝完毕。。");

        } catch (IOException e) {
            e.printStackTrace();
        }finally {
            //关闭流
            try {
                if(br != null) {
                    br.close();
                }
                if(bw != null) {
                    bw.close();
                }
            } catch (IOException e) {
                e.printStackTrace();
            }
        }
    }
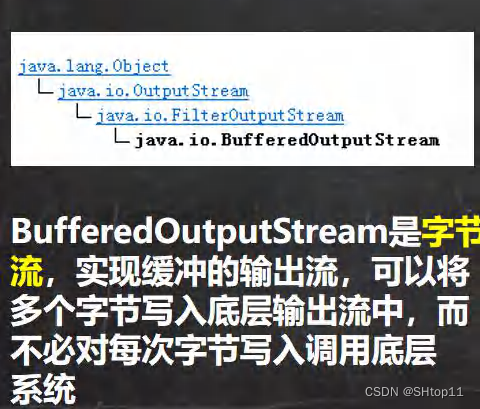
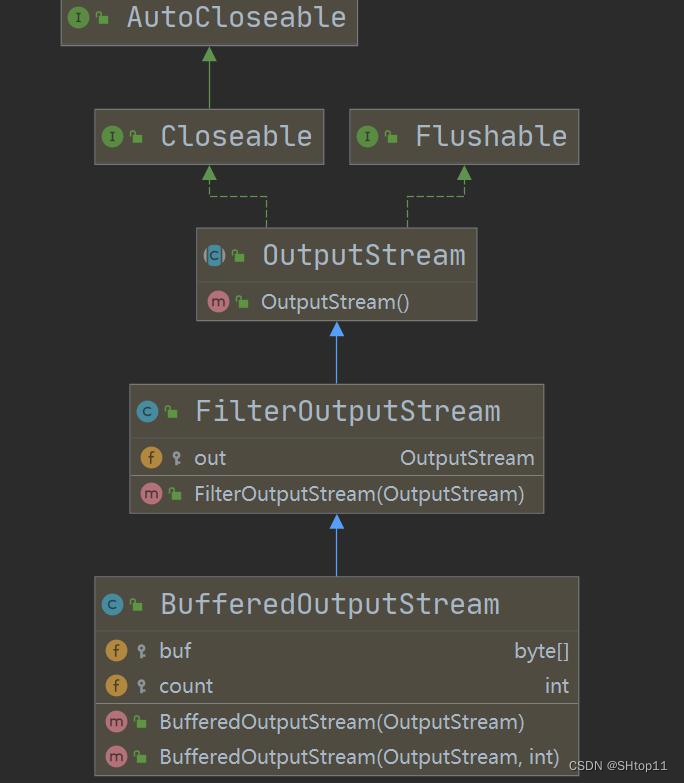
处理流-BufferedInputStream 和 BufferedOutputStream
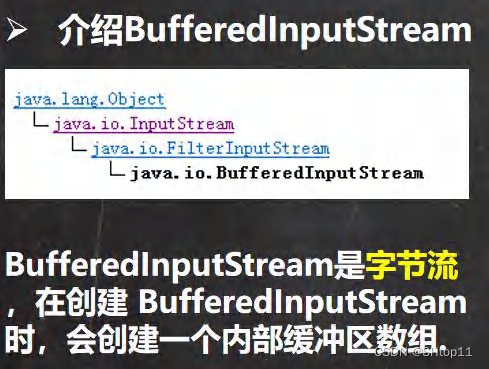
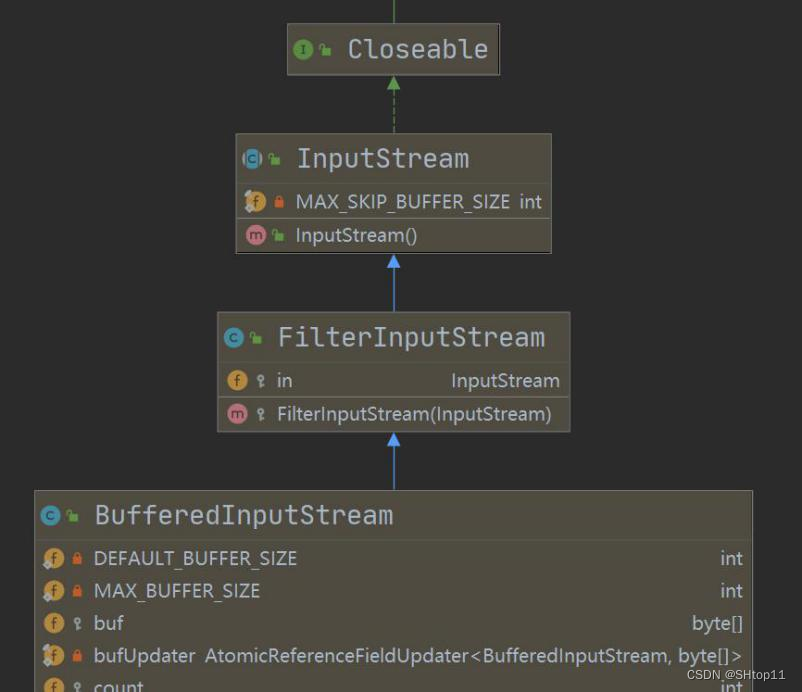
介绍 BufferedOutputStream

public class BufferedCopy02 {
    public static void main(String[] args) {
        String srcFilePath = "d:\\22.jpg";
        String destFilePath = "d:\\220.jpg";

        //创建 BufferedOutputStream 对象 BufferedInputStream 对象
        BufferedInputStream bis = null;
        BufferedOutputStream bos = null;
        try {
            因为 FileInputStream 是 InputStream 子类
            bis = new BufferedInputStream(new FileInputStream(srcFilePath));
            bos = new BufferedOutputStream(new FileOutputStream(destFilePath));

            //循环的读取文件,并写入到 destFilePath
            byte[] buff = new byte[1024];
            int readLen = 0;
            //当返回 -1 时,就表示文件读取完毕
            while ((readLen = bis.read(buff)) != -1) {
                bos.write(buff,0,readLen);
            }
            System.out.println("拷贝完毕。。");
        } catch (IOException e) {
            e.printStackTrace();
        } finally {
            //关闭流 , 关闭外层的处理流即可,底层会去关闭节点流
            try {
                if (bis != null) {
                    bis.close();
                }
                if (bos != null) {
                    bos.close();
                }
            } catch (IOException e) {
                e.printStackTrace();
            }
        }
    }
}
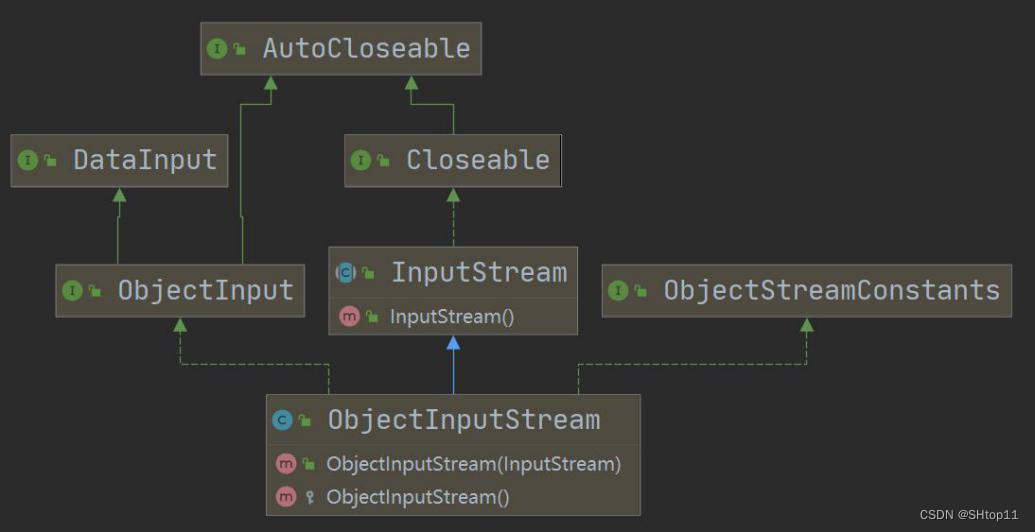
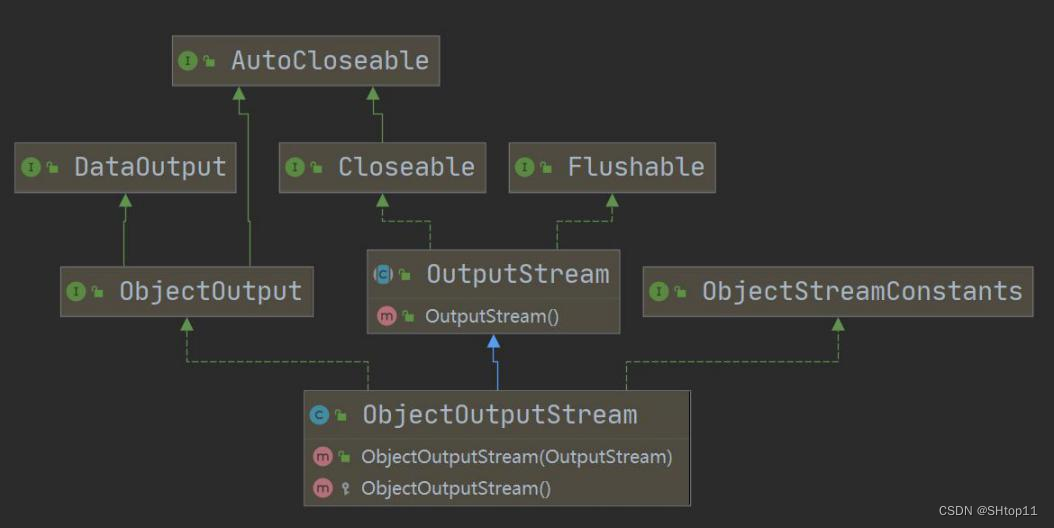
对象流-ObjectInputStream 和 ObjectOutputStream
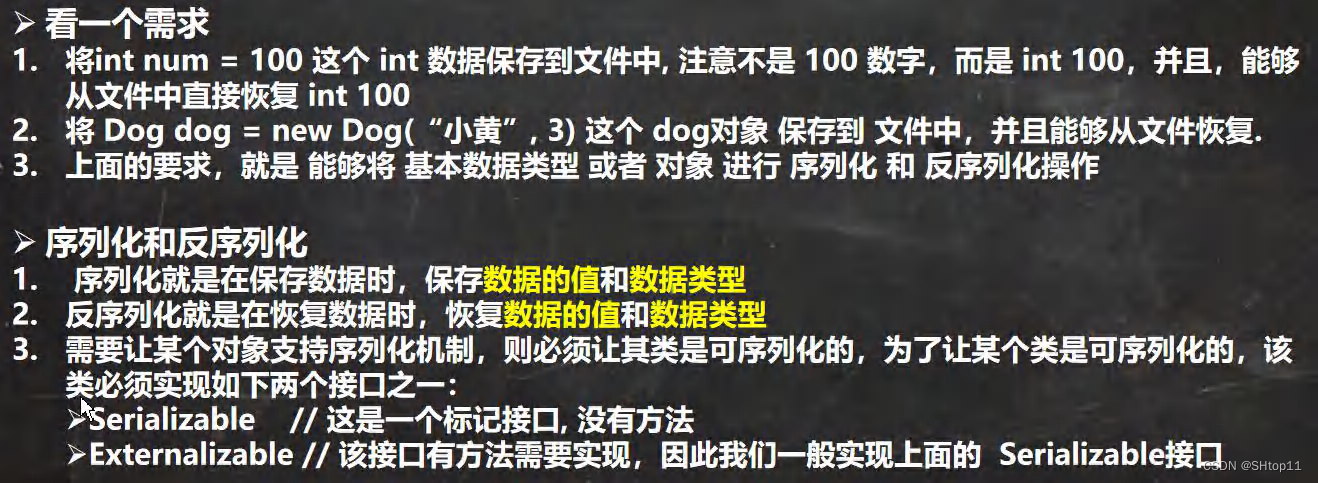
对象流介绍
功能:提供了对基本类型或对象类型的序列化和反序列化的方法
ObjectOutputStream 提供 序列化功能
ObjectInputStream 提供 反序列化功能
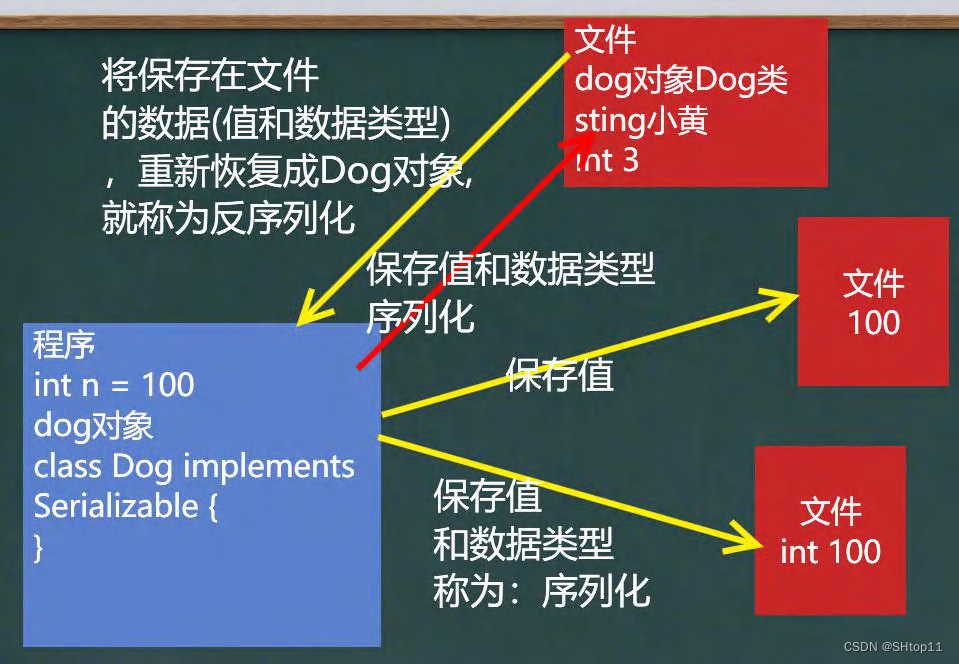
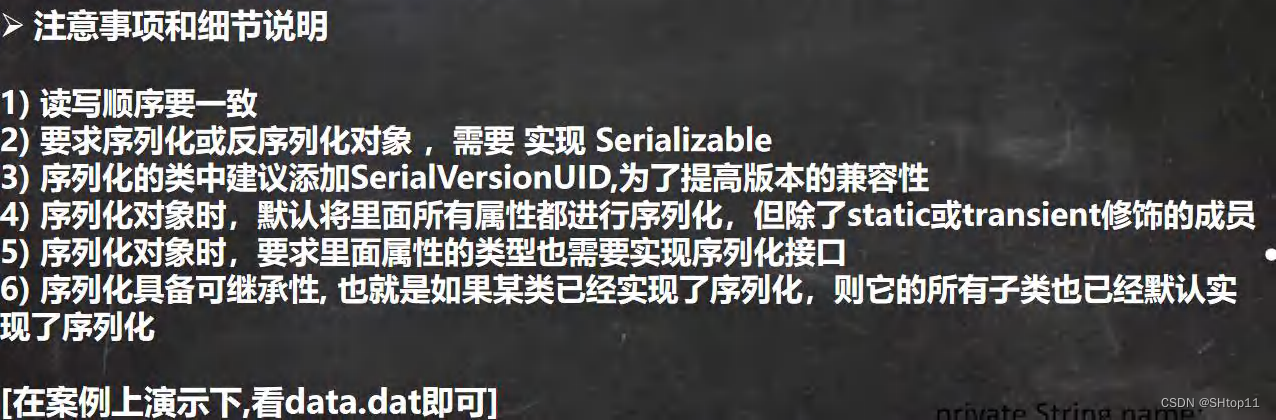
序列化

//如果需要序列化某个类的对象,实现Serializable
public class Dog implements Serializable {
    private String name;
    private int age;

    //序列化对象时,默认将里面所有属性都进行序列化,但除了static或transient修饰的成员
    private static String nation;
    private transient String color;
    //序列化对象时,要求里面属性的类型也需要实现序列化接口
    private Master master = new Master();

    //serialVersionUID序列化的版本号,可以提高兼容性
    private static final long serialVersionUID = 1L;
    public Dog(String name, int age, String nation, String color) {
        this.name = name;
        this.age = age;
        this.color = color;
        this.nation = nation;
    }

    @Override
    public String toString() {
        return "Dog{" +
                "name='" + name + '\'' +
                ", age=" + age +
                ", color='" + color + '\'' +
                '}' + " " + nation
                + " " + master;
    }

    public String getName() {
        return name;
    }

    public void setName(String name) {
        this.name = name;
    }

    public int getAge() {
        return age;
    }

    public void setAge(int age) {
        this.age = age;
    }

    public static String getNation() {
        return nation;
    }

    public static void setNation(String nation) {
        Dog.nation = nation;
    }

    public String getColor() {
        return color;
    }

    public void setColor(String color) {
        this.color = color;
    }
}
public class Master implements Serializable {
}
public class ObjectOutStream_ {
    public static void main(String[] args) throws IOException {
        //序列化后,保存的文件格式,不是存文本,而是按照他的格式来保存
        String filePath = "d:\\data.dat";
        ObjectOutputStream oos = new ObjectOutputStream(new FileOutputStream(filePath));
        //序列化数据到 d:\data.dat
        oos.writeInt(100);// int -> Integer (实现了 Serializable)
        oos.writeBoolean(true);// boolean -> Boolean (实现了 Serializable)
        oos.writeChar('a');// char -> Character (实现了 Serializable)
        oos.writeDouble(9.5);// double -> Double (实现了 Serializable)
        oos.writeUTF("欢欢");//String

        //保存一个 dog 对象
        oos.writeObject(new Dog("旺财", 10,"日本", "白色"));
        oos.close();
        System.out.println("数据保存完毕(序列化形式)");
    }
}

反序列化

public class ObjectInputStream_ {
public static void main(String[] args) throws IOException, ClassNotFoundException {
//指定反序列化的文件
String filePath = "d:\\data.dat";
ObjectInputStream ois = new ObjectInputStream(new FileInputStream(filePath));
//读取
// 1.读取(反序列化)的顺序需要和你保存数据(序列化)的顺序一致
// 2.否则会出现异常
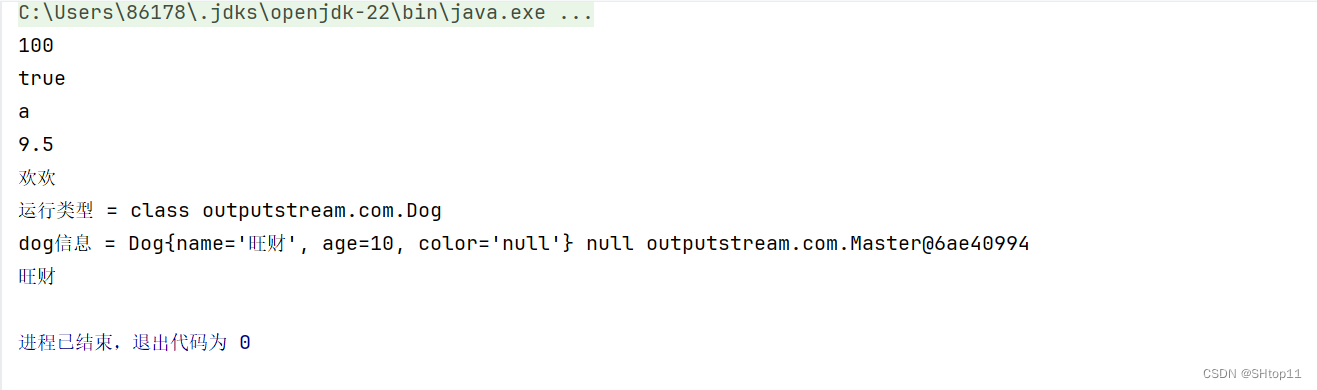
System.out.println(ois.readInt());
System.out.println(ois.readBoolean());
System.out.println(ois.readChar());
System.out.println(ois.readDouble());
System.out.println(ois.readUTF());
//dog 的编译类型是 0bject ,dog 的运行类型是 Dog
Object dog = ois.readObject();
System.out.println("运行类型 = " + dog.getClass());
System.out.println("dog信息 = " + dog);//底层 Object -> dog
//这里是特别重要的细节:
// 1.如果我们希望调用Dog的方法,需要向下转型
// 2.需要我们将Dog类的定义,放在可以引用的位置
Dog dog2 = (Dog)dog;
System.out.println(dog2.getName());
//关闭流,关闭外层流即可,底层会关闭 FileInputStream 流
ois.close();
}
}
注意事项和细节说明
标准输入输出流

应用案例

public class InputAndOutput {
    public static void main(String[] args) {
        //System类的public final static Inputstream in = null;
        //System.in 编译类型InputStream
        //System.in 运行类型BufferedInputStream
        System.out.println(System.in.getClass());

        //1.System.out public final static PrintStream out = null;
        //2.编译类型 PrintStream
        //3.运行类型 PrintStream
        //表示标准输出 显示器
        System.out.println(System.out.getClass());

        System.out.println("hello,欢欢~");

        Scanner scanner = new Scanner(System.in);
        System.out.println("输入内容:");
        String next = scanner.next();
        System.out.println("next=" + next);
    }
}
转换流-InputStreamReader 和 OutputStreamWriter
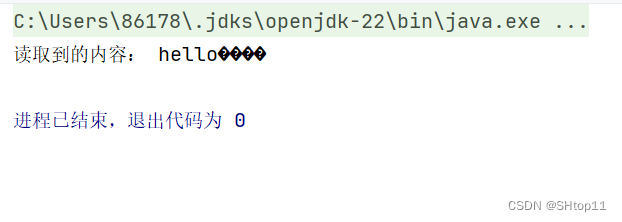
//文件乱码问题
public class CodeQuestion {
    public static void main(String[] args) throws IOException {
        //读取d:\\a.txt 文件到程序
        //思路
        //1. 创建字符输入流 BufferedReader[处理流]
        //2.使用 BufferedReader 对象读取a.txt
        //3,默认情况下,读取文件是按照 utf-8 编码
        String filePath = "d:\\a.txt";
        BufferedReader br = new BufferedReader(new FileReader(filePath));
        String s = br.readLine();
        System.out.println("读取到的内容: " + s);
        br.close();
    }
}
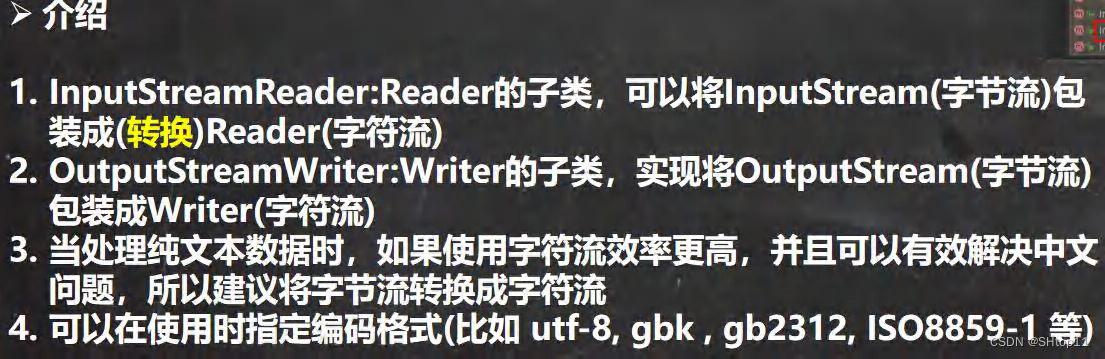

public class InputStreamReader_ {
    public static void main(String[] args) throws IOException {
        String filePath = "d:\\a.txt";
        //解读
        //1.把 FileInputStream 转成 InputStreamReader
//        //2.指定编码 gbk
//        InputStreamReader isr = new InputStreamReader(new FileInputStream(filePath),"gbk");
//        //3.把 InputStreamReader 传入 BufferedReader
//        BufferedReader br = new BufferedReader(isr);

        //将 2 和 3 合在一起
        BufferedReader br = new BufferedReader(new InputStreamReader(new FileInputStream(filePath),"gbk"));

        //4.读取
        String s = br.readLine();
        System.out.println("读取到的内容: " + s);
        br.close();
    }
}

public class OutputStreamWriter_ {
    public static void main(String[] args) throws IOException {
        String filePath = "d:\\sjy.txt";
        String charSet = "utf-8";
        OutputStreamWriter osw = new OutputStreamWriter(new FileOutputStream(filePath),charSet);
        osw.write("hi,欢欢");
        osw.close();
        System.out.println("按照 " + charSet + " 保存文件成功~");
    }
}
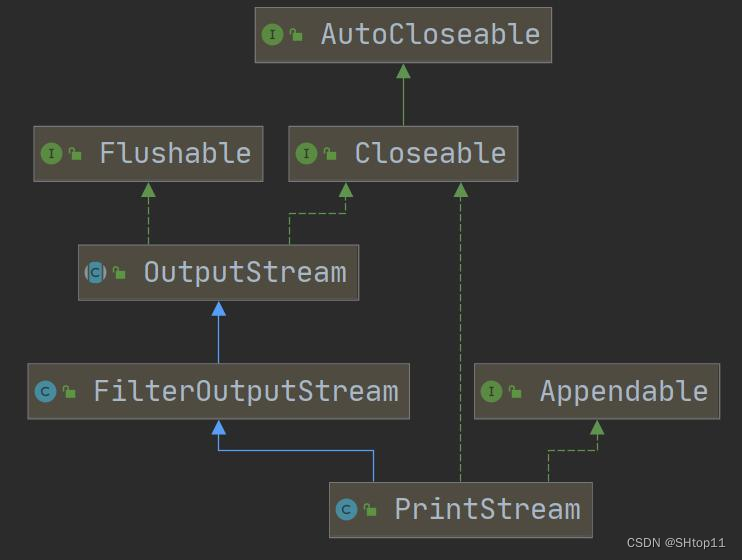
打印流-PrintStream 和 PrintWriter
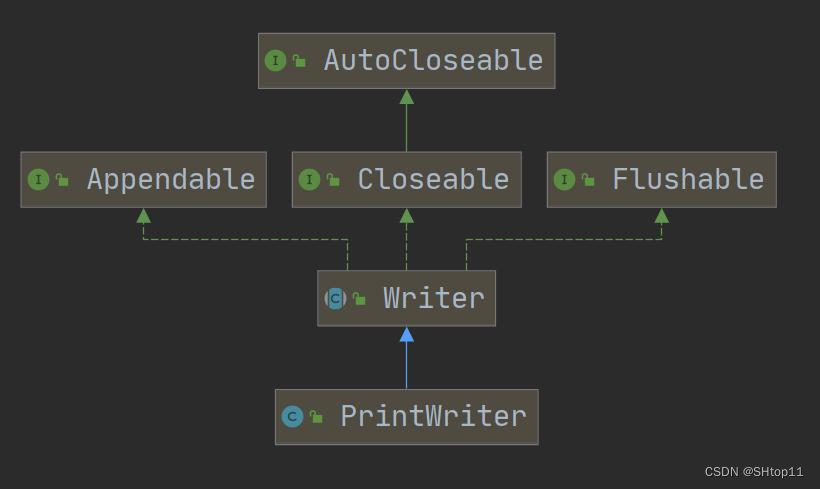
public class PrintWriter_ {
    public static void main(String[] args) throws IOException {
        //PrintWriter printWriter = new PrintWriter(System.out);
        PrintWriter printWriter = new PrintWriter(new FileWriter("d:\\f2.txt"));
        printWriter.print("hi,北京~");
        printWriter.close();//flush + 关闭流, 才会将数据写入到文件..
    }
}
//演示 PrintStream (字节打印流/输出流)
public class PrintStream_ {
    public static void main(String[] args) throws IOException {
        PrintStream out = System.out;
        //在默认情况下,PrintStream 输出数据的位置是 标准输出,即显示器
        out.print("john,hello");
        //因为 print 底层使用的是 write , 所以我们可以直接调用 write 进行打印/输出
        out.write("你好".getBytes());
        /*
        print 的源码

        public void print(String s) {
            if (s == null) {
                s = "null";
            }
            write(s);
        }
           */
        out.close();

        //我们可以去修改打印流输出的位置/设备
        //1. 输出修改成到 "d:\\f1.txt"
        //2. "hello,欢欢~" 就会输出到 d:\f1.txt
        System.setOut(new PrintStream("d:\\f1.txt"));
        System.out.println("hello, 欢欢~");
        //3. 源码
        //   public static void setOut(PrintStream out) {
        //          checkIO();
        //          setOut0(out); // native 方法,修改了 out
        //      }

    }
}
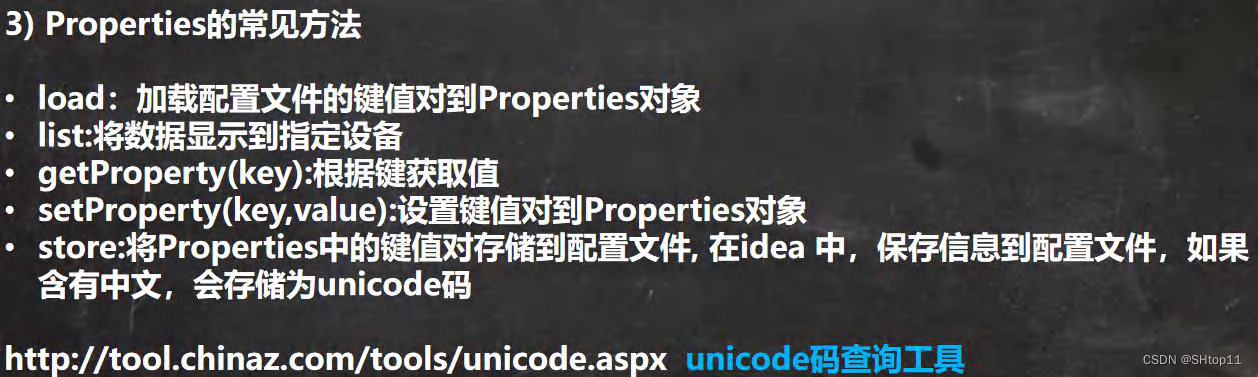
Properties 类
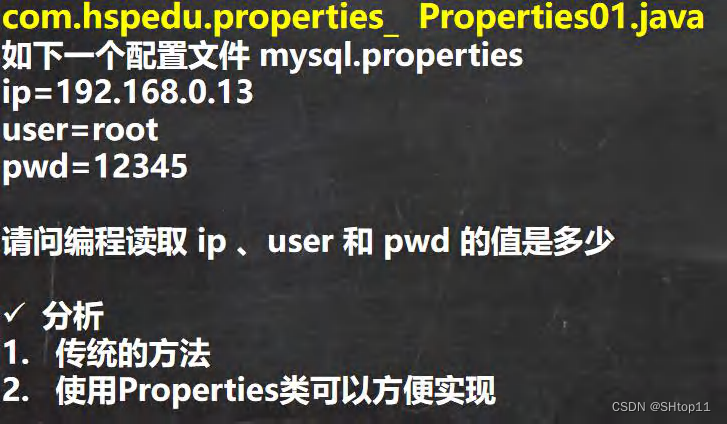
public class Properties01 {
    public static void main(String[] args) throws IOException {
        //读取 mysql.properties 文件,并得到 ip, user 和 pwd
        BufferedReader br = new BufferedReader(new FileReader("src\\mysql.properties"));
        String line = "";
        while ((line = br.readLine()) != null) {
            String[] split = line.split("=");
            System.out.println(split[0] + " 值是: " + split[1]);
        }
        br.close();
    }
}
基本介绍
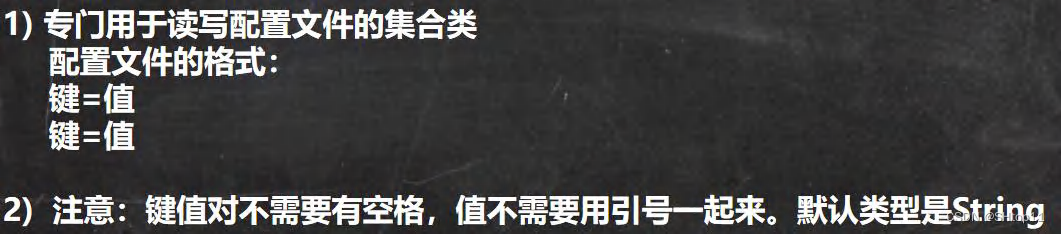
应用案例

public class Properties02 {
    public static void main(String[] args) throws IOException {
        //使用 Properties 类来读取 mysql.properties 文件

        //1. 创建 Properties 对象
        Properties properties = new Properties();
        //2. 加载指定配置文件
        properties.load(new FileReader("src\\mysql.properties"));
        //3. 把 k-v 显示控制台
        properties.list(System.out);
        //4. 根据 key 获取对应的值
        String user = properties.getProperty("user");
        String pwd = properties.getProperty("pwd");
        System.out.println("用户名=" + user);
        System.out.println("密码是=" + pwd);
    }
}
public class Properties03 {
    public static void main(String[] args) throws IOException {
        //使用 Properties 类来创建 配置文件, 修改配置文件内容
        Properties properties = new Properties();
        //创建
        //1.如果该文件没有 key 就是创建
        //2.如果该文件有 key ,就是修改
        /*
            Properties 父类是 Hashtable , 底层就是 Hashtable 核心方法
            public synchronized V put(K key, V value) {
                // Make sure the value is not null
                if (value == null) {
                    throw new NullPointerException();
                }

                // Makes sure the key is not already in the hashtable.
                Entry<?,?> tab[] = table;
                int hash = key.hashCode();
                int index = (hash & 0x7FFFFFFF) % tab.length;
                @SuppressWarnings("unchecked")
                Entry<K,V> entry = (Entry<K,V>)tab[index];
                for(; entry != null ; entry = entry.next) {
                    if ((entry.hash == hash) && entry.key.equals(key)) {
                        V old = entry.value;
                        entry.value = value;//如果 key 存在,就替换
                        return old;
                    }
                }

                addEntry(hash, key, value, index);//如果是新 k, 就 addEntry
                return null;
           }

         */
        properties.setProperty("charset", "utf8");
        properties.setProperty("user", "汤姆");//注意保存时,是中文的 unicode 码值
        properties.setProperty("pwd", "888888");
        //将 k-v 存储文件中即可
        properties.store(new FileOutputStream("src\\mysql2.properties"), null);
        System.out.println("保存配置文件成功~");
    }
}


 6882
6882


 被折叠的 条评论
为什么被折叠?
被折叠的 条评论
为什么被折叠?
 到【灌水乐园】发言


