


好了,兄弟们,继昨天的项目之后,开始继续敲前端代码,完成前端部分
昨天完成了全局页面的代码,和登录页面的代码,不过昨天的代码还有一些需要补充的,这里添加一下
内容补充:在调用登录接口之后进行一个页面的跳转
先介绍一下router路由的使用吧(知道的兄弟们可以跳过哦)
页面的路由:1.安装vue-router :npm install vue-router @4 (在终端输入命令即可)。2.在index.js中创建路由器并导出。3.main.js中使用,4.<router-view>中展示
(这里因为刚开始创建项目的时候点击了vue Router,脚手架已经帮我们生成好了,那就不用管了,前三步自动完成,我们只管使用就好了)
这里在Login页面中添加
import {useRouter} from 'vue-router'
const router = useRouter()
const login = async()=>{
    let result = await userLoginService(loginData.value);
    renderIcon(result.msg?result.msg:'登录成功');
    router.push('/')
}
添加完这几行代码就OK了,这里我们可以试一下能不能跳转,
emmmm,因为暂时没有进行后端的开发,如果要测试的话,此时要么把调用后端的函数给注释了,要么使用接口测试工具(感觉好麻烦)
<script setup>
// import { h } from 'vue';
// import { IconExclamationCircleFill } from '@arco-design/web-vue/es/icon';
import { ref } from "vue";
// import {userLoginService} from '../api/user'
import {useRouter} from 'vue-router'
const router = useRouter()
const loginData = ref({
  username: "",
  password: "",
  isRead: false,
});


const rules = [
  {
    validator: (value, cb) => {
      return new Promise((resolve) => {
        window.setTimeout(() => {
          if (value !== " ") {
            cb("content not empty");
          }
          resolve();
        }, 1000);
      });
    },
  },
];
// const renderIcon = () => h(IconExclamationCircleFill);
const login = async()=>{
    // let result = await userLoginService(loginData.value);
    // renderIcon(result.msg?result.msg:'登录成功');
    router.push('/')
}

</script>
方便起见,还是用注释吧。
OK,我们来运行一下代码


在点击了Submit之后,成功跳转到了主页面,(记得把函数的注释去掉)
内容补充,GlobalPage.vue的样式修改(改了一下布局,现在能全局了)
<style scoped>
.global{
  height: 100vh;
}
.layout-demo :deep(.arco-layout-header),
.layout-demo :deep(.arco-layout-footer),
.layout-demo :deep(.arco-layout-sider-children),
.layout-demo :deep(.arco-layout-content) {
  display: flex;
  flex-direction: column;
  justify-content: center;
  color: var(--color-white);
  font-size: 16px;
  font-stretch: condensed;
  text-align: center;
}

.layout-demo :deep(.arco-layout-header),
.layout-demo :deep(.arco-layout-footer) {
  height: 64px;
  background-color: var(--color-primary-light-4);
}

.layout-demo :deep(.arco-layout-sider) {
  width: 206px;
  background-color: var(--color-primary-light-3);
}

.layout-demo :deep(.arco-layout-content) {
  background-color: rgb(var(--arcoblue-6));
}

.footer {
  background-color: aliceblue;
  padding: 16px;
  position: sticky;
  bottom: 0;
  left: 0;
  right: 0;
  text-align: center;
  letter-spacing: 3px;
}
</style>
内容补充: 在登录页补充开发一下注册页面。
之前只写了登录页面,当然也得有注册页面,来打造一个
其实只要有了登录页面,对于注册页面也就不难了,
    <div class="login-box" v-if="!isLogin">
      <a-form
        :model="loginData"
        :style="{ width: '600px' }"
        @submit="handleSubmit"
        class="input-box"
      >
        <h2 style="margin-bottom: 60px">Login</h2>
        <a-form-item
          field="name"
          tooltip="Please enter username"
          label="账号"
          class="element"
          :rules="rules"
        >
          <a-input
            v-model="loginData.username"
            placeholder="please enter your username..."
            style="margin-right: 40px"
          />
        </a-form-item>
        <a-form-item field="post" label="密码" class="element" :rules="rules">
          <a-input
            v-model="loginData.password"
            placeholder="please enter your password..."
            style="margin-right: 40px"
          />
        </a-form-item>
        <a-form-item field="isRead">
          <a-checkbox v-model="loginData.isRead">
            I have read the manual
          </a-checkbox>
        </a-form-item>
        <a-form-item>
          <a-button html-type="submit" class="input-box" @click="login"
            >Submit</a-button
          >
        </a-form-item>
        <div class="register-link">
          <a @click="isLogin = !isLogin">Don't have an account? Create Now!</a>
        </div>
      </a-form>
    </div>
这是之前登录页面的代码,我们直接把它复制一份,再把h2标签的login改成register就好了
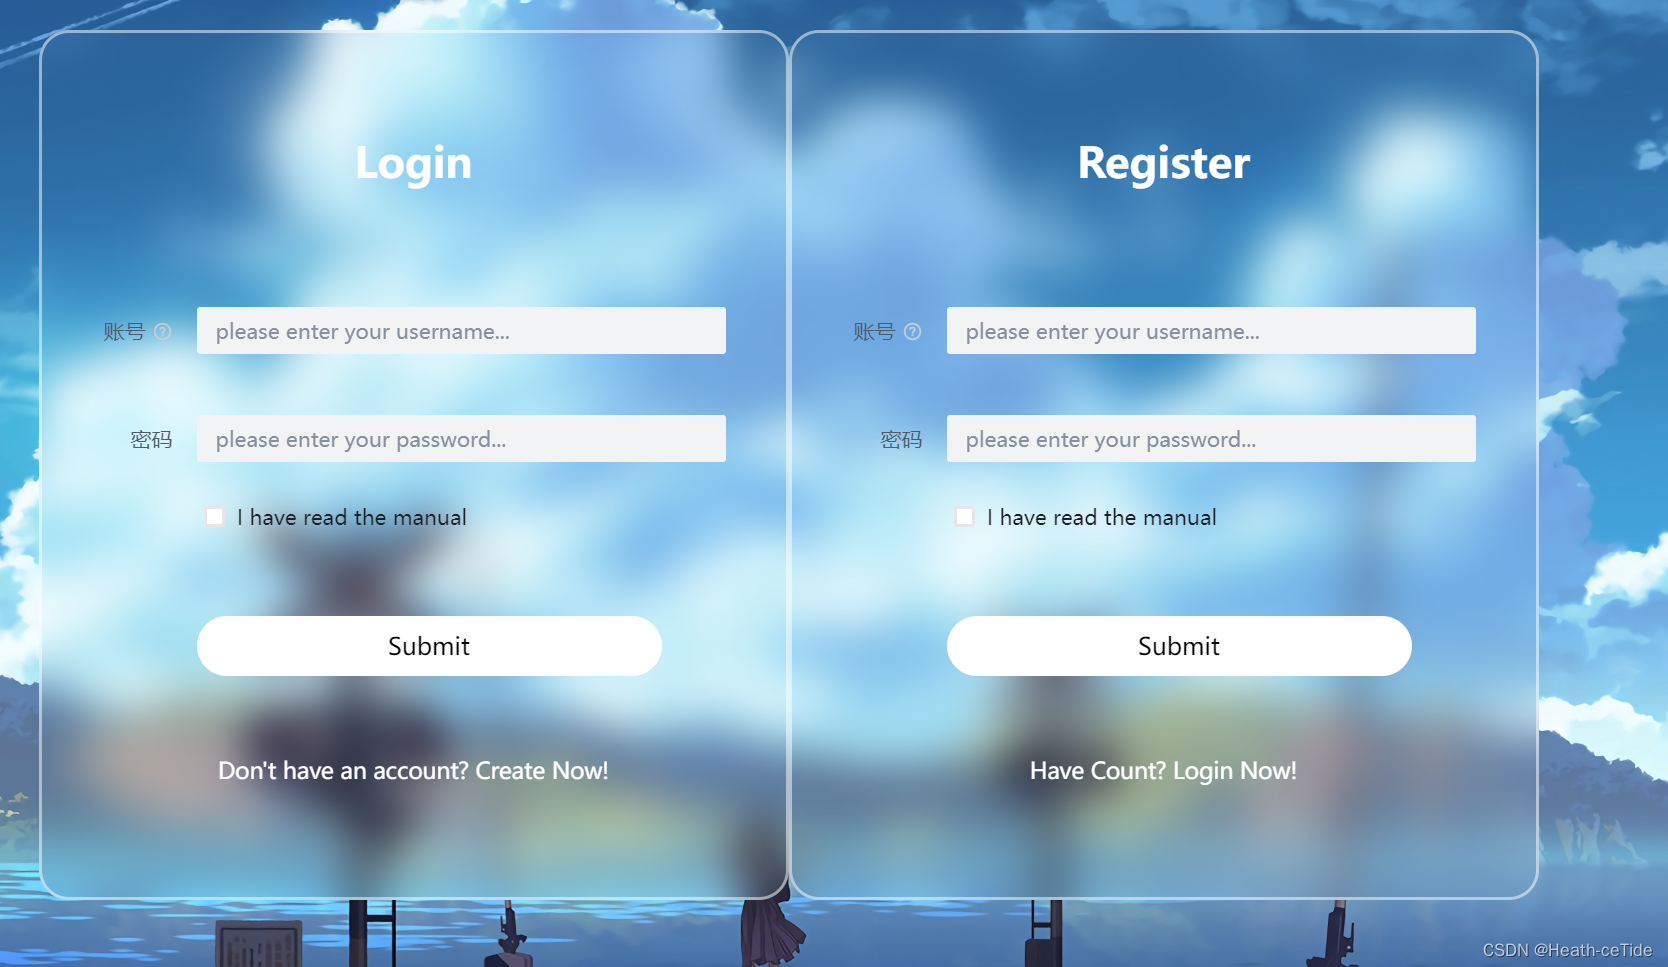
此时页面上就出现了两个表单,还记得之前的搜素框控制显示隐藏吗,这个也是这样,甚至更加简单,
<div class="login-box" v-if="!isLogin">在div标签这里用v-if来控制两个,
回忆之前的组件开发三部曲:前端样式代码(html,css)已经完成,下面开始数据绑定与事件
这里我们在script代码中加上
const isLogin = ref(false) //记得引入ref(之前好像引入过了)
那么:登录页的div: <div class="login-box" v-if="!isLogin">
注册页的div: <div class="login-box" v-if="isLogin">
这样就成功控制了一个显示一个隐藏的效果了(注意其中的逻辑关系,要让login先显示)
然后就是控制页面的转换了,当点击Don't have an account? Create Now!就转换到注册页,那么可以
<div class="register-link">
<a @click="isLogin = !isLogin">Don't have an account? Create Now!</a>
</div>
加一个点击效果进行转换
除此之外,注册页面用的输入框可跟登录页不一样,这里可以去组件库找找

这里可以使用其中的一些输入框和表单校验方法,不过数据绑定这块建议继续用ref
然后我们前往api/user.js,为用户注册写调用后端接口方法(这里跟登录差不多)
import request from '../utils/request'

//创建一个调用登录接口函数
export const userLoginService = (loginData) =>{
    //用urlSearchParams完成传递
    const params = new URLSearchParams()
    for(let key in loginData){
        params.append(key,loginData[key]);
    }
    return request.post('/user/login',params);
}

export const userRegisterService = (registerData) =>{
    //用urlSearchParams完成传递
    const params = new URLSearchParams()
    for(let key in registerData){
        params.append(key,registerData[key]);
    }
    return request.post('/user/register',params);
}
不能说长得很像,只能说根本就是一模一样。。
然后我们在Login登录界面编写调用后端接口方法
const register = async () => {
let result = await userRegisterService(registerData.value);
renderIcon(result.msg ? result.msg : "注册成功");
};
然后在上面submit按钮上绑定@click=“register”即可
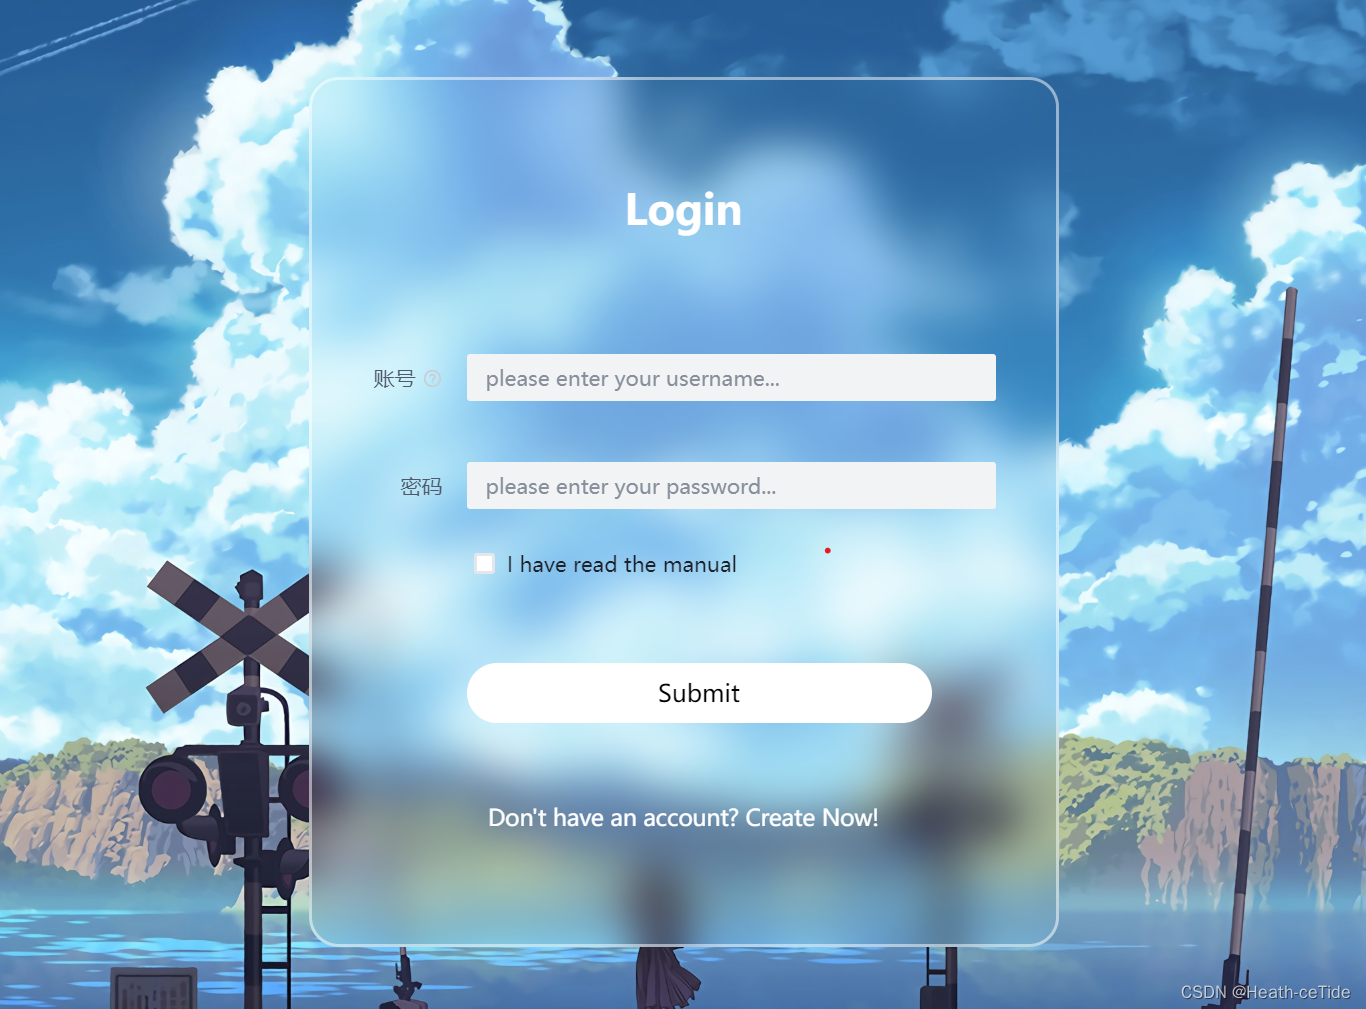
下面来展示一下登录页目前的全部代码:
<template>
  <div class="container">
    <div class="login-box" v-if="!isLogin">
      <a-form
        :model="loginData"
        :style="{ width: '600px' }"
        @submit="handleSubmit"
        class="input-box"
      >
        <h2 style="margin-bottom: 60px">Login</h2>
        <a-form-item
          field="name"
          tooltip="Please enter username"
          label="账号"
          class="element"
          :rules="rules"
        >
          <a-input
            v-model="loginData.username"
            placeholder="please enter your username..."
            style="margin-right: 40px"
          />
        </a-form-item>
        <a-form-item field="post" label="密码" class="element" :rules="loginRules">
          <a-input
            v-model="loginData.password"
            placeholder="please enter your password..."
            style="margin-right: 40px"
          />
        </a-form-item>
        <a-form-item field="isRead">
          <a-checkbox v-model="loginData.isRead">
            I have read the manual
          </a-checkbox>
        </a-form-item>
        <a-form-item>
          <a-button html-type="submit" class="input-box" @click="login"
            >Enter</a-button
          >
        </a-form-item>
        <div class="register-link">
          <a @click="isLogin = !isLogin">Don't have an account? Create Now!</a>
        </div>
      </a-form>
    </div>

    <div class="login-box" v-if="isLogin">
      <a-form
        :model="loginData"
        :style="{ width: '600px' }"
        @submit="handleSubmit"
        class="input-box"
      >
        <h2 style="margin-bottom: 60px">Register</h2>
        <a-form
          ref="formRef"
          :rules="regRules"
          :model="registerData"
          :style="{ width: '600px' }"
          @submit="handleSubmit"
        >
          <a-form-item field="name" label="账号" validate-trigger="blur">
            <a-input
              v-model="registerData.name"
              placeholder="please enter your username..."
                          style="margin-right: 60px"
            />
          </a-form-item>
          <a-form-item field="password" label="密码" validate-trigger="blur">
            <a-input-password
              v-model="registerData.password"
              placeholder="please enter your password..."
                          style="margin-right: 60px"
            />
          </a-form-item>
          <a-form-item
            field="password2"
            label="确认密码"
            validate-trigger="blur"
          >
            <a-input-password
              v-model="registerData.password2"
              placeholder="please confirm your password..."
                          style="margin-right: 60px"
            />
          </a-form-item>
          <a-form-item field="email" label="email">
            <a-input
              v-model="registerData.email"
              placeholder="please enter your email..."
                          style="margin-right: 60px"
            />
          </a-form-item>
        </a-form>
        <a-form-item>
          <a-button html-type="submit" class="input-box" @click="register"
            >Submit</a-button
          >
        </a-form-item>
        <div class="register-link">
          <a @click="isLogin = !isLogin">Have Count? Login Now!</a>
        </div>
      </a-form>
    </div>
  </div>
</template>
<script setup>
import { h } from "vue";
import { IconExclamationCircleFill } from "@arco-design/web-vue/es/icon";
import { ref } from "vue";
import { userLoginService, userRegisterService } from "../api/user";
import { useRouter } from "vue-router";
const router = useRouter();
const loginData = ref({
  username: "",
  password: "",
  isRead: false,
});

const loginRules = [
  {
    validator: (value, cb) => {
      return new Promise((resolve) => {
        window.setTimeout(() => {
          if (value !== " ") {
            cb("content not empty");
          }
          resolve();
        }, 1000);
      });
    },
  },
];
const renderIcon = () => h(IconExclamationCircleFill);
const login = async () => {
  let result = await userLoginService(loginData.value);
  renderIcon(result.msg ? result.msg : "登录成功");
  router.push("/");
};

const register = async () => {
  let result = await userRegisterService(registerData.value);
  renderIcon(result.msg ? result.msg : "登录成功");
};

//登录注册页显示隐藏
const isLogin = ref(false);

const handleSubmit = ({ values, errors }) => {
  console.log("values:", values, "\nerrors:", errors);
};
const registerData = ref({
  name: "",
  password: "",
  password2: "",
  email: ""
});
 const regRules = {
      name: [
        {
          required: true,
          message:'name is required',
        },
      ],
      password: [
        {
          required: true,
          message:'password is required',
        },
      ],
      password2: [
        {
          required: true,
          message:'password is required',
        },
        {
          validator: (value, cb) => {
            if (value !== registerData.value.password) {
              cb('two passwords do not match')
            } else {
              cb()
            }
          }
        }
      ],
      email: [
        {
          type: 'email',
          required: true,
        }
      ],
  }


</script>

<style scoped>
* {
  margin: 0;
  padding: 0;
  box-sizing: border-box;
  font-family: "Poppins", sans-serif;
  display: flex;
  justify-content: center;
}
.container {
  width: 100%;
  height: 100vh;
  background: url("../assets/background.jpg") no-repeat;
  background-size: cover;
  background-position: center;
  display: flex;
  justify-content: center;
  align-items: center;
}

.container .login-box {
  position: relative;
  width: 500px;
  height: 580px;
  background-color: transparent;
  border: 2px solid rgba(255, 255, 255, 0.5);
  border-radius: 20px;
  display: flex;
  justify-content: center;
  align-items: center;
  backdrop-filter: blur(15px);
}

.login-box h2 {
  font-size: 28px;
  color: #fff;
  text-align: center;
}

.login-box .input-box {
  position: relative;
  width: 310px;
  margin: 30px 0;
}

.input-box input {
  width: 80%;
  height: 60px;
  background: transparent;
  border: none;
  outline: none;
  font-size: 16px;
  color: #fff;
  padding: 0 2px 0 5px;
}

.input-box input::placeholder {
  color: #f9f9f9;
}

.input-box .icon {
  position: absolute;
  right: 8px;
  color: #fff;
  font-size: 16px;
  line-height: 25px;
}

.login-box .remember-forget {
  margin: -15px 0 15px;
  font-size: 15px;
  color: #fff;
  display: flex;
  justify-content: space-between;
}

.remember-forget label input {
  margin-right: 30px;
}

.login-box button {
  width: 100%;
  height: 40px;
  background: #fff;
  border: none;
  outline: none;
  border-radius: 40px;
  cursor: pointer;
  font-size: 16px;
  color: #000;
  transition: all 0.5s;
}

.login-box button:hover {
  background: #1f73c9;
  color: #fff;
}

.login-box .register-link {
  font-size: 15px;
  color: #fff;
  text-align: center;
  margin: 5px 0 5px;
}

.remember-forget a,
.register-link a {
  color: #fff;
  text-decoration: none;
}

.remember-forget a:hover,
.register-link a:hover {
  text-decoration: underline;
}

/* Responsive Design */
@media (max-width: 460px) {
  .container .login-box {
    width: 350px;
  }

  .login-box .input-box {
    width: 290px;
  }
}

@media (max-width: 360px) {
  .container .login-box {
    width: 100%;
    height: 100vh;
    border: none;
  }
}
.element {
  margin: 20px 0;
}
</style>
全局页面跳转解决:
既然都讲到页面路由了,就多练练吧,
在全局页面(GlobalPage.vue)这一块我们把之前写死的searchPage去掉改成可变的router-view
<template>
  <a-layout style="height: 400px">
    <a-layout-header><global-header></global-header></a-layout-header>
    <a-layout>
      <a-layout-sider theme="dark">Sider</a-layout-sider>
      <a-layout-content><router-view></router-view></a-layout-content><!--就是这里-->

    </a-layout>
    <a-layout-footer>
      <global-footer class="footer"></global-footer>
    </a-layout-footer>
  </a-layout>
</template>
然后就可以开始布置了,现在点击GlobalHeader.vue全局头部,
<template>
  <div class="menu-demo">
    <a-menu mode="horizontal" theme="dark" :default-selected-keys="['1']">
      <a-menu-item
        key="0"
        :style="{ padding: 0, marginRight: '38px' }"
        disabled
        class="logo"
      >
        <div
          :style="{
            width: '180px',
            height: '30px',
            background: 'var(--color-fill-3)',
            cursor: 'text',
          }"
        ><img src="../assets/logo.png" width="180px"></div>
      </a-menu-item>
      <a-menu-item key="1"><router-link to="/main/search">全局搜索</router-link></a-menu-item>
      <a-menu-item key="2"><router-link to="/main/article">文章大全</router-link></a-menu-item>
      <a-menu-item key="3">Cloud Service</a-menu-item>
      <a-menu-item key="4">Cooperation</a-menu-item>
    </a-menu>
这里修改一下a-menu-item标签,(一般在组件库这里会有专门的跳转属性这种,不过今天好像组件库页面打不开了,那暂时就用原始版的router-link来实现一下吧,(之后我会修改一下的))
这里布置了两个页面,全局搜素和文章大全,进行跳转,然后呢,去index.js处创建一下主页面的子路由,
下面,看代码展示
import { createRouter, createWebHashHistory } from 'vue-router'
import MainPage from '../components/GlobalPage.vue'
import LoginPage from '../components/LoginPage.vue'
import SearchPage from '../views/SearchPage.vue'
import ArticlePage from '../views/ArticlePage.vue'
const routes = [
  {
    path: '/',
    name: 'mainPage',
    component: MainPage,
    redirect: '/main/search',
    children: [
      {
        path: '/main/search',
        component: SearchPage
      },
      {
        path: '/main/article',
        component: ArticlePage
      }
    ]
  },
  {
    path: '/login',
    name: 'loginPage',
    component: LoginPage
  }
]

const router = createRouter({
  history: createWebHashHistory(),
  routes
})

export default router
这里我目前添加了全局搜素和文章大全两个子页面(小细节:redirect: '/main/search',这里我使用了一个重定向,让每次进入‘/’页面的时候都会跳转到全局搜素页面处),全局搜素的页面之前已经写过了,那也就不用管了,这里我们添加以下文章大全的页面,在views文件夹下创建ArticlePage.vue文件用<vue>创建基本样子,
<template>
  <div id="article">
    文章篇
  </div>
</template>

<script>
export default {

}
</script>

<style>

</style>
先随便写一点吧,主要是要能现在展现以下跳转。
目前来看就差不多了,来试试能不能实现跳转。


好嘞,那么现在也就实现了这一功能,
好了,目前主要的一些前端样子也就差不多了,这一期的项目主要还是练练手,就做一些最基本文章管理这些吧。
文章管理界面开发:
既然写界面,我觉得还是先来一手布局比较合适
来吧,组件库见:

这里我没想太多,直接用这个朴实无华的布局吧。
先用代码写个初始布局
<template>
  <div id="article">
        <a-divider />
    <a-layout style="height: 400px;">
      <a-layout-header>Header</a-layout-header>
       <a-divider orientation="left">热点文章</a-divider>
      <a-layout-content>Content</a-layout-content>
      <a-layout-footer>Footer</a-layout-footer>
    </a-layout>


  </div>
</template>

<script>
export default {

}
</script>

<style scoped>
body {
  margin: 0;
  background-color: #f5f5f5;
}

/* fade-slide */
.fade-slide-leave-active,
.fade-slide-enter-active {
  transition: all 0.3s;
}

.fade-slide-enter-from {
  transform: translateX(-30px);
  opacity: 0;
}

.fade-slide-leave-to {
  transform: translateX(30px);
  opacity: 0;
}
</style>
这里我加了一个带有文字的分割线
然后就是最关键的content内容区域了,这里可以加上一些样式,(如果对自己的前端没有太自信的话,直接组件库!)
好,看一手,我们先找一个滑动条

就这个了,

将滚动条放入content区域之后,小改一下代码,调整大小,适应一下屏幕大小就好看多了
<template>
  <div id="article">
    <a-divider />
    <a-layout style="height: 760px">
      <a-layout-header class="header">文章管理</a-layout-header>
      <a-divider orientation="left">Cetide-Net</a-divider>
      <a-layout-content>
        <a-scrollbar class="rollBar"
          style="height: 673.34px; overflow: auto; margin: 10px 20px">
          <div class="content">Content</div>
        </a-scrollbar>
      </a-layout-content>
    </a-layout>
  </div>
</template>

<script>
export default {};
</script>

<style scoped>
#article {
  margin: 20px;
}

/* fade-slide */
.fade-slide-leave-active,
.fade-slide-enter-active {
  transition: all 0.3s;
}

.fade-slide-enter-from {
  transform: translateX(-30px);
  opacity: 0;
}

.fade-slide-leave-to {
  transform: translateX(30px);
  opacity: 0;
}
.header {
  font-family: "Satisfy", cursive;
  font-size: 26px;
  color: rgb(93, 186, 216);
  padding-left: 50px;
  text-align: left;
}
.rollBar{

}
.content {
  height: 2000px;
  width: 1424px;
  background-color: var(--color-primary-light-4);
}
</style>
然后就是存放文章的了,这里可以找找组件库的列表组件:
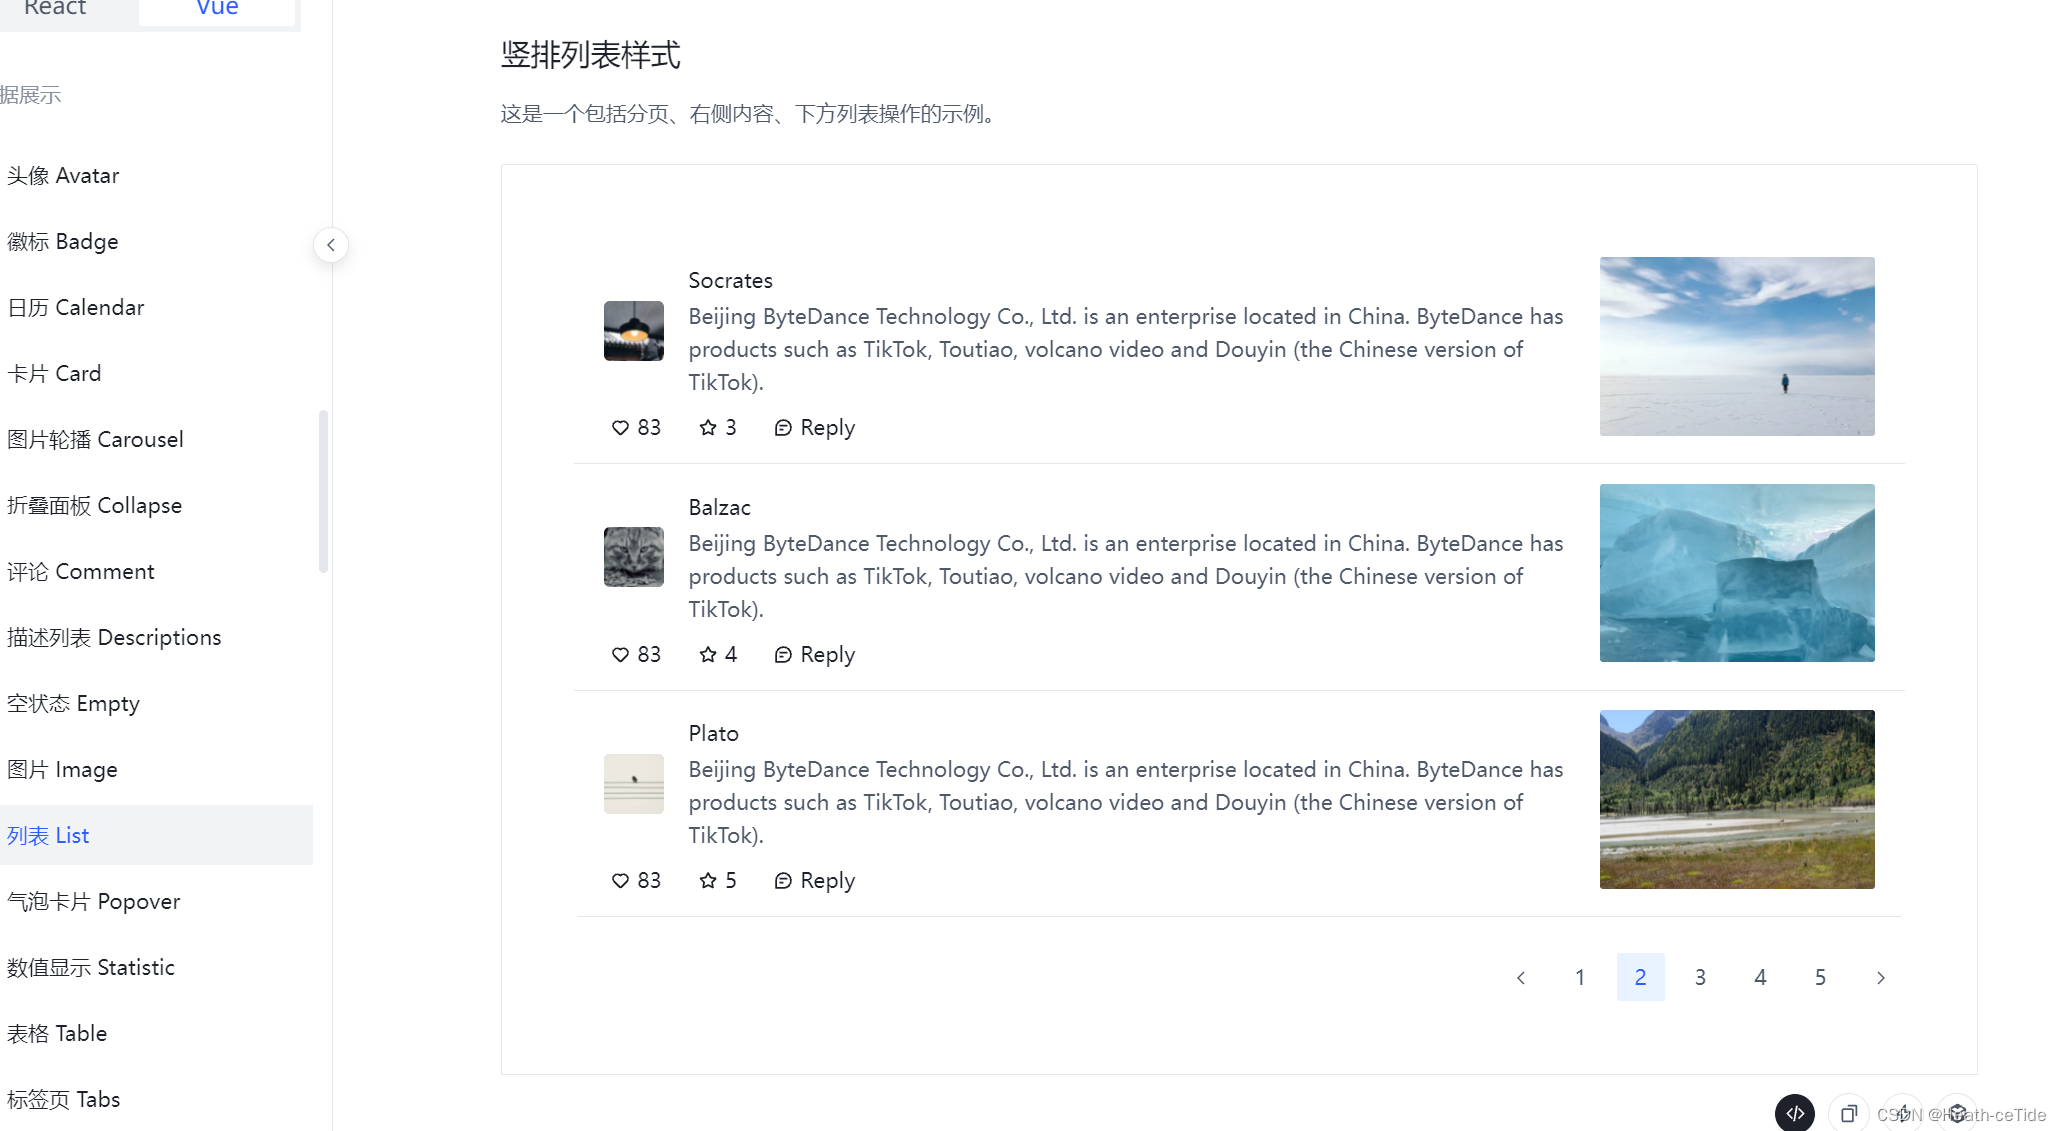
这个组件就很奈斯(分页条,评论按键都有),因为这里主要是文章大全,所以就不用加上编辑和删除功能了,不过可以加上一个评论功能

这里加一个显示神评的吧,到时候把点赞数最多的评论放到让文章大全页面都能看到
修改一下代码,嵌入文章大全页面.
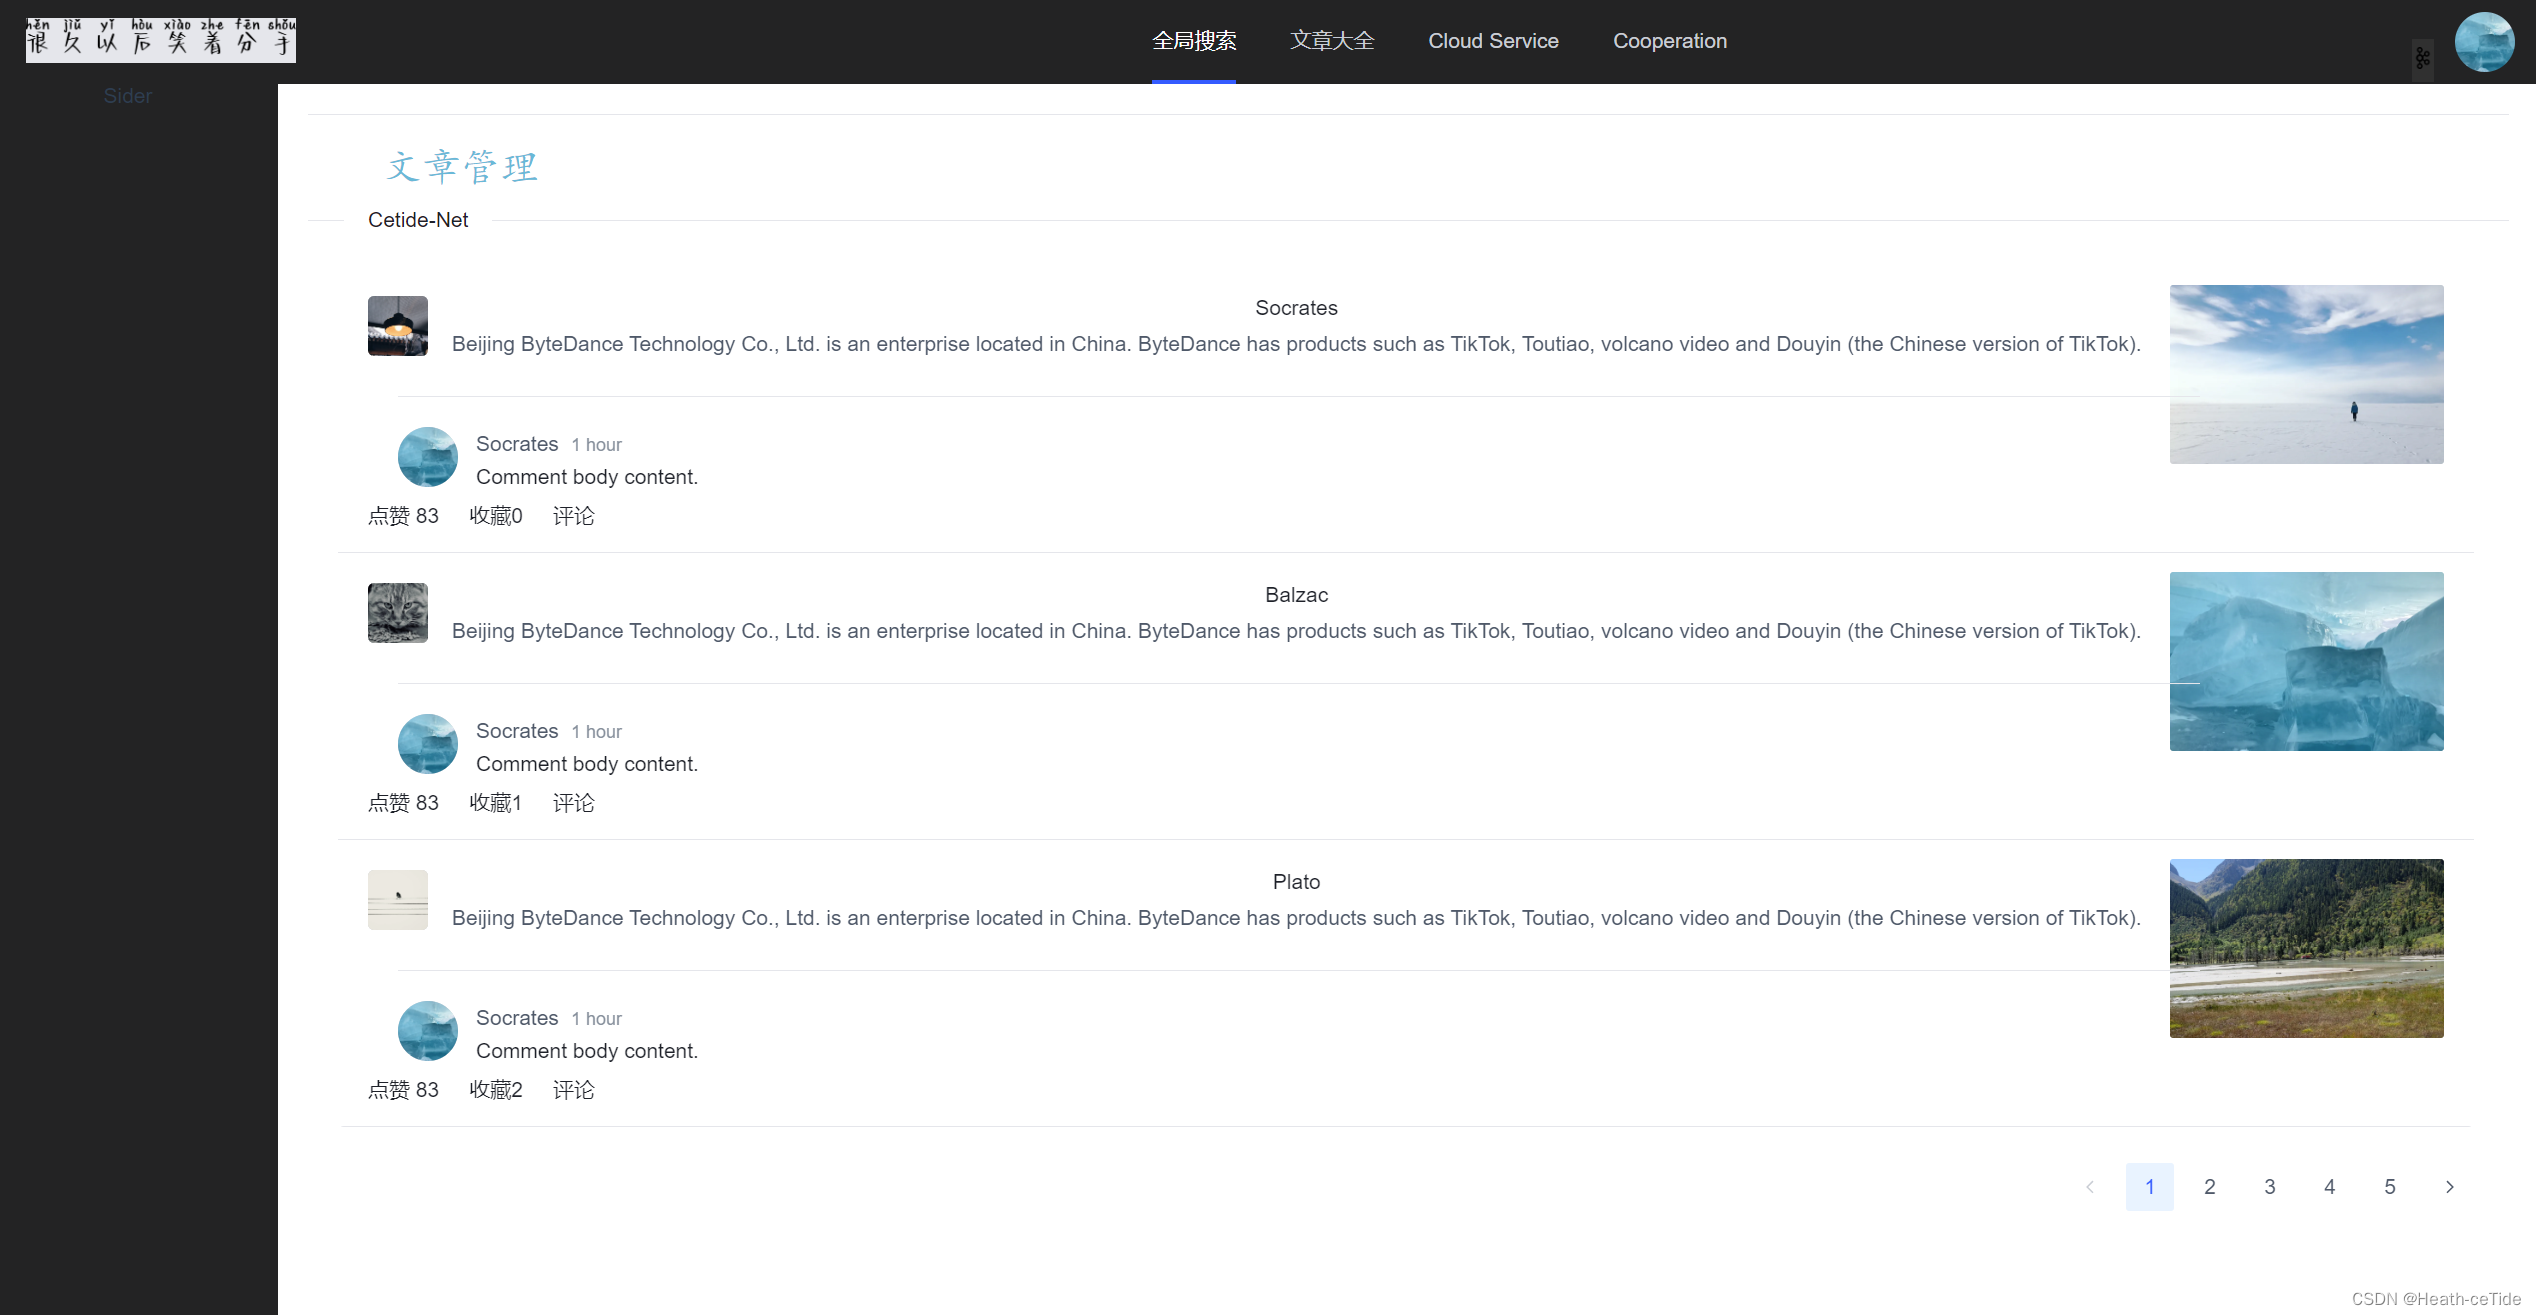
<template>
  <div id="article">
    <a-divider />
    <a-layout style="height: 760px">
      <a-layout-header class="header">文章管理</a-layout-header>
      <a-divider orientation="left">Cetide-Net</a-divider>
      <a-layout-content>
        <a-scrollbar class="rollBar"
          style="height: 673.34px; overflow: auto; margin: 10px 20px">
          <div class="content">

  <a-list
    class="list-demo-action-layout"
    :bordered="false"
    :data="dataSource"
    :pagination-props="paginationProps"
  >
    <template #item="{ item }">
      <a-list-item class="list-demo-item" action-layout="vertical">
        <template #actions>
          <span><icon-heart />点赞 83</span>
          <span><icon-star />收藏{{ item.index }}</span>
          <span><icon-message />评论</span>
        </template>

        <template #extra>
          <div className="image-area">
            <img alt="arco-design" :src="item.imageSrc" />
          </div>
        </template>

        <a-list-item-meta
          :title="item.title"
          :description="item.description"
        >
          <template #avatar>
            <a-avatar shape="square">
              <img alt="avatar" :src="item.avatar" />
            </a-avatar>
          </template>
        </a-list-item-meta>

        <div style="width:100%; text-align: left; padding-left:20px">
              <a-divider />
          <a-comment author="Socrates" content="Comment body content." datetime="1 hour">
    <template #avatar>
      <a-avatar>
        <img
          alt="avatar"
          src="https://p1-arco.byteimg.com/tos-cn-i-uwbnlip3yd/3ee5f13fb09879ecb5185e440cef6eb9.png~tplv-uwbnlip3yd-webp.webp"
        />
      </a-avatar>
    </template>
  </a-comment>
        </div>
      </a-list-item>
    </template>
  </a-list>

          </div>
        </a-scrollbar>
      </a-layout-content>
    </a-layout>
  </div>
</template>

<script>
import { reactive } from 'vue'

const names = ['Socrates', 'Balzac', 'Plato'];
const avatarSrc = [
  '//p1-arco.byteimg.com/tos-cn-i-uwbnlip3yd/a8c8cdb109cb051163646151a4a5083b.png~tplv-uwbnlip3yd-webp.webp',
  '//p1-arco.byteimg.com/tos-cn-i-uwbnlip3yd/e278888093bef8910e829486fb45dd69.png~tplv-uwbnlip3yd-webp.webp',
  '//p1-arco.byteimg.com/tos-cn-i-uwbnlip3yd/9eeb1800d9b78349b24682c3518ac4a3.png~tplv-uwbnlip3yd-webp.webp',
];
const imageSrc = [
  '//p1-arco.byteimg.com/tos-cn-i-uwbnlip3yd/29c1f9d7d17c503c5d7bf4e538cb7c4f.png~tplv-uwbnlip3yd-webp.webp',
  '//p1-arco.byteimg.com/tos-cn-i-uwbnlip3yd/04d7bc31dd67dcdf380bc3f6aa07599f.png~tplv-uwbnlip3yd-webp.webp',
  '//p1-arco.byteimg.com/tos-cn-i-uwbnlip3yd/1f61854a849a076318ed527c8fca1bbf.png~tplv-uwbnlip3yd-webp.webp',
];
const dataSource = new Array(15).fill(null).map((_, index) => {
  return {
    index: index,
    avatar: avatarSrc[index % avatarSrc.length],
    title: names[index % names.length],
    description:
      'Beijing ByteDance Technology Co., Ltd. is an enterprise located in China. ByteDance has products such as TikTok, Toutiao, volcano video and Douyin (the Chinese version of TikTok).',
    imageSrc: imageSrc[index % imageSrc.length],
  };
});

export default {
  setup() {
    return {
      dataSource,
      paginationProps: reactive({
        defaultPageSize: 3,
        total: dataSource.length
      })
    }
  },
}
</script>

<style scoped>
#article {
  margin: 20px;
}

/* fade-slide */
.fade-slide-leave-active,
.fade-slide-enter-active {
  transition: all 0.3s;
}

.fade-slide-enter-from {
  transform: translateX(-30px);
  opacity: 0;
}

.fade-slide-leave-to {
  transform: translateX(30px);
  opacity: 0;
}
.header {
  font-family: "Satisfy", cursive;
  font-size: 26px;
  color: rgb(93, 186, 216);
  padding-left: 50px;
  text-align: left;
}
.rollBar{

}
.content {
  /* height: 2000px; */
  width: 1424px;
}

.list-demo-action-layout .image-area {
  width: 183px;
  height: 119px;
  border-radius: 2px;
  overflow: hidden;

}

.list-demo-action-layout .list-demo-item {
  padding: 20px 0;
  border-bottom: 1px solid var(--color-fill-3);
}

.list-demo-action-layout .image-area img {
  width: 100%;
}

.list-demo-action-layout .arco-list-item-action .arco-icon {
  margin: 0 4px;
}
</style>
大家一定要看懂一些组件代码才好使用,(后续调用后端接口,使用后端数据库的时候就会用到)
这一期的项目,打算就先做一个文章管理页面,加上用户个人中心的东西就差不多了(主要还是先熟悉熟悉流程,后面可以看看加上一些更好的功能(也不能只是crud哈))
用户个人中心界面开发:
在component文件夹下面创建一个UserCentre.vue页面
先做一个雏形:

然后在index.js中注册页面
{
path: '/user',
name: 'userPage',
component: UserPage
}
然后做一个页面跳转吧,这里我们回到GlobalHeader.vue全局导航栏区域,
<template>
  <div class="menu-demo">
    <a-menu mode="horizontal" theme="dark" :default-selected-keys="['1']">
      <a-menu-item
        key="0"
        :style="{ padding: 0, marginRight: '38px' }"
        disabled
        class="logo"
      >
        <div
          :style="{
            width: '180px',
            height: '30px',
            background: 'var(--color-fill-3)',
            cursor: 'text',
          }"
        ><img src="../assets/logo.png" width="180px"></div>
      </a-menu-item>
      <a-menu-item key="1"><router-link to="/main/search">全局搜索</router-link></a-menu-item>
      <a-menu-item key="2"><router-link to="/main/article">文章大全</router-link></a-menu-item>
      <a-menu-item key="3">Cloud Service</a-menu-item>
      <a-menu-item key="4">Cooperation</a-menu-item>
    </a-menu>
    <div class="user-avatar">
        <img src="https://p1-arco.byteimg.com/tos-cn-i-uwbnlip3yd/3ee5f13fb09879ecb5185e440cef6eb9.png~tplv-uwbnlip3yd-webp.webp"
          alt="User Avatar" class="avatar-image"/>
      <div
        class="dropdown"
        style="font-family: 'Satisfy', cursive; margin-right: 20px"
      >
        <button class="dropdown-button">
          <img src="../assets/list.png" width="15px" />
        </button>
        <div class="dropdown-content">
          <a href="#">个人信息</a>
          <a href="#">修改密码</a>
          <a href="#">其他属性</a>
          <a href="/#/login">退出登录</a>
        </div>
      </div>
    </div>
  </div>
</template>
<script setup>

</script>


<style scoped>
.logo{
  float: left;
}
.menu-demo {
  box-sizing: border-box;
  width: 100%;
  background-color: var(--color-neutral-2);
}
.user-avatar {
  /* position: absolute;
  right: 0;
  top: 4px; */
}

.avatar-image {
  position: absolute;
  top: 10px;
  right: 16px;
  width: 40px;
  height: 40px;
  border-radius: 50%;
  cursor: pointer;
  z-index: 10;
}

.dropdown {
  position: absolute;
  top: 28px;
  right: 50px;
  display: inline-block;
  z-index: 1;
}

.dropdown-button {
  background-color: #303030;
  color: white;
  padding: 5px 0px;
  border: none;
  cursor: pointer;
}

.dropdown-content {
  display: none;
  position: absolute;
  background-color: #f9f9f9;
  min-width: 85px;
  box-shadow: 0px 8px 16px 0px rgba(0, 0, 0, 0.2);
  z-index: 1;
}

.dropdown-content a {
  color: black;
  padding: 8px 8px;
  text-decoration: none;
  display: block;
}

.dropdown-content a:hover {
  background-color: #f1f1f1;
}

.dropdown:hover .dropdown-content {
  display: block;
}
</style>
这里展示一下之前添加的一点点代码,然后在右上角添加了一个用户头像和一个下拉栏目(感觉代码写的不太好,这边还是建议大家去组件库里找一些比较方便的(这里我是自己写的))

<template>
  <div class="menu-demo">
    <a-menu mode="horizontal" theme="dark" :default-selected-keys="['1']">
      <a-menu-item
        key="0"
        :style="{ padding: 0, marginRight: '38px' }"
        disabled
        class="logo"
      >
        <div
          :style="{
            width: '180px',
            height: '30px',
            background: 'var(--color-fill-3)',
            cursor: 'text',
          }"
        >
          <img src="../assets/logo.png" width="180px" />
        </div>
      </a-menu-item>
      <a-menu-item key="1"
        ><router-link to="/main/search">全局搜索</router-link></a-menu-item
      >
      <a-menu-item key="2"
        ><router-link to="/main/article">文章大全</router-link></a-menu-item
      >
      <a-menu-item key="3">Cloud Service</a-menu-item>
      <a-menu-item key="4">Cooperation</a-menu-item>
    </a-menu>
    <div class="user-avatar">
      <img
        src="https://p1-arco.byteimg.com/tos-cn-i-uwbnlip3yd/3ee5f13fb09879ecb5185e440cef6eb9.png~tplv-uwbnlip3yd-webp.webp"
        alt="User Avatar"
        class="avatar-image"
      />
      <div
        class="dropdown"
        style="font-family: 'Satisfy', cursive; margin-right: 20px"
      >
        <button class="dropdown-button">
          <img src="../assets/list.png" width="15px" />
        </button>
        <div class="dropdown-content">
          <router-link to="/user">个人信息</router-link>
          <router-link to="/login">修改密码</router-link>
          <router-link to="/login">其他属性</router-link>
          <router-link to="/login">退出登录</router-link>
        </div>
      </div>
    </div>
  </div>
</template>
<script setup>
</script>


<style scoped>
.logo {
  float: left;
}
.menu-demo {
  box-sizing: border-box;
  width: 100%;
  background-color: var(--color-neutral-2);
}
.user-avatar {
  /* position: absolute;
  right: 0;
  top: 4px; */
}

.avatar-image {
  position: absolute;
  top: 10px;
  right: 16px;
  width: 40px;
  height: 40px;
  border-radius: 50%;
  cursor: pointer;
  z-index: 10;
}

.dropdown {
  position: absolute;
  top: 28px;
  right: 50px;
  display: inline-block;
  z-index: 1;
}

.dropdown-button {
  background-color: #303030;
  color: white;
  padding: 5px 0px;
  border: none;
  cursor: pointer;
}

.dropdown-content {
  display: none;
  position: absolute;
  background-color: #f9f9f9;
  min-width: 85px;
  box-shadow: 0px 8px 16px 0px rgba(0, 0, 0, 0.2);
  z-index: 1;
}

.dropdown-content a {
  color: black;
  padding: 8px 8px;
  text-decoration: none;
  display: block;
}

.dropdown-content a:hover {
  background-color: #f1f1f1;
}

.dropdown:hover .dropdown-content {
  display: block;
}
</style>
那么,这样就可以点击个人中心进行跳转到个人中心了(这里的退出登录bug很大,应该要调用专门的函数,去除登录状态什么的,之后有机会再改一下)

这里刚开始就是这样了,老样子,做个布局吧。

就用这个了
<template>
  <div id="userCenter">
    <a-layout style="height: 100vh">
      <a-layout-header>Header</a-layout-header>
      <a-layout style="margin: 24px 120px">
        <a-layout-sider>Sider</a-layout-sider>
        <a-layout-content>Content</a-layout-content>
      </a-layout>
      <a-layout-footer>Footer</a-layout-footer>
    </a-layout>
  </div>
</template>

<script>
export default {};
</script>

<style>
</style>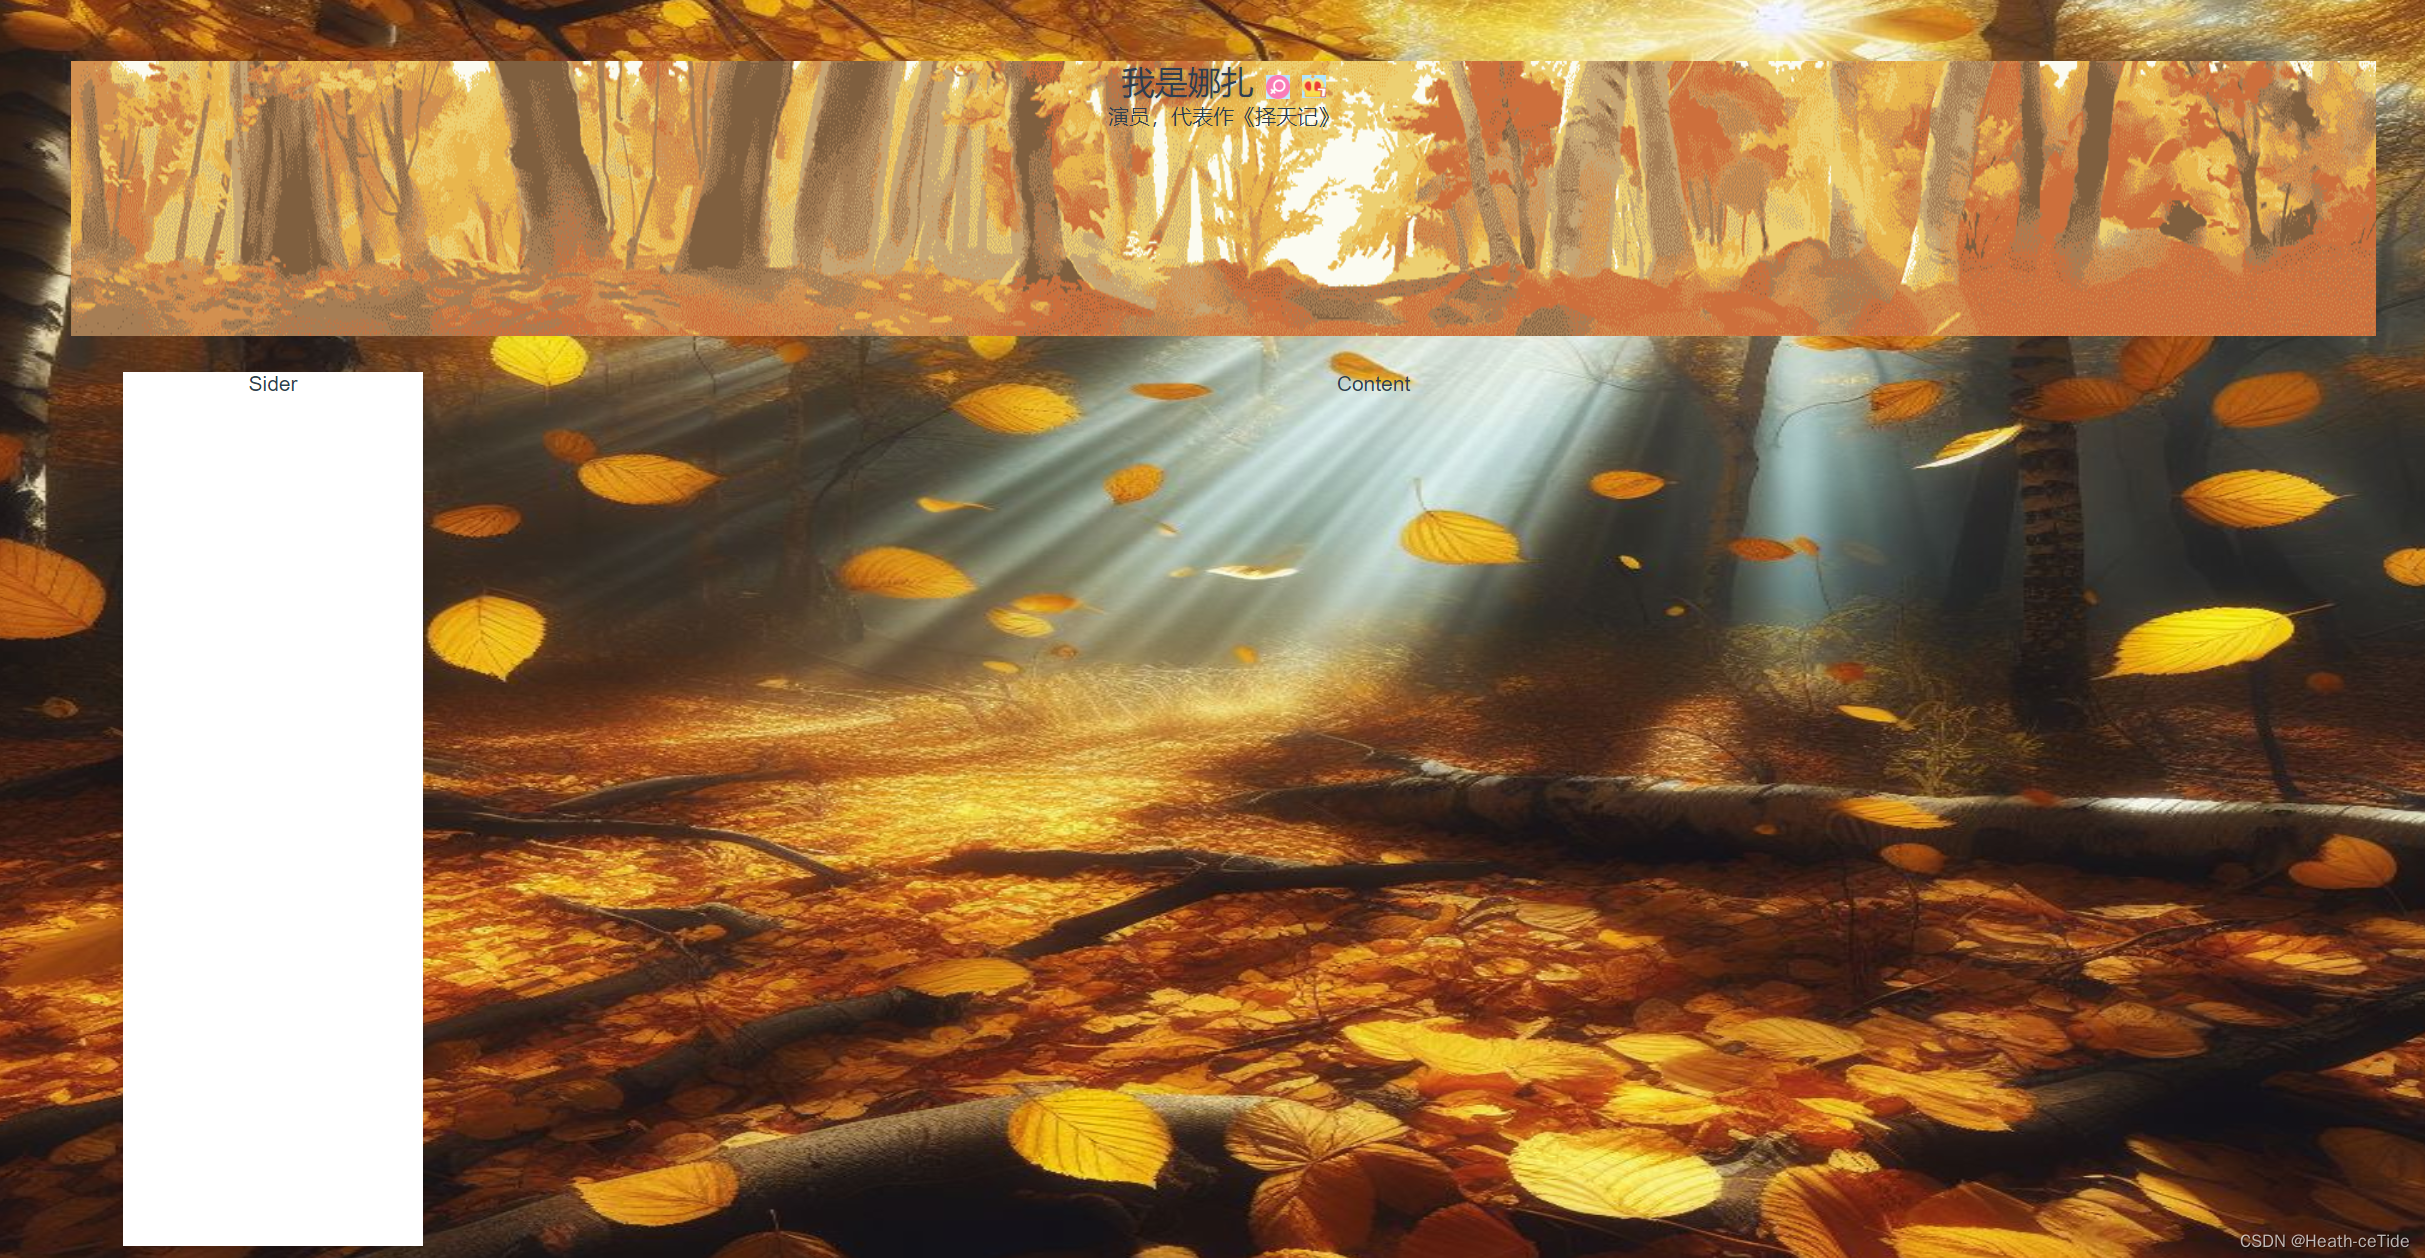
稍微搭建一下用户界面吧,明天继续(hhh)(emmm,还以为今天能写完这部分的)
发一下代码吧(感觉这个代码后面要大改。。)
<template>
  <div id="userCenter">
    <a-layout style="height: 100vh">
      <a-layout-header>
        <div class="header">
            <div class="personal-introduce">
              <span class="name">我是小丑</span>
              <span class="sex-icon"></span>
              <span class="level-icon"></span>
            </div><div class="professional">演员,代表作:</div>
        </div>
      </a-layout-header>
      <a-layout style="margin: 24px 120px">
        <a-layout-sider>Sider</a-layout-sider>
        <a-layout-content>Content</a-layout-content>
      </a-layout>
      <a-layout-footer>Footer</a-layout-footer>
    </a-layout>
  </div>
</template>

<script>
export default {};
</script>

<style lang="scss" scoped>
#userCenter {
  background: url("../assets/image.png") no-repeat bottom center / 100%
    100%;
}
.header {
  height: 20vh;
  margin-top: 5%;
   background: url("../assets/back.png") no-repeat center / 90%
    100%;
}

.personal-introduce {
        display: flex;
        justify-content: center;
        align-items: flex-end;
        margin-top: 10px;
        text-shadow: 0px 0px 4px rgba(0, 0, 0, 0.31);
        .name {
          line-height: 29px;
          font-size: 22px;
        }
        .sex-icon {
          display: inline-block;
          width: 16px;
          height: 16px;
          margin: 0px 8px;
          margin-bottom: 4px;
          background: url(../assets/user-images/sex-icon.png) no-repeat center;
          background-size: contain;
        }
        .level-icon {
          display: inline-block;
          width: 16px;
          height: 16px;
          margin-bottom: 4px;
          background: url(../assets/user-images/leval-icon.png) no-repeat center;
          background-size: contain;
        }
      }
</style>


 3003
3003

 被折叠的 条评论
为什么被折叠?
被折叠的 条评论
为什么被折叠?
 到【灌水乐园】发言


